This post is sponsored by Lowes. I was shocked at the number of ecstatic messages I got this week when I announced on stories that Lowes invited me to makeover a bedroom, and challenged me to use any color BUT WHITE! I had a feeling you guys would be excited to see color on walls for…
I was shocked at the number of ecstatic messages I got this week when I announced on stories that Lowes invited me to makeover a bedroom, and challenged me to use any color BUT WHITE! I had a feeling you guys would be excited to see color on walls for a change, because I feel the same way! As much as I love using and seeing photos of white walls, I’ve been feeling the itch to bring back color in my home. Today I’ll be sharing my best tips for picking the right paint and paint color for your space and my super fast and efficient technique for getting a room painted!
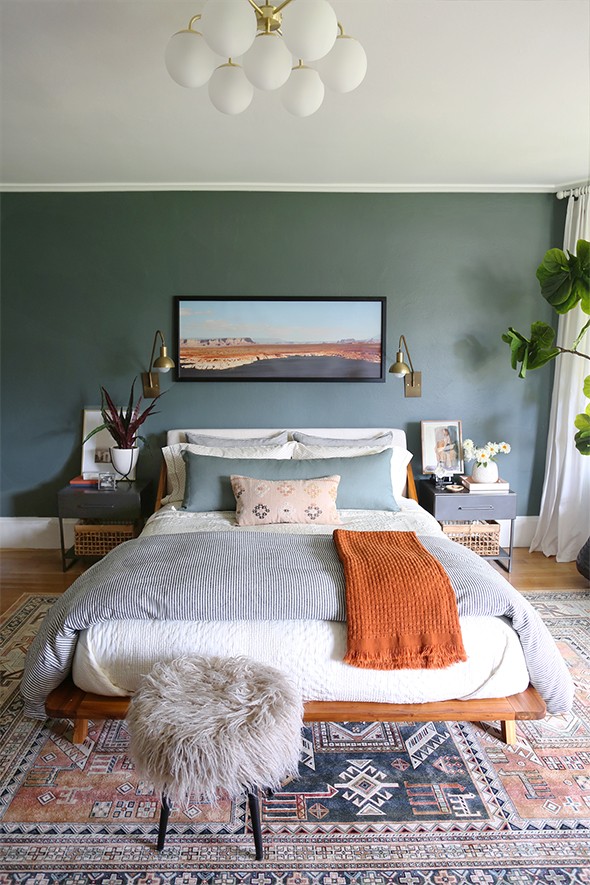
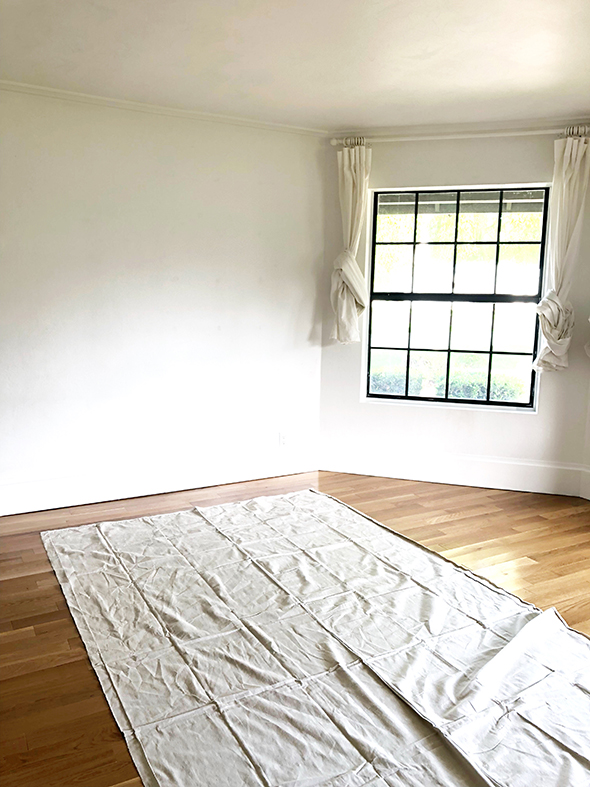
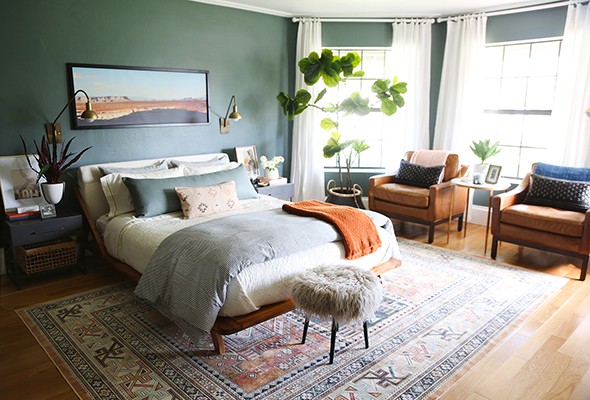
If you’re a little unsure how or where to incorporate a dark or saturated paint color in your home, bedrooms are a great place to start! Michael and I will be using our former play room as our bedroom during the renovation and after that we’ll be using it as a guest room, so I was excited to give this space a brand new, more grown up look. We had some serious water damage on the ceiling that ruined the wallpaper a couple of months ago so it was time for a change in here anyway!
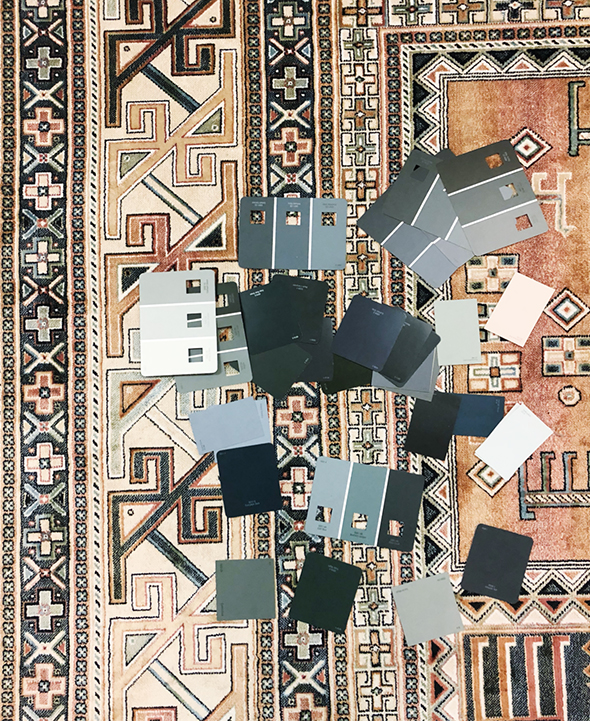
TIP #1: Pick your paint samples with your existing decor and flooring in mind! I always like to start any decorating project by finding the right rug first. That’s the hard and expensive part! Finding the perfect paint color to work with your rug is the fun and easy part!
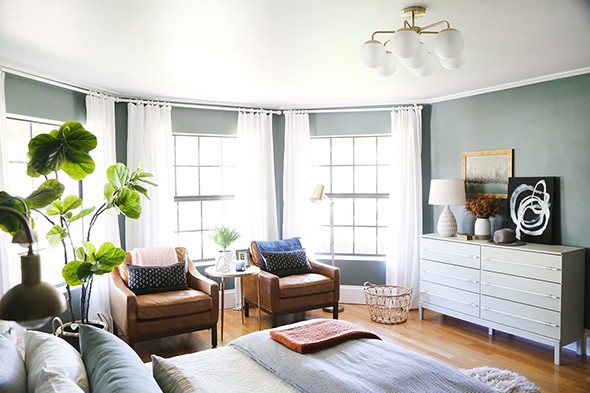
My plan was to reuse the furniture we already had in our former guest room and other spaces in our house. Here’s what our guest room furniture looked like before in another part of the house. Isn’t it crazy the same furniture and rug looks SO different next to the new paint color! Painting your walls is such an easy way to give new life to your old things!
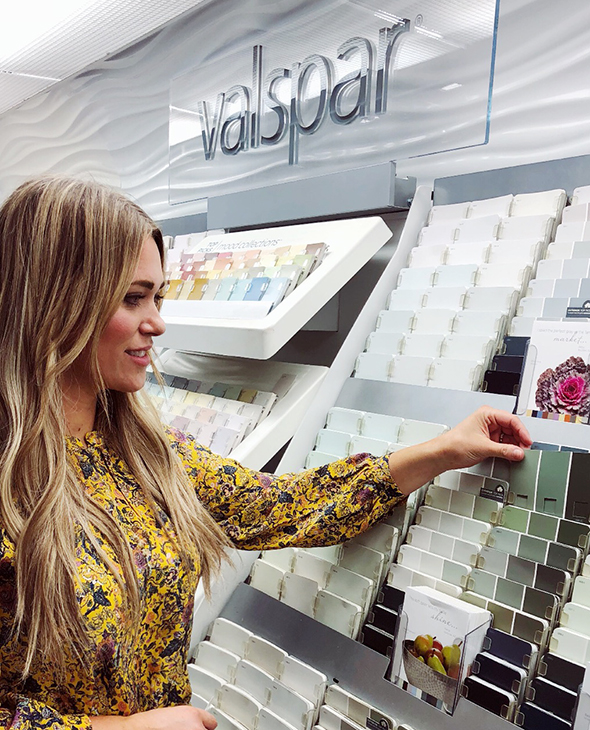
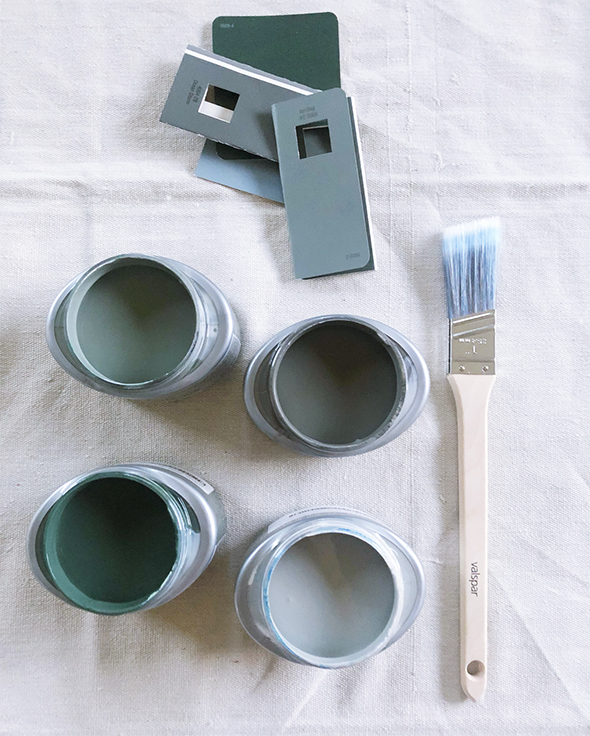
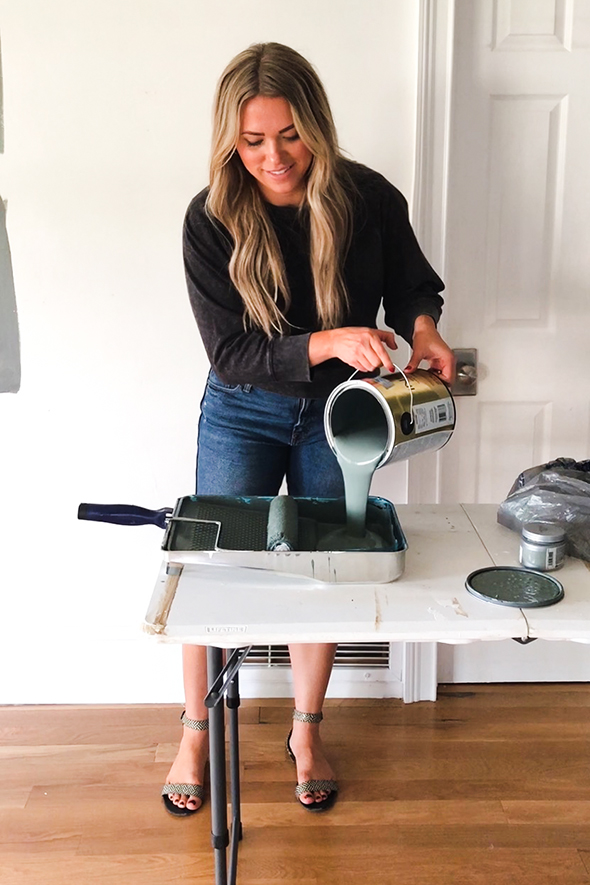
I went to Lowes with a general sense of what I was looking for and grabbed a bunch of paint chips in the dark greens and blues family, referencing photos of my rug in my phone while I was pulling. When I got home I laid out my paint chips and narrowed the selection down to four favorite colors. We live close to a Lowes so it was easy for me to swing back in and grab my sample pots, but did you know it’s SUPER easy and inexpensive to order paint samples online? I love that Lowes offers this option!
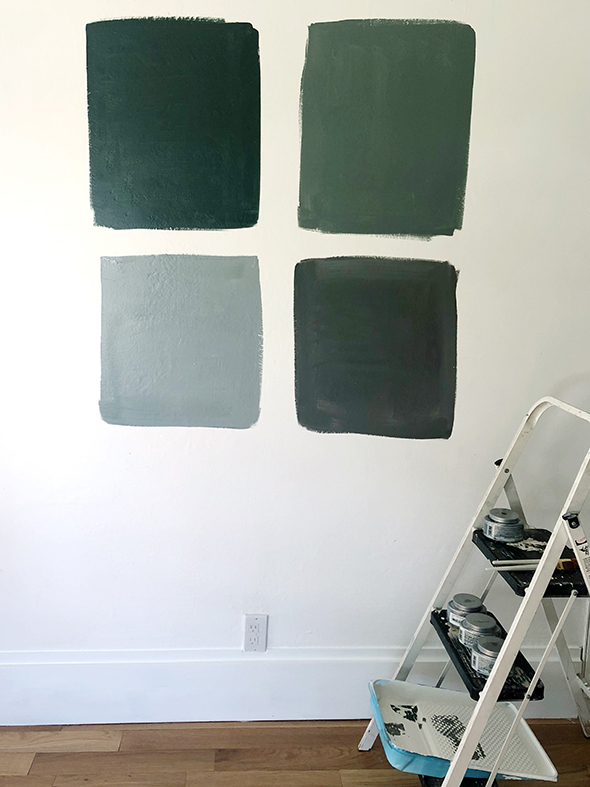
TIP #2: Take the time to put up actual paint samples on your actual walls. Every room shows color in different ways depending on your lighting, which mostly has to do with window size and placement. It’s so important to see the colors you like in your space at different times of day, including with the lights on at night!
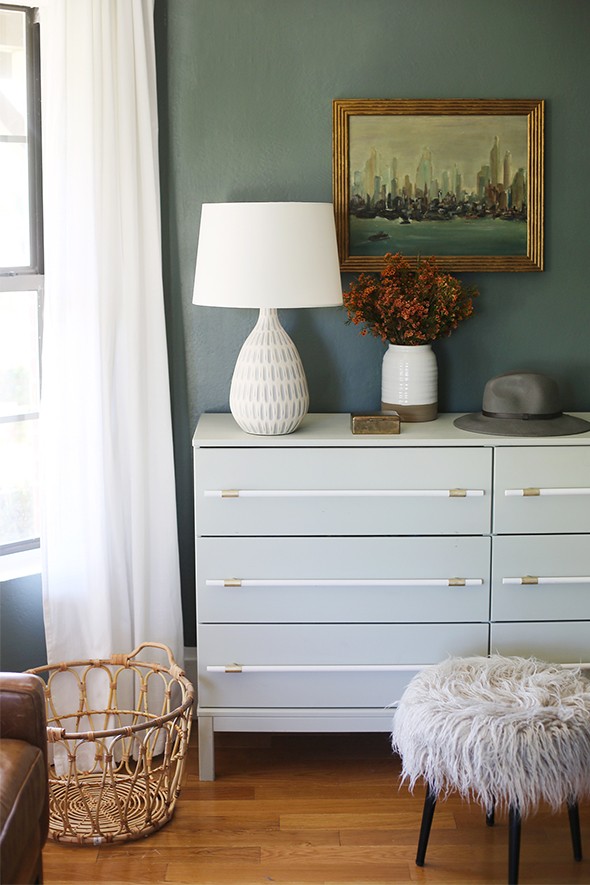
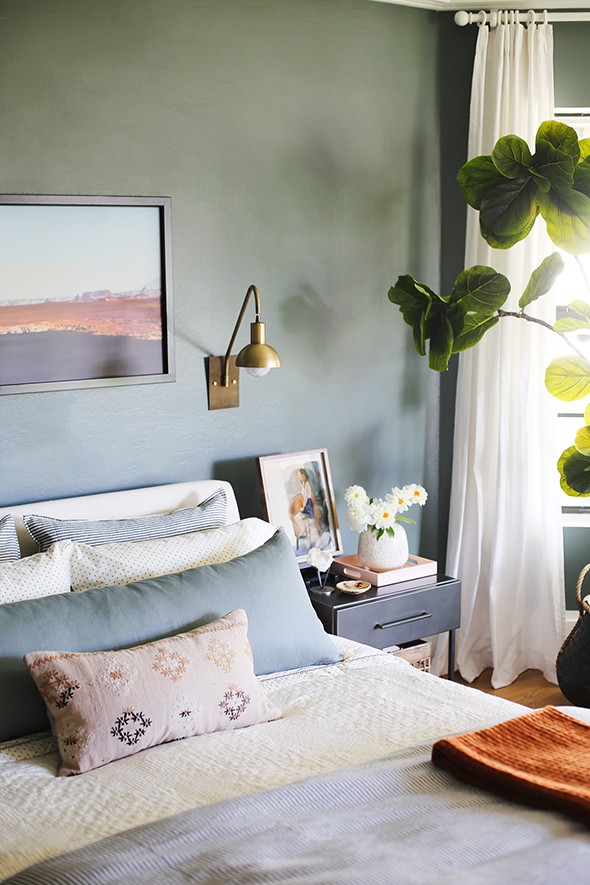
I really loved the bottom left color on the paint chip (Cafe Blue by Valspar) but as soon as all of my samples were up on the wall, the top right color, Coastal Dusk, immediately popped out as the winner! It was the perfect shade of muddy green gray that really helped to tone down our orangey floors.
TIP #3: Pay the extra couple of dollars for the Premium paint line! You’ll probably only need to put on one coat this way and you’ll end up saving tons of time and money! I only needed one gallon of Coral Dusk in Valspar’s Signature paint in Eggshell for this bedroom.
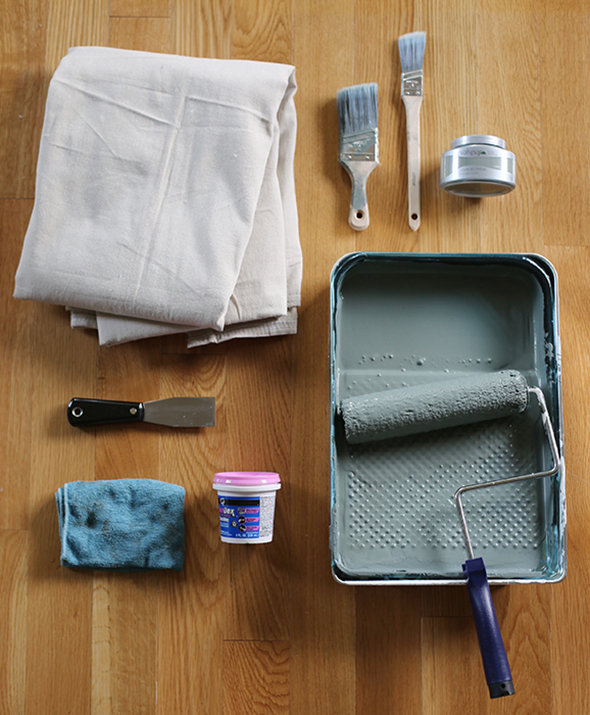
Here are the other supplies I like to pick up before starting a painting project. I’m a minimalist when it comes to painting and like to keep it to the best basics!
6×9′ dropcloth – I don’t usually drip or spill when I paint (years of practice under my belt!) so I often go without a drop cloth! But this is the one I use and really like when I do!
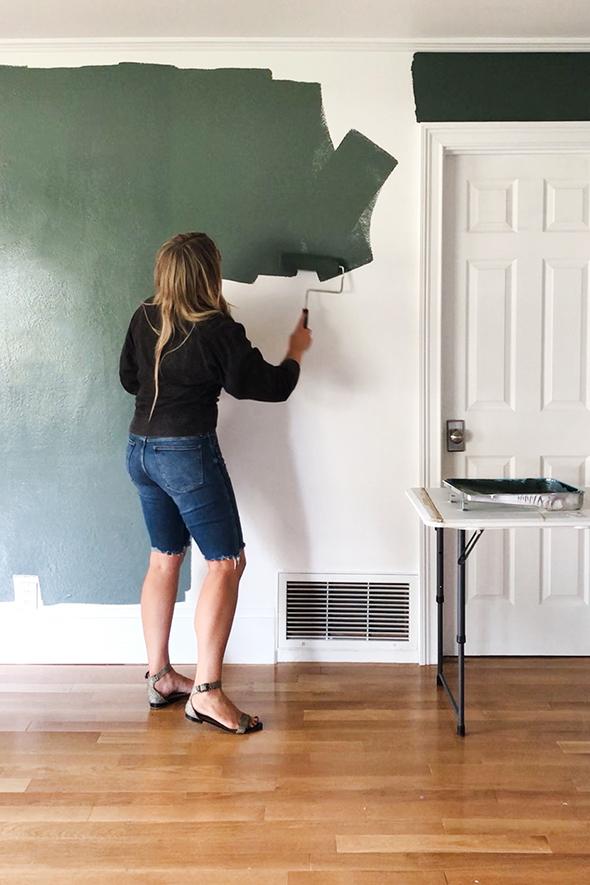
TIP #4: I touched up my trim with semi-gloss white paint first before painting my walls. Then I have found the quickest approach is to start with rolling before brushing on/cutting in. The very best trick I can share with you is a little something I like to call the 3×3 foot rule: every dip of the roller will cover 9 or 10 square feet (or about a 3×3′ square) with great coverage and no drips. If you work in slightly overlapping squares, taking your roller close to your trim, you’ll be done rolling quickly and will only need one coat! This is especially true if you buy a premium paint, like the Valspar Signature line with a built in primer. This paint rolls on like butter!
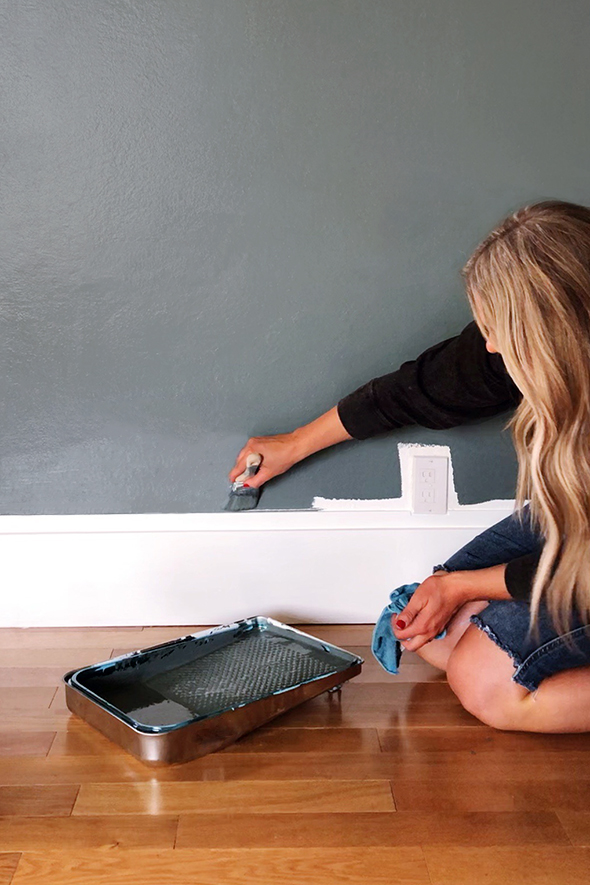
TIP #5: After rolling, use a 2″ angled brush (this one’s my favorite) to cut in your edges next to your ceiling and trim. This specific brush is magical and makes painting straight lines so easy! I haven’t used painters tape for years once I started using these brushes and my wonderful blue microfiber cloths as insurance in case of drips or splatters.
It only takes me about 45 minutes to paint a bedroom with this method! It’s a BREEZE! And since paint is so affordable, I am not at all intimidated by using adventurous colors like this dark green! I’m truly obsessed with the finished look, but if I’m ever ready for a change, I know it’s not a big deal at all to switch things up. Here’s a little photo tour of this finished space! We are working on putting together a second post with all the sources (and new prints!) in this space, but let us know if you have any questions in the meantime! And let me know how my approach to painting a room quickly works for you!
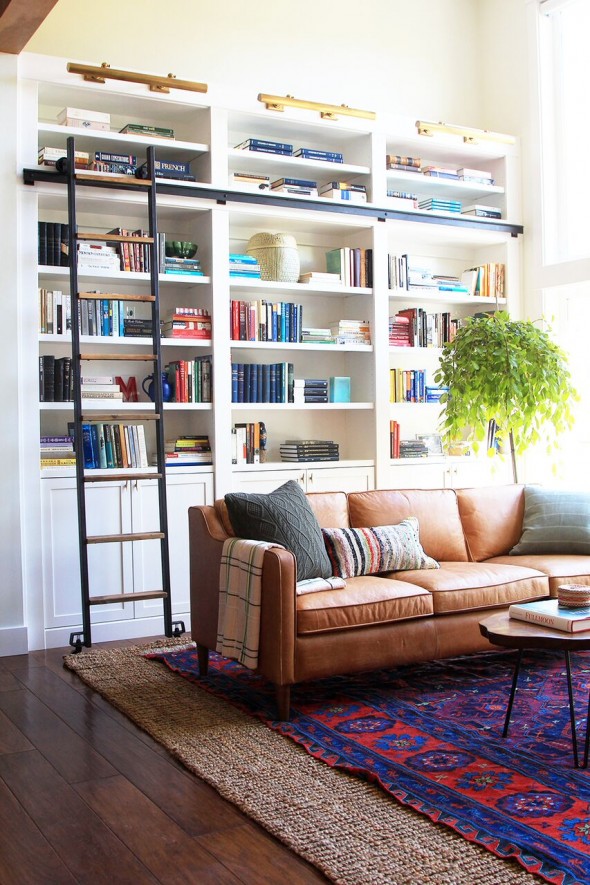
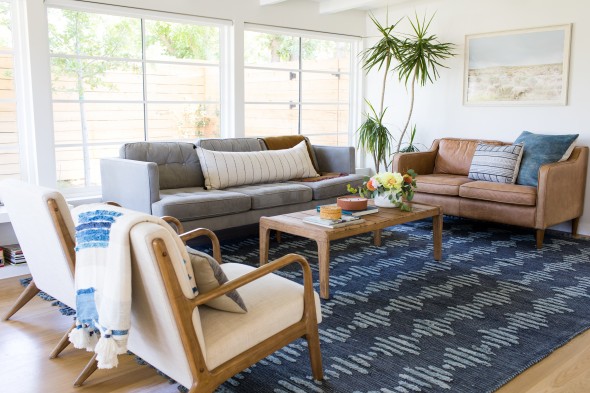
Vintage pieces are the soul of a room! I’m a firm believer that you can make inexpensive home products sourced from big box stores and the internet look expensive when you can combine them with the right vintage pieces. sofa // rug // coffee table // chandelier STARLITE print // chairs // lamp See this living…
Vintage pieces are the soul of a room! I’m a firm believer that you can make inexpensive home products sourced from big box stores and the internet look expensive when you can combine them with the right vintage pieces.
Vintage pillows are an easy place to start if you’re feeling timid. They are colorful, textural little pieces of art! Just like a great pair of statement earrings with a simple t-shirt, a fun vintage pillow can trick the eye and make the whole room look more expensive!
Throw blankets are the next step in vintage shopping that feels accessible but fun! I love a good Moroccan throw with giant tassels! The bonus is these throws can be easily dyed if you’re not finding the exact color you’d like for your bedroom.
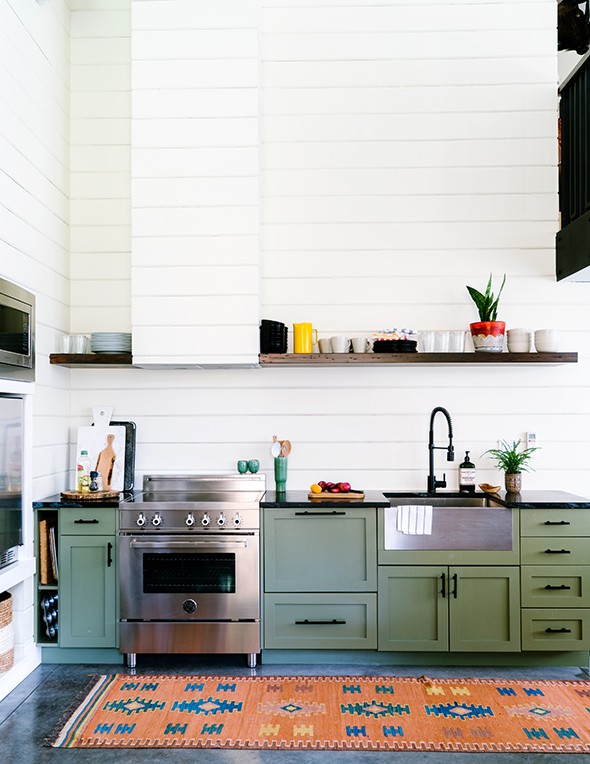
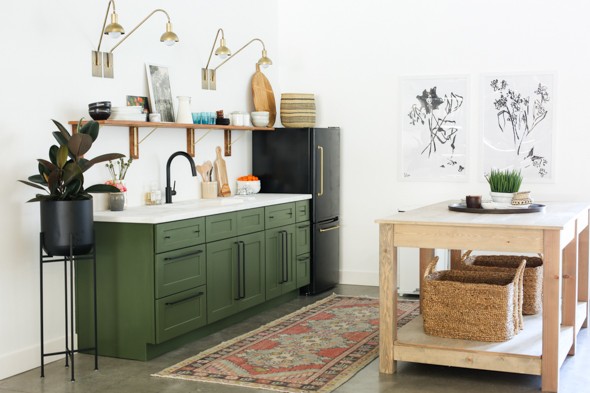
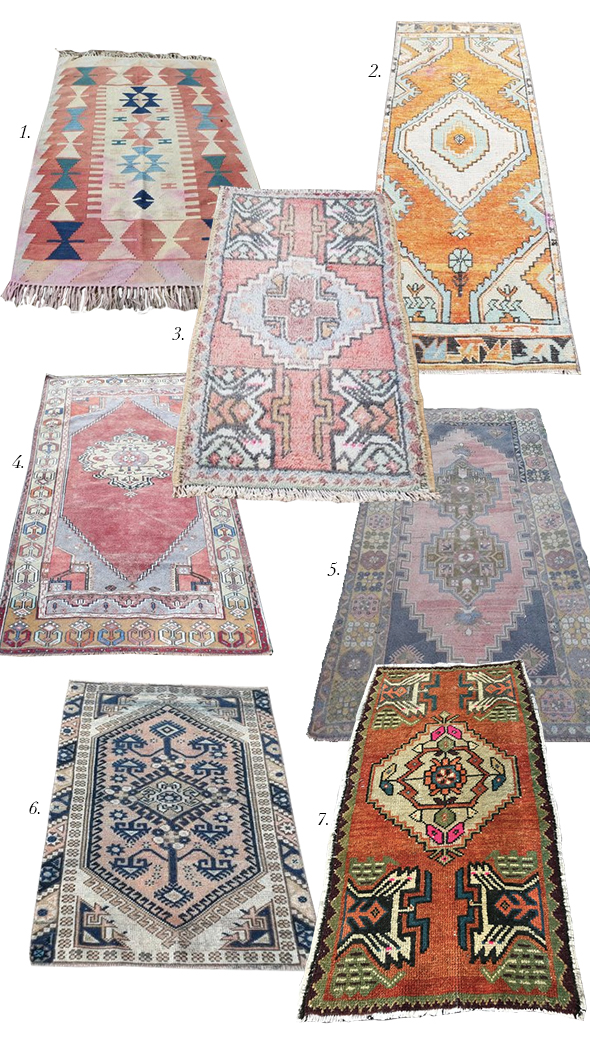
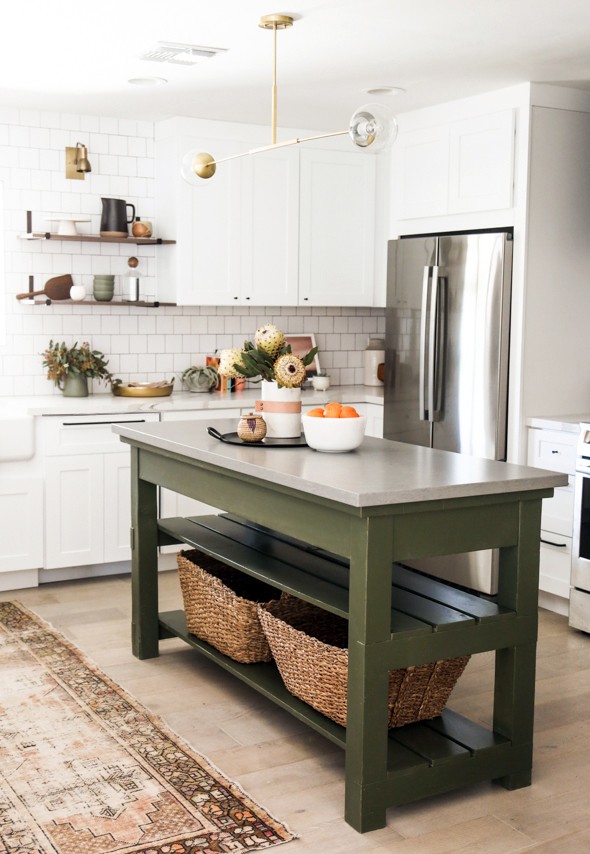
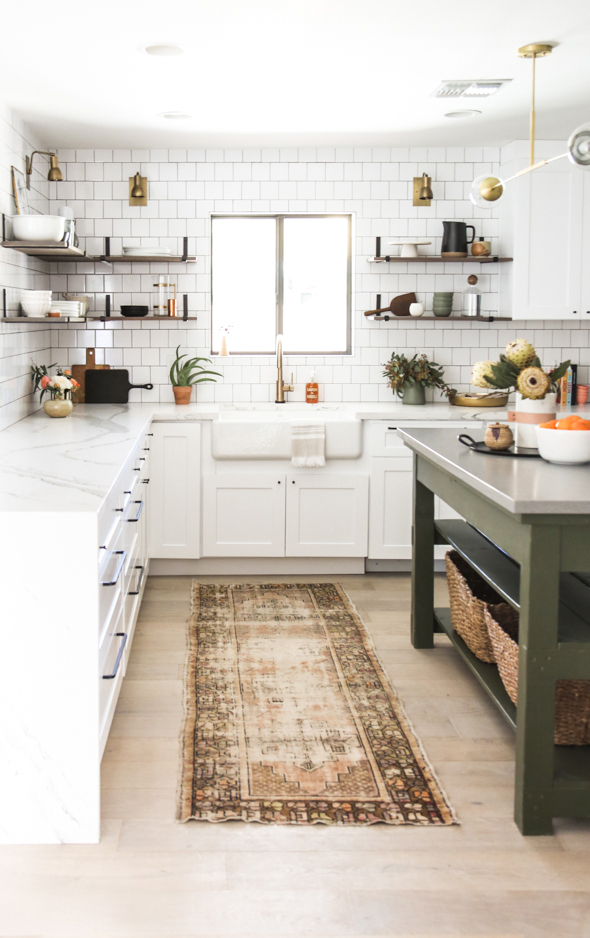
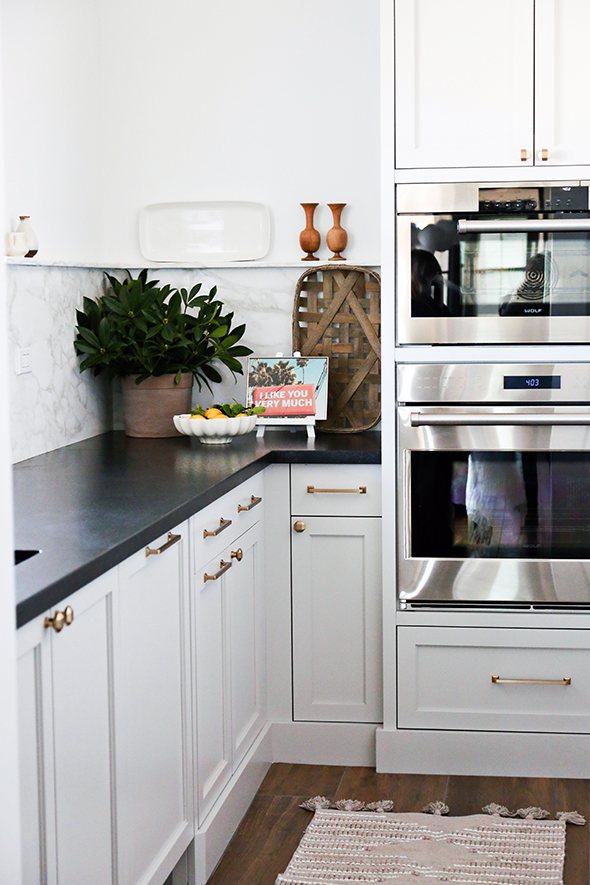
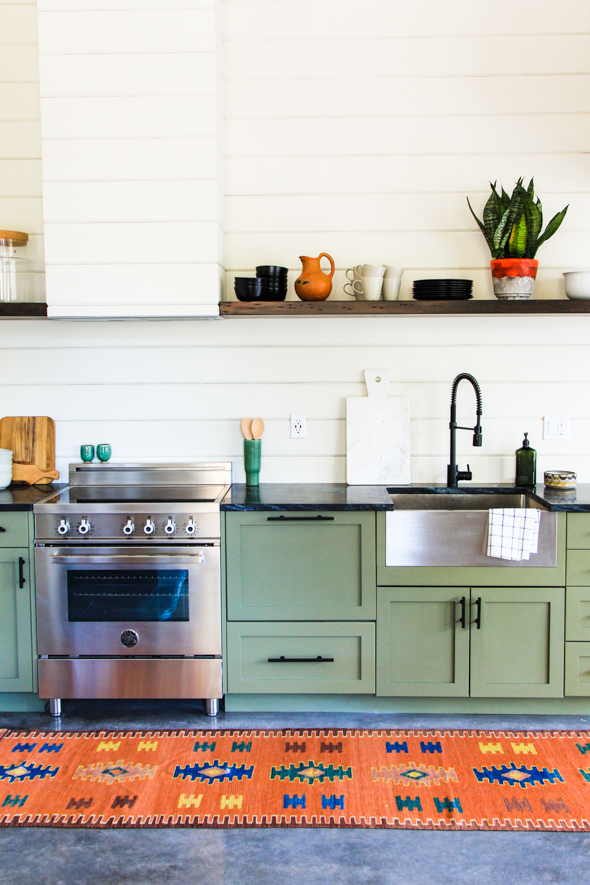
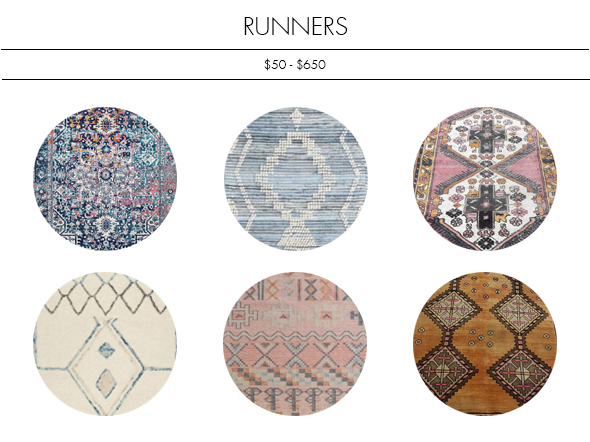
I’ve said it before, but vintage runners are a must for me in every kitchen I design! They bring warmth and soul to what can feel like a cold space otherwise.
If you click through some of these linked rugs below, you’ll find a few of our favorite rug sources! You can follow their shops and see all the beautiful pieces these sellers list daily! Treasure hunting at its most convenient! :)
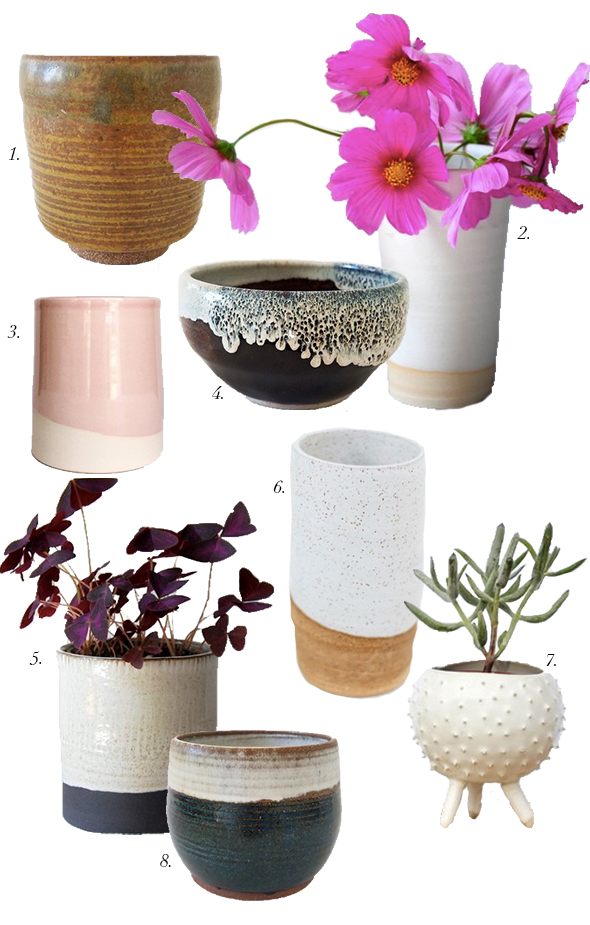
Another easy way to incorporate vintage pieces into your home is through pottery! I am a straight up ceramics hoarder!! I have closets full of the stuff and each piece is genuinely priceless to me! And lucky for me, my sister is also a potter and she is constantly letting me use her pieces for projects! :)
I especially love the ceramic pieces that look organic and extra drippy/imperfect! That is what’s so great about vintage pieces – their unique, one of a kind qualities. I hope you find some treasures in our favorite shops here! xo
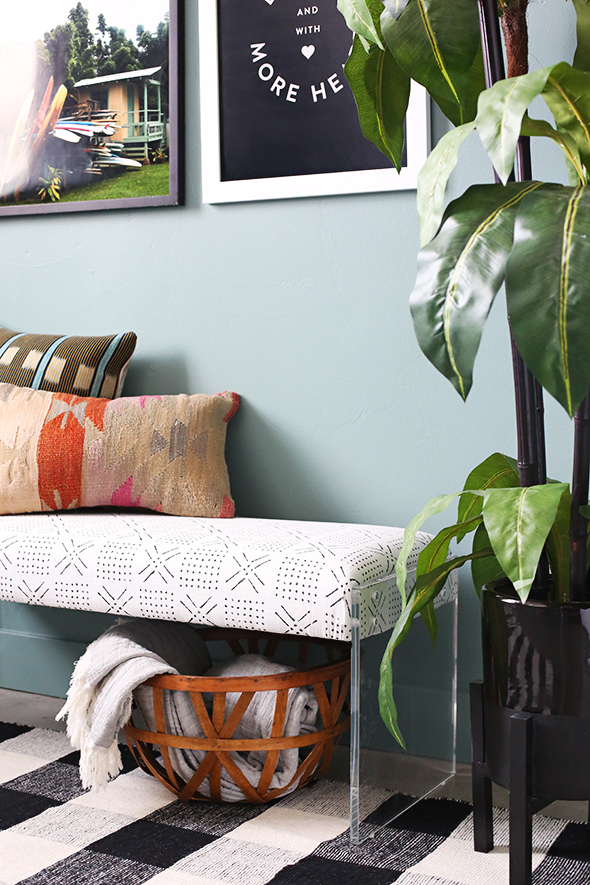
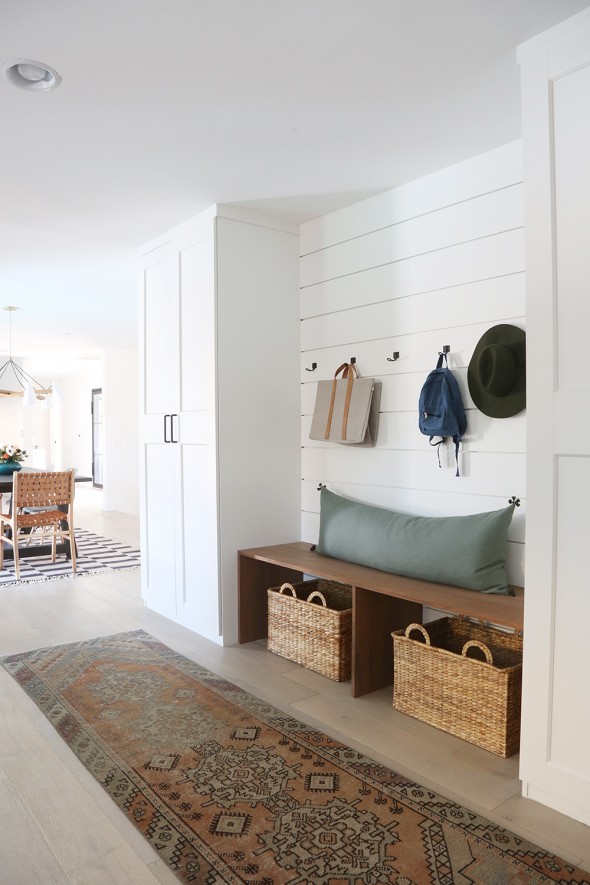
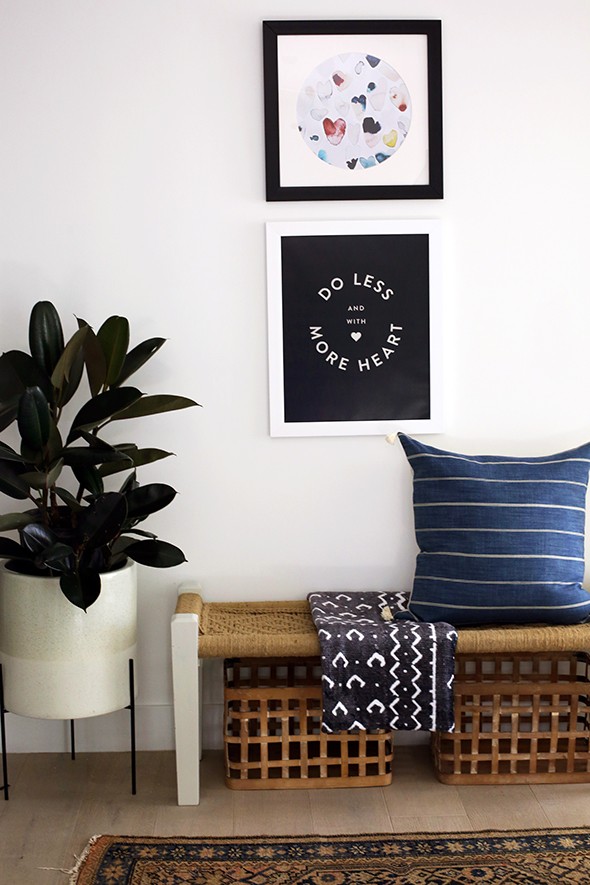
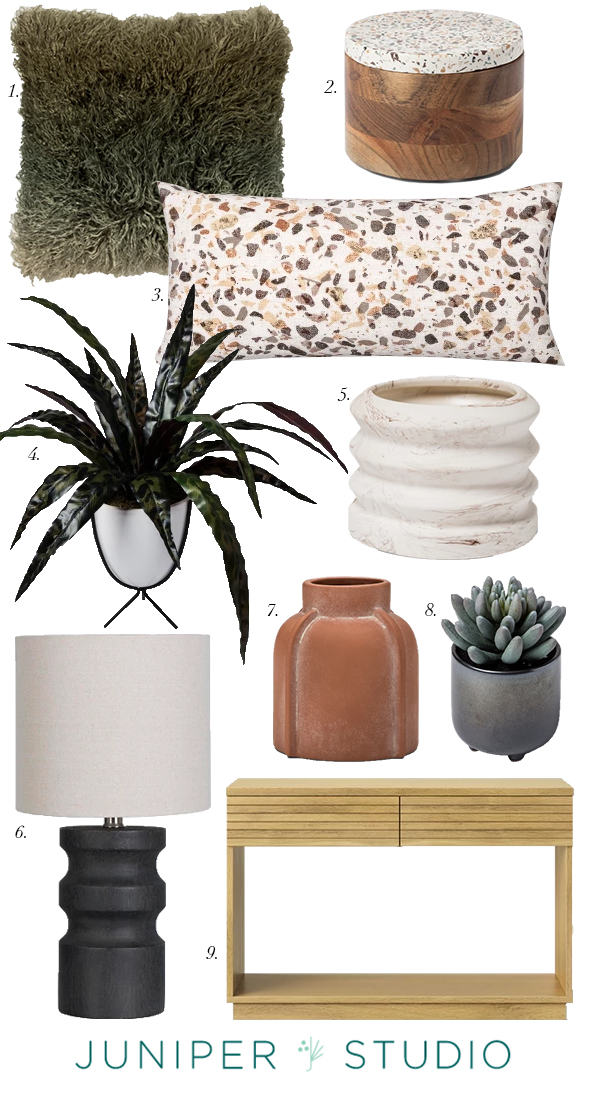
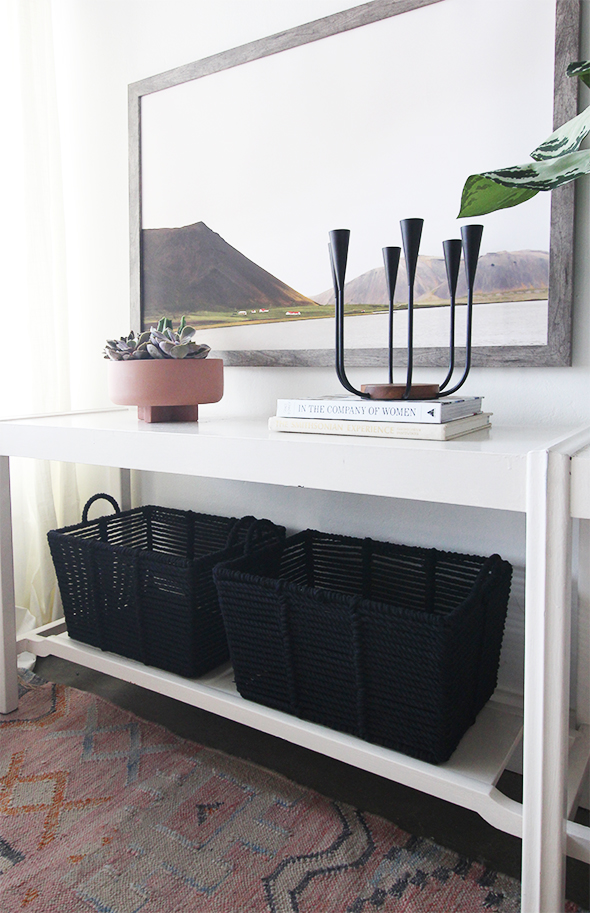
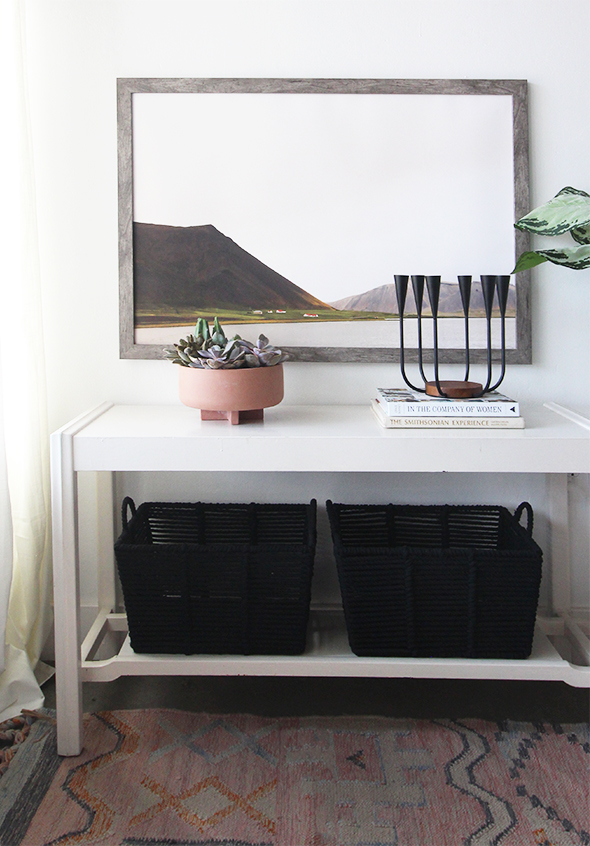
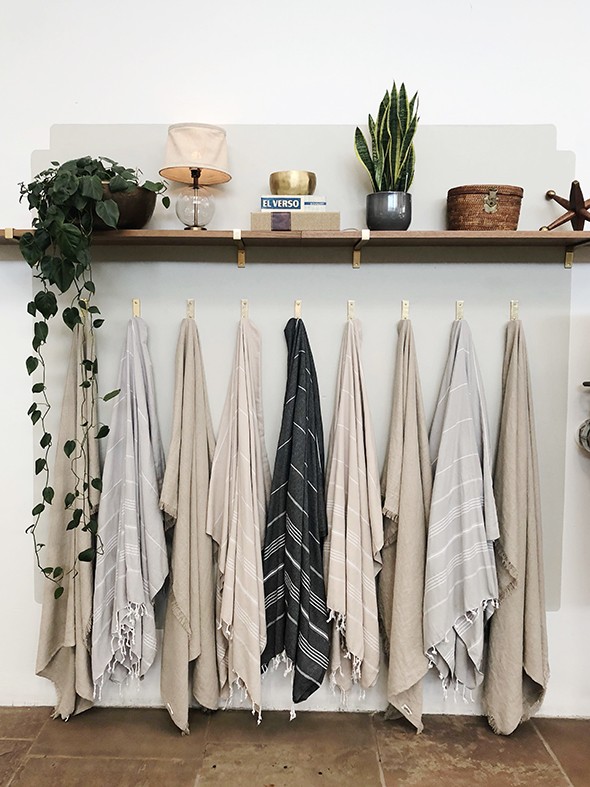
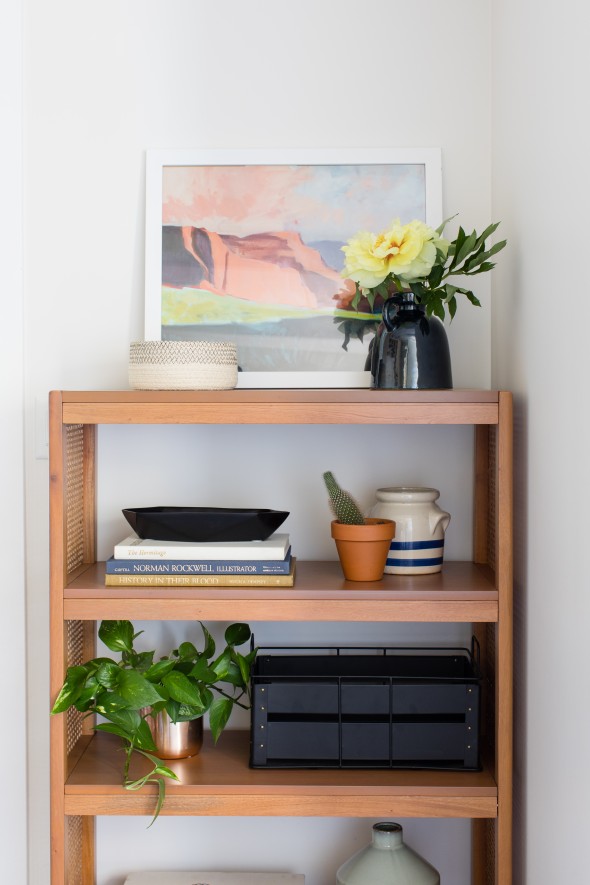
Baskets are such a easy, affordable and functional addition to every room! They also bring a beautiful layer of warmth and texture. You can of course tuck them under benches and have them on shelving, but don’t be afraid to layer them under console tables or next to side tables and nightstands. runner (similar) //…
Baskets are such a easy, affordable and functional addition to every room! They also bring a beautiful layer of warmth and texture. You can of course tuck them under benches and have them on shelving, but don’t be afraid to layer them under console tables or next to side tables and nightstands.
It can be tricky to find the right specific basket for your space, so make sure you have you measurements handy when you start your search. We’ve rounded up our tried and true favorites for you here, but please let us know in the comments if we’ve missed any of your favorite basket finds!
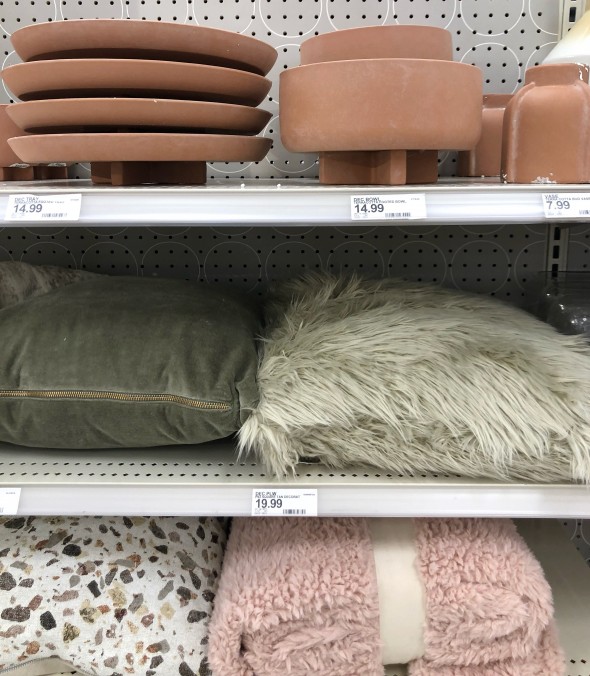
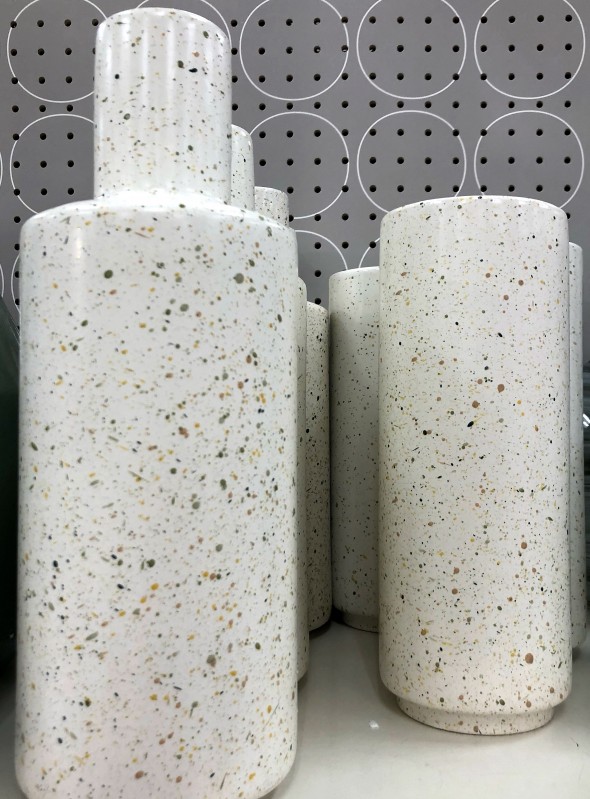
We have a REALLY great Target near the studio. I love shopping their home section, because nothing is picked over like the store closes to my house! A few days ago I popped in to pick up water and paper towels for the office and I noticed their new fall decor was out. It is SO GOOD!!…
We have a REALLY great Target near the studio. I love shopping their home section, because nothing is picked over like the store closes to my house! A few days ago I popped in to pick up water and paper towels for the office and I noticed their new fall decor was out. It is SO GOOD!!
Here are some more of our favorites from the collection. Have you checked any of these pieces out yet? Target nails it every time, but these feel especially on-trend!
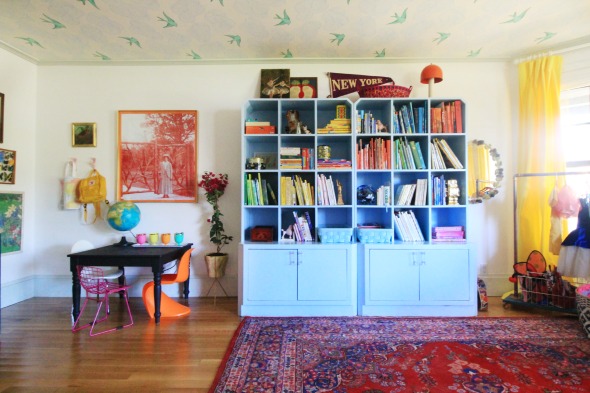
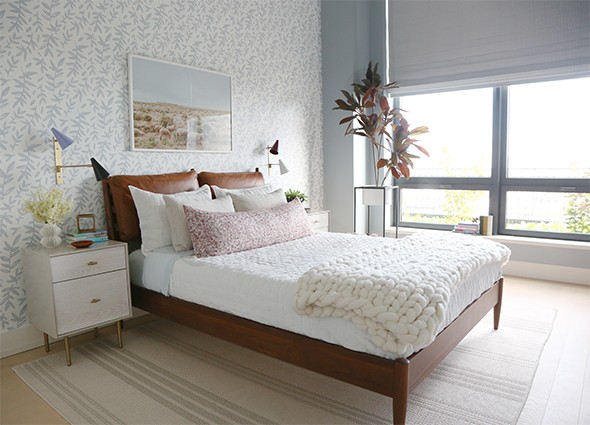
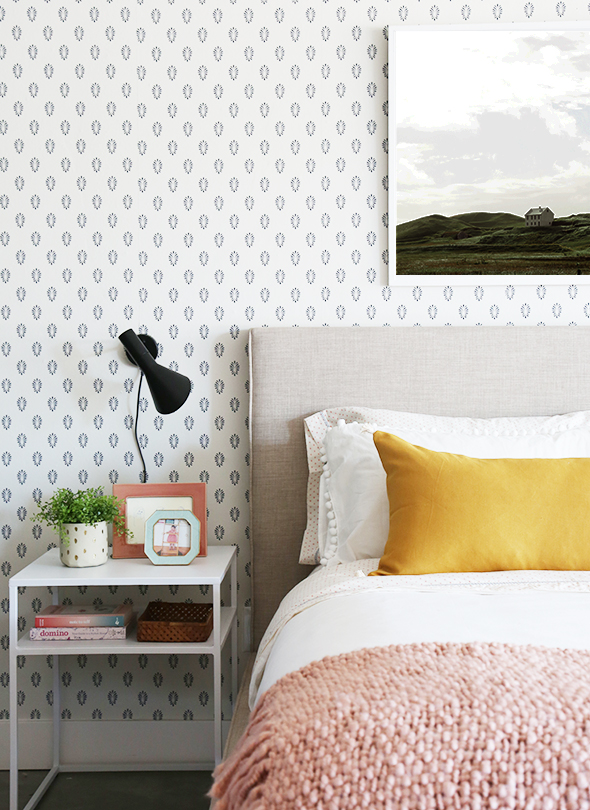
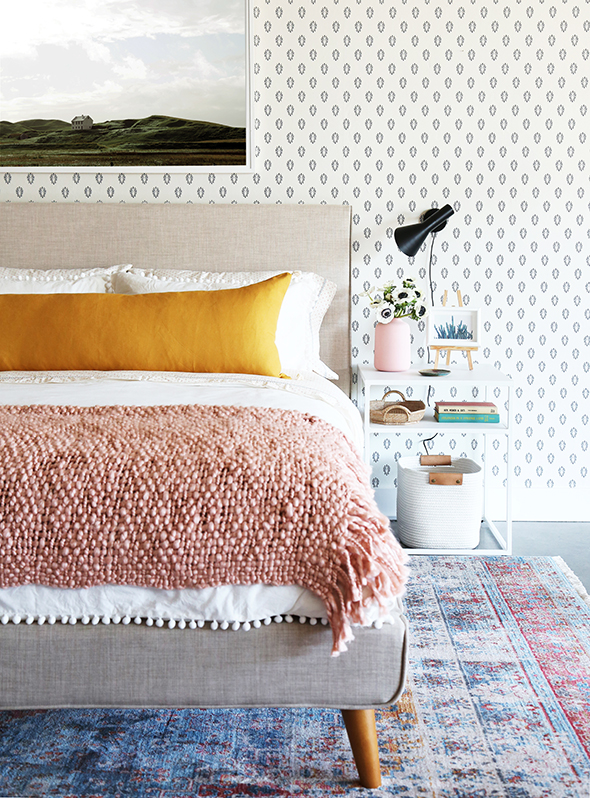
A few months ago, Real Simple magazine reached out to see if I’d be interested in designing the kid’s room in their first #RSHome show house. Of course I was THRILLED to participate, especially when hearing about the other designers working on the other spaces including Nate Berkus and Jeremiah Brent, Studio McGee, Sabrina Soto,…
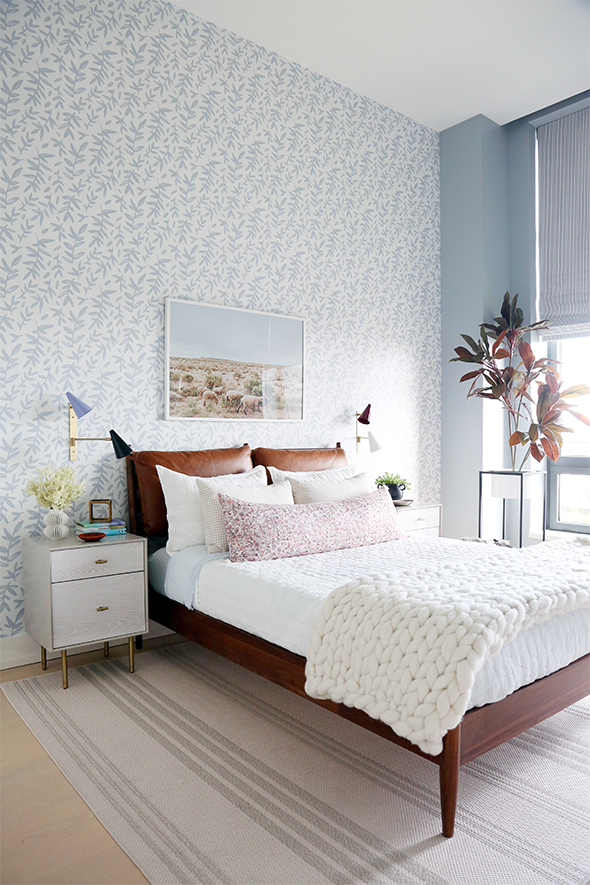
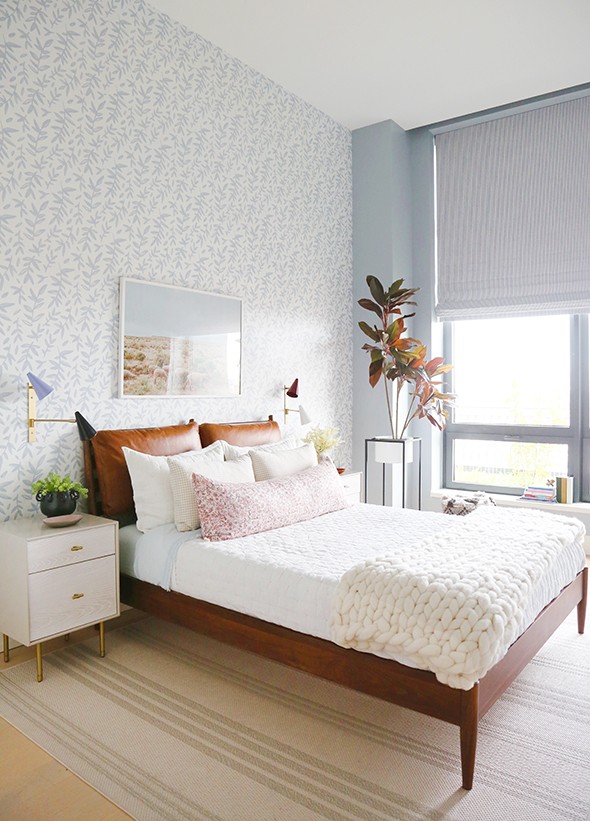
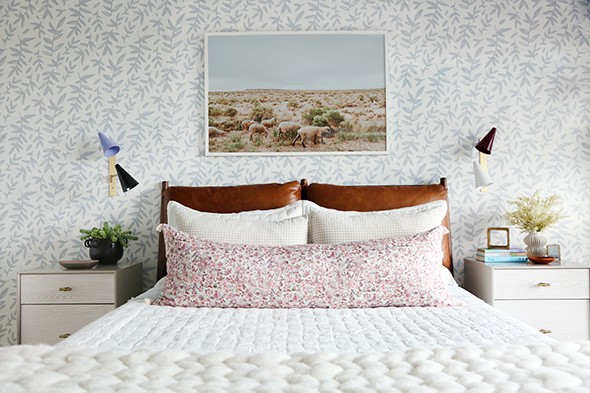
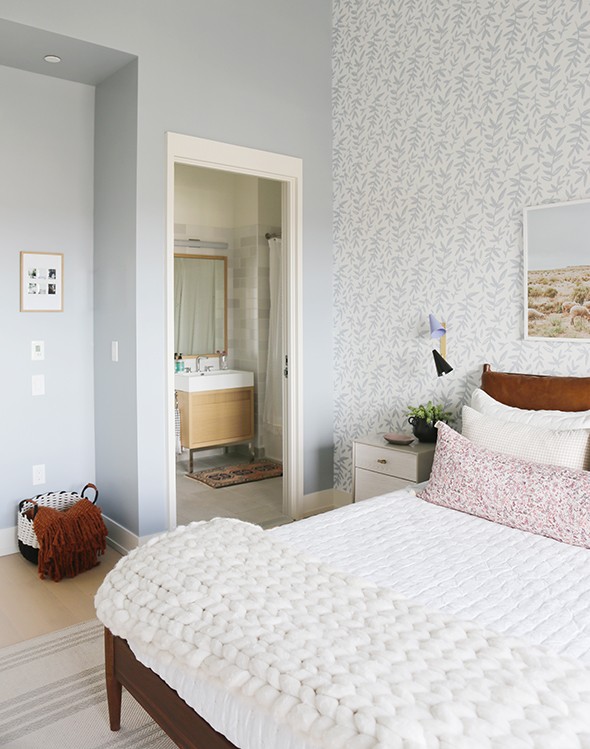
A few months ago, Real Simple magazine reached out to see if I’d be interested in designing the kid’s room in their first #RSHome show house. Of course I was THRILLED to participate, especially when hearing about the other designers working on the other spaces including Nate Berkus and Jeremiah Brent, Studio McGee, Sabrina Soto, Home Polish, The Decorist, Robyn Henry, Donna Garlough and The Neat Method. Such an inspiring group! And it didn’t hurt that the show home was going to be held in the most stunning penthouse apartment at 550 Vanderbilt Avenue in Brooklyn’s Prospect Heights! :) The HUGE spread on the entire show house is in the new October issue of Real Simple, so go grab a copy to see all of the other spaces! Here are a few more photos of my finished room. If you’re looking for the behind the scenes when we installed this space, check out my insta stories highlights called REAL SIMPLE HOME.
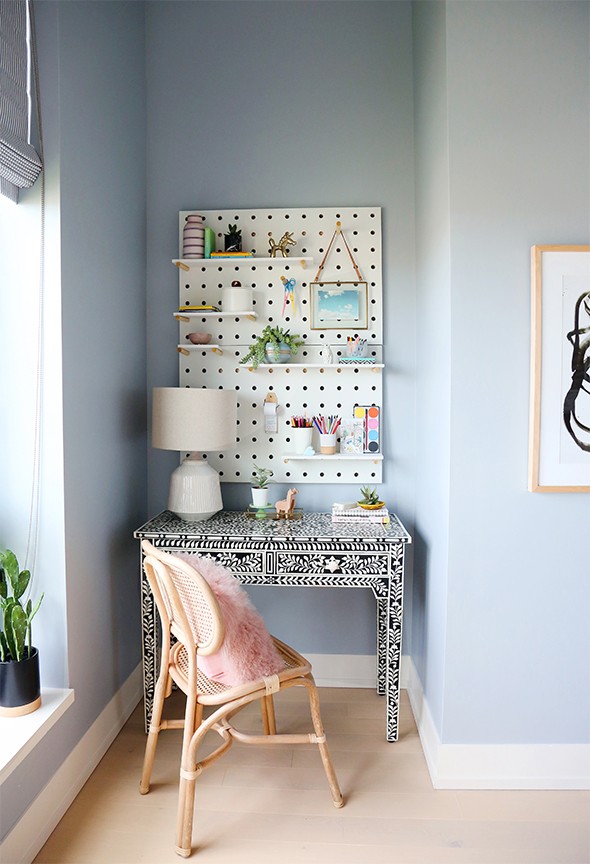
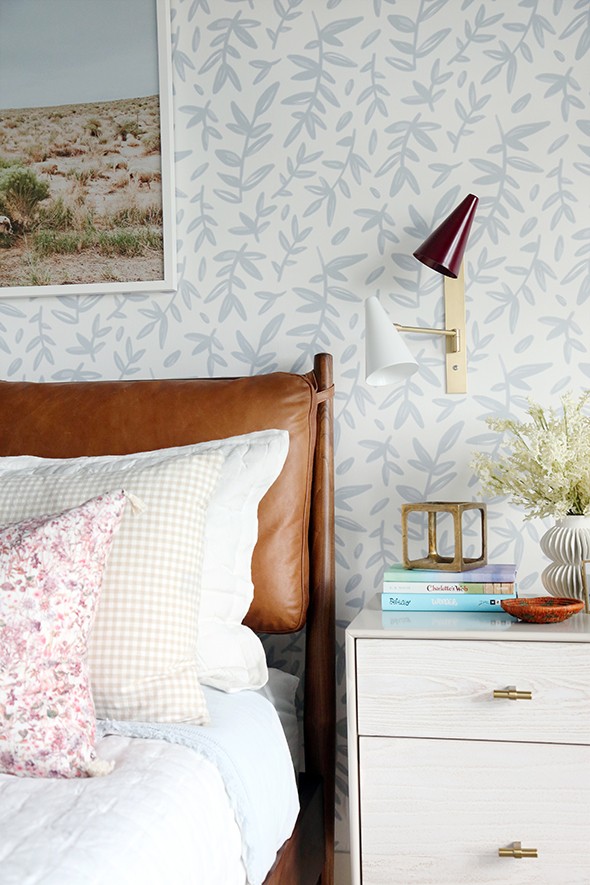
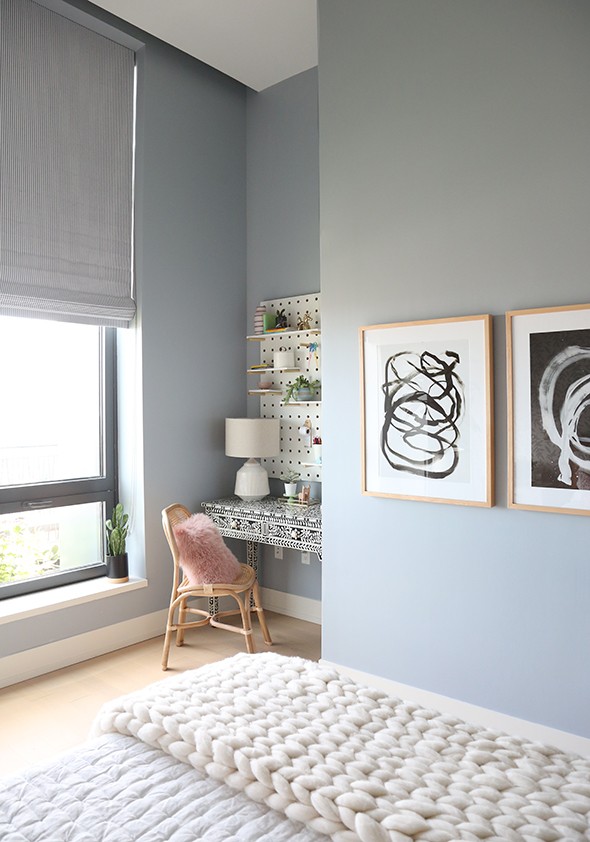
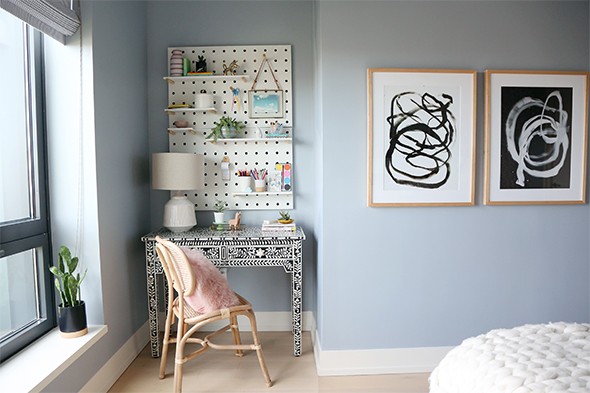
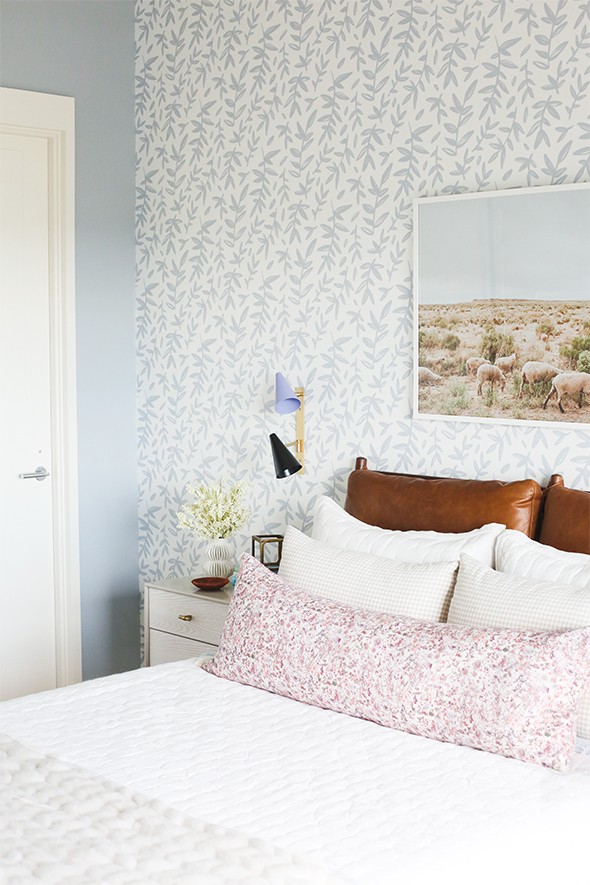
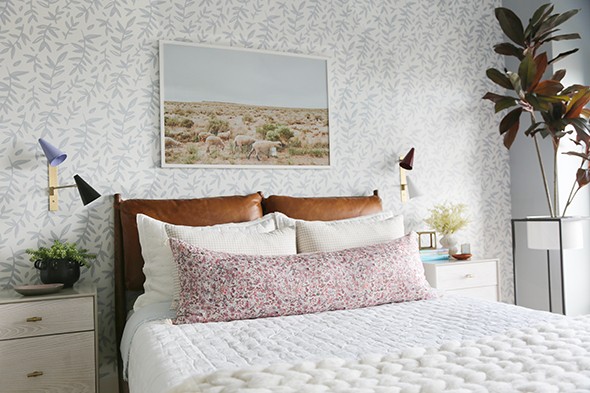
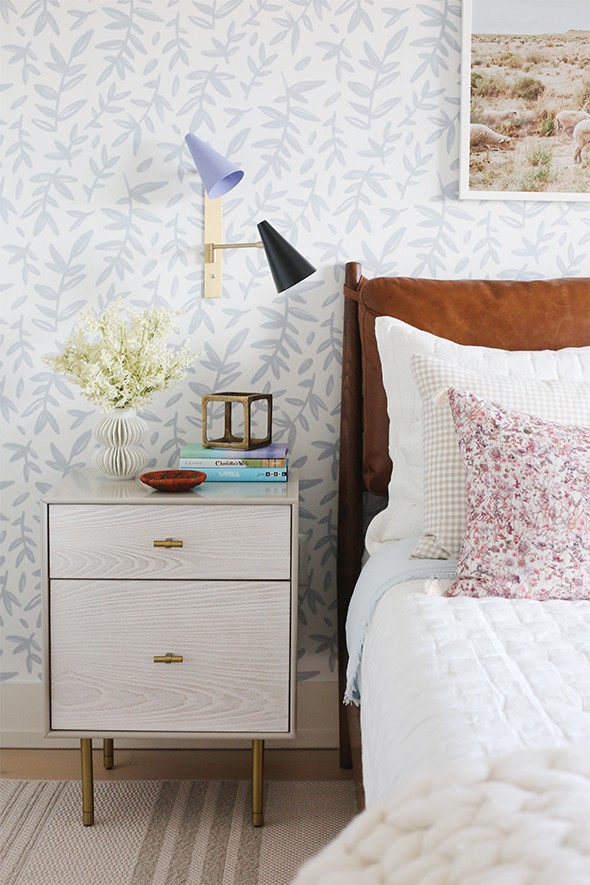
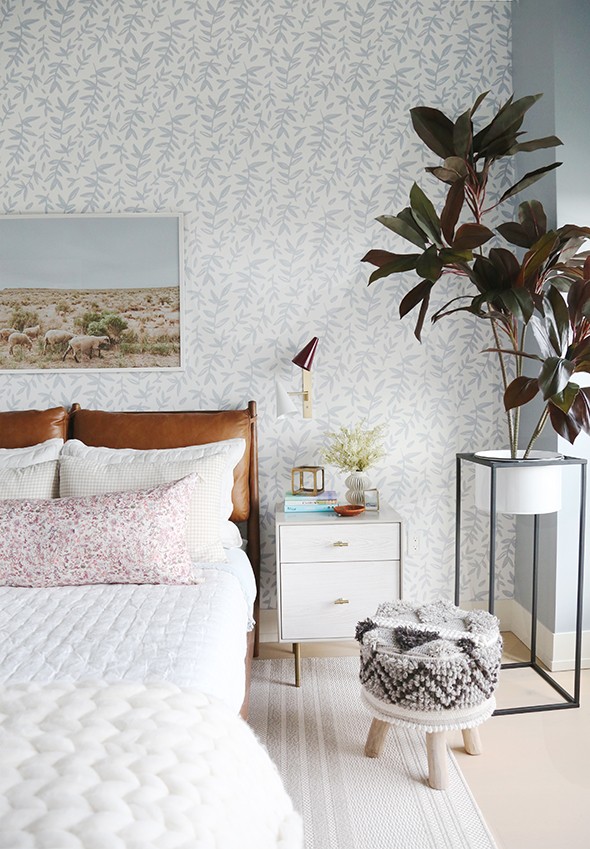
Since we didn’t have a real client to work with on this project, I had to imagine up a young girl we were designing this space for. Real Simple suggested a space for a pre-teen girl, which was easy for me, since I have two of those! I imagined this little girl to be an art-lover and a reader. I love using blue in girls spaces and I thought wallpaper would be so fun! I also wanted the space to feel slightly grown up. I talked about this in the article interview, but my biggest tip for designing kids spaces, is to invest in furniture that grows with your littles. It’s easy and inexpensive to switch out accessories and linens as the child grows. If you find furniture that is more grown up but still playful, you’ll be able to keep these pieces forever, like this beautiful inlay desk from Arhaus and the bed and nightstands from West Elm. I love these pieces in this space, but I’d love them equally in an adult’s room (like my own bedroom maybe?!)
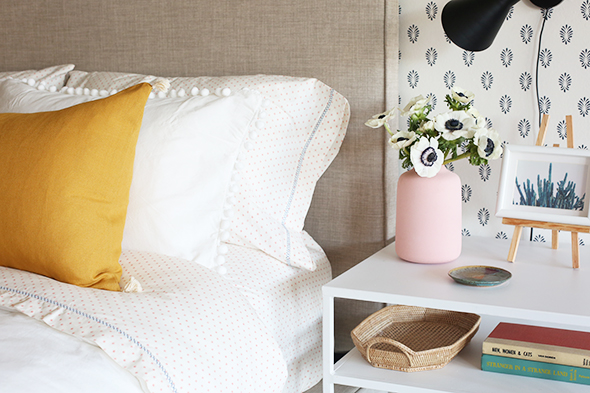
The floral lumbar pillow is brand new in our shop today! We are calling it the WILDFLOWER lumbar and I LOVE this fabric and pattern!
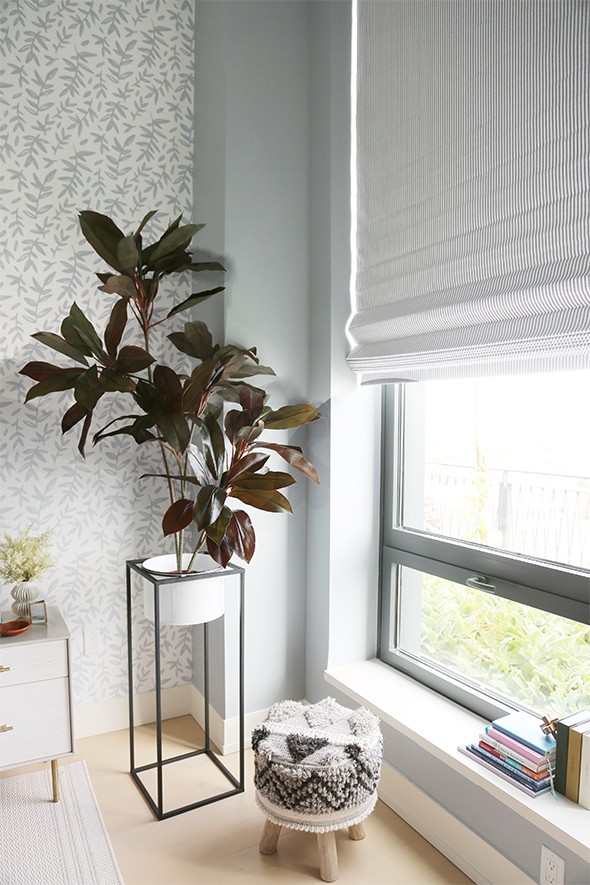
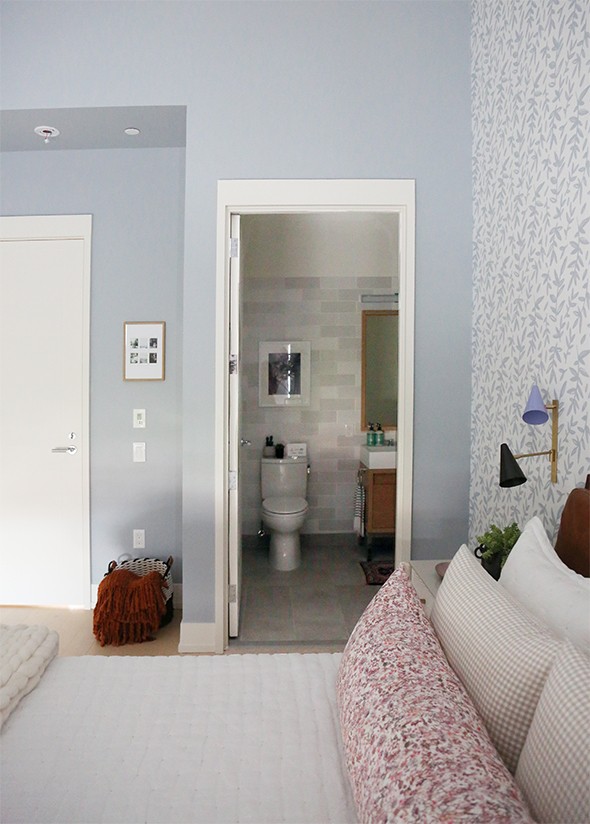
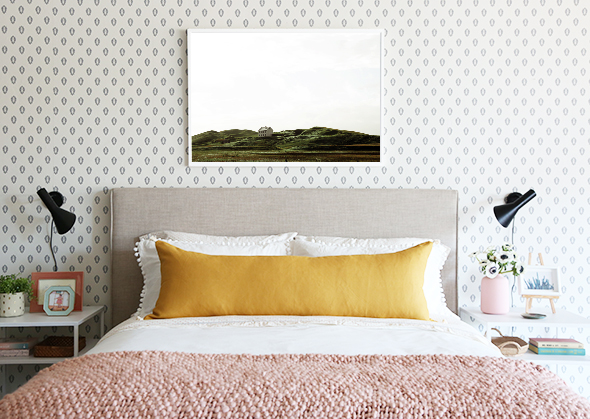
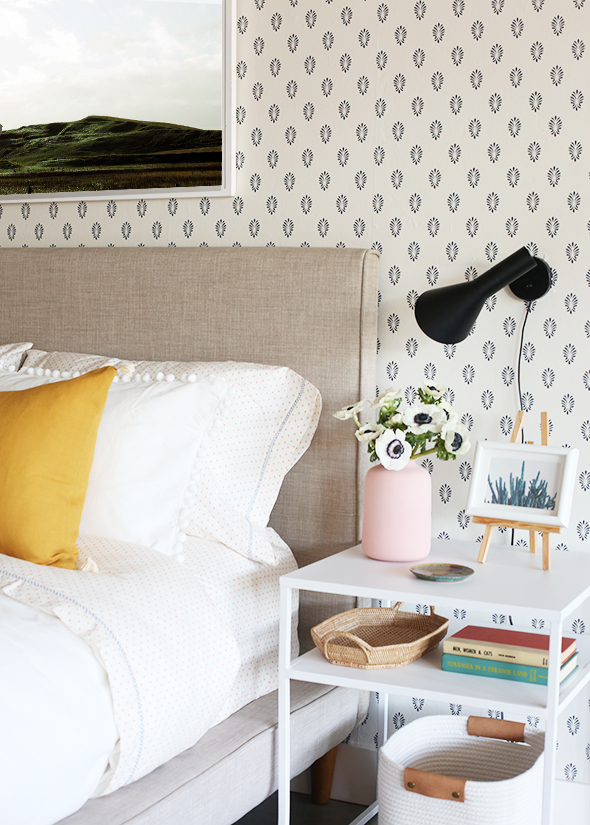
The wall color was tricky to get right in this space (it is SO important to put up samples!), but I think we got it right the second go-round. The color is called Jubilee by Sherwin Williams. We wanted a warm chambray blue and I think this is just that! How amazing does it look with the blue and white ticking stripe roman shade from The Shade Store? The windows in this apartment were a major challenge, but the sweet designers at The Shade Store really came through for all of us working on the RS Home and everything turned out beautifully!
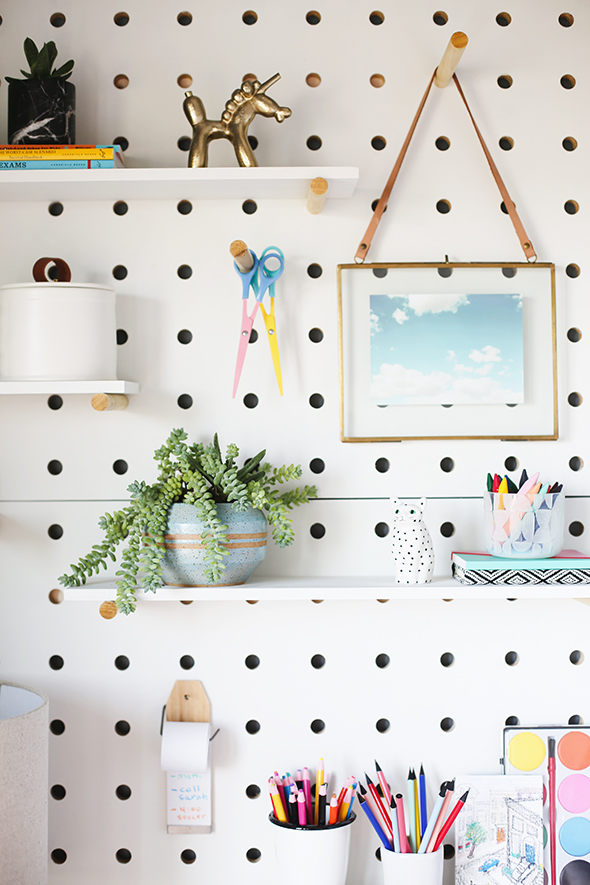
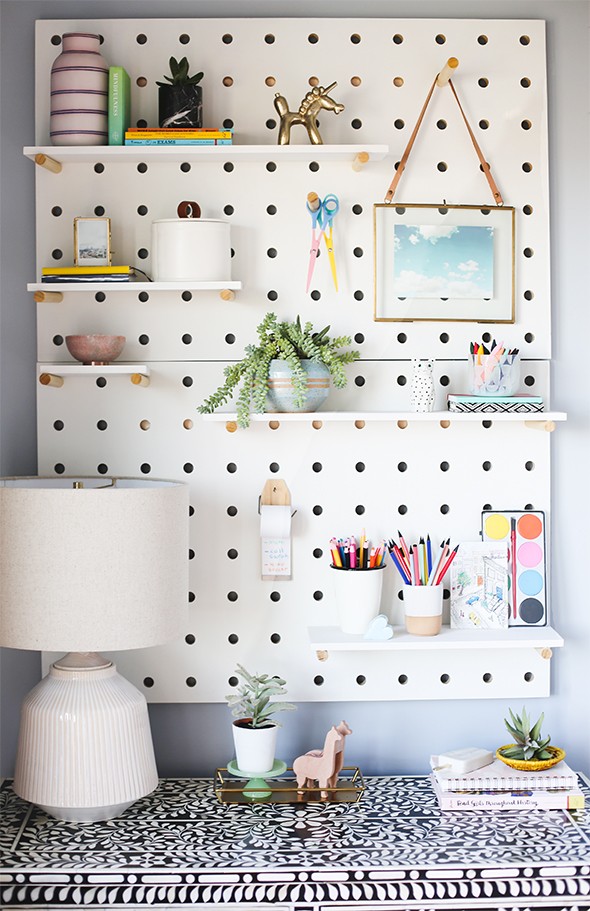
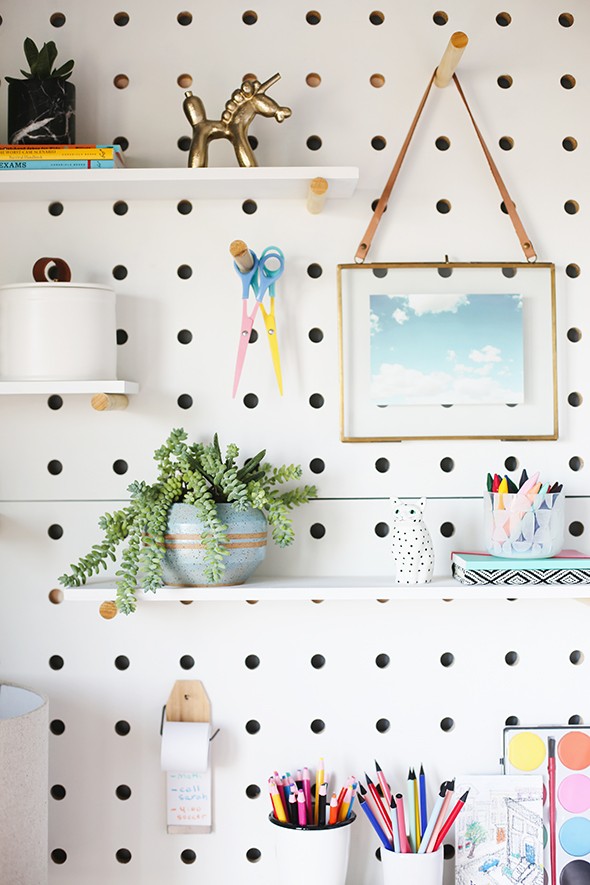
The pegboard was an Etsy find. We bought it in a natural finish and painted the board and shelves white. I wish we could have just bought it this way, but I wasn’t finding any good quick-ship options!
It wasn’t hard to paint with a mini roller, but spray painting would have been even easier. We left the pegs natural and I love the warmth they bring! (PS as a side note – I brought one of my sister’s ceramic pots with us to use in the styling here and she straight up cried seeing one of her pieces in a magazine. Such a sweet moment for me!)
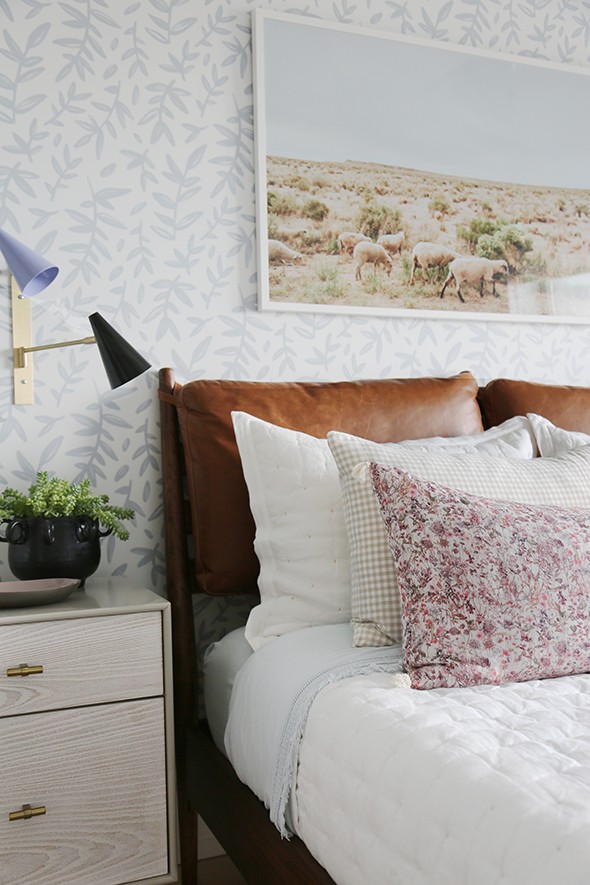
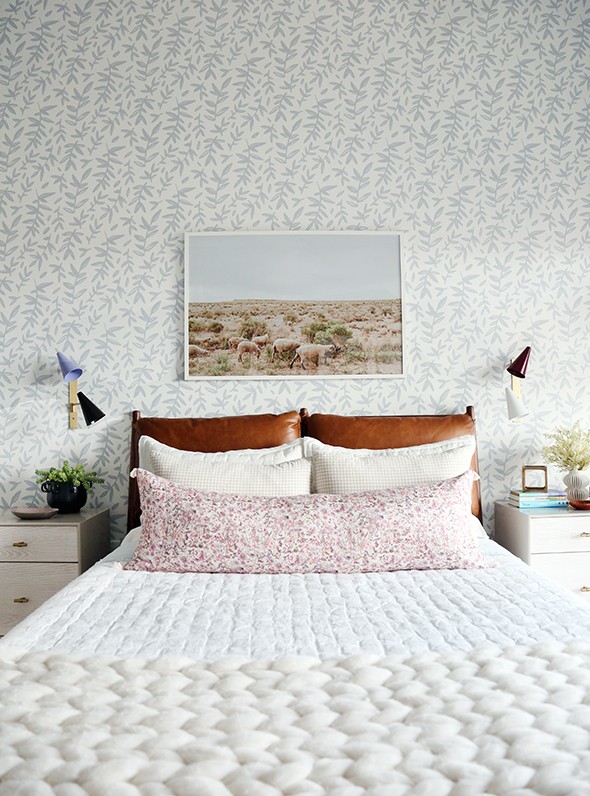
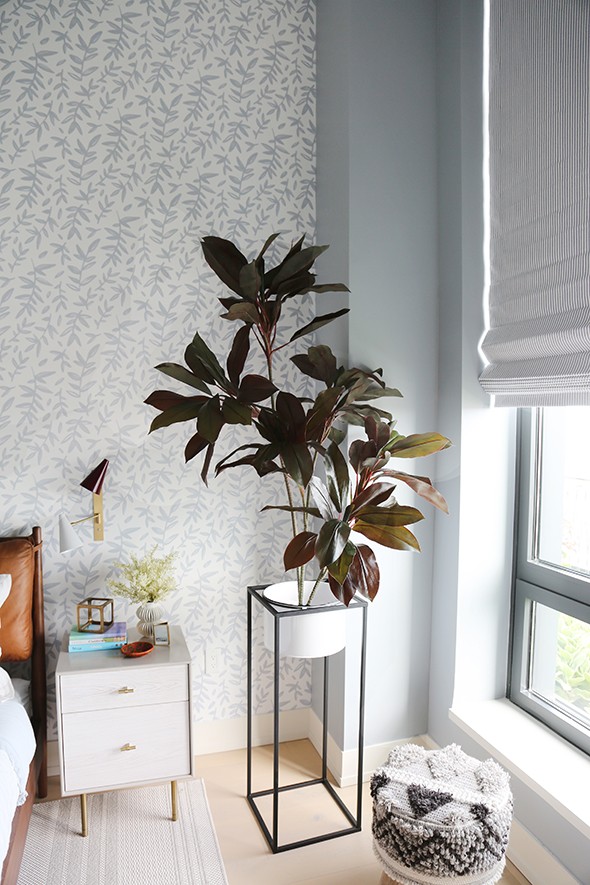
Isn’t the wallpaper amazing!? It’s from Muse Wall Studio and the pattern is called Leaf Branches. It is a removable wallpaper and it is surprisingly easy to hang (it’s like a giant sticker!). I love the movement and texture this pattern brings to our room.
It was a little tricky to match the wallpaper to a paint color thousands of miles away without a wallpaper sample or without being able to put up sample paint colors, but I think it really turned out great in the end! The wallpaper, paint and roman shade fabric are all subtly different colors of blue, but I think they play together beautifully!
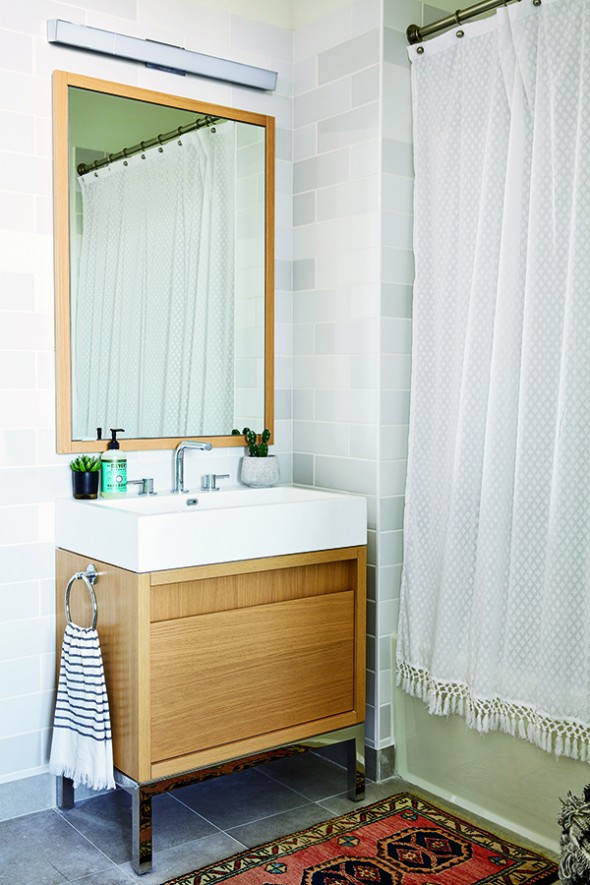
The cute little en suite bathroom was tricky to photograph, but I think it turned out sweet! We found that beautiful little Persian throw rug at the ABC Carpet & Home in their basement outlet area (similar here)! I love that coral pink pop!
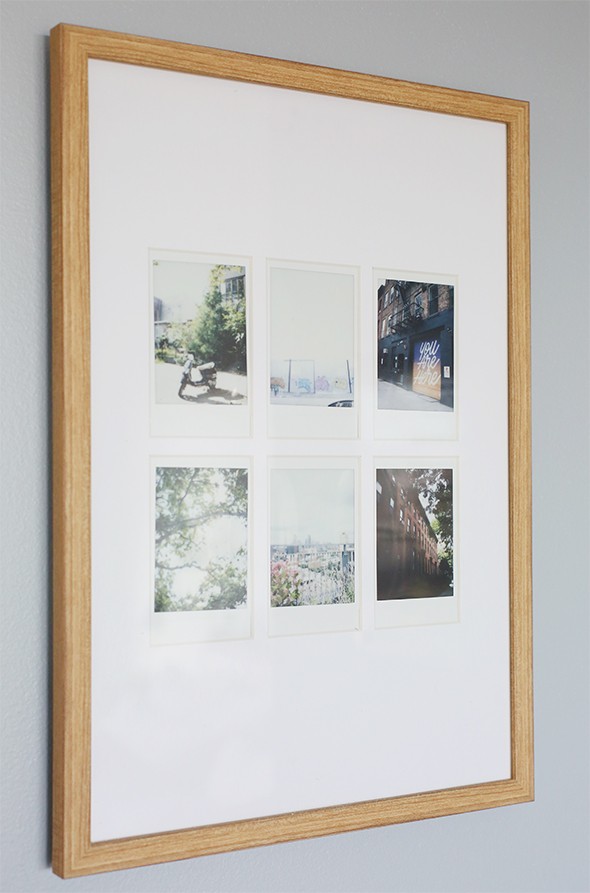
We used my favorite Instax camera to take photos of the city while we were doing the install and put them in this frame made specially for Instax photos. I love how this turned out! Such a sweet way to remember a specific trip or day!
Another favorite purchase for this room, was this AMAZING faux rubber tree! Isn’t the color so good? I love that it has large leaves like a fiddle leaf fig, but the coloring is so different and dramatic! I also love the enamel plant stand we found at Homegoods (similar here and here). We needed some serious height in this room with its 15 foot ceilings and this plant stand really helped!
I am SO honored that Real Simple invited us to help with this beautiful show home! What a dream! I love designing kids rooms and we had a lot of fun in here. :) Don’t forget to pick up the October issue to see the rest of the designers’ spaces! I know you’ll love them as much as I do!
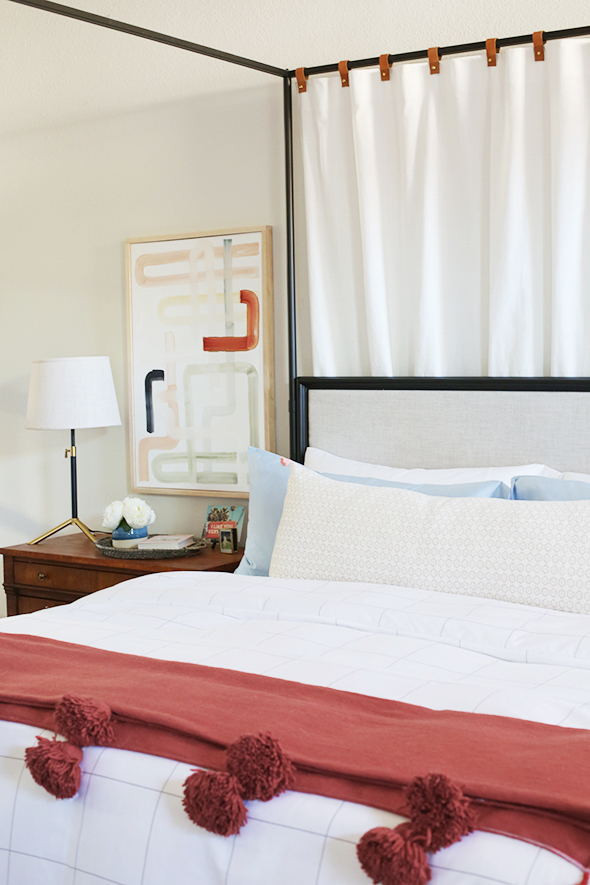
With cooler weather just around the corner we thought this would be a great time to share some of the throw blankets we have been loving! The chunkier the weave, the fuller the tassel or fringe, the better! SALTBOX PRINT // MARIGOLD LUMBAR bed frame // rug // pink throw in color ‘Rosette’ // sconces pom pom duvet // pom…
With cooler weather just around the corner we thought this would be a great time to share some of the throw blankets we have been loving! The chunkier the weave, the fuller the tassel or fringe, the better!
We also recently picked up this super affordable pom pom duvet and pillowcases and paired it with this sweet sheet set. I love the subtle color and pattern and the blue hemstitching! I think these sheets pass for something WAY more expensive! And how pretty is the color combo with our marigold linen lumbar pillow? Did you see on our Juniper instagram that you can use the code MARIGOLD10 for $10 off while they last?! Yay!
And since I know a lot of you will ask about the cute removable wallpaper – I’m so bummed, but the pattern is no longer available (it’s originally from the Opalhouse wallpaper line at Target). We did a whole post a few weeks ago and featured a bunch of other fun removable wallpaper options! Click here for that post!
Also, guys, can you even HANDLE these black plug-in sconces?! They are only $52 and you have the option to hardwire install them too! I think they look so chic, especially for that price. I like a pop of black in any room (even a child’s bedroom), and I love these in here, but don’t miss the white option too if you’re on the hunt for some great sconces that won’t break the bank.
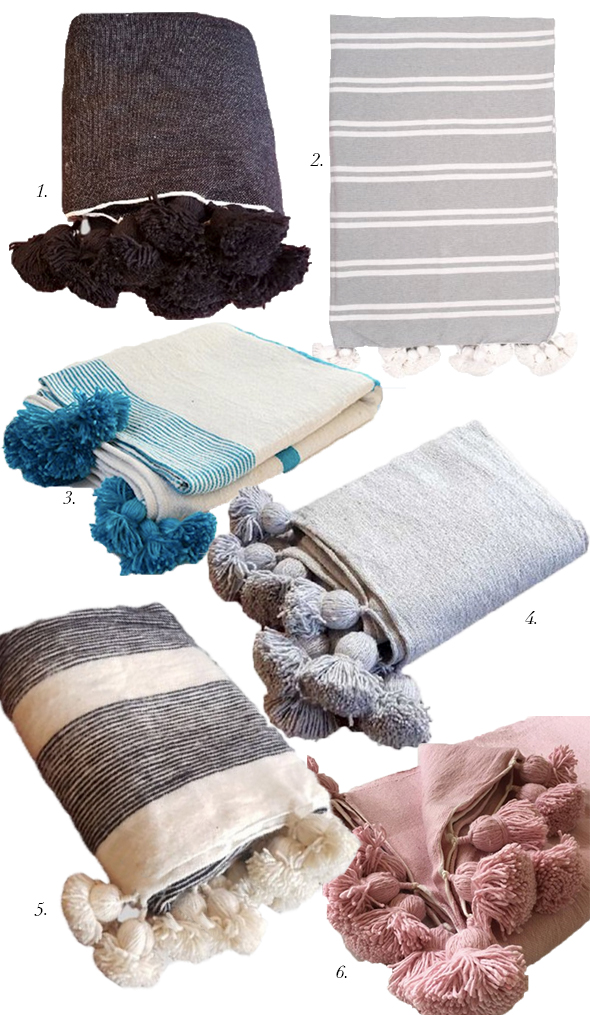
And without further ado, here’s that chunky knit throw round up we promised! We searched high and low on the internet, and these are our very favorites when considering price, color and availability. I hope you find something cozy and textural for your home! :)
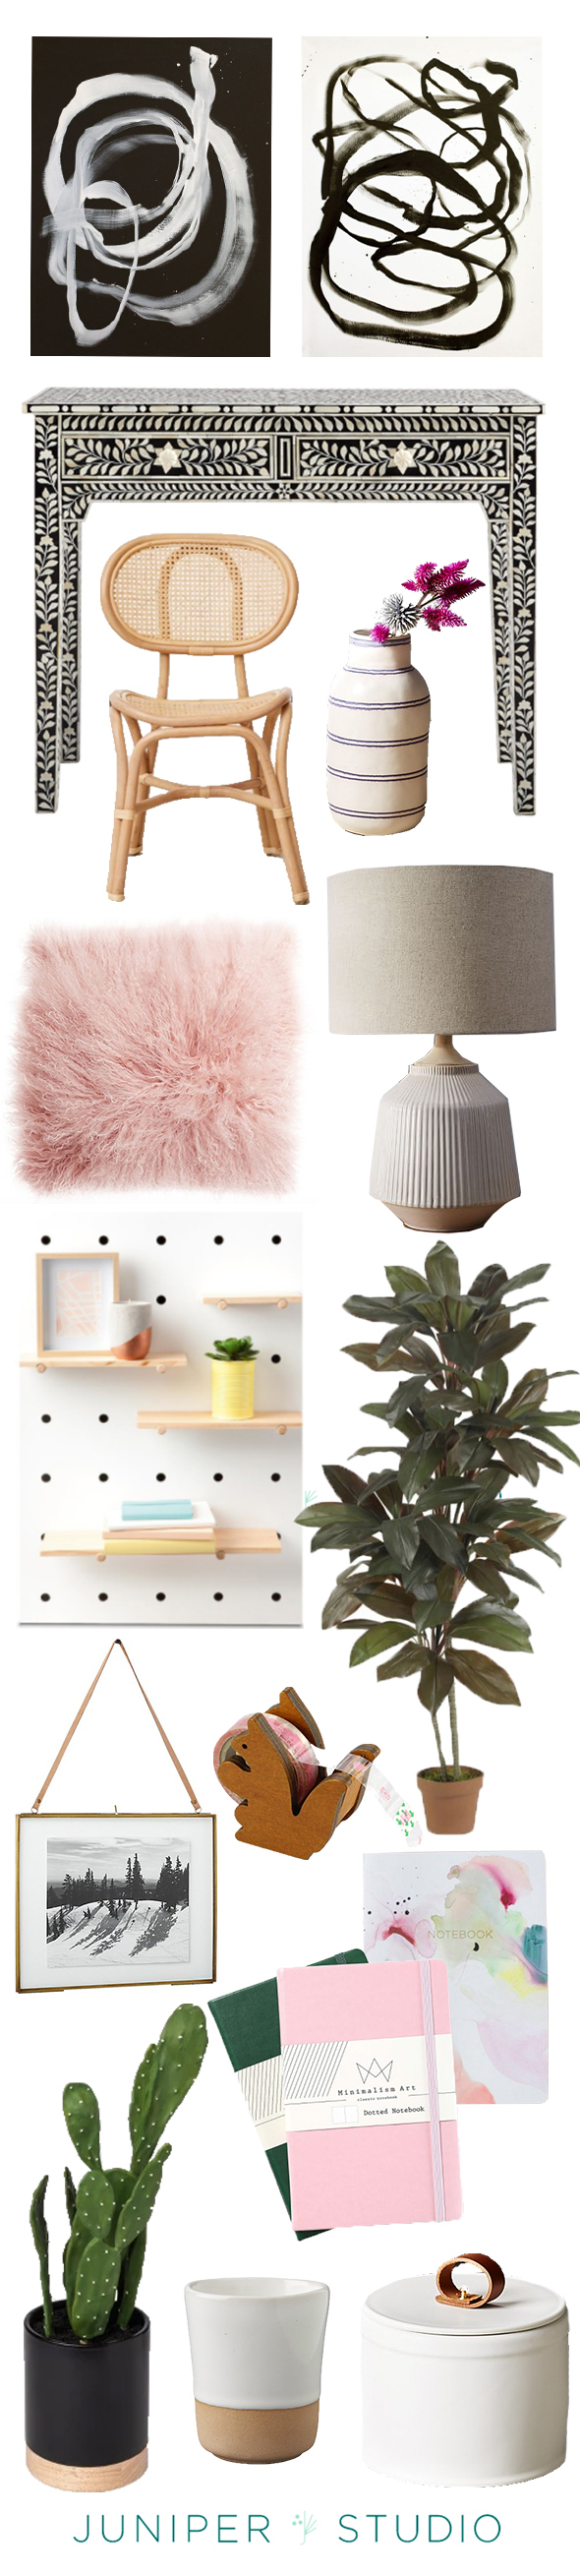
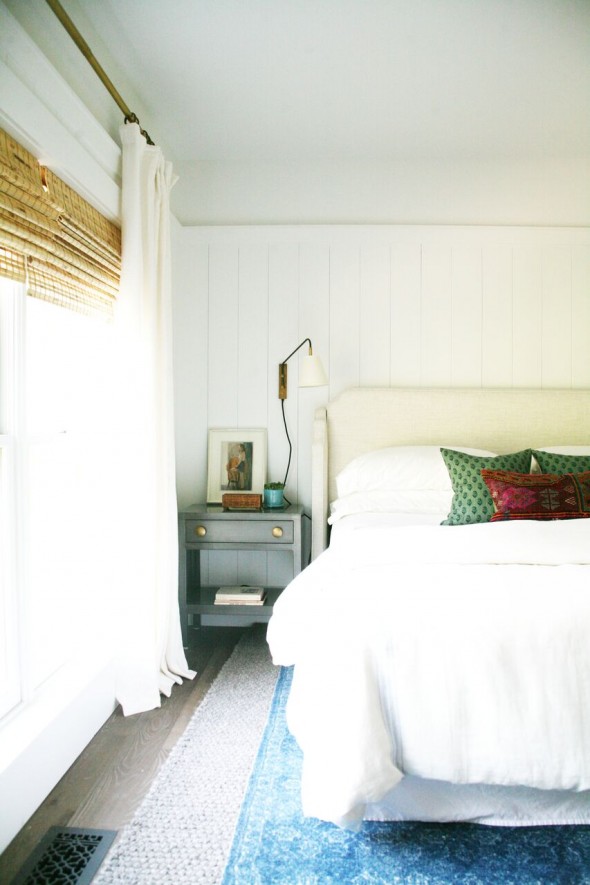
Market Trends: Texture, Warmth and Saturated Color
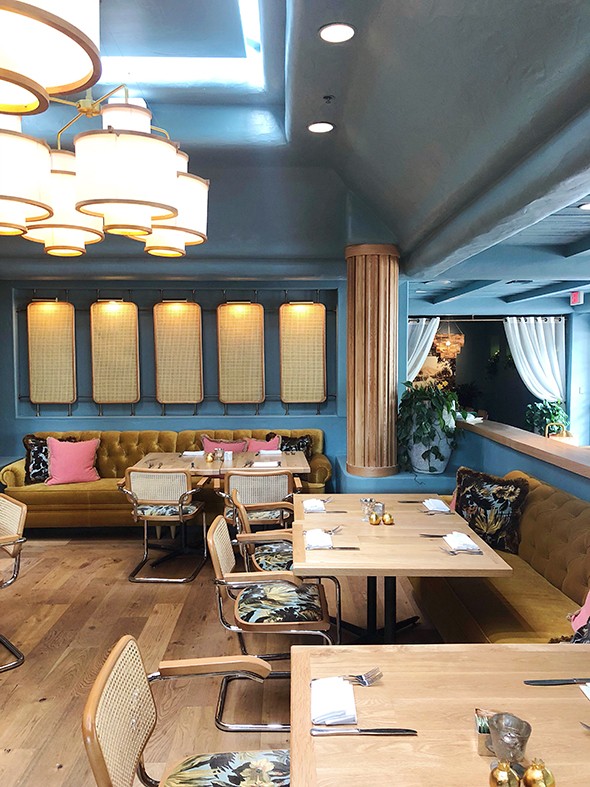
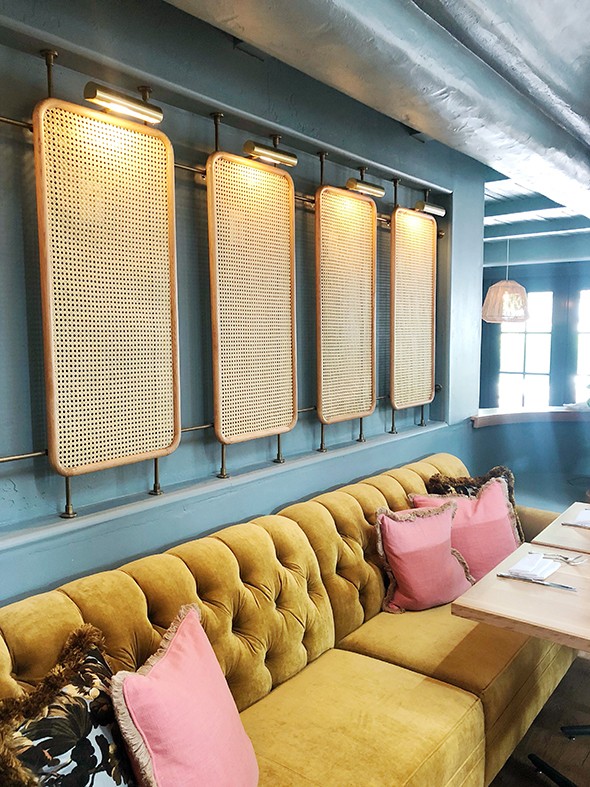
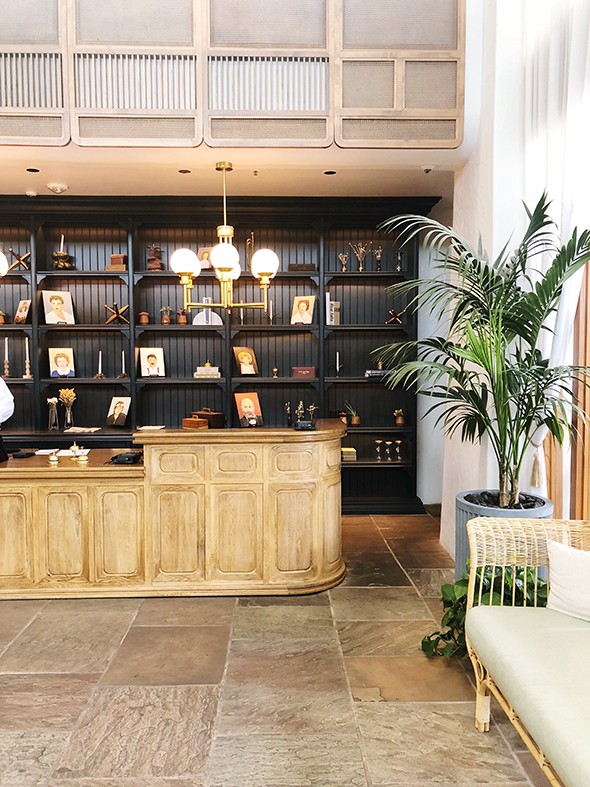
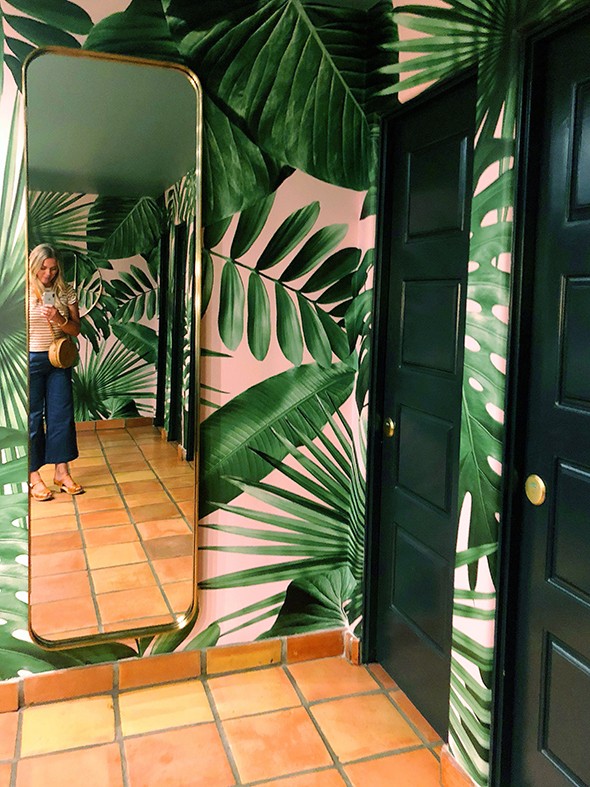
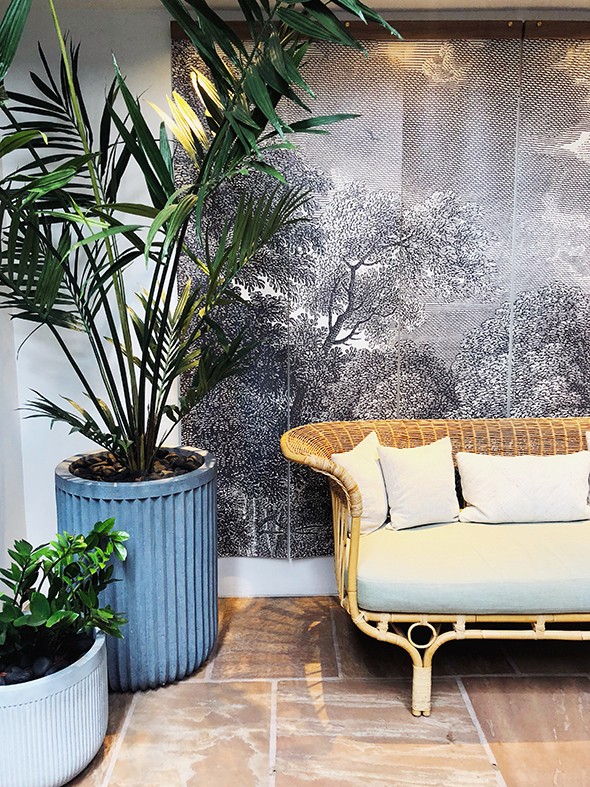
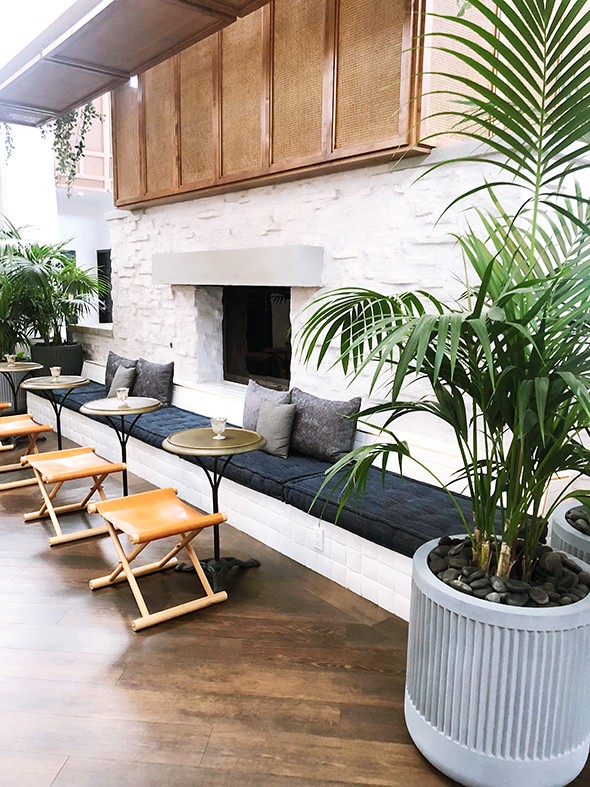
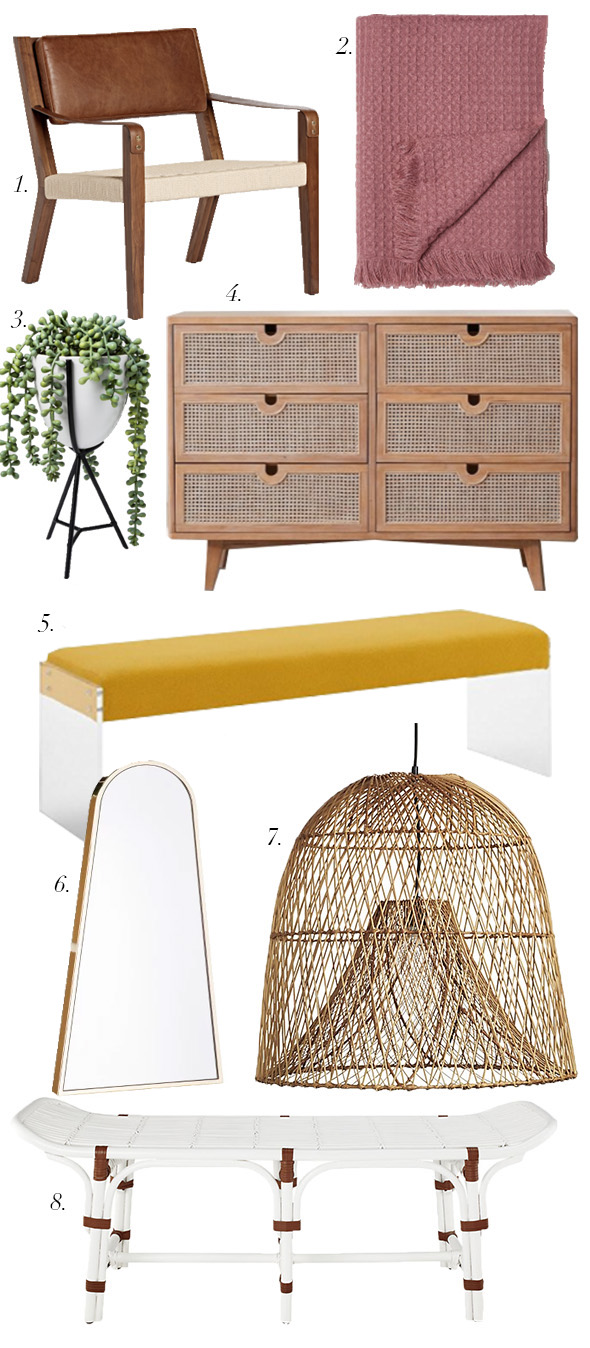
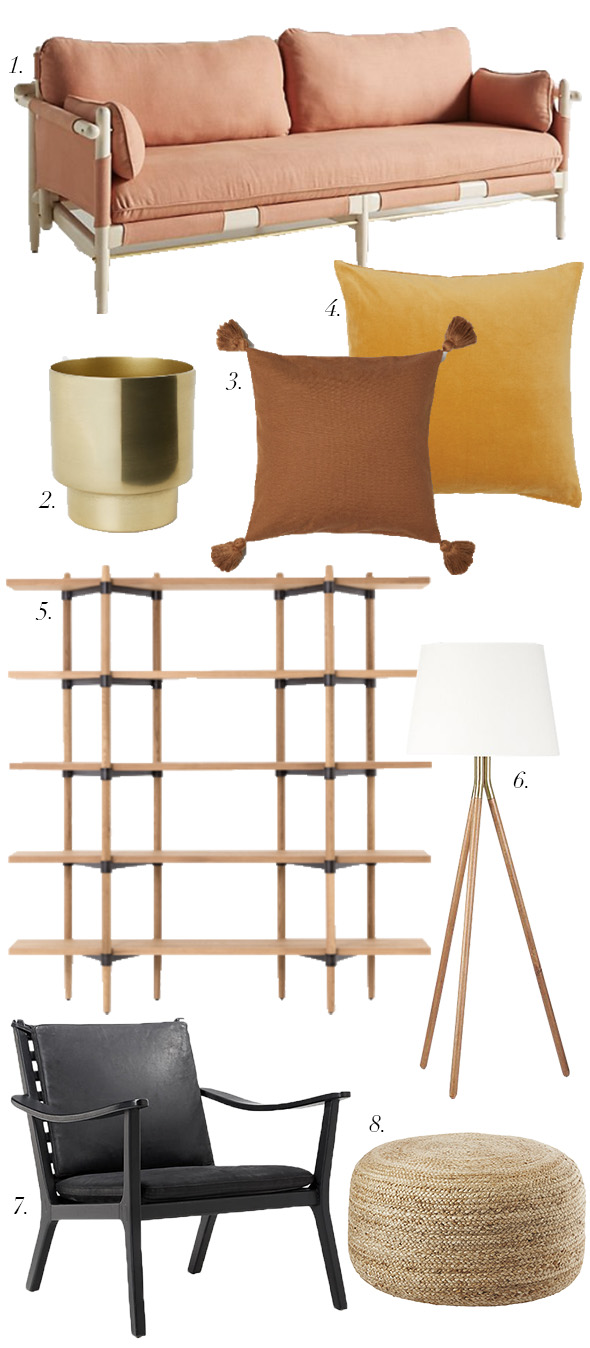
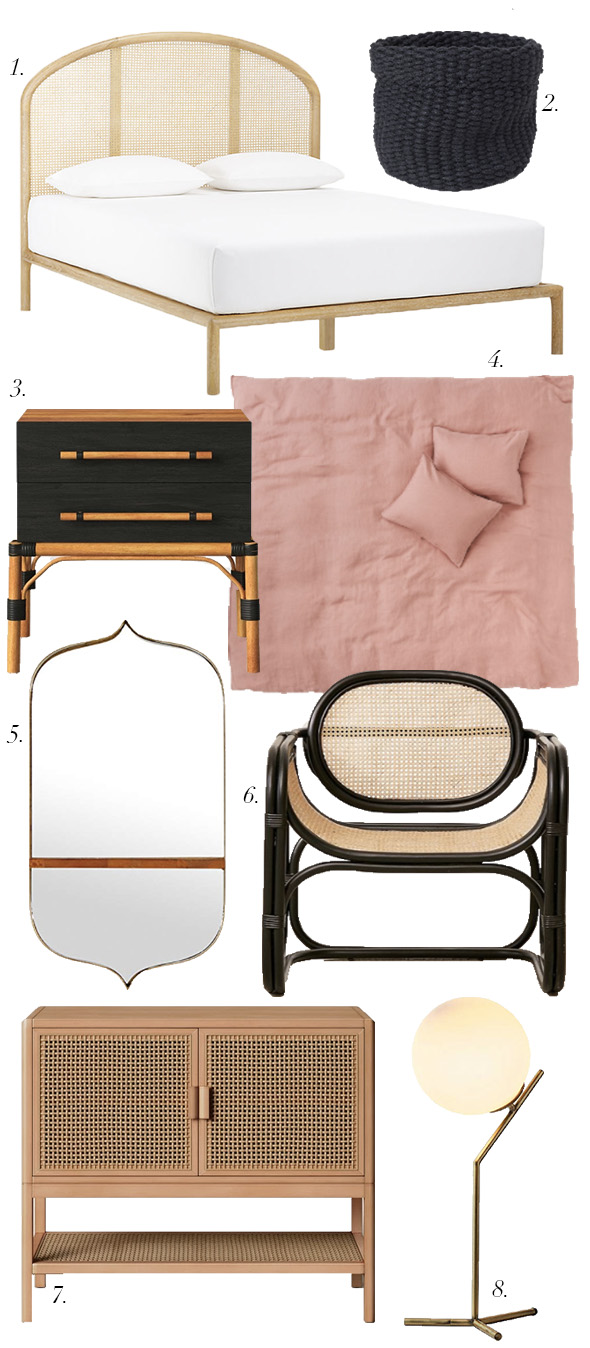
Earlier this summer, I went to Las Vegas Market (a HUGE trade show for people in the interior design field) and spoke on their Best of the West panel. One of the questions was about trends I’ve noticed this market. My answer was WARMTH, TEXTURE, MIXED METALS and SATURATED MUDDY COLORS. These are all some of my…
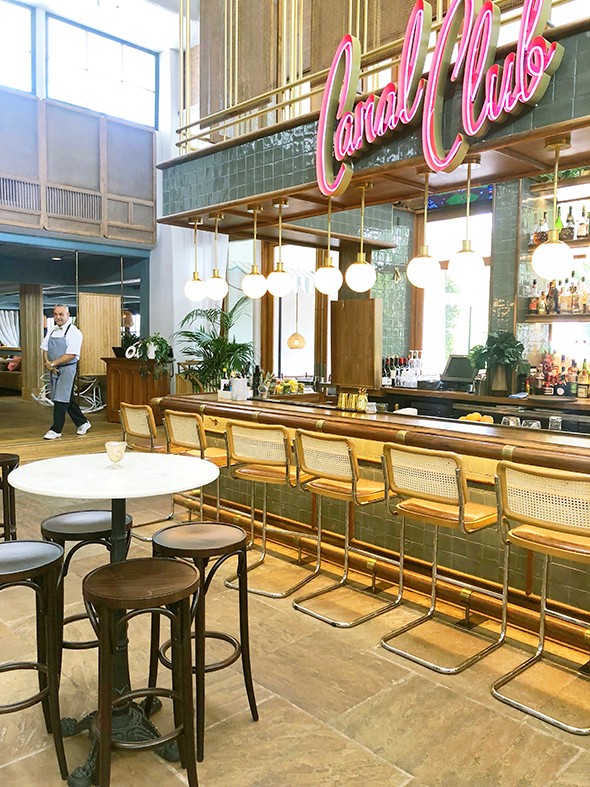
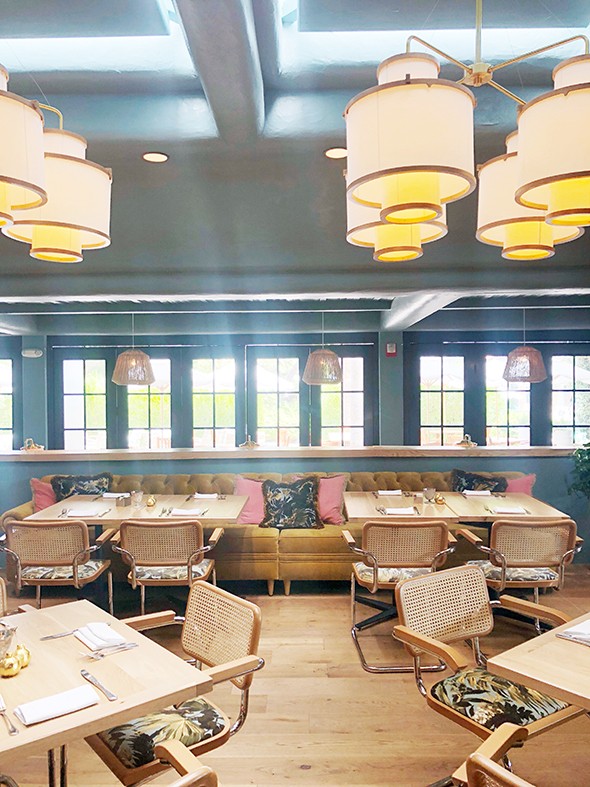
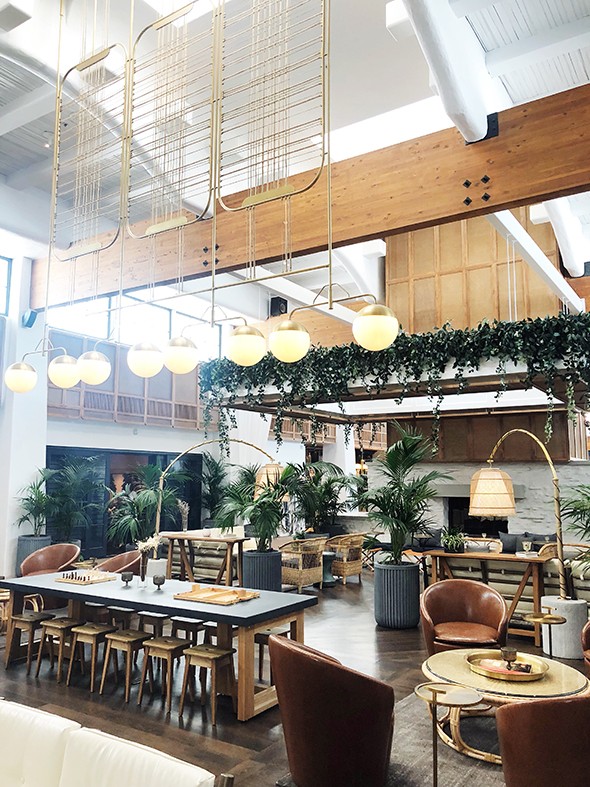
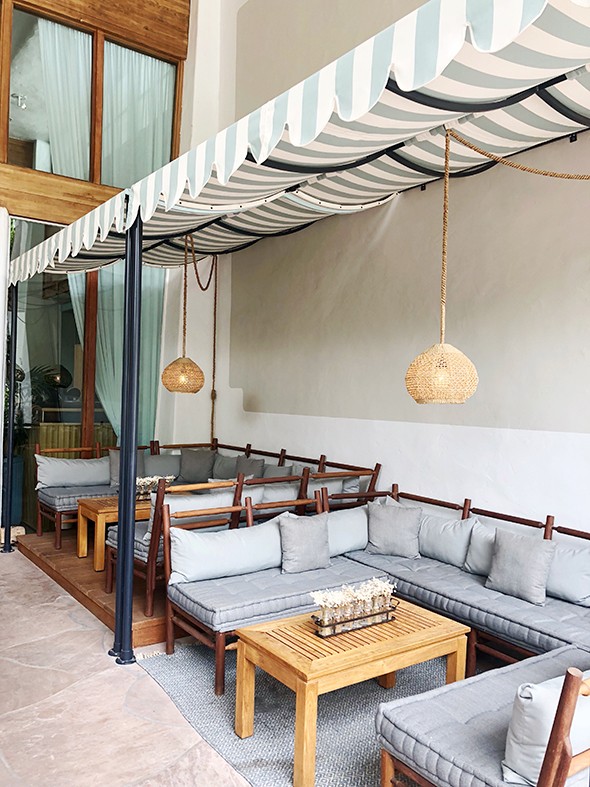
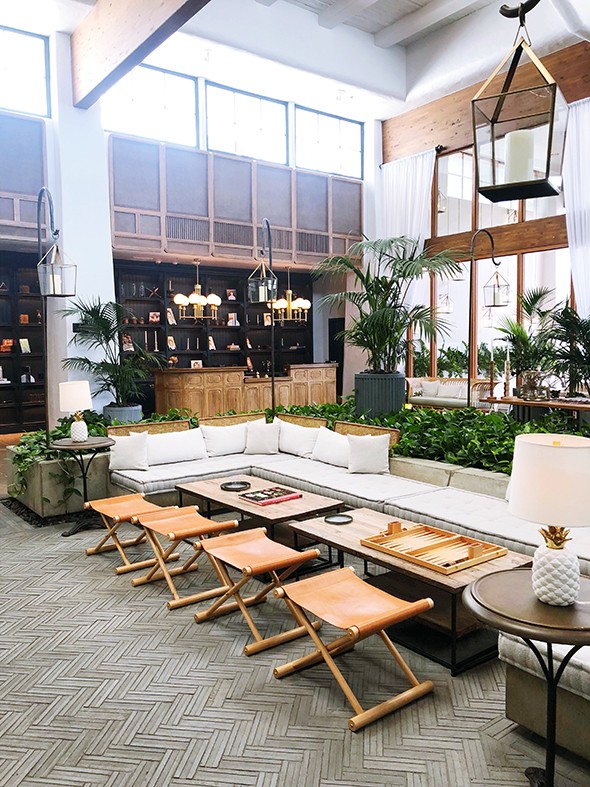
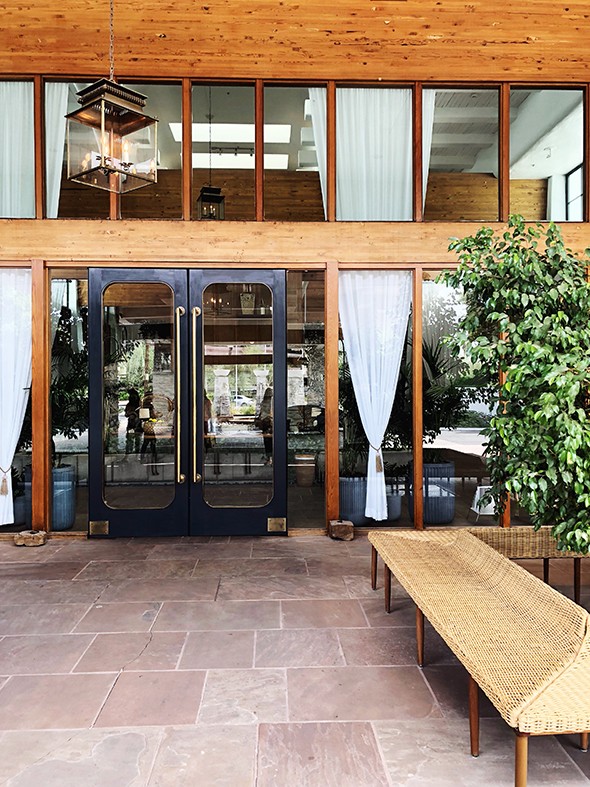
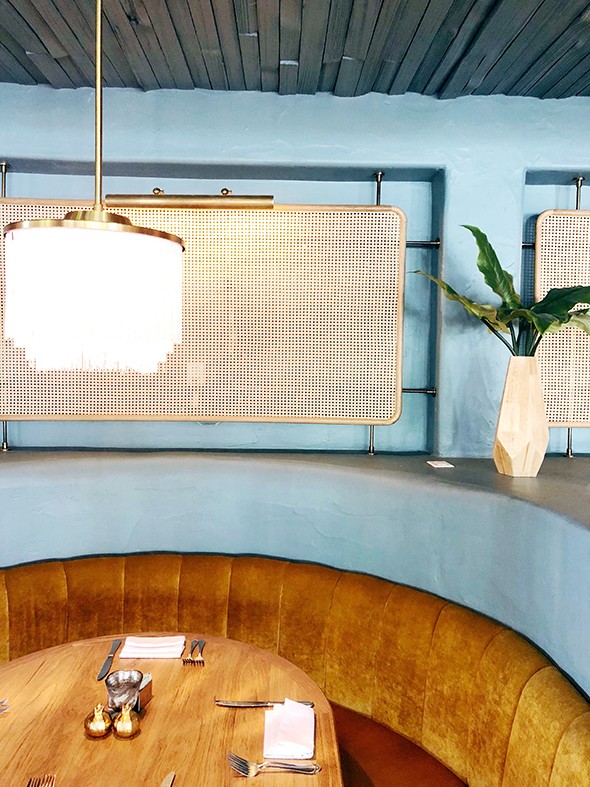
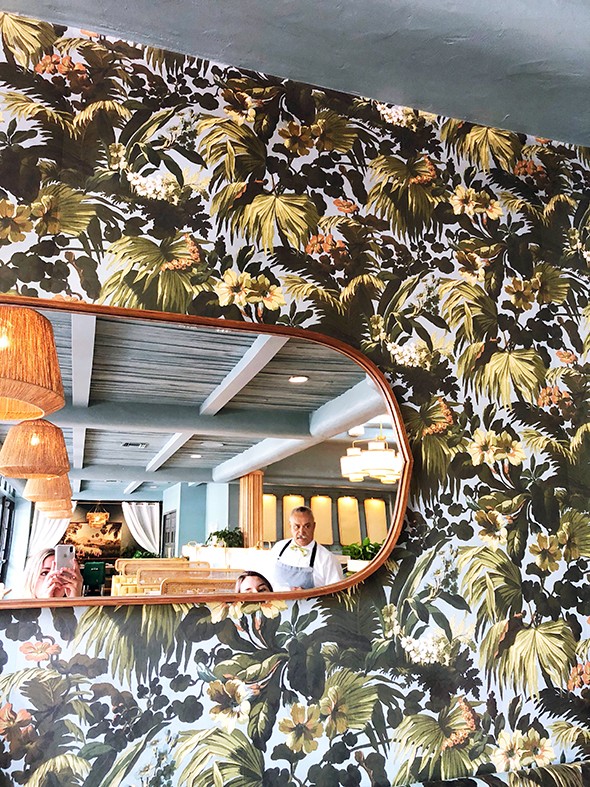
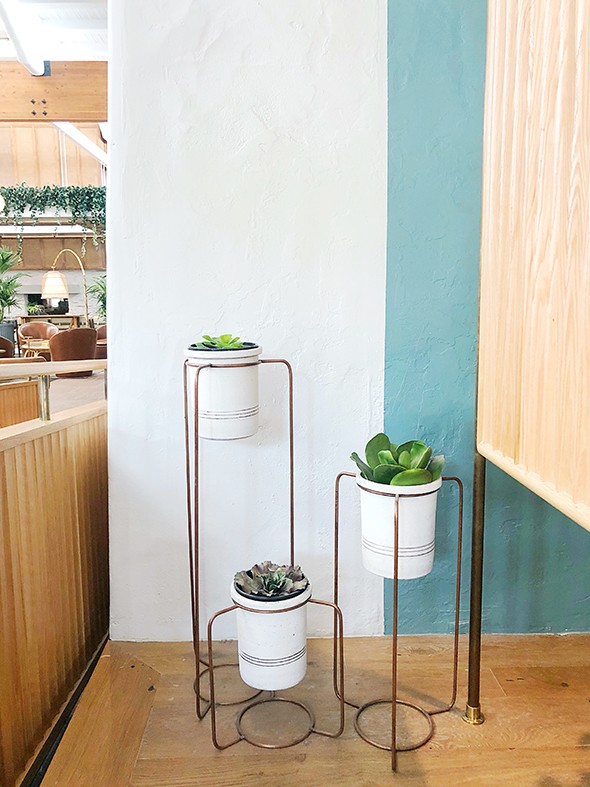
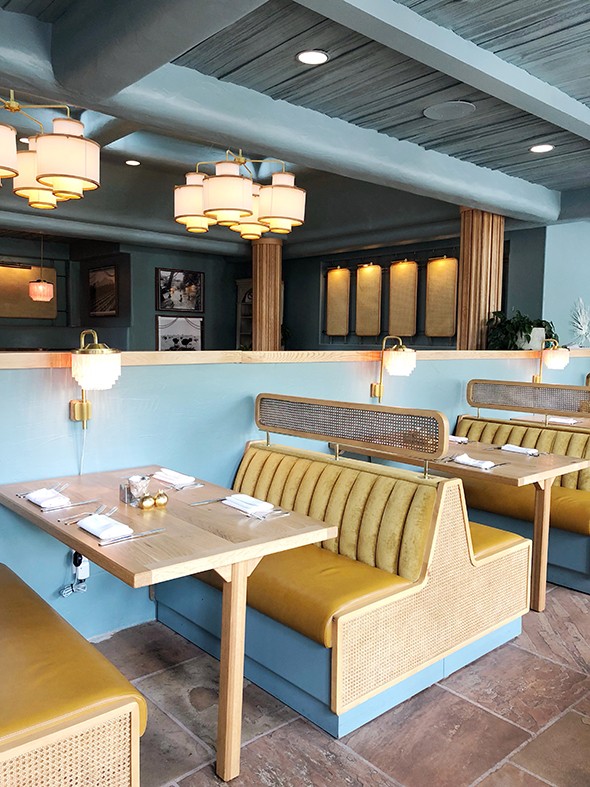
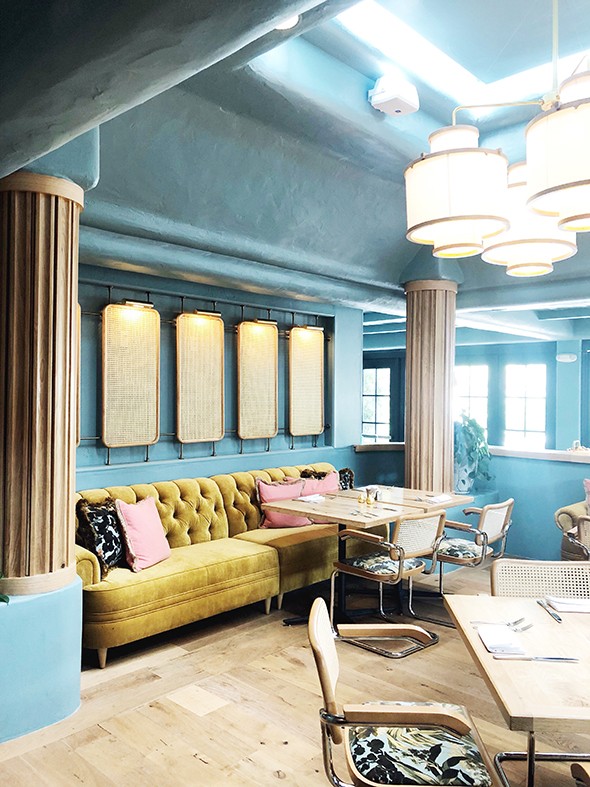
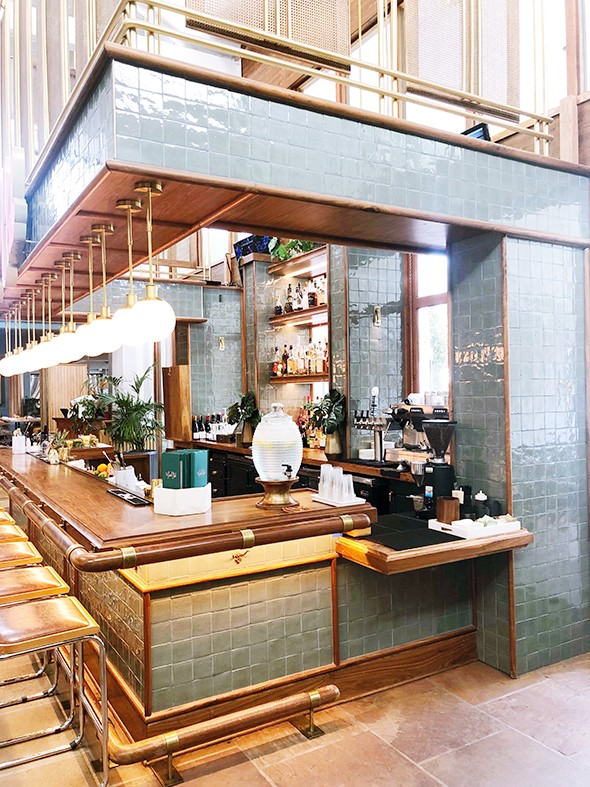
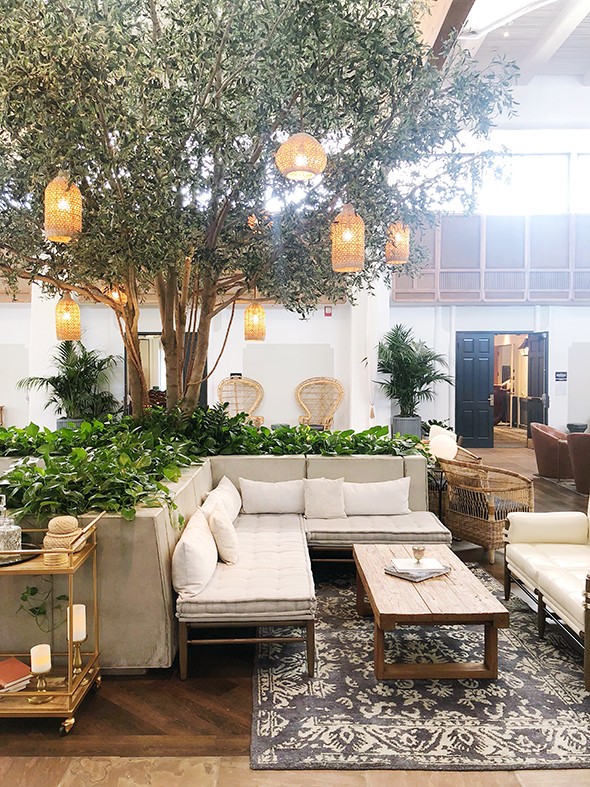
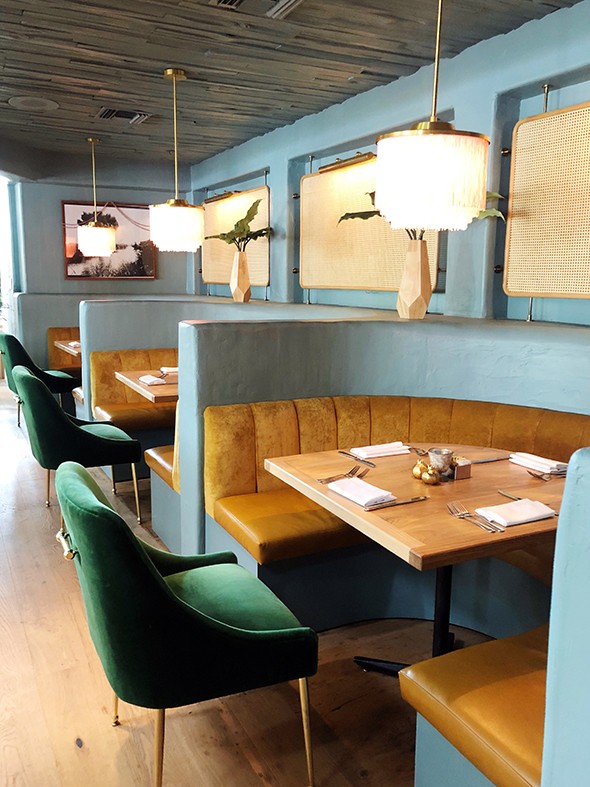
Earlier this summer, I went to Las Vegas Market (a HUGE trade show for people in the interior design field) and spoke on their Best of the West panel. One of the questions was about trends I’ve noticed this market. My answer was WARMTH, TEXTURE, MIXED METALS and SATURATED MUDDY COLORS. These are all some of my favorite things, so you can imagine how much fun I had shopping at market this summer! A few weeks later, I took my Juniper team to a birthday lunch at the newly renovated Canal Club in Scottsdale. We had heard the interiors were beautiful, but they were absolutely show-stopping! And SO on-trend!
Our waiter was very kind and could tell I was dying to snap a few photos of the interiors. They had just opened and weren’t busy yet, so he encouraged me to take as many photos as I wanted. Do you think he meant this many though? :)
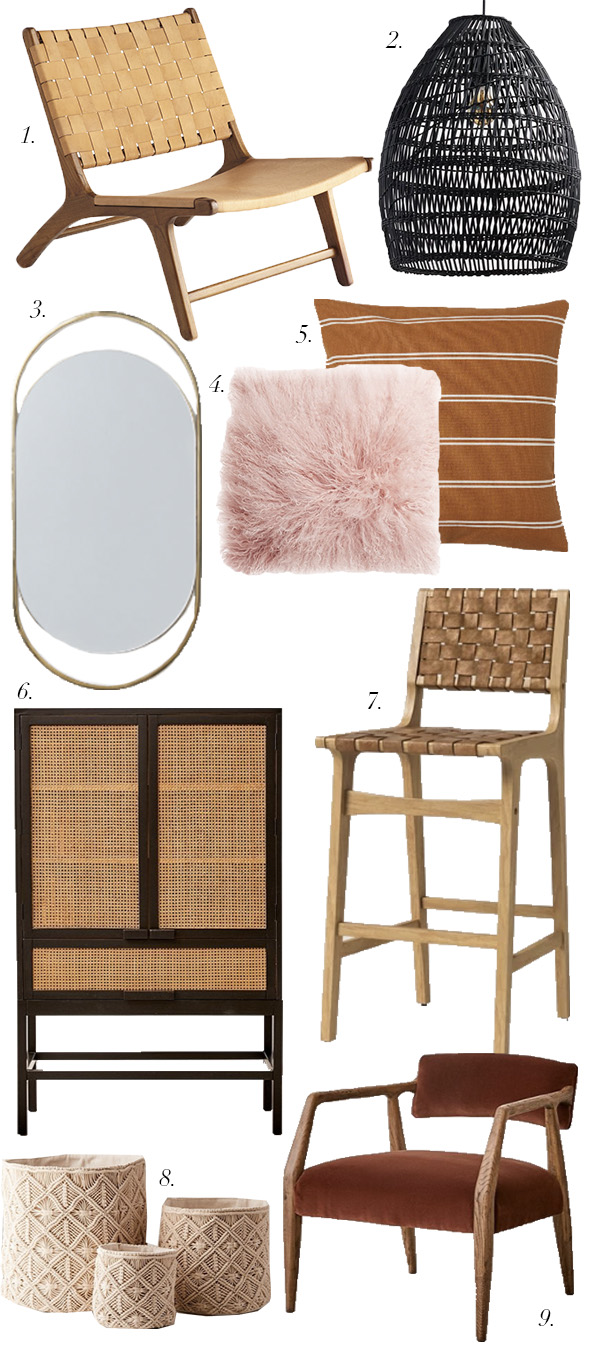
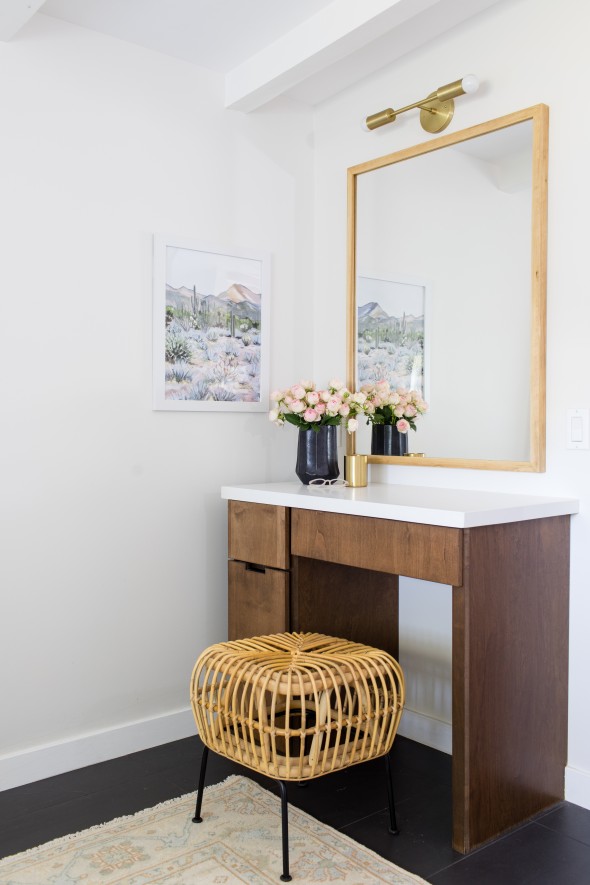
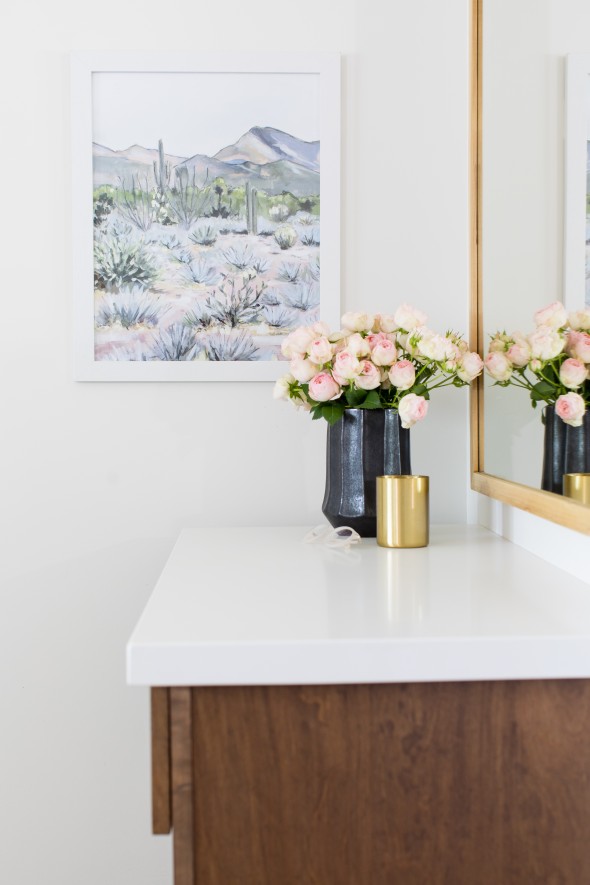
Can you even handle all this eye candy?! The food was delicious too! The Canal Club is a can’t-miss stop if you’re in Arizona any time soon! And here are some of our favorite finds that have a similar vibe. Lots of textural caning, rattan and baskets with accents of antiqued brass. Warm, muddy blues and greens with dusty rose pink and rusty copper shades. It’s all so cozy and inviting! I’m feeling SO inspired for our own upcoming home reno!
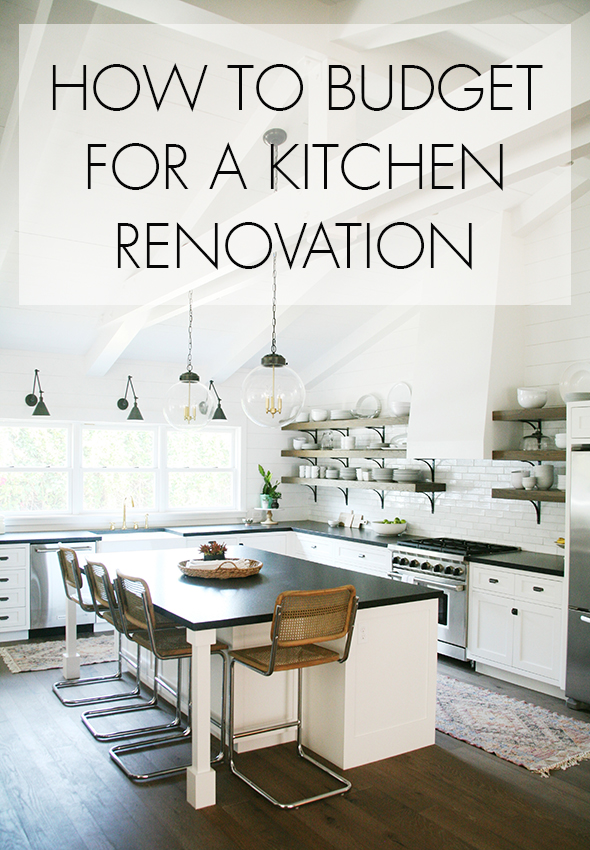
This post is sponsored by American Express Personal Loans. If I could tally up all the questions I’ve received from readers over the years, I would bet you that a big majority of them are asking about kitchen design. I get it! Renovating a kitchen can be stressful, complicated and, not to mention, so expensive! It…
If I could tally up all the questions I’ve received from readers over the years, I would bet you that a big majority of them are asking about kitchen design. I get it! Renovating a kitchen can be stressful, complicated and, not to mention, so expensive! It can often take you endless hours of research, shopping, meeting with designers, vendors and contractors to even get a sense of how much your kitchen renovation will end up costing you!
American Express invited me to put together a simple-to-use guide for kitchen renovation budgeting and I LOVED the idea! If you’re considering tackling a big home project, and if you’re an existing eligible consumer American Express Card Member American Express Personal Loans may be a good place to start.
They offer loans of $3,500 – $40,000 with no origination fee and APRs starting as low as 6.98% to eligible consumer Card Members1
Find out more about eligibility and the quick application process, plus the full terms and conditions here.
Now read on to estimate how much it will cost to renovate your kitchen! All estimates are my own.
Since there are a million different ways to renovate a kitchen, it can be tricky to cover all the different options or directions you could go. In this post, my goal is simply to show you how I budget for my clients’ kitchens, who more often than not have average sized kitchens and budgets. I literally pulled these numbers from our kitchen budgeting spreadsheet template! I will share the costs and sources that I use and leave out the options I have decided against for value and style purposes. I hope this information is helpful for you! I am using these same reference tools for my own upcoming kitchen renovation and it has really helped me zero in on my costs!
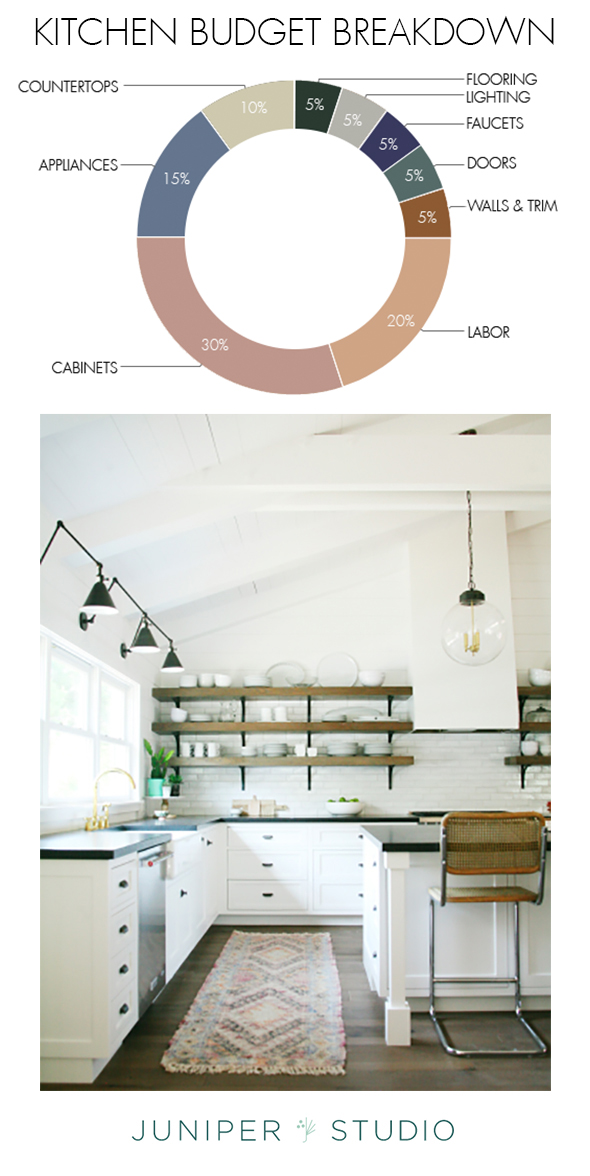
The pie chart above breaks down the percentages of where our budgets usually end up after installation. This can be helpful for you to compare when you start getting bids from contractors and vendors. I’ve found that labor ends up costing about 20% of the total budget, which is a significant chunk of change! You can lower that number if you are a DIYer and willing to get your hands dirty by doing the demo yourself or building IKEA cabinets before an installer comes, or if you’re feeling really ambitious, tiling a backsplash is pretty easy work!
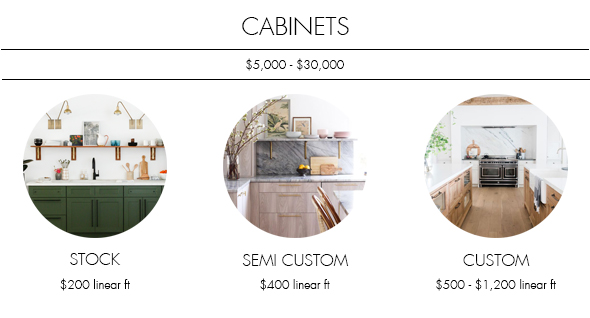
Cabinets are almost ALWAYS the most expensive part of a kitchen remodel. I usually allocate about 30% of the total budget to cabinetry. Cabinets are priced by the linear foot, so before you start shopping around, you’ll want to have a rough measurement of how many linear feet of cabinets you’ll be looking to order (don’t forget to measure the uppers separately!). As a reference point, an average size kitchen in my experience will need between 20 and 30 linear feet of cabinetry. This means nicer $200/ft stock cabinets from a hardware store in an average sized kitchen will cost about $5000 for materials and installation. The obvious downside to stock cabinetry is it is not highly customizable. The benefit of stock cabinetry is, well, it’s usually in stock and you can get your order in about a week. I went in to Lowes recently to check out their stock selection and was shocked at all the on-trend color options in the stocked lines! There was a green color I feel in love with and a driftwoody/cerused oak that were both about $200/ft and looked AMAZING!
Semi-custom cabinets, where you can buy IKEA boxes (or sometimes reuse your existing boxes) and have beautiful custom doors and drawer-fronts made by a local cabinet maker or ordered through Semihandmade, can be a really great option for detail oriented design-lovers on a budget. It’s sort of like wearing a really beautiful designer coat with a Target dress. It can feel like the best of both worlds, but my word of warning is this – the semi-custom cabinetry route usually ends up taking a lot of time (at IKEA especially! Ugh!) and a lot of coordination. At best, it will eat up a ton of your own time, but sort of the worst case scenario is it can really add up if you’re paying a designer by the hour. BUT the results are beautiful and often look more custom than stock cabinetry. I’ve found that going this route usually ends up costing about $10,000, plus or minus $2000, depending on the size of the kitchen and the upgrades you are looking for. It’s a great option if you’re not loving the stock cabinet options you’ve found, but can’t afford to go full custom!
Custom cabinets are not cheap and I’ve seen some VERY expensive jobs go south. If your budget allows for custom cabinetry, go with a very experienced local company that has a ton of great reviews. The best bet would be if you could see and touch one of their kitchens in person before committing (even better if it’s a kitchen that’s been in use for a couple years! That’s the real test!). You get what you pay for when it comes to custom cabinetry and if you’re in a position to do it, go with the best. I’d honestly rather have a client use IKEA + Semihandmade rather than spend $25,000 on custom inset cabinets that never quite line up right and with paint that starts to flake in the first year. (I’ve never had that happen btw – just stories from friends that went with a middle of the road cabinetry bid!)
As a style note, I almost always select full overlay door and drawer cabinets, where you can’t see the face frame of the cabinet. It’s a clean, seamless look and maximizes interior storage space. If you have a giant kitchen (and a budget to match), custom inset cabinets are a beautiful, timeless look. You’ll spend about 30% more for the look and lose a couple of inches of interior storage, and you might have some problems with the wood expanding and contracting if you live in areas with extreme changes in humidity, but they are really, truly gorgeous!
It’s also worth mentioning, if you’re not planning to replace your cabinetry, you can expect to pay $2500+ (depending on where you live) to have an average-sized kitchen’s cabinets professionally painted.
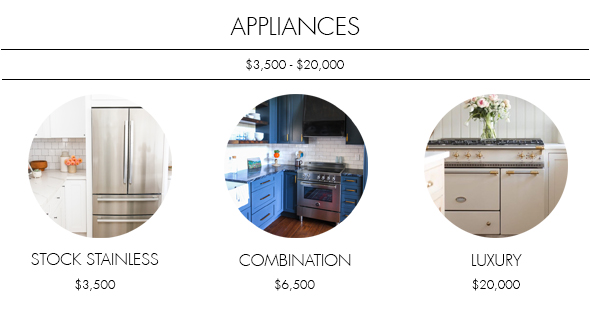
Appliances are another big ticket item and the costs can vary greatly. If given the choice, I’d go with nicer appliances over custom cabinets. I think a beautiful range especially can really elevate the feel of a kitchen! French gas ranges (like Le Cornue or Lacanche are STUNNING, but can easily cost as much as a small car. I’ve had good luck finding very gently used Viking and La Cornue ranges on Craigslist and eBay (they usually from vacation homes, where the appliances were used only a few times a year). You’ll likely need to have a technician tune them up, but it can be a great way to save thousands of dollars. These ranges are meant to last decades, so it’s worth considering finding a second hand or scratch-and-dent sale version if a new range is not in the budget or the timeline. Ordering a new one can take MONTHS and the shipping charges are not fun.
Gas ranges are wonderful and beautiful, but many homes don’t have gas or propane lines. It costs several thousand dollars to install a propane tank and line and several hundred dollars a year for filling and leasing the tank. So if a gas or propane range is not in the cards for you, I’ve used and LOVED this beautiful electric range.
If your kitchen is on the smaller side and you need a 30″ range, there are many beautiful options available online at through hardware stores. I prefer a slide-in range (so the operating panel is in the front and you can see the backsplash). Stainless steel ranges are easy to find at lots of price points, but I’ve been really drawn to black appliances lately! This line looks a lot like Viking at a fraction of the cost and is better suited to smaller kitchens.
Fridges and dishwashers on the other hand should be as simple and inconspicuous as possible. If you can spring for a panel-ready version that blends in with the cabinetry, that’s really the best of all worlds! I prefer water and ice dispensers to be inside the fridge and freezer (just for looks) but I get that it’s less convenient. My preference, if it’s in-budget, is an under counter pebble ice maker and a filtered water faucet or in-fridge water dispenser.
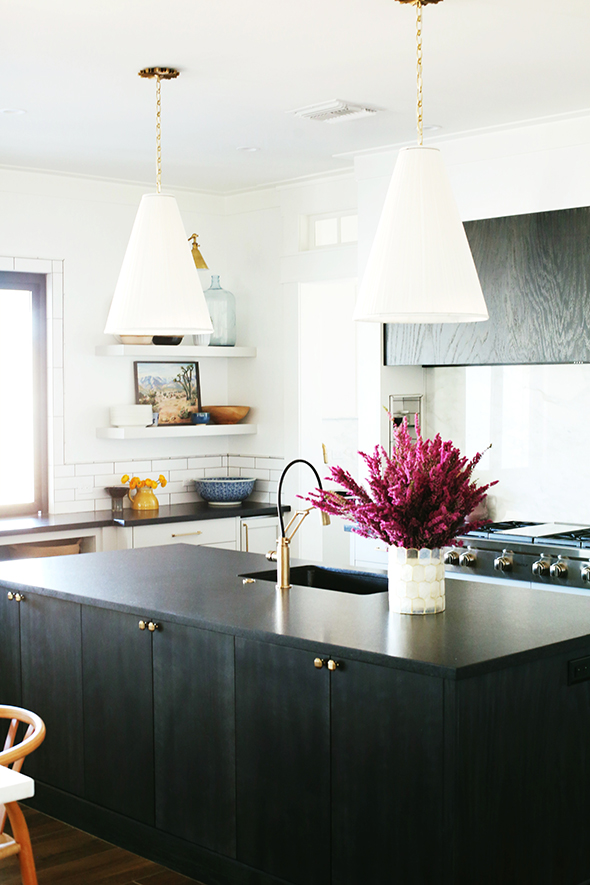
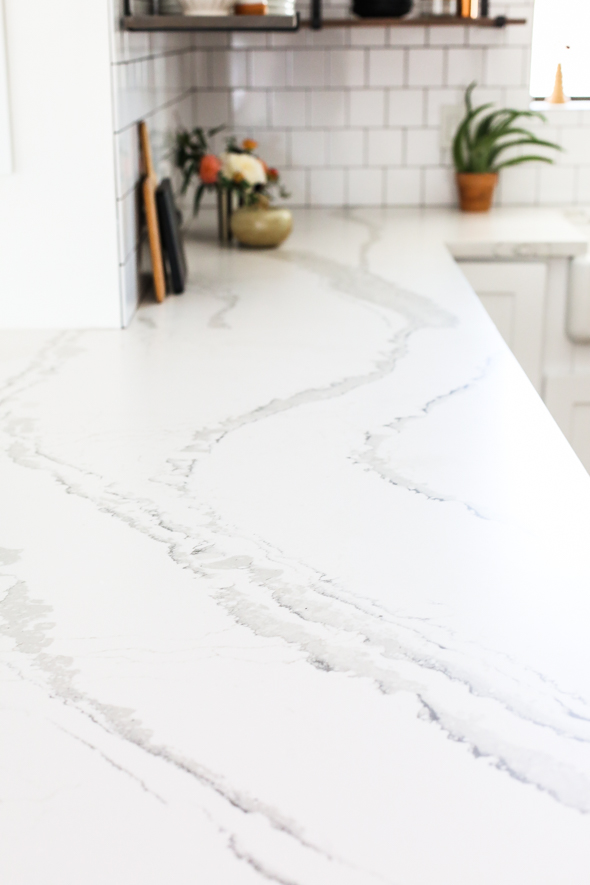
I love the look and feel of stone countertops and these are the materials I come back to over and over again. The pricing here includes fabrication and installation costs. As a general rule of thumb fab and install should be about $35/sf, again depending on the material and the design details. You’ll want to ask about additional costs for cutouts for sinks, plumbing and outlets.
I wrote a long post about countertop materials here, but in short, if you’re up for a little bit of upkeep and down for inevitable “character” that will come as natural stone slightly stains and etches, marble might be your best option. Upkeep with regular cleaning and sealing is going to be a reality with all of these choices. This is my favorite cleaner for removing etching.
I prefer honed finishes to polished because the wear better and have a softer, more matte look. Honed or even leathered black granite is an amazing option for homeowners on a budget that want real stone and really low levels of upkeep. Make sure you have a lot of natural light in your kitchen if you go with any black or dark stone tops though! They are beautiful and dramatic, but really drop the light and bright factor of a kitchen, even with white cabinets.
Quartz is an amazing countertop material option and has come SO far in the last couple of years. I loved the honed quartz we installed at our Gentry Project flip. Take extra care when choosing quartz products – the lower priced ones stain easily and are porous (which is a nightmare anywhere near a range!) Quartzite is a miracle stone, with a price tag to match, that acts like a granite (basically indestructible) but looks more like a marble. Lower quality quartzites can crack and crumble, so make sure you’re getting a good quality slab series. Black soapstone has the most beautiful chalky finish and really pretty, subtle veining. It is not as durable as granite, but it’s prettier. It does require less upkeep than marble, but not much.
I didn’t include poured concrete countertops here, because they usually end up costing as much or more than stone at around $75/sf installed. I also left off butcher block and wood counters, because I haven’t used these in my own kitchen designs, just in laundry rooms. They also seem expensive to me compared to the longevity of stone at around $55/sf installed. That said, I love the warmth of wood materials in kitchens and prefer to add that through floors, cabinets, shelving material or accessories like large bread boards.
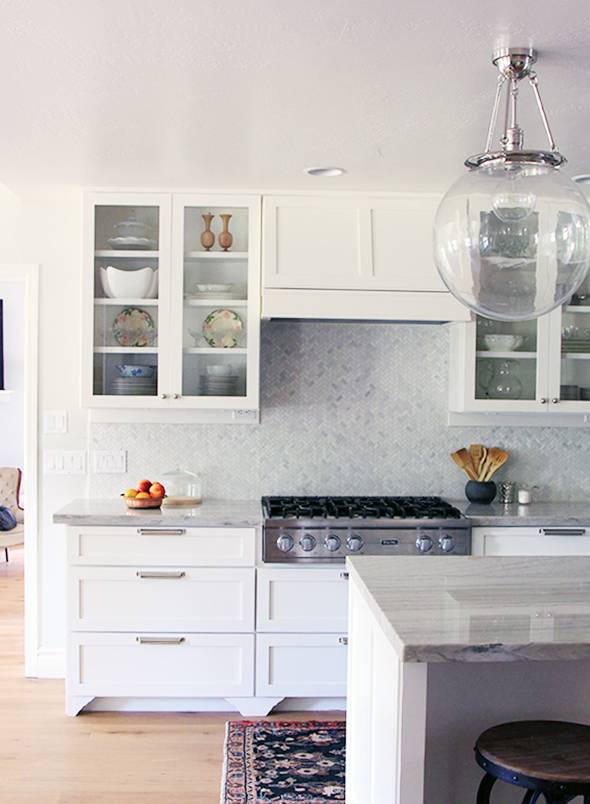
In my experience, hardware for a full kitchen will usually cost a few hundred dollars and it’s money well spent! Even super old and dated cabinets look good with a paint job and new hardware! I love the warmth of brass tones and usually start there for kitchen design, but if we are looking for a modern spin, I like using matte black hardware. I like to use polished nickel for more traditional or formal kitchens. Lately I’ve been drawn to painted or stained round wood knobs too.
Mixing metals is ALWAYS a good idea to make a space feel layered and balanced. Just remember you should try to stick with just two finishes in the installed fixtures, but you can add one more finish in the accessories if you feel like it!
I usually select pulls for drawers and only use knobs for top drawers and upper cabinet doors. You can install longer pulls for a more modern look, or double up the knobs on the top drawers for more function.
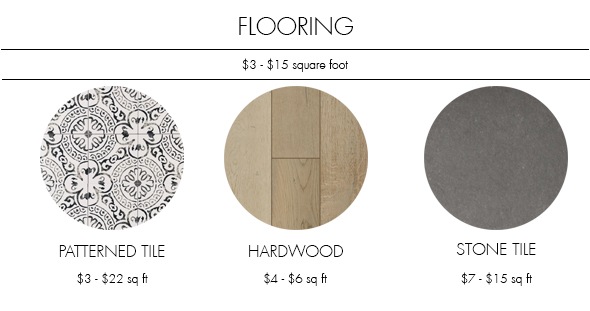
Flooring in a kitchen space is a lot like countertop selection. Hardwood is GORGEOUS in a kitchen, but just like marble, it is a little more risky and has the potential to end in disaster if your fridge, sink or ice maker starts to leak. If you can accept the fact that you might have some minor or major repairs to make in the future, buy a couple extra boxes of your hardwood and cross your fingers and toes.
If you’re a little less adventurous (or if it’s impossible to match the rest of the flooring in your house), you might want to go for a patterned tile floor. I’ve heard concerns about it being trendy, but people have been installing colorful patterned tiles for hundreds of years (cement tile specifically has been around since the 1850s!), so I think you’ll be safe for the next 10-20 years. :) Just go for something in a traditional pattern and maybe even more neutral tones and I think you’ll be happy for years to come. Cement tile options are not cheap at usually $18-25/sq ft, but if you are will to look around a little you can find better deals at the under $10/ft range. Also there are new ceramic patterned tile options every day it feels like and they usually cost between $3 and $8/sf and require less maintenance than real cement tiles, which need to be sealed every year.
Slate or other stone tile options are pricier and can feel a little cold underfoot, but they are beautiful and a completely classic choice. They’ll look as good as new for decades to come and I think you’ll love them for as long.
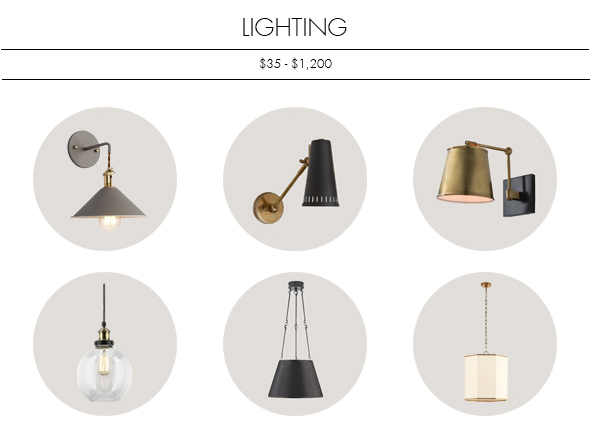
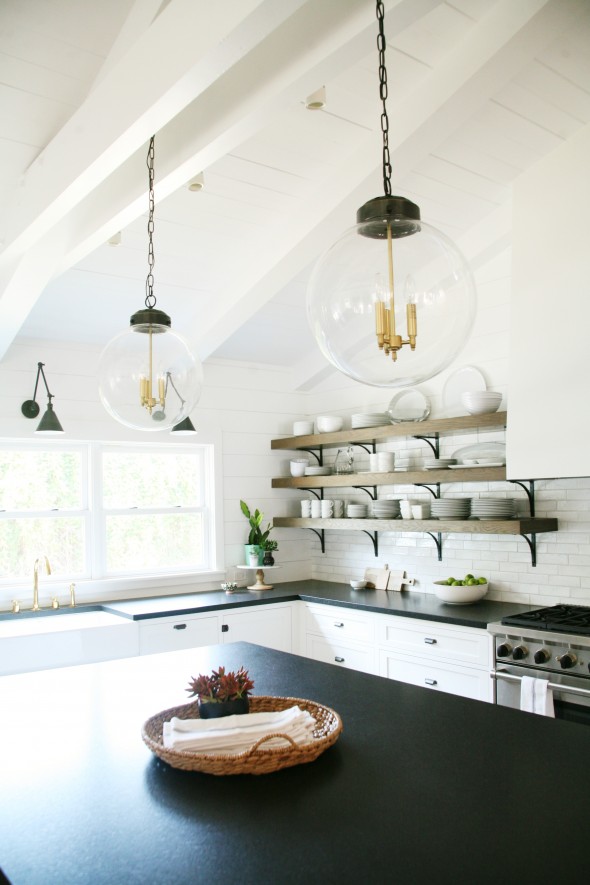
Prices for decorative light fixtures can vary wildly, from $35 for a sconce to several thousands of dollars for a single chandelier or pendant. I usually budget about $2500 total for all decorative lighting purchases, which usually ends up being three or four sconces over open shelving and two or three pendants over the island. Under-cabinet lighting is an option that I don’t always go with, but if my client loves it, we usually spend about $1500 in lights and installation.
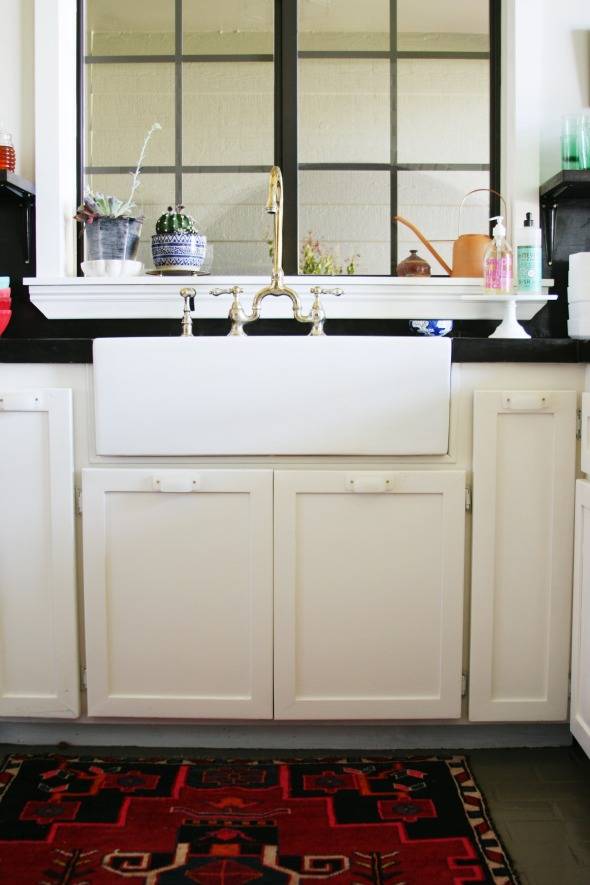
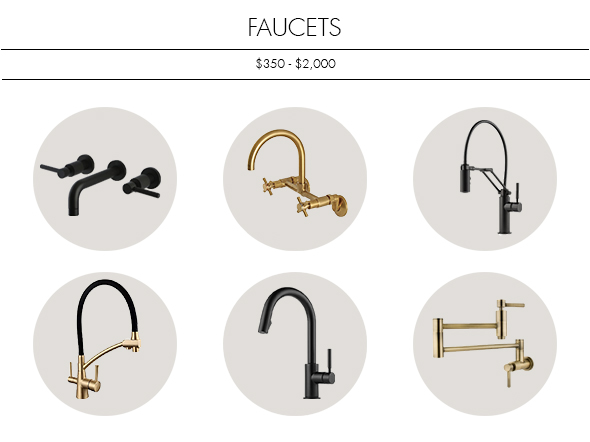
Faucets are one of my favorite places to splurge in a kitchen design. A great French range and a beautiful brass faucet can make IKEA cabinets look downright luxe! I love all types of faucet designs, and usually focus on the style of the space when we make our selection. Though I love installing both, single hole faucets are easier to use and to clean around than bridge faucets. I usually stick with deck-mounted faucets for my primary sink and use wall-mounted for my prep sinks or pot fillers.
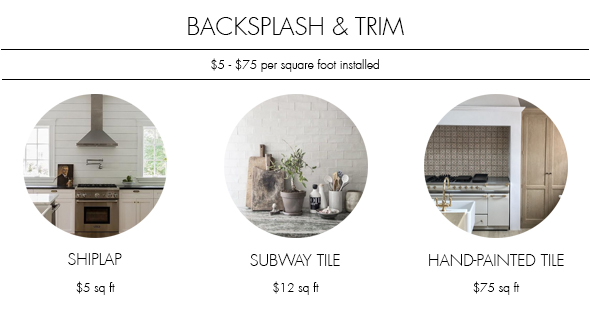
I included only tile options here, but one of my favorite and more modern backsplash treatments is to run the countertop stone up the wall. Even if it’s just 12 or 18″ of stone, the look will be custom and seamless and you’ll love how easy it is to wipe down!
Shiplap can be a great option for a backsplash. Your contractor can help you choose a material (I recommend Hardiplank) that is safe for behind a range. Just make sure you use a semi-gloss paint so it can be wiped! Consider doing a vertical installation for an updated look too!
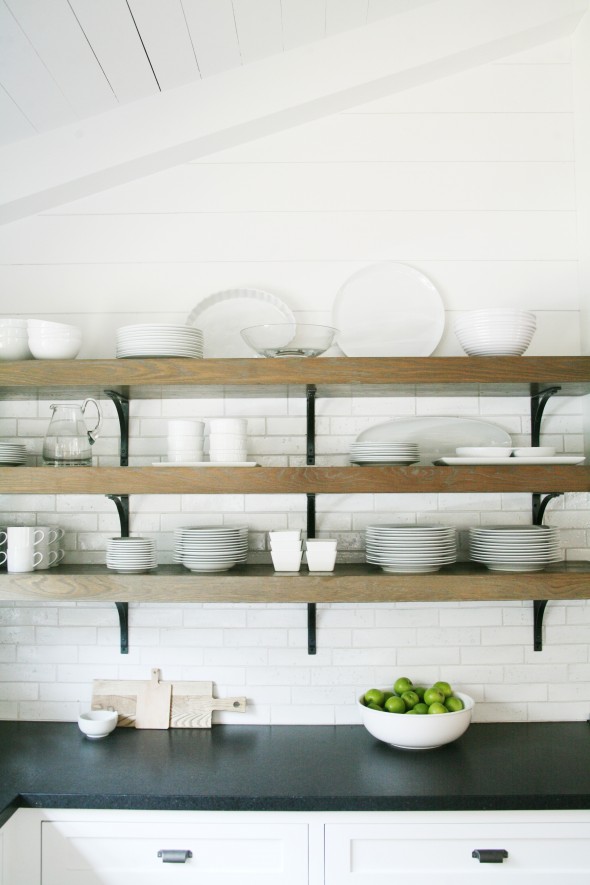
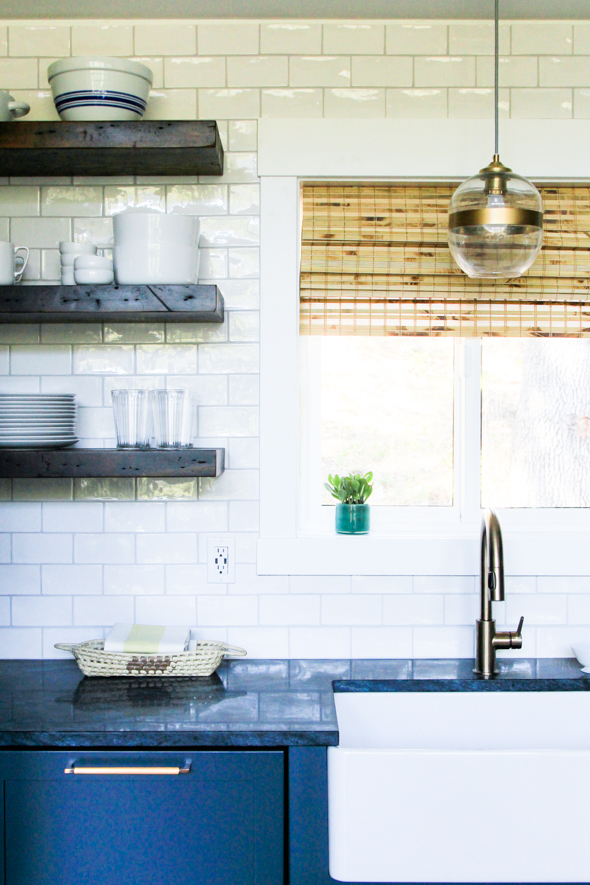
Handmade subway tile is one of my go-to backsplash selections! It has a traditional, organic texture that reminds me of painted brick (which is also one of my favorite backsplash materials if the budget allows!). You can find options at under $10/ft that make it usually a pretty small investment for something you’ll look at and enjoy every single day! If you’re budget doesn’t allow for that splurge, stick with standard subway tile, which ends up being only about $1.20/sf.
Hand-painted tiles are INSANELY expensive. Most of the really good ones are $50-100+/sf. They are little works of art though and if you can scrape together an extra $800-1500, that would be my choice every time for a range surround backsplash! I like the tiles in a smaller application anyway!
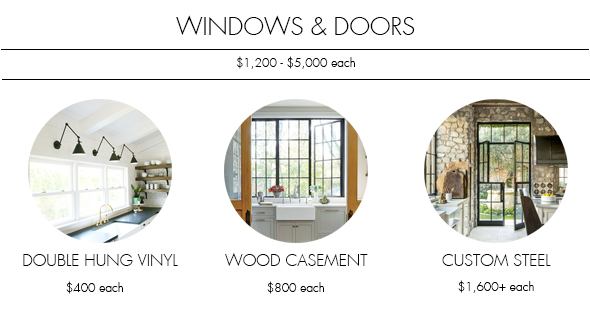
I love a good casement window for quickly sending the perfect fresh breeze through a kitchen! Double hung windows work fine too, though even sliders are slightly easier to move while leaning over a countertop. The cost of windows has a lot to do with the material of the frame. Vinyl is a good budget open, though I prefer wood or wood-clad (which is wood on the interior and fiberglass on the exterior), though the cost jumps up a bit for this elevated look. The most expensive version of all, but the most beautiful by far, is custom steel windows. A wall of these thin framed beauties can easily cost more than $10,000, but what a feature!
For doors, I love to source antique doors for pantries at salvage yards or on Craigslist for less than $300. Good exterior doors (if you have one in your kitchen -or two like I weirdly do??) run about $900 for a single door or $1200 for a more basic fiberglass French door set. A gorgeous custom iron or steel door will easily cost $5000+ for even the most simple designs in a standard 8′ size.
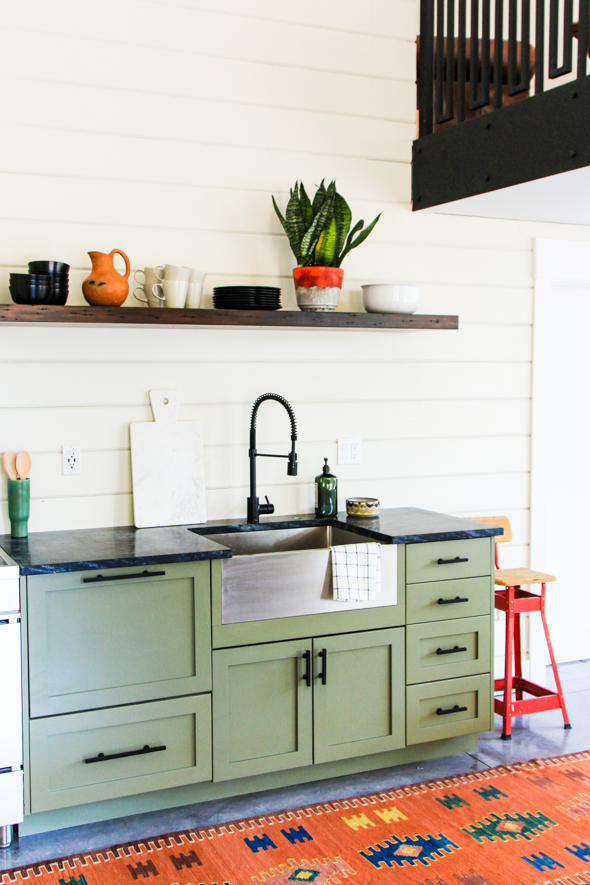
I know runners aren’t exactly a necessary item in a kitchen renovation, but we always plan for one or two in any kitchen reno budget, because they add SO much warmth and character to space that can easily feel harsh and cold otherwise! Vintage or vintage looking is my rule of thumb when shopping for kitchen rugs and these are a few of my favorites here. I try to keep the price under $350, but sometime you find a runner worth splurging on!
Bread boards also fit into that category of “not necessary, but necessary.” Not only are they actually functional, but they can be gorgeous works of sculptural art – my favorite type of home accessory! The warm tones of the wood can really help soften a kitchen.
That’s it for my EPIC KITCHEN BUDGETING POST!! Five stars for you if you managed to make it this far! Like I mentioned before, this is absolutely not meant to be a universal guide for every person on the planet. This is just me, sharing what I do and what I spend for my kitchen projects – it is highly subjective material! Please feel free to ask questions in the comments and I’ll do my best to keep on top of the answers.
And of course, a HUGE thank you to American Express for sponsoring this novel of a post! Don’t forget to head on over to their site to learn more about their Personal Loans, available to existing eligible consumer American Express Card Members. It could be a great place to start for Card Members who are looking to tackle a kitchen remodel.
1 American Express Card Members must be pre-approved for a loan offer in order to apply. Pre-approved APRs and loan amounts are based on the Card Member’s creditworthiness and other factors. Pre-approved APRs will be between 6.90% and 18.97%, as of 3/2/2018. Not all Card Members will be pre-approved or receive the lowest APR or the highest loan amount.
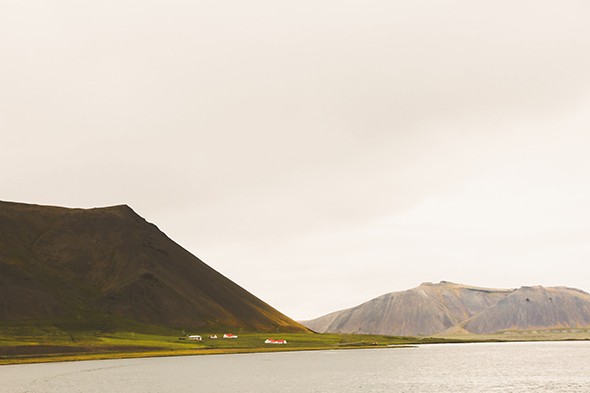
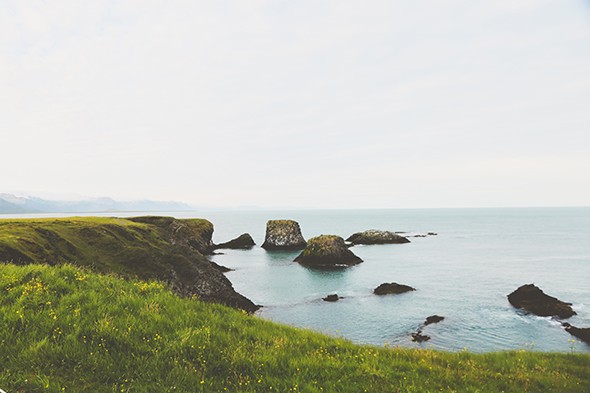
This summer, Michael and I took our three oldest girls (ages 8, 11 and 12) on a two week adventure to Scandinavia. Many of you followed along on Instagram (I’ve saved a lot of the stories in my highlights) and I got about a million messages asking for details on how we traveled with only…
This summer, Michael and I took our three oldest girls (ages 8, 11 and 12) on a two week adventure to Scandinavia. Many of you followed along on Instagram (I’ve saved a lot of the stories in my highlights) and I got about a million messages asking for details on how we traveled with only our backpacks and questions about what we saw, ate and loved the most. So here it is – an epic brain dump all about our life-changing trip! I hope you love it, and enjoy the photos I’m sharing here, which are all now listed on Jenny’s Print Shop! Yay! :)
In general, if you book either six months in advance, or sometimes at the very last minute, you can get insane deals on airfare. Using Google Flights, we booked a different airline for each leg and saved thousands by adding an extra layover in the states and, most importantly, by bringing only one carry-on backpack each. Checking luggage on European flights can get really pricey (like $300 per bag, per leg!). We lived in Brussels for a few months years ago and I famously overpacked for our time there and paid almost $1000 just to get our luggage home. Yikes! Ever since then I’ve been a committed light packer for trips. I might not be the most glamorous one on the trip, but I’ll be the least stressed out and the first one out the door! Packing light is the only way to go, especially with kids in tow.
Here is a list of what we packed! We did laundry only once while we were in Stockholm, which ended up being sort of a joke. We thought it would be easy to find a laundromat in such a big city, but the government provides laundry machines in every apartment building, so there is literally only ONE laundromat in all of Stockholm! Ha! Luckily the service was quick and great and we were thrilled to have all clean clothes again before leaving for Iceland!
1. Chambray Shirt – My goal while packing was to have one shirt for every day of one week and three pairs of pants. This chambray button up is my absolute favorite and goes with everything.
2. White Converse – There is a major trend for wearing white tennies with dresses, so I felt like my comfotable white converse were a good packing choice (and they were great!) I felt cute, but still really comfortable while clocking about 15 miles of walking every day!
3. Straw Bag – I got this bag at the beginning of the summer and it has been my most complimented purse I think, ever! I love that its light and small but roomy. It was perfect for this trip and I’m still using it now at home.
4. Wide Leg Pant – I have these cropped wide leg pants in literally every color they sell. They’re so affordable and they wash well. I feel cute and put together in them and they look great with tennies and sandals!
5. Military Parka – This parka is less than $30 and is the perfect layering piece!
6. Gold Hoops – My tried and true favorites. I’ve been wearing these for almost a year now and feel special wearing them, which is funny because they are NOT expensive!
7. Black High-Rise Jeans – High-waisted but not too high, these are my favorite jeans and my favorite cut! Black jeans are so versatile and I was glad to have them on this trip!
8. Black Sandals – I normally reach for brown leather sandals, but I found a pair of these EXTREMELY COMFORTABLE walking sandals at a local store and bought them specifically for the trip and they were an absolute dream to wear. It felt like I was wearing crocs! Ha!
9. White Oxford Shirt – Just like my chambray button up, a white oxford is hard to mess up. It’s classic and looks so cute tucked in or out or tied in a little knot!
1. Navy Parka – Guys, this puffer was my best purchase for this trip! We only really needed jackets in Iceland so this one was a great purchase because it comes with a little storage bag you can cram the whole jacket into and then hook on our backpacks! I got one for every member of the family at this price!
2. Arc Earrings – Since I was wearing mostly solid color and neutral tops, I wanted to have a few fun jewelry pieces to dress up my wardrobe. These statement earrings made my casual outfits feel dressier!
3. Black Midi Dress – It doesn’t look like it much here, but this midi dress is MAGICAL. Every woman should have one! The fabric is light but not sheer and the cut is extremely flattering! I LOVED this for hotter days in Copenhagen and for layering in Iceland when we went to church!
4. Nude Sandals – These sandals look like my beloved Madewell sandals that are comfortable but not for walking alllllll day. I picked these up and was so glad I had them! They were insanely comfortable!
5. Bandana – I didn’t bring a curling iron with me, so I wore my hair up in a top knot or in a braid for much of the trip. I brought a bandana with me last minute and I ended up wearing it in my hair or around my neck most days. Fun!
6. White Pullover – This sweater is a WINNER. I bought it in ivory, black and lilac. It is the perfect fit and the perfect weight! I brought my ivory one for the trip and wore it every travel day (I freeze on planes!). It is so comfortable.
7. Ray Ban Sunglasses – These are my forever favorite sunnies. They are classic but the shape is not instantly recognizable the way Aviators and Wayfarers are. They are not too big and the gold frames look luxe but understated. I love them to the moon and back.
9. High-Rise Jeans – This is the other pair of jeans I brought. I have THREE pairs of these jeans!! They are SO flattering and they are on sale for less than $30! The vintage-looking side seam is the best! They’re like vintage 501s but tailored to fit a woman’s body perfectly. LOVE!
10. Tie-Waist Button Down – I brought six tops with me and the goal with all of them was comfort, ease and no need for ironing or steaming. (it’s harder to come by ironing boards in European bnbs and hotels!) This top is wrinkle resistant and oh-so-cute with that perfect sleeve length! I have the olive version too!
1. Camera Bag – I packed my camera bag inside my backpack and Michael packed my toiletries for me. We didn’t have a lot of extra space, but it really ended up working well for us! This little camera bag was perfect for holding my Canon DSLR and two smaller lenses.
2. Canon Camera – I get asked a lot about what camera I shoot my print shop images on and this is the one with this lens usually (or a 50 mm).
3 . Power Adapter – We had four of these adaptors with us and I wish we would have brought at least six so the girls could charge their tablets at night. Don’t leave home without these!
4. Backpack – This backpack is the perfect size for traveling. It’s big but not too big and there are tons of great compartments. Michael and I each had one of these. The girls just brought their school backpacks (below).
6. Brush-On Sunblock – I am intense about sunscreen and this brush-on powder is so handy and doesn’t ruin makeup!
7. Portable Charger – This charger ended up being a lifesaver! It can fully charge an iPhone SEVEN TIMES before needing to be plugged back in. We were on our phones a lot (navigating, taking photos and researching places to visit), so we were so happy how reliable this little guy was for us!
8. Neck Pillows with Ear Plugs – I almost didn’t pack a neck pillow, but this one is inflatable and ended up being really great for those suuuuuuper long flights and car trips!
9. Toiletry Bag – When you have eight flights with a carry on, a TSA approved clear toiletries bag is a big time saver. We breezed through every security check point quickly!
10. Hair Brush – The best hairbrush on the market. Ask any of my four daughters! I love the price point too!
11. Eye Mask – Another must for long travel days and for the never ending arctic days! When the sun is only set for about an hour each night, these masks are wonderful!
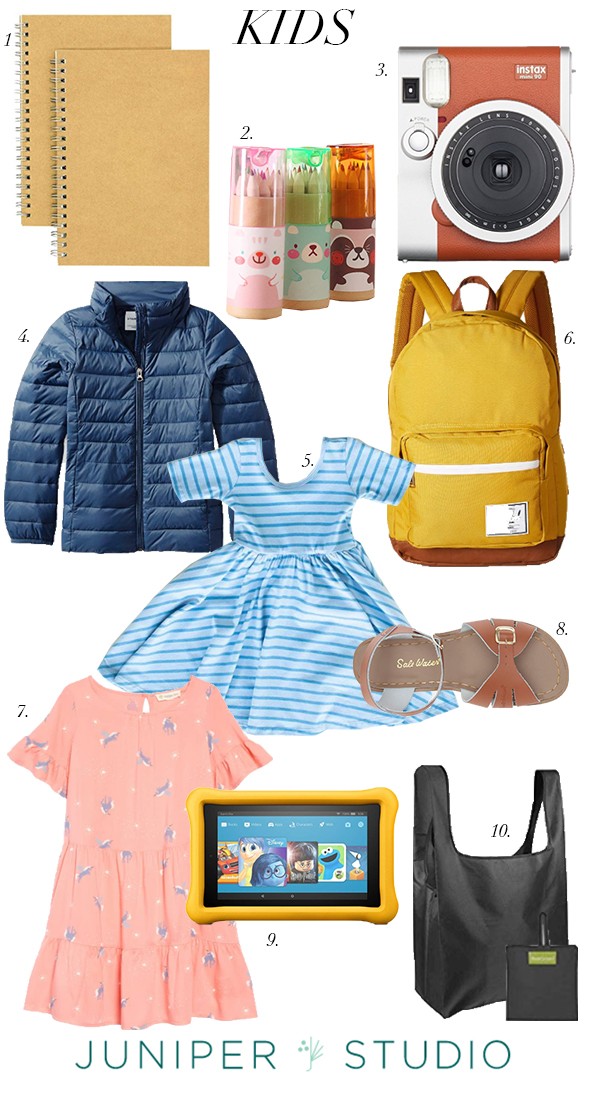
1. Kraft Notebooks – Everytime we go on a big trip with the girls, I get them one of these unlined spiral kraft notebooks to use as a travel journal. During long travel days or downtime, they sketch and journal trip highlights and later we paste in Instax polaroids and little pressed flowers and leaves. These notebooks are absolute TREASURES to us.
2. Colored Pencils – These coloring pencils are small but mighty and the case has a built-in sharpener! Perfect for journaling.
3. Instax Mini Camera – We bought one pack of film for each daughter and it was fun to let them pick where they want their pictures taken to put in their journals.
5. Blue Stripe Ballet Dress – The girls and I each packed one dress and I’m so glad we did! We were comfortable on the warmer days in Copenhagen and had options for dressing up when going to nicer dinners! I love anything from my friend’s clothing line Alice and Ames.
6. Herschel Backpack – We get Herschel backpacks for school because they are cute and so well-made. They ended up being great for this trip too!
8. Sandals – My girls have all grown up wearing these brown Saltwaters. I literally have a pair in every size from a toddle 5 up to a Kids size 3. They are comfortable, look nice and wear so well.
9. Amazon Fire Kids Tablet – Since we were low on space and there wasn’t room to bring books and other forms of entertainment, we let the girls bring their Kindles on the trip so they could read and play games during the travel time. It ended up being a good move, because we were in the car a lot!
10. Reusable Folding Tote – We didn’t have a lot of extra space in our backpacks when we left to go to Europe, so I was so glad I had brought these reusable collapsable grocery totes with me. Each of us had one to fill with souvenirs and keepsakes and snacks for the planes. We each filled our totes and backpacks to capacity by the end of the trip!
Okay, on to the actual trip! Here was our exact trip itinerary. I honestly wish we would have stayed another week to see Finland and Norway, but almost two weeks was perfect to see Copenhagen, all of southern Sweden and the western half of Iceland.
Some of these places we only had time to look at from the street, others we wandered around for hours and hours. We like to structure our trips with lots of flexibility, but we really try to pack it in! We go to bed late and exhausted and wake up early, eager to see more. Our girls were champs and didn’t need as much down time as I maybe guessed.
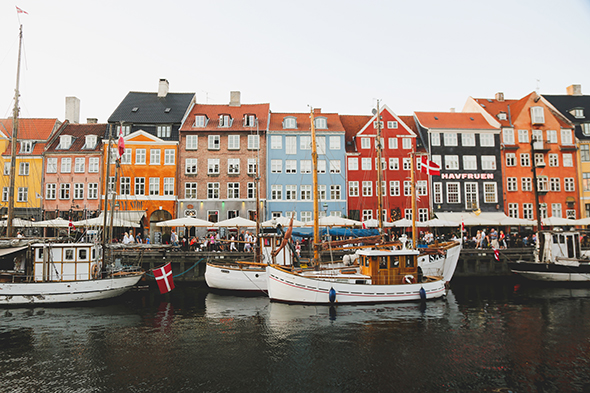
July 7th — Arrive in Copenhagen (props to the Copenhagen Card! Buy one for free public transportation and entrance into museums and parks!)
Four hours at Tivoli Gardens, which is like the ultimate Central Park meets Disneyland. Open air ballet performances, legit roller coaster rides, beautiful gardens, great food!
July 8th — Copenhagen Day 2
Town Hall and Hans Christian Andersen statue
Ny Carlsberg Glyptotek – check out my stories for peeks into the most beautiful museum I’ve ever been to! It was PERFECTION.
Lunch at Paludan – an adorable cafe with a bookstore!
Round Tower – A really beautiful, tall tower with a spiral ramp up to one of the oldest astronomical observatories! It’s a fun little hike to the top and the 360 view of Copenhagen is worth it!
Nyhavn is a bit touristy with its colorful buildings lining the waterfront, but the waffles and ice cream make up for the extra people everwhere! This is the neighborhood where Hans Christian Andersen once lived.
Dinner at Gasoline Grill and an open market across the canal from Nyhavn
Somods Bolcher – a charming candy making “factory” though it’s really more of a room, where generations of family together make candy the old way, completely by hand. Every day they let the public come in and watch the process. Only a few other people (locals!) were there watching with us and we were able to ask a million questions as the family worked. It was completely charming and intimate.
Christiansborg Palace, Ruins, Royal Kitchen and Royal Stables – this palace is a can’t-miss for me! The design of the royal kitchens and even the horse stables was absolutely jaw-dropping! I left inspired to make some changes to my kitchen reno plan!
Train to Malmo – it’s only a few dollars and a short 45 minute train ride to Malmo Sweden from Copenhagen’s main train station near Tivoli Gardens. It was nice to take a little rest in the comfortable chairs and see the amazing view from the rail above the North Sea.
Kommendanthuset – Malmo is a charming seaside town with lovely architecture and a fun mix of the old and the new(er). We grabbed a rental car just a few hundred feet from the rail station and hit the road! One of the first buildings we saw while exploring Malmo had a big sign saying Kommendathuset which means Commander’s House but looked way to close to our last name to not stop and take some silly pics. The girls were into it. :)
Malmo Castle
Traditional Swedish Dinner at Bullen – Tva Krogare. These were the best mashed potatoes I’ve ever eaten and the meatballs put IKEA’s to shame!!
Lund – This little university town was another trip highlight for me. We stayed here WAY longer than we expected, wandering around the charming homes in the historic town center and then lingering until almost midnight at the Lund Botanical Gardens.
See Kronborg Castle (Hamlet castle) on the other side of the sea
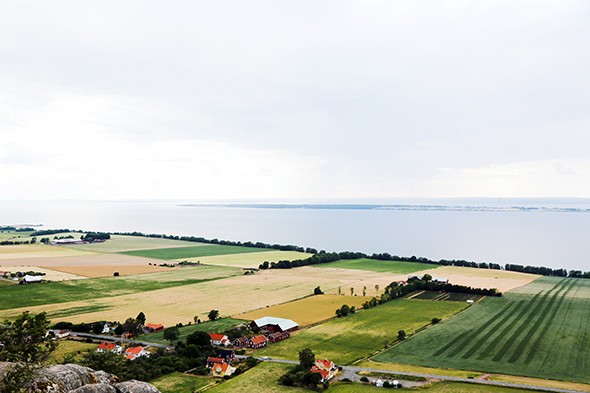
Sofiero Gardens – The Swedish Royal family used to summer at Sofiero for decades. It is a beautiful large estate with lush grounds (don’t miss the rose gardens!) and ponds with beautiful lilypads. I loved touring the inside of the house too – the Swedes really love a good wallpaper! :)
Jonkoping to stretch our legs and walk around the base of Sweden’s largest lake. The water was crystal clear blue!
Granna for lunch of the traditional open face sandwich that we all came to love and crave! Rye bread with fresh shrimp, lettuce, cheese, and summer tomatoes! YUM.
Brahehus – Near a literal gas station on the side of the highway, you can see the ruins of an old fortress castle built in the 1600s for a Count. You can pull over and anyone can hike around the ruins and explore. It’s SO COOL. The best part is when you look out over the cliffs, you are surprised by a view of the prettiest lakeside farmland down far below!
Dusk at Sparreholm – You’ll have to watch my SWEDEN story highlights to see all the family photos, but my great grandma, Edith Johnson, was born and raised in Sparreholm, Sweden, a small town in the Swedish countryside, about two hours from Stockholm. I grew up hearing wonderful stories about this place and couldn’t wait to finally see it all for myself. Edith’s dad was the head caretaker for the Sparreholm palace grounds. We arrived at Sparreholm palace, the only address we knew for sure, at about 10pm. It was soooo quiet, and the sunset was incredible over the lake my grandmother used to play in and where she was baptized as a young child. I took photos of this beautiful place and face-timed my mom and cried as I felt my grandma near. The next morning we discovered her childhood home was right under these trees just on the other side of the lake in this photo! I love that I have this beautiful image to remember the kismet of that night.
Watch deer bounding through the fields and nearly ruin our Volvo rental car as we pull off the side of the road to explore. :)
Stay with the kindest Swedes ever, Johann and Johanna at Ekeby Farm near Gnesta. Their farmhouse cottage was charming and perfect in every way! If you ask Johann nicely, he’ll give a tour of his vegetable cellar, horse stables and even show you his outdoor bathtub that he dug into the ground at the top of hill, where he has a view of the fields and forest below. I mean, guys, we’re seriously in the market for Swedish farmland if you know of any! I can’t wait to go back!
July 11th — Sparreholm and Stockholm
Hike to Parkstugen – the small farmhouse my Grandma grew up in! There is no formal street address, so it took some work to figure it out, but we stumbled across her farmhouse and it happened to be under renovation! The workers were so kind and let us come inside to see the old farmhouse. I choked up seeing the original wood-burning stove that Grandma, who was a very accomplished chef, grew up learning to cook on. It was MAGICAL.
Back to Sparreholm grounds, where there are a series of museums and beautiful gardens on the grounds.
Lunch at Sparreholm (more open faced sandwiches!) and visit to jukebox museum, which was surprisingly cool!
Arrive in Stockholm in the evening
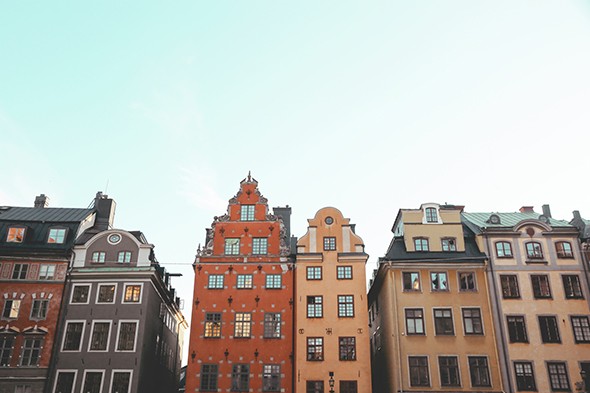
Miles and miles of walking around Stockholm. Dinner and sites and pictures of doors and buildings in Gamla Stan (Old Town)
Michael did laundry at the one laundromat in all of Stockholm and saw Gustaf Vasa Kyrka
Vasa museum – I was admittedly a little tired at this point in the trip and almost skipped out on the Vasa Museum. I didn’t toootttally care about seeing the ruins of a sunken ship, but I ended up coming anyway and I am SO GLAD I DID. As a child of the 80s and 90s would loved Goonies, this was a can’t-miss. :) It’s hard to explain why it was actually cool, so you’ll just have to take my word for it. It was amazing.
Nordic museum – I enjoyed this museum, but thought I would like it a little more than I did if I’m being honest. I wanted it to be more like the Danish Design Museum or even the IKEA museum, but I actually felt like I learned more about Swedish culture through the Skansen exhibits. I did really like the Northern Lights exhibit and the exhibit about what apartments looked like during socialist regimes in Stockholm. Super fascinating!
Djurgarden – The island where many of Stockholm’s museums sit, it feels like a beautiful little land of amusement and beauty! There are gorgeous gardens and grounds, delicious food trucks everywhere and a helpful little rail system that takes you anywhere you want to go.
Skogskyrkogarden cemetery – is it weird we went to a cemetery that none of our known relatives are buried at? Maybe, but the grounds here are legendary. It was worth the detour.
July 13th — Stockholm and Reykjavik
Michael and kids to go back to Skansen and Jenny goes thrifting and shopping in Stockholm’s hipster district, Sodermalm. I found some treasures that made me sliiiightly regretful about not having any luggage. I got a few small things though and can’t wait to come back.
Flight to Reykjavik – We flew on the new budget airline, WOW Air, for three of the eight total flights of our journey and it was awesome! The planes are brand new and the staff is all amazingly helpful and friendly. It felt like Jetblue back in the day, you know? I just saw a special for like $200 round trip tickets from a few of their US hubs (the closest to us is Dallas) to Reykjavik for September and October and you’d better believe I’m tempted to go back and explore the east coast of the island this time!
Dinner at Jamie’s Italian – Don’t judge. I’m usually a very strict believer in eating as the locals eat when traveling, but we got in to Reykjavik late and we were starving and suddenly freezing. Jamie’s Italian was a lovely restaurant (like, really, the interior design was stunning!) and the food was delicious. But I definitely felt like we were cheating. :)
Checking out downtown stores and getting settled into our suite at A Townhouse hotel. (HIGHLY recommend!) Our Airbnb got cancelled last minute, so this was a big change in plans, but staying right in downtown Reykjavik ended up being so perfect!
Also, I have to throw a big, huge shout out to Brian Patrick Flynn, who lives part time in Iceland, part time in the states, and part time everywhere and practically anywhere chic in this wide world. BPF knows Iceland inside and out and was an amazing resource as we planned our time here.
Hallgrimskirkja Church – We listened to a beautiful organ recital and then took the loooong elevator up to the top of the church tower to see a 360 view of Reykjavik, which translates to ‘smoky harbor’ in English. After watching the fog roll in an out in a matter of minutes over the colorful rooftops, I could definitely see why it earned that name!
Shopping in downtown Reykjavik – Icelanders take a lot of pride in design and simplicity. Downtown Reykjavik is beautiful and so fun to wander around!
Driving to Snaefellsnes peninsula, where the lime green rocks in places look other-worldly!
Kirkjufell mountain, the most iconic of Iceland’s 130+ volcanos, and the first up close encounter of one of it’s 10,000+ waterfalls!
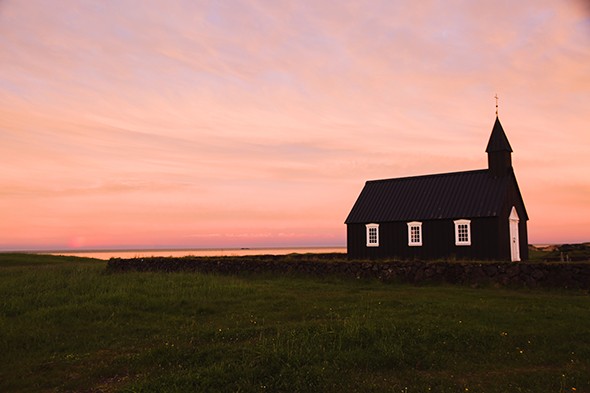
Black church at Budir – we made it to the remote black church at around 8pm and the sun was high and bright, so we went on an adventure to the little town in the North where they filmed Walter Mitty. By the time we made it back down to the Black Church, it was after midnight and the sky was COMPLETELY PINK. It was perfection and I got this shot for the print shop.
Arnarstapi – and amazing seaside town full of gorges, giant rock statues and the only unfriendly animals we encountered in all of Scandinavia – the Arctic Tern bird. We accidentally walked near a colony (they make their nests in fields, though we were on a clearly marked path for hikers) and we had to run for our lives in a scene that looked WAY too much like something from The Birds. Ha! Looking back, I think this was the only time in the whole trip something went wrong or weird! How lucky are we!? Plus the photos from this little hike along the coast were absolutely worth the little scare! :)
Seljalandsfoss – You can walk behind this enormous waterfall and live out your Last of the Mohicans dreams like I did. I was one of my favorite things we did in Iceland! The wind that blows off of waterfalls is INTENSE!
Horse riding at any of the farms advertising this along the road. We kept this short and sweet, but I’m glad we did it.
Dyrholaey Nature Preserve – Birdwatchers from all over come to these cliffs in Iceland for a few specific weeks in the summer to watch the Puffins nesting. I am not a particular fan of birds generally, but Puffins are STUNNING. I can see why they are so celebrated in Iceland!
Reynisfjara – the Black Sand Beaches at Vik were surreal. The cliffs are giant columns of basalt, the sand is truly jet black and the water was a bright, frothy white. So much high contrast and so different than any place on earth.
Blue Lagoon – On our last night in Iceland, near midnight, we bought a two-hour session at the famous Blue Lagoon. The geothermal silica mud water spa was even more beautiful, relaxing and rejuvenating than expected. Our girls came too and they loved it as much as Michael and I did. It was basically the perfect almost-end to our epic trip.
Harpa opera house – We got an early start to our last day so we could cram in as many adventures and sites as possible before our late afternoon flight home. We stopped by the beautiful Harpa Opera House – a stained glass modern structure, inspired by the gorgeous basalt column formations in Vik that we had seen just the day before.
Thingvellir National Park (tectonic plates and UNESCO site) – Iceland remarkably straddles the Mid-Atlantic Ridge between the Eurasia and North American tectonic plates. In Thingvellir, you can walk between the two plates and touch Europe in one hand and North America in the other!
Gullfoss (Golden Waterfall) – Gullfoss is a HUGE waterfall on the Golden Circle, fed by one of Iceland’s largest glaciers. We loved the little hike out to edge of the falls. The wind was so powerful and there were rainbows everywhere in the mist! Iceland gave us a great send off with this last adventure!
Have you been to any of these places? What did you love and what would you add to our list here? I know we’ll be going back again to these places. We had an amazing time!
PS We are offering a limited time discount on prints from my Scandinavian collection. Buy two, get one free with the code JENNYSTRIP at checkout. Enjoy!
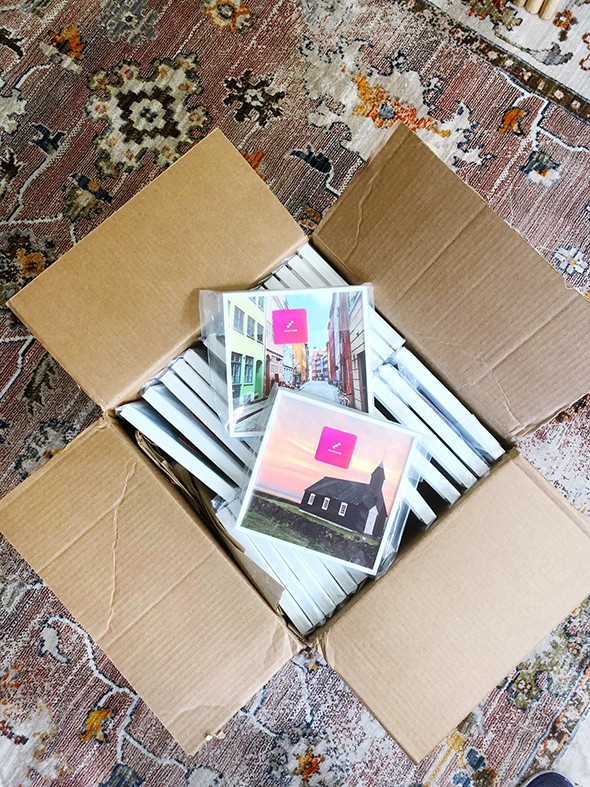
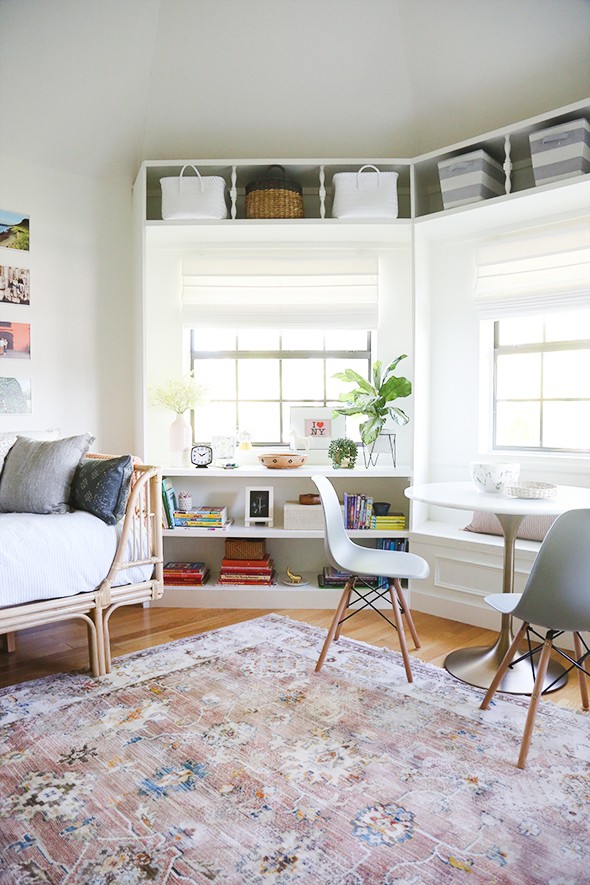
Sponsored by Mixtiles. After years of saving, and now weeks of meeting with contractors and trades, we are getting VERY close to starting a big remodel at my house. I’ve got a big post coming up that shares the details of the plans now that they are almost final! In the meantime, we are spending…
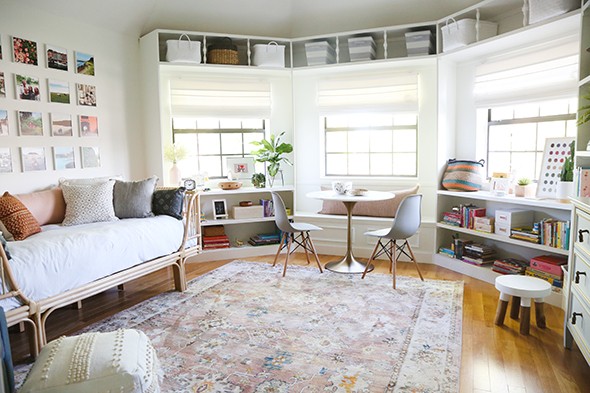
After years of saving, and now weeks of meeting with contractors and trades, we are getting VERY close to starting a big remodel at my house. I’ve got a big post coming up that shares the details of the plans now that they are almost final! In the meantime, we are spending our recent nights and weekends shuffling rooms around, preparing for months and months of half the living space (and no kitchen or laundry room!).
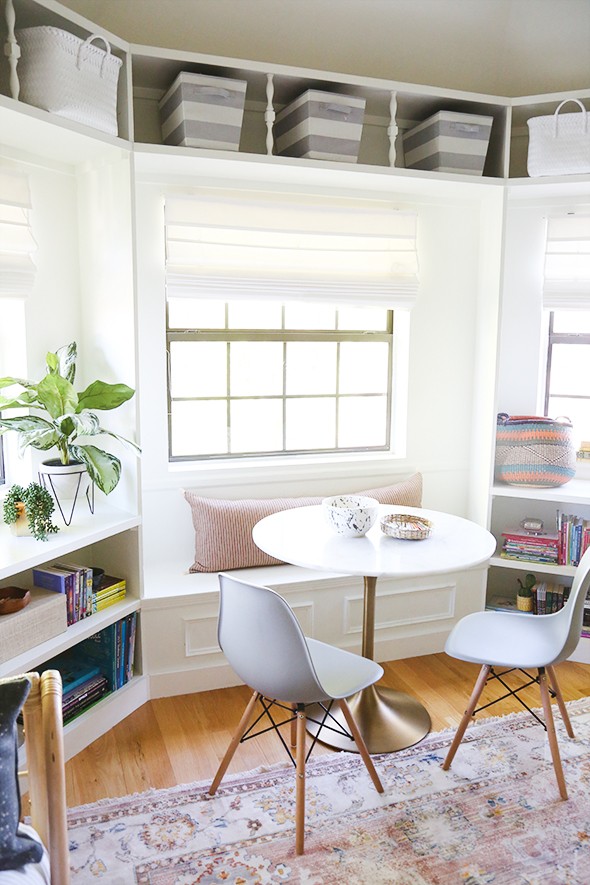
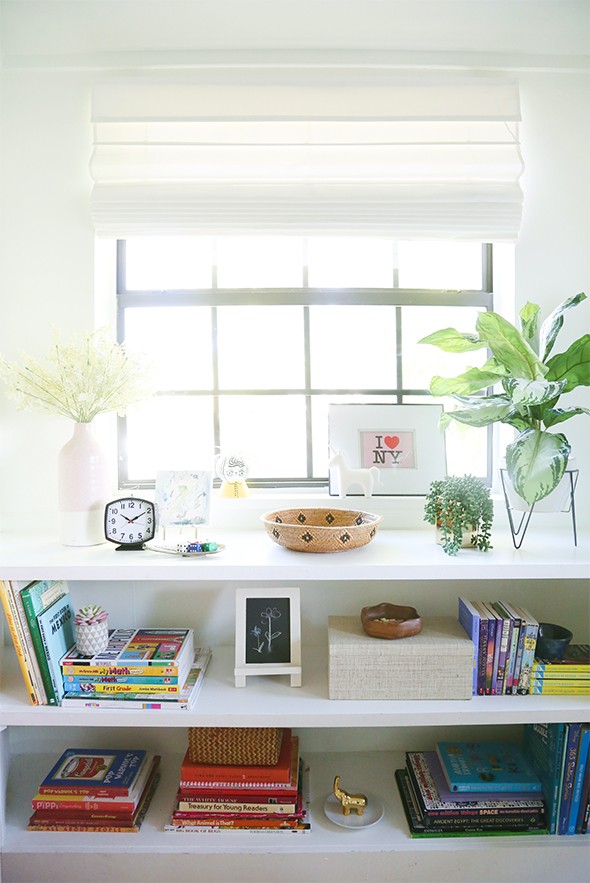
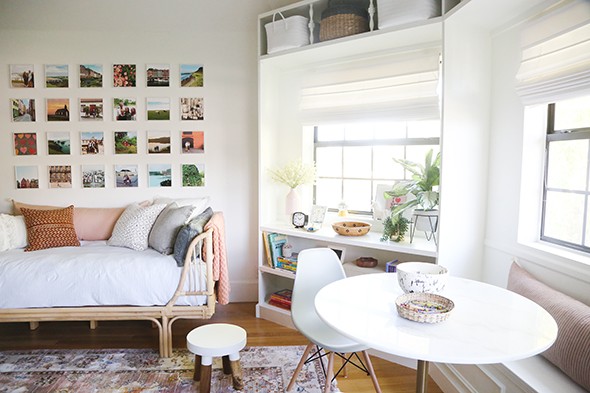
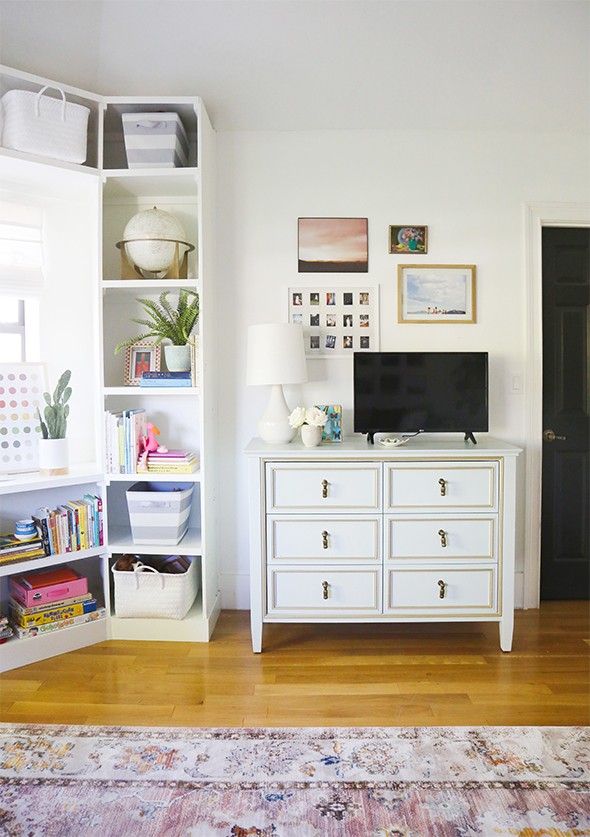
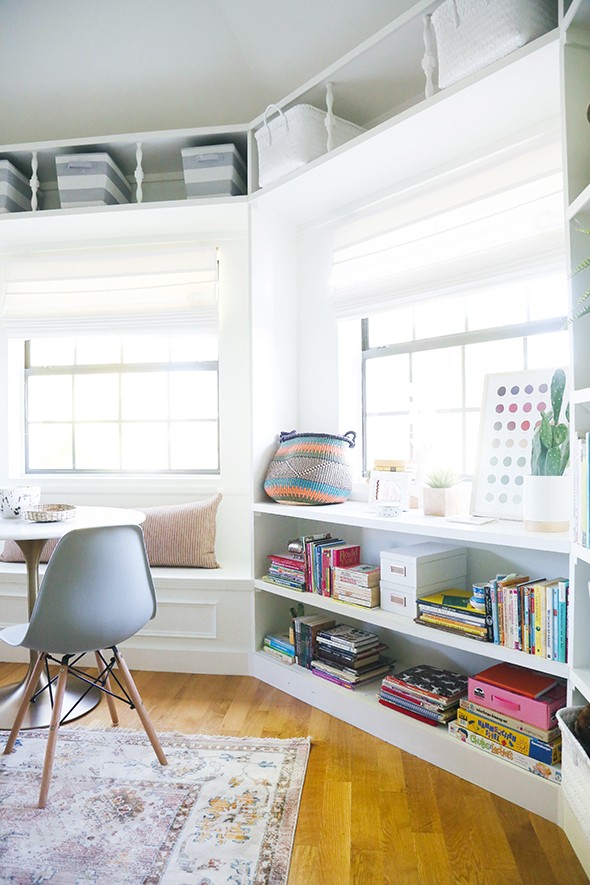
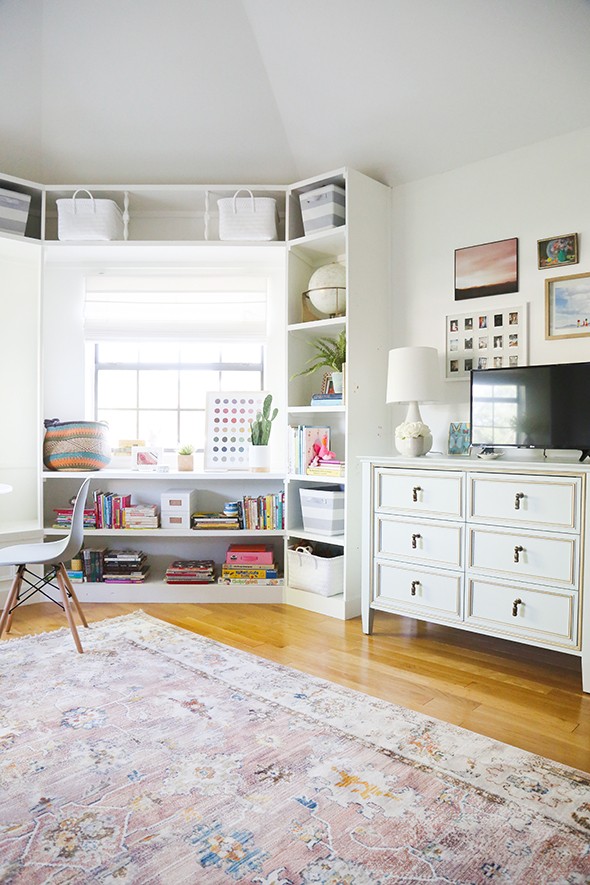
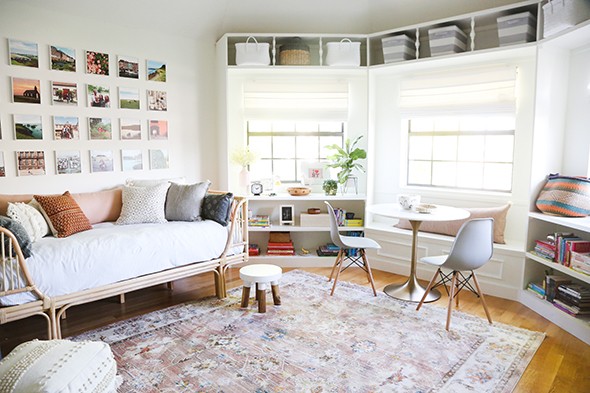
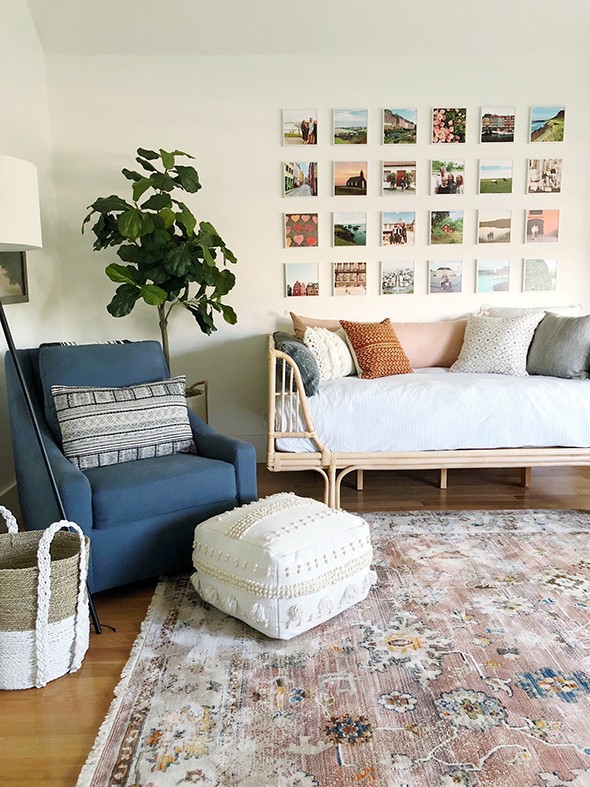
Last week we moved Evie in with Grace and turned her bedroom into a playroom and I think with just a couple quick changes and additions, we’ve got ourselves an adorable, comfortable kids space! I’m the hugest fan of playrooms if you can manage to squeeze a space into your square footage. I love having a dedicated place for toys and games to live – it really helps the rest of the house stay more tidy – and the girls love having a space of their own for arts and crafts, legos, watching movies and hanging out with their neighborhood friends.
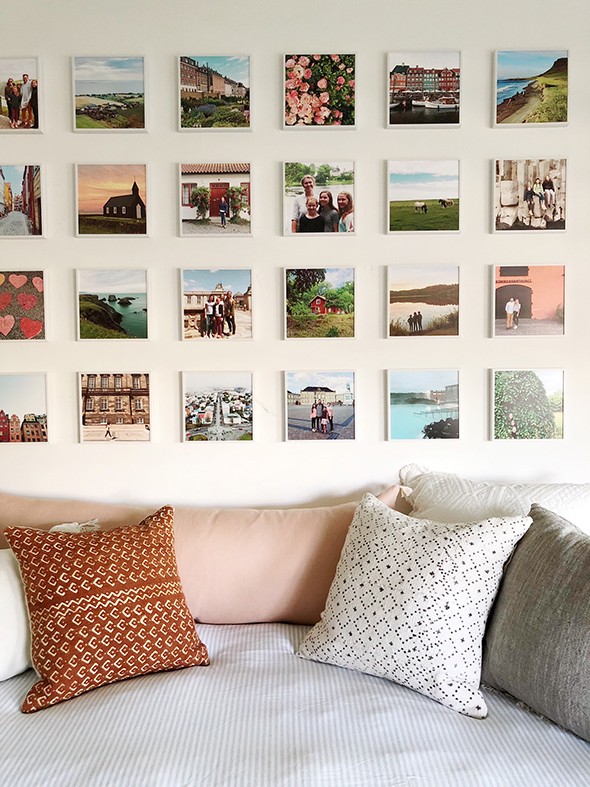
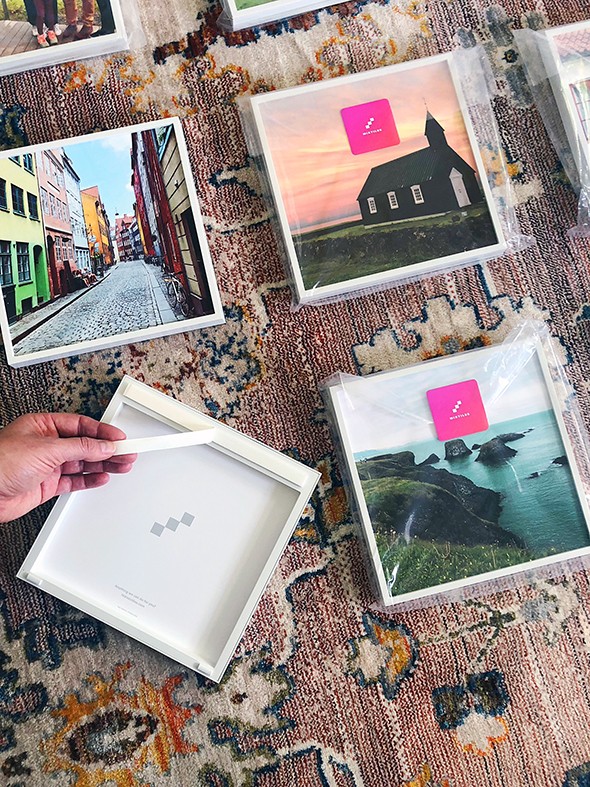
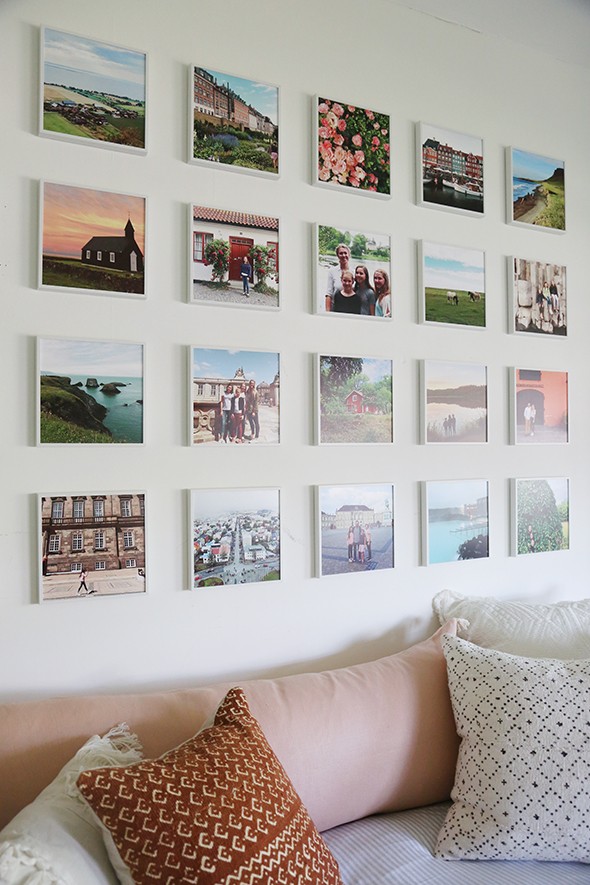
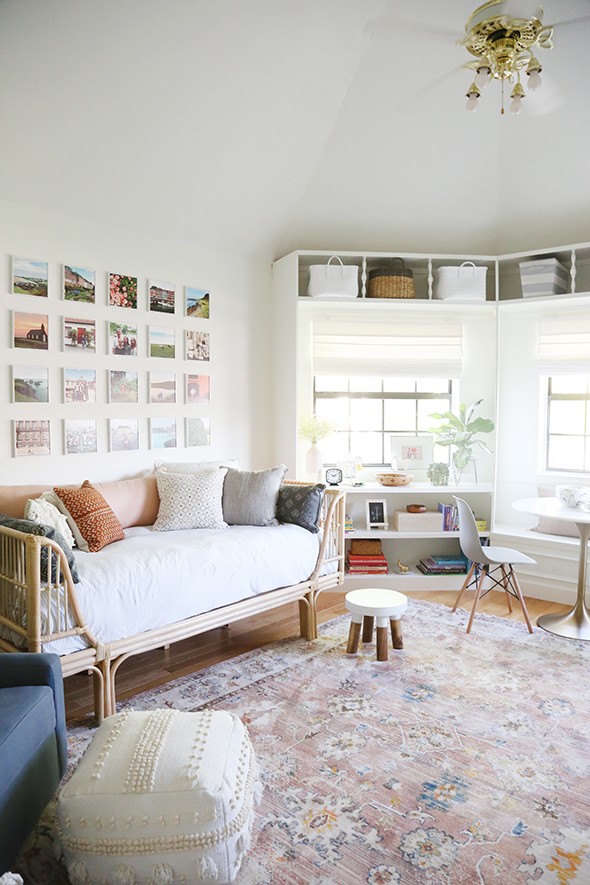
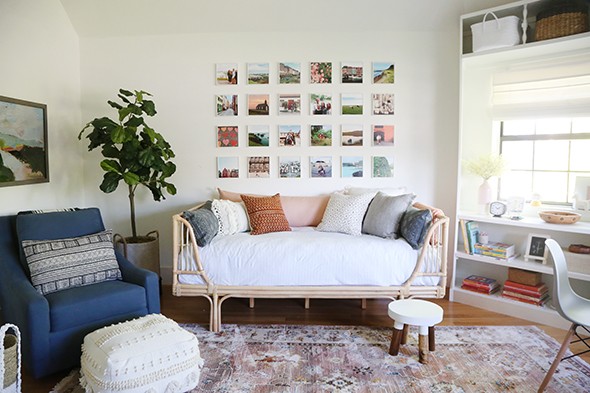
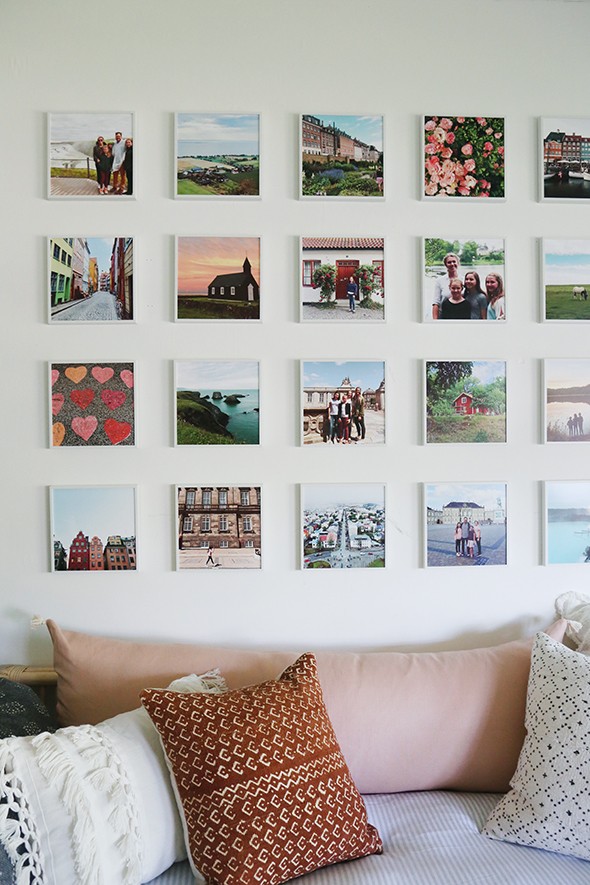
I knew I wanted to do a gallery wall above the daybed in here, and when I heard about the Mixtiles app, I got SO excited about the idea of using all trip photos from our recent family vacation to Scandinavia! Mixtiles syncs directly with your phone’s camera roll to quickly and easily order high-quality prints that come in less than a week. And they always have free shipping!
The Mixtiles are really easy to hang – no hammer and nails required here! They have a sticky adhesive strip on the back of the frames that allows you to place and move the tiles anywhere without damaging your walls. Perfect for renters or people like me who don’t want to put a million holes in their walls for a big gallery wall arrangement like this one!
Since I ordered a lot of Mixtiles for the wall, I had the idea to use some scraps of packaging materials from the new furniture as a guide for hanging all my new wall decor. It wasn’t necessary since the adhesive is reusable and you can pull off and readjust quickly, but it made a simple process even simpler for me! I used a piece of styrofoam as my spacer for the bottom row and a 3″ piece of wood for the rest of my grid.
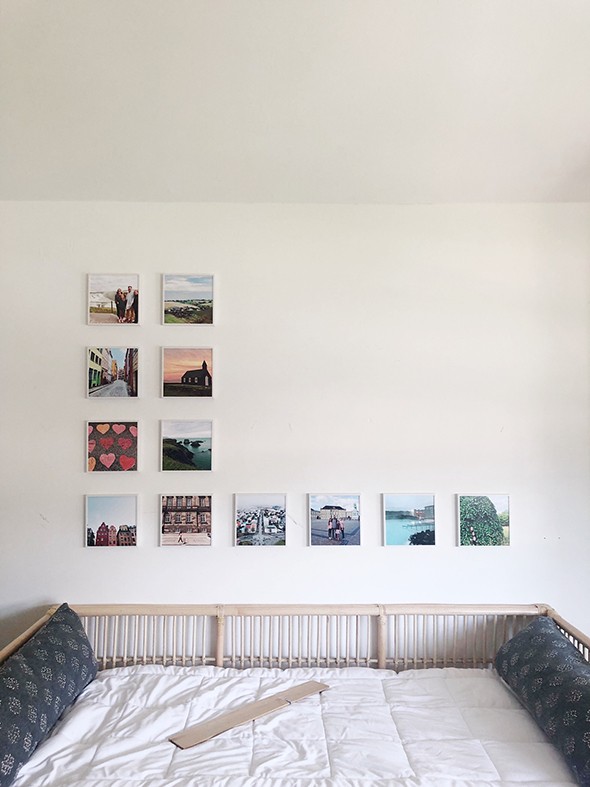
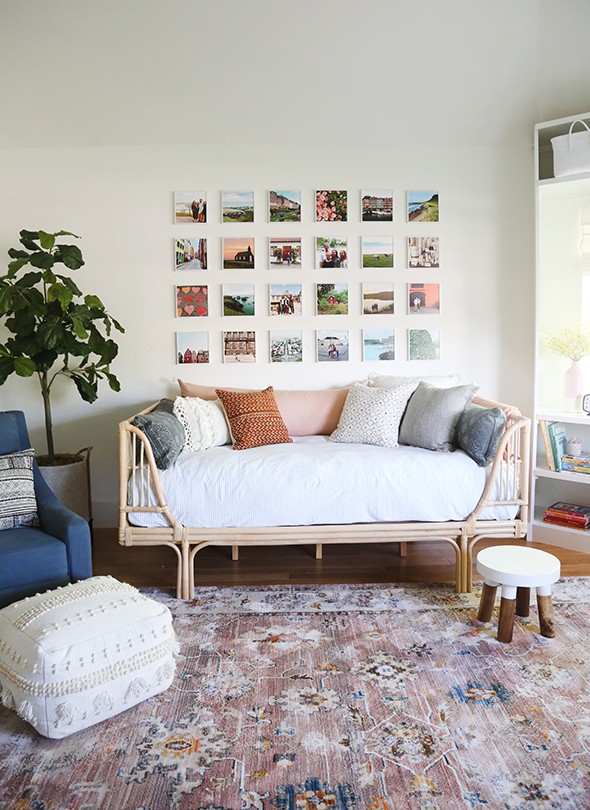
The gallery wall was up and perfect in about five minutes! EASIEST GALLERY WALL EVER. (PS make sure you don’t miss the discount code at the end of the post!)
The walls were already painted Chantilly Lace, my favorite bright white, so we definitely needed some colorful art and accessories in here to make things a little more playful. (PS To see the room transform in real time, don’t miss my Insta Story highlights called ‘playroom’!)
The blue chair was a lucky PB Outlet find and the warm denim-y blue upholstery was the start of my color inspiration for this space. I found the perfect inexpensive rug that was colorful but not crazy, and I think really compliments the art and accessories in here!
I can’t tell you how much I love this new space and especially that wall of memories! Our trip to Denmark, Sweden and Iceland this summer was nothing short of life-changing, especially getting to see where my grandma grew up in Sweden (check out my story highlights for more!). Having these special photos up on the wall, reminding us of those magical two weeks, has been SO COOL.
And I love that when our reno is finished in a few months and Evie moves back into her room, I can move the Mixtiles back down to our regular playroom quickly and simply, with no damage to our walls!
Thank you to Mixtiles for sponsoring this room makeover! For 15% of your first order (and free shipping, of course!), use the code NOTEBOOK15 at checkout on the Mixtiles app. The promotion runs only for a limited time, so hurry fast! :)
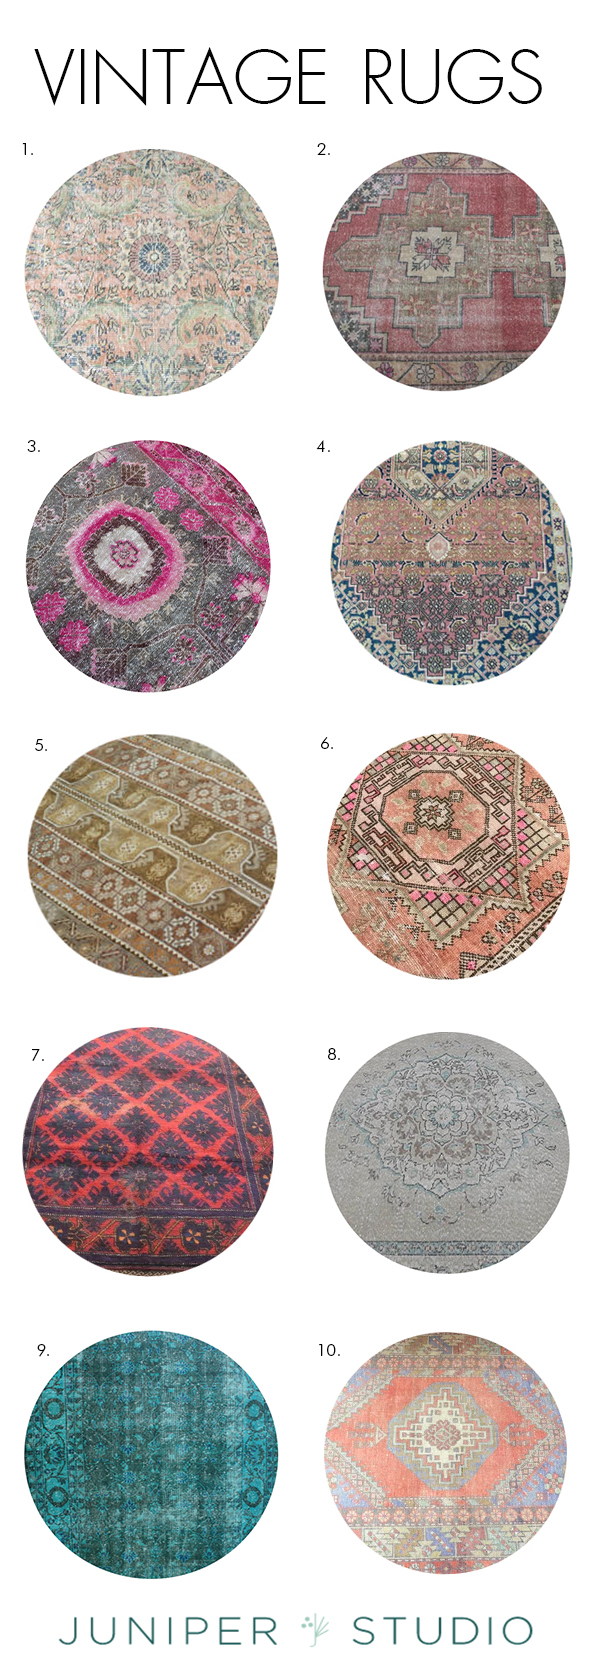
I love incorporating vintage rugs into just about any space. They bring so much character, color and texture into a space and make it feel instantly more unique. source The only negative with vintage rugs can be the sizing. You typically aren’t going to find one in your standard living room sizes, which can be a challenge…
I love incorporating vintage rugs into just about any space. They bring so much character, color and texture into a space and make it feel instantly more unique.
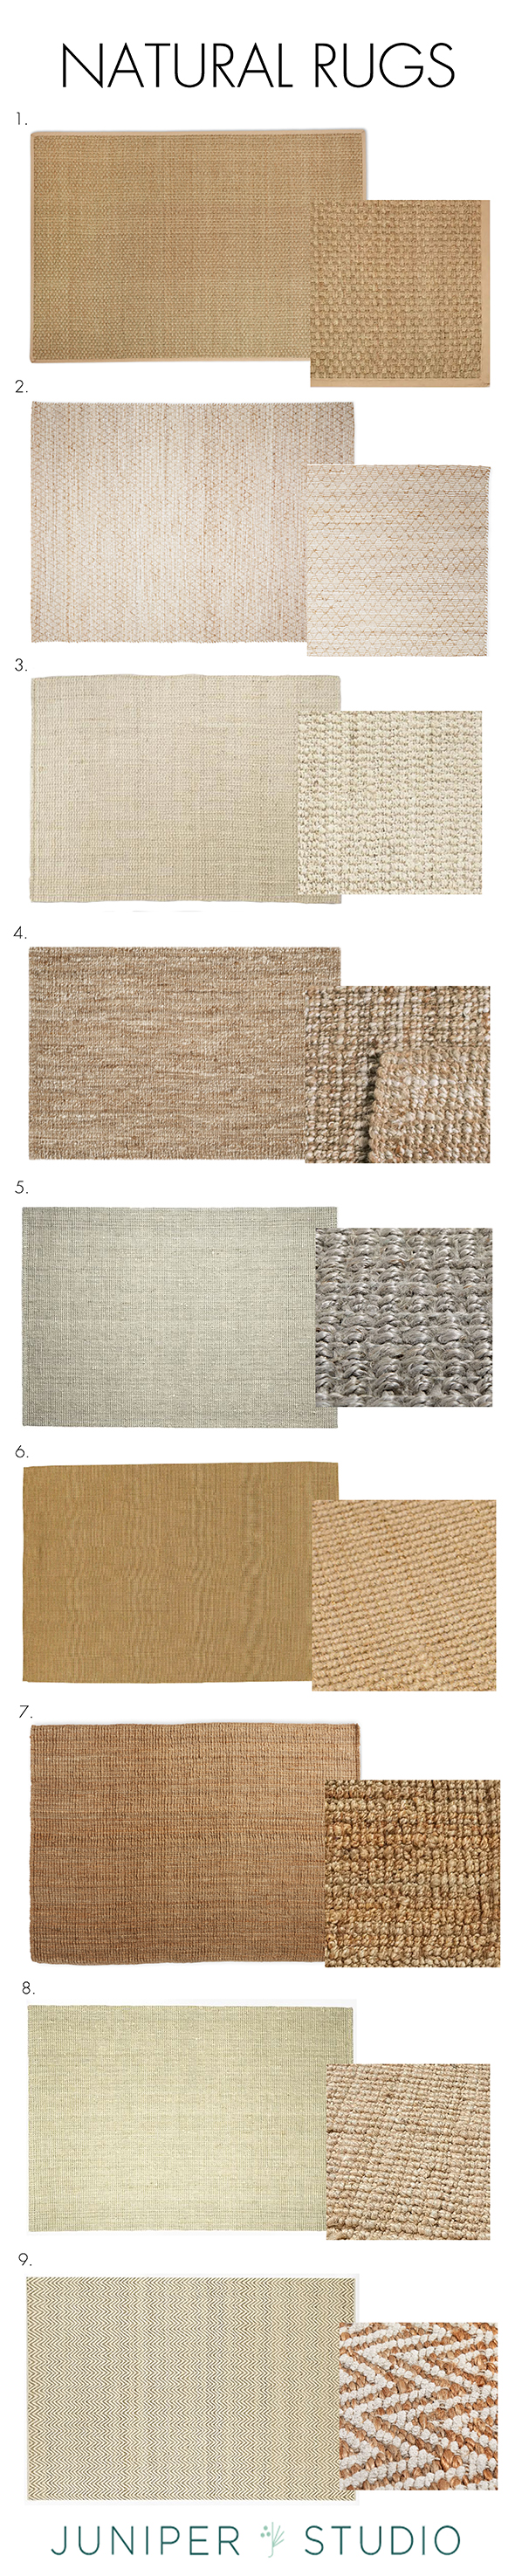
The only negative with vintage rugs can be the sizing. You typically aren’t going to find one in your standard living room sizes, which can be a challenge to design around. One of our favorite solutions is layering your vintage rug over a larger, natural rug like a jute or sisal.
One of our favorite places to find vintage rugs at fair prices is Etsy. There are SOO many options there and you could easily spend an entire day sifting through them! Here are some of our favorites.
We have a REALLY fun house tour for you all today! Our friends, Haleigh and Scott, the owners of the Park Haus in downtown Gilbert, have remodeled and now live in a total gem of a midcentury modern home here in Arizona. They made SO many wonderful choices with the design of this home and the…
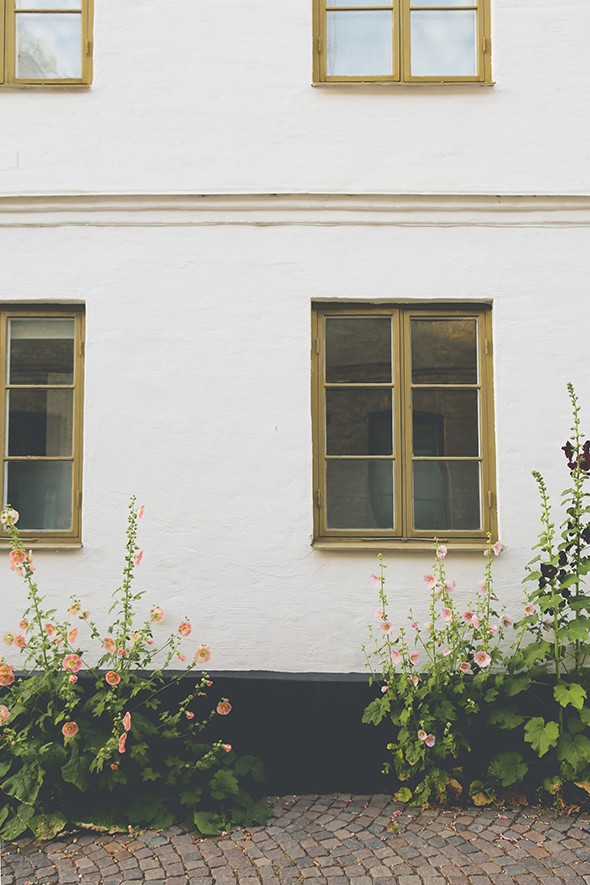
We have a REALLY fun house tour for you all today! Our friends, Haleigh and Scott, the owners of the Park Haus in downtown Gilbert, have remodeled and now live in a total gem of a midcentury modern home here in Arizona. They made SO many wonderful choices with the design of this home and the exterior selections are especially spot-on! The powder blue paint color was a bit of a risky choice, but I think it’s unique and completely architecturally appropriate!
Inside, the homeowners really played up all the light they get from their amazing windows by installing unstained white oak floors and creamy white walls. We hung one of our newest prints Counting Sheep from Jenny’s Print Shop. The photo was taken by Cami Parker and we’re all obsessed with the soft colors and beautiful texture!
We just launched our Summer Lumbar Collection over at Juniper Home and although we keep selling out, we are doing our best to stay on top of inventory. We are consistently adding pillows to the shop, so if the pattern you love is sold out, don’t give up! :) Also, Jenna and I went to NYC this week to install a really cute bedroom for Real Simple’s Idea House and while we were there, we found a TON of new linen fabric patterns that we’re excited about, but I’d love to hear from you in the comments here or on our Juniper instagram feed what kind of patterns you’d love to see in our next collections!
I love this textured indigo rug. It’s only available in a 5×7 right now, but at this price, you could layer it with a jute rug and it would still be a steal!
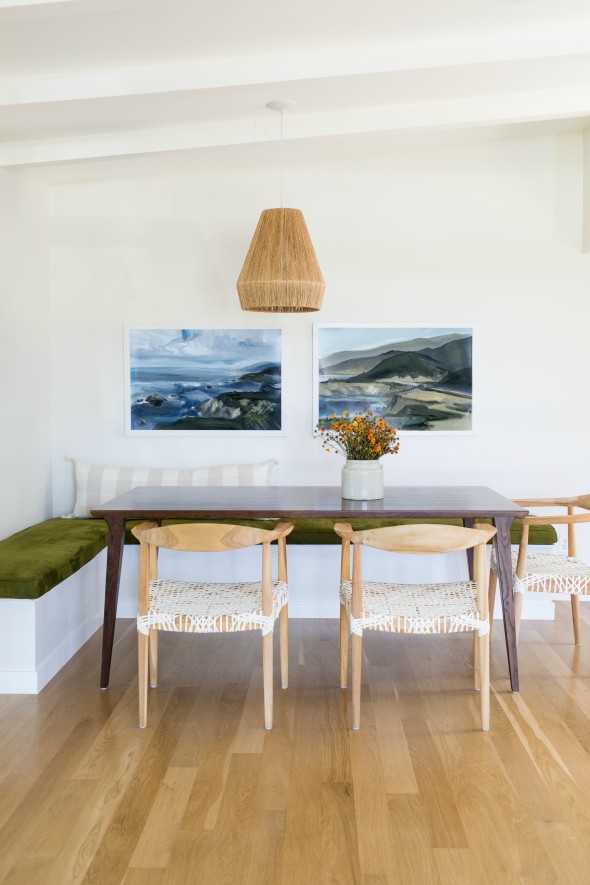
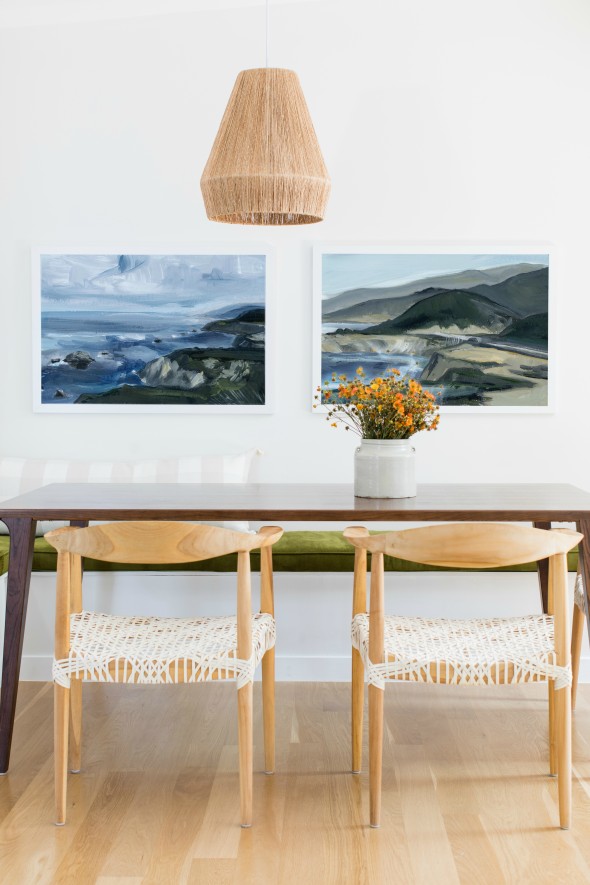
We hung Seascape I and Seascape II by LaurieAnne Gonzalez on the other wall. SOOO many of you have been asking for paintings of the sea landscapes and LaurieAnne really delivered for us (and you!). I am really loving the moody blue and green colors!
We wanted to add a fun pop of color to the laundry room and WINK and our Marigold lumbar do just the trick! So many of you ask about where we buy our frames for our print shop prints (and you can check out this post for more info on printing and framing!), but we are working on an updated post of where to buy our favorite easy-to-source frames.
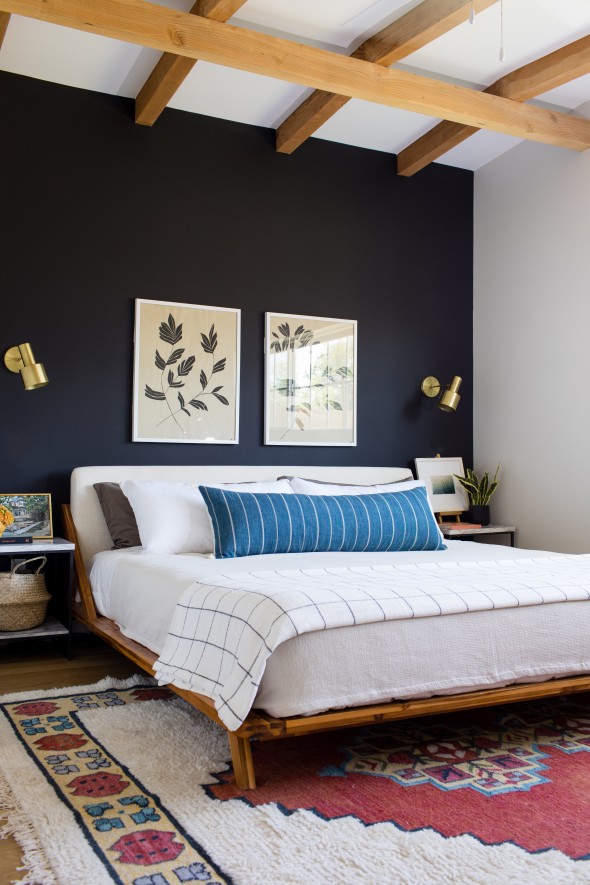
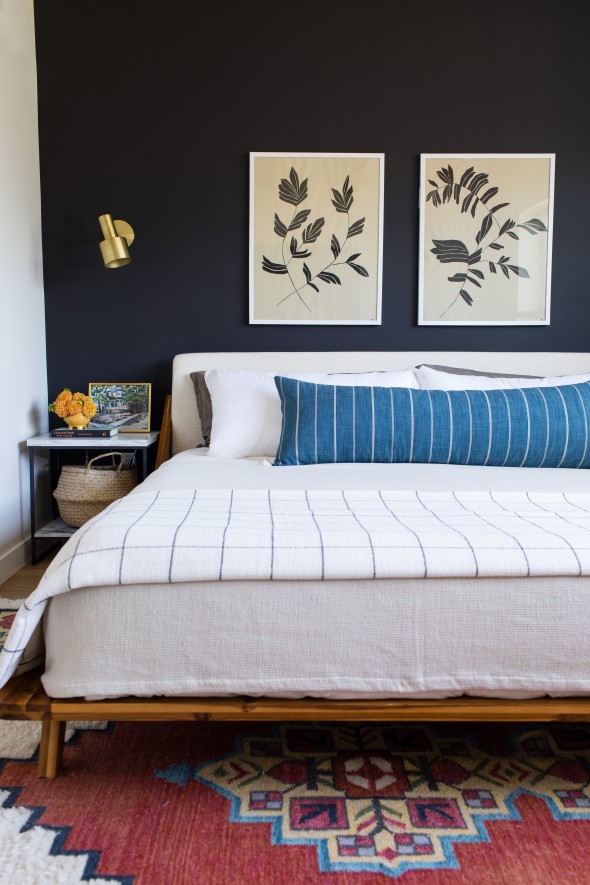
The master bedroom with that amazing black wall and those beams is one of my favorite spaces in the house! I love that Haleigh has our favorite platform bed!
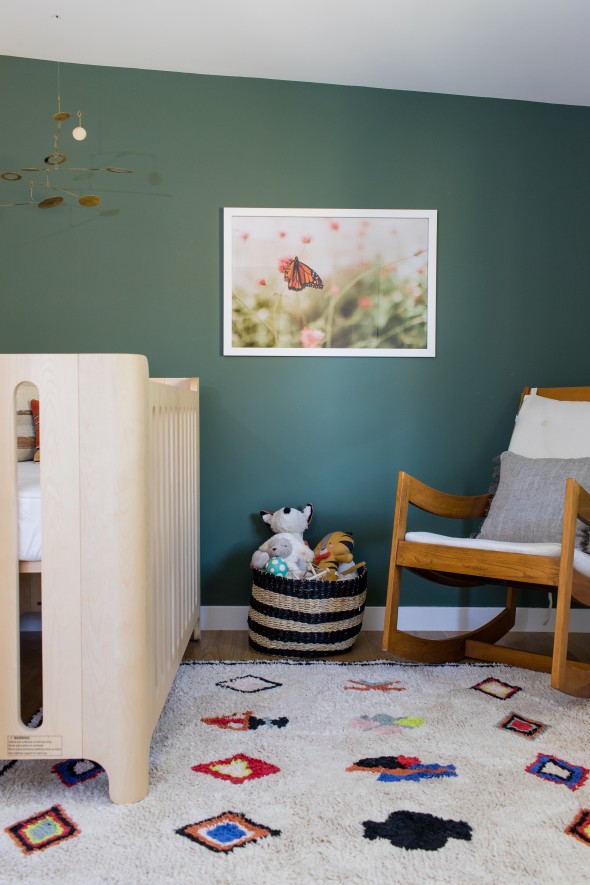
How AMAZING is this green paint color in the baby’s nursery!? The color is Benjamin Moore’s Caldwell Green (one of my personal favorites!) because it pairs SO well with light mid-tone wood stains. Also, how great is her rug? Get this – it’s machine washable!! Perfect for any space, but especially a kids room!
A HUGE thanks to Haleigh and Scott for letting us shoot their beautiful home! If you’re looking for a great Airbnb in downtown Gilbert, be sure to check out the Park Haus!


 1
1


