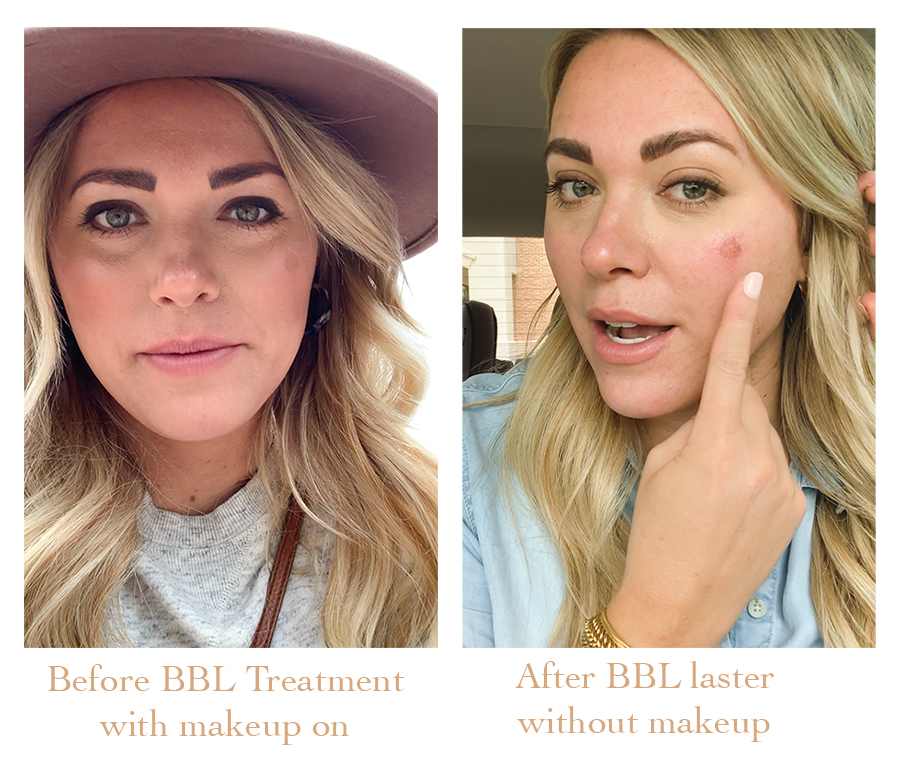
I got my second BBL laser treatment done for a stubborn sun spot on my cheek and after sharing some of my favorite skin care products on stories yesterday, a lot of you asked for all the info in a post. Here are a few before photos/stories screen shots (with and without makeup on!) and an after shot!
I don’t have the very best skin but I feel like it’s been getting better the last couple of years as I’ve been learning what works best for me! First of all, I think drinking 100 ounces of water a day can work miracles on a lot of health related things, especially skin problems. Also breaking a sweat every day is SO GOOD for skin! I started running again a couple months ago and while my knees are not thrilled, the rest of me is loving life.
Another big key to improving my skin has been going to a good dermatologist and aesthetician (I go to Ashley and Rachel at The Skin Ritual in Gilbert). They helped me figure out a lot of things about my skin (hello sun spots! UGH.) and introduced me to some great products. I am 36 and about a year ago I decided it was time to up my skin care game and invest in better (and more expensive) products.
The best one by far is this micro exfoliating polish. It is pricey, yes, but the jar lasts me at least six months and no other exfoliators can come close in results! I’ve even tried a PMD (and really didn’t love it). Old fashioned warm water, exfoliator and a clean wash cloth does the trick for me! I use it probably two times a week or as needed after taking off my makeup with these makeup removing wipes that don’t irritate my skin at all.
After exfoliating and drying my face, I use a Tinkle razor once a week and I immediately follow with a couple of swipes of witch hazel and then Retinol for my face and for my neck. For the last year or so I’ve been using and LOVING this brand based on a recommendation from my dermatologist. But before that (in my younger years! haha) I used and really liked this super affordable Retinol. It’s cheap and does the trick! I let that soak into my face and neck while I brush my teeth before bed and then I apply this Vitamin C serum that is supposed to help brighten my skin. I moisturize like crazy with this super affordable Rosehip Oil. It’s way lighter than Coconut or Argan Oil and has antibacterial properties so it doesn’t cause me to break out at all! It gives me dewy, moisturized skin that’s not sticky or greasy. It’s the best oil I’ve ever used. I’ve been hooked for more than a year now and love it more than ever. Michael and my girls use and love it too!
I also use this fancy-but-worth-it eye cream under my eyes and on my lids. It helps a ton with dryness and fine lines, which I have pretty bad. Lately I’ve been using a light swipe of castor oil on my lash line as a natural lash serum using these cheap applicators.
I use this lip mask generously every night and can’t remember the last time I had dry or cracked lips, even in the winter!
Probably twice a week I do a face mask with these Korean Collagen sheet masks. I wish I had the time to do one every night – they give my skin a great glow and help to clear up any small breakouts.
The Retinol and Rosehip oil also really help to keep blemishes at bay, but occasionally I’ll have one or two pop up. Picking only makes things worse guys and can cause scarring, so I like using this extraction tool on a clean face before bed followed up with these zit patches that I keep on all night. They are cheap and they WORK to pull everything out of the blemish without drying out and killing the skin around it! I don’t even waste my time with blemish creams anymore. With these patches you’ll wake up with no bump and almost no redness.
For makeup, I feel like I’ve also learned a lot this year from following two makeup accounts – Huda Beauty and The BeYouTy Bureau. I find it completely relaxing to watch makeup tutorials before bed and the bonus is I’ve learned a thing or two about contour and highlight! :) Okay, so here is my morning routine for getting ready:
After spending so much time and money on anti-aging skin care products, I am now VERY intense about sunscreen. I use and love this brand of sunscreen under my make up and then I also use this tinted moisturizer with SPF as my foundation. I try to not wear very much, if any, foundation though. I feel like I look my best when my face actually looks like skin, even if some discoloration or freckles are coming though. This concealer is the best formula for me. It’s easy to put on and is long lasting and natural looking, though it has amazing coverage. I put on my concealer under my eyes in kind of a triangle shape and on any blemished or sun spots and I let the concealer “bake” or sort of dry out for a few minutes while I put on a little contouring bronzer under my cheekbones, around my forehead. I do my nose with whatever is left on my contour brush.
While my concealer is still baking, if I feel like wearing a little more makeup that day, I swipe on this SUPER CHEAP eyeliner in the Espresso color that has been my go-to since high school! I use an eyeshadow brush to blend and smudge the eyeliner and create a softer line. I try to leave the eyeliner full strength around my lash line though.
I use this grocery store mascara every day (also since high school), because I’ve tried $50 mascaras before and they just don’t work as well for me! I love that I can build this up with two layers and it doesn’t clump! I use the brown black color to match the roots of my hair color, which I think ends up being a much more natural look than a black eyeliner and mascara would be on me.
After finishing my eyes, I use a smaller make up brush to blend in my concealer. I really like this brush set! I use the same brush to swipe on a little highlighter on my cheekbones and nose. And then I use the tiniest amount of blush on just the center apple of my cheeks (rather than all over my cheekbones). I use a clean blush brush to blend everything in with small circles. If makeup videos have taught me anything, it’s that it’s ALL ABOUT THE BLEND!!!
The last step is filling in my eyebrows. I got my eyebrows micro-bladed two years ago and I liked it for the most part. The color of the ink got a little red toward the last six months or so, but I was mostly filling them in again at that point anyway. I think I really loved them about three months in until maybe the 18 month mark? I’m trying to decide if it’s worth is to go back in and do them again, but if I’m being honest it really hurt! I felt everything – and the sound of those blades! Not so fun. I think the best part about getting them done was she showed me the right/ideal brow shape for my face. It might be worth getting them redone just for that. Subtle tweaks to brow placement can really help with facial symmetry!
In the meantime, I use beard dye to tint my own eyebrows at home every two or three weeks. It only takes a few minutes and is pretty straightforward, just following the instructions on the beard box (ha). Every morning I start with this brown brow gel for color and fullness and then I fill in my brows with this super thin watereproof brow pencil. I try to mostly do individual strokes that look more like hair rather than just coloring in. I also really love this tinted gel that helps everything stay in place all day!
I think that’s it! I hope this list was helpful for those of you that have asked for a tutorial! What questions can I answer for you?
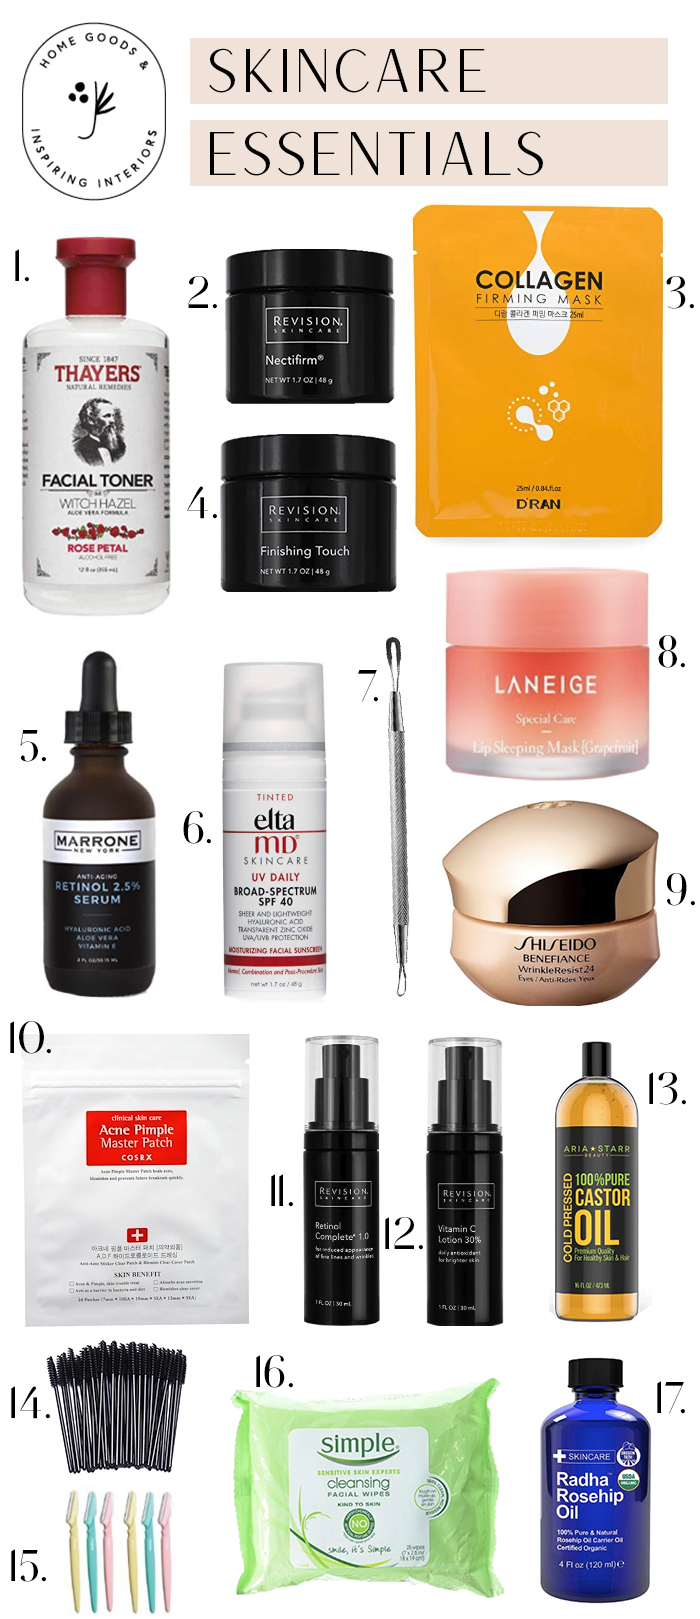
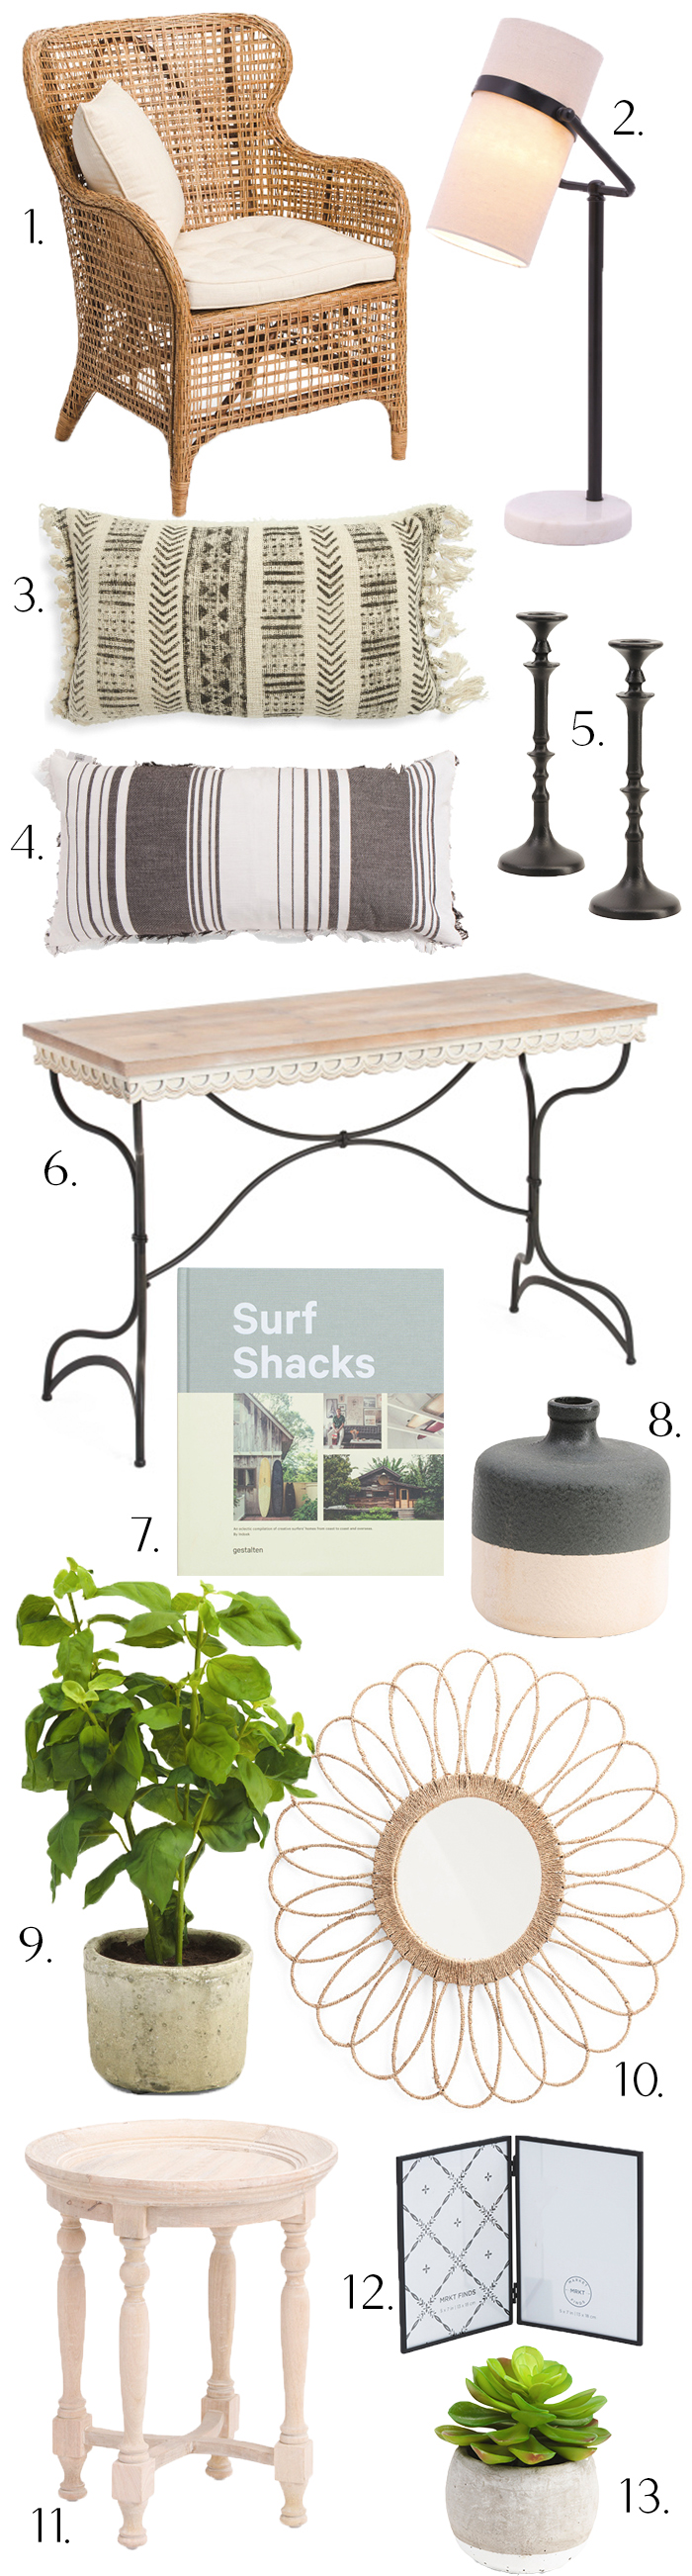
1. Witch Hazel // 2. Retinol Neck Cream // 3. Collagen Face Masks (similar) // 4. Micro Exfoliating Polish
5. Retinol Serum (similar) // 6. Sunscreen // 7. Blemish Extractor // 8. Lip Mask // 9. Eye Cream // 10. Zit Patches
11. Retinol Face Cream // 12. Vitamin C Serum // 13. Castor Oil // 14. Disposable Applicator Wands
15. Tinkle Razor // 16. Makeup Removing Wipes // 17. Rosehip Oil
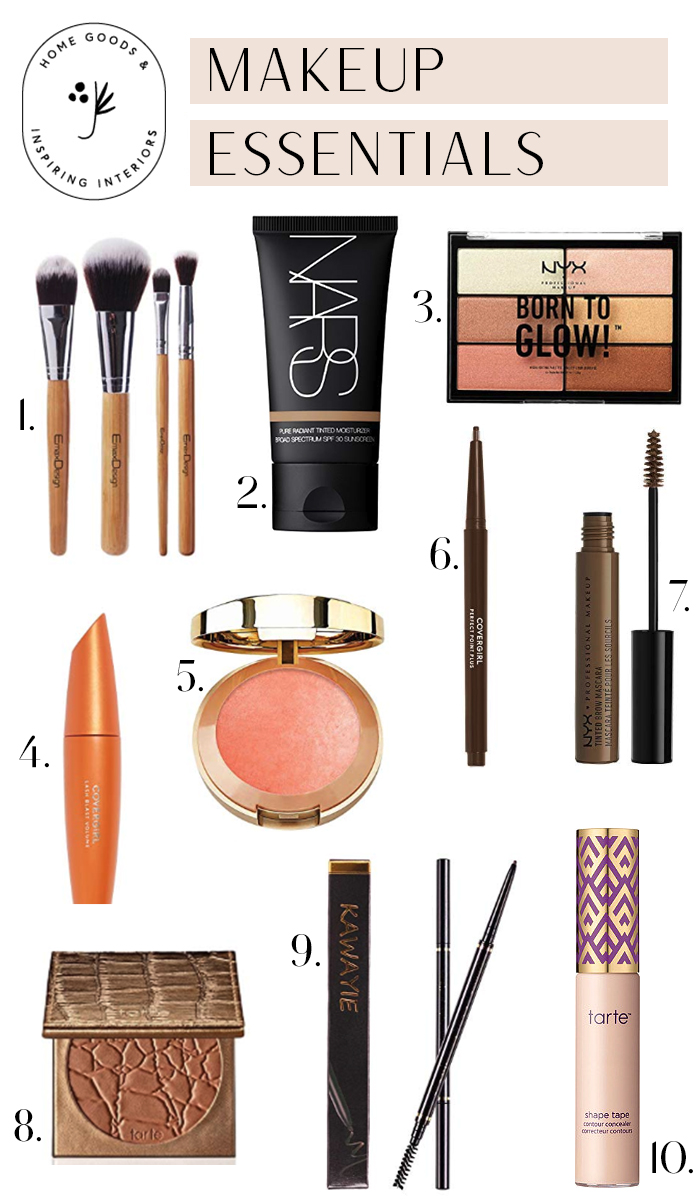
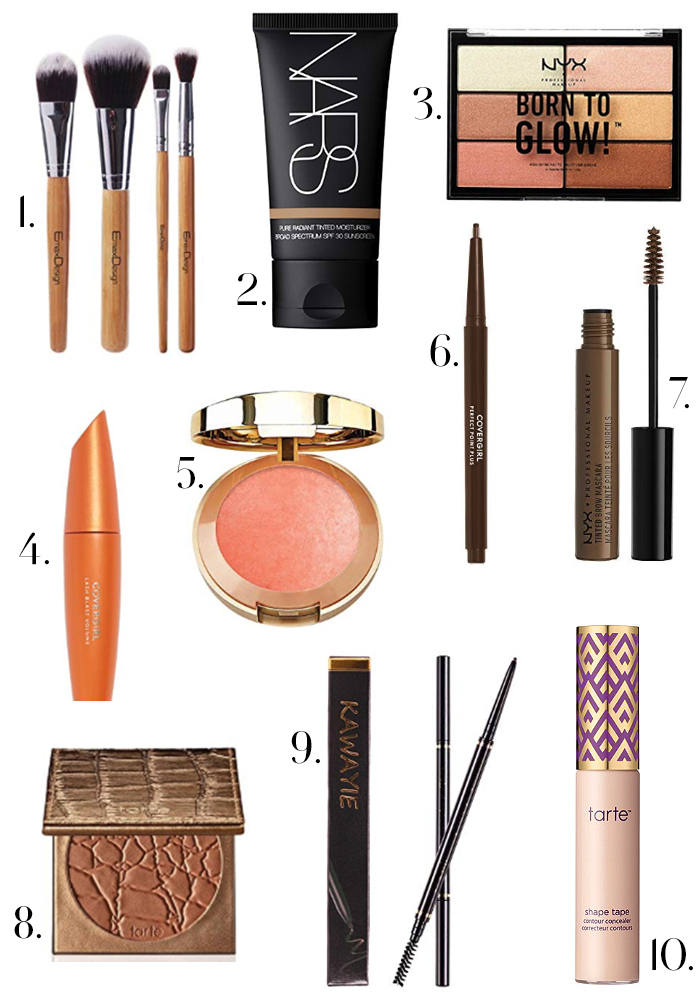
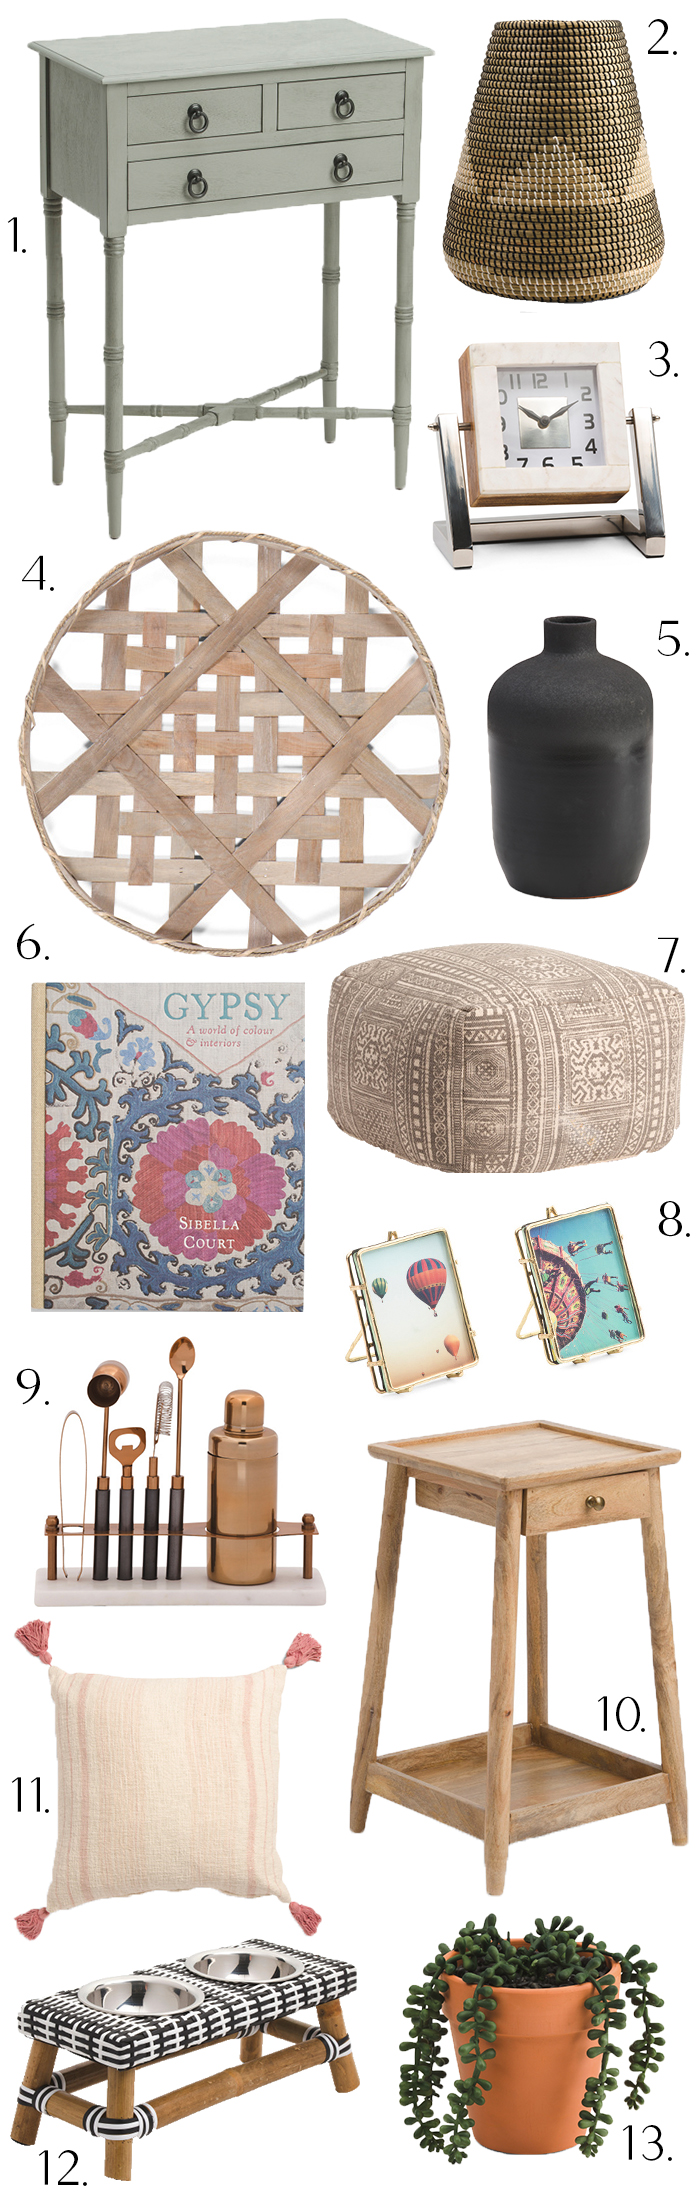
1. Brush Set // 2. Tinted Moisturizer // 3. Highlighter // 4. Mascara // 5. Blush
6. Eyeliner // 7. Brow Gel // 8. Contouring Bronzer // 9. Waterproof Brow Pencil (similar) // 10. Concealer


 1.
1. 


 1.
1. 
