Style and Beauty

Holiday Give Away: Five Pairs of Shoemint Shoes

Shoemint, the fab collaboration from Steve Madden and Rachel Bilson, has some great new looks that I’m eying for the holiday parties we have coming up this month.  Here are some of my favorites:   Today Shoemint is offering FIVE pairs of gorgeous real leather or suede shoes (or a bag!) to five readers. To enter visit…

Shoemint, the fab collaboration from Steve Madden and Rachel Bilson, has some great new looks that I’m eying for the holiday parties we have coming up this month.  Here are some of my favorites:


Today Shoemint is offering FIVE pairs of gorgeous real leather or suede shoes (or a bag!) to five readers. To enter visit the Shoemint site and register (it’s quick, and free!) and leave a comment here with your very favorite choice.

Which one do you have your heart set on? I’m obsessed with these gold-toe flats can’t decide between the black or green version) and this see-through clutch. I think it would double perfectly as a great laptop sleeve and I love that the little pouch in the front can store a power cord…

Contest ends next Saturday at midnight. Good luck!


PS Don’t forget to take $30 off your first order here!
Musings

Taking Pause

What a tragic weekend. I’m sure you all have similarly shed tears over the horrible news coming from Connecticut yesterday. After being glued to media all day, I felt completely overwhelmed and raw and heart-broken for those poor families.  So I turned off the tv and shut my laptop and I held my little ones…

What a tragic weekend. I’m sure you all have similarly shed tears over the horrible news coming from Connecticut yesterday. After being glued to media all day, I felt completely overwhelmed and raw and heart-broken for those poor families.  So I turned off the tv and shut my laptop and I held my little ones tight, feeling just thankful they were safe. Isn’t it hard to find a balance of staying informed and not getting fully absorbed in events that are completely out of your control?

I was supposed to post a holiday give away yesterday the same hour I heard about the Newtown incident and it only seemed right to push it back. I’ll be putting it up later today and then I’m taking the girls out for a walk and hot chocolate. I’m looking forward to letting go of some of these sad and fearful emotions. I hope you’re salvaging your weekend too. xoxo

Musings

Stocking Stuffers for Kids

Brought to you by the Brita Bottle for Kids: Help teach your kids to learn to love water. Learn more. When I was growing up in Arizona, we got an orange at the bottom of our Christmas stocking every year. There are lots of great traditional stories about giving and receiving fruit for Christmas and…

Brought to you by the Brita Bottle for Kids: Help teach your kids to learn to love water. Learn more.

When I was growing up in Arizona, we got an orange at the bottom of our Christmas stocking every year. There are lots of great traditional stories about giving and receiving fruit for Christmas and I love the simple, sweet sentiment behind it. Last year, I was fed up of having candy in the house (I was still trying to get rid of the Halloween candy stash), so the only treats I put in the girls’ stockings were nuts and an orange. I thought I was being sneaking and figured they were still too young to know what they were missing. Not so! “MOM. Santa forgot to put candy in our stockings!” and “Why did he put Fuh-RUIT in there?” Busted.

This year, I’ll put a just a little bit of candy in the stockings, but I think I’ll keep the oranges and nuts in too. We’re not doing a ton of big presents this year (feels like lots of people are moving toward this model – are you?), just a handful of carefully chosen gifts and some fun stocking items. Here are some kid items that I’m thinking about giving or that we already have and love.

1. Oranges remind me of home. :) Also, I remember hearing this story when I was young.
2. We are in desperate need of new water bottles this year. These are BPA-free.
3. I am normally a fan of boar-bristle hair brushes – but they hurt my kids’ heads. A stylist here recommended these super-cheap brushes to me for my girls and for even brushing my own hair out in the shower (it’s actually called a Wet Brush). I am a super-loyal fan now – they’re amazing.
4. My kids ask for frozen treats a lot. We’re shooting to make more low-sugar smoothie pops this year. I was with my stylish friend Jessie at a work thing last night and she mentioned that putting vitamin-packed Chia seeds in smoothies helps to thicken them up a little? Good to know!
5. Christmas and the Fourth of July are usually when we set dentist appointments and buy new toothbrushes (we try to replace those every quarter though). These are my favorite. The bristles are soft and the brush itself lights up for about two minutes so my kids know how long to be brushing.
6. To encourage healthier lunches at school, we’re going to pick up a couple of these bento lunch boxes. There is a cute frog too, but I love the panda.


7. Now that Evie is getting a little older, I think it’s about time we added Pick Up Sticks to our game cabinet. I loved Pick Up Sticks when I was Gracie’s age.
8. Plan Toys are my favorite – really beautiful, high-quality wooden toys. I’d love to give Evie this pretty set of Memory.
9. Remember this Potholder weaving kit?! I totally did this as a kid!
10. We have this Origami book and my girls love it. In fact, it’s time to buy some more paper.
11. Another favorite from my childhood (don’t worry, POGS did not make the list :) – string games! I loved Jacob’s ladder the best.

12. These headphones are parent and kid life-savers on flights and long car rides. They have a soft padding around the ear, and they seem to be comfortable for little ones. And they’re pretty darn cute too.
13. Bubbles that are guarenteed to not drip or spill or make a mess are my kind of bubbles!
14. We’ve been reading the Boxcar Children books at night (we’re starting book five this week), and Grace and Claire are as in love with the story as I was. I used to have dreams about finding perfect little pink teacups and dishes in the dump with Jessie and Violet. Guess I liked vintage china and bargain finds even back then. :)
15. This series of simple mechanical machine toys from Kikkerland is all the rage at parks in Brooklyn. They’re super cool, and cool-looking too. Shelf-friendly toys, for sure.
16. Evelyn needs a camera of her own I think so she can photograph my projects with me.
17. This balloon-making kit might be more for me than my kids. I’ve always wanted to have this talent in my arsenal. You never know when a situation calls for a balloon animal!
18. How cool is this family of wooden peg dolls? The dolls come to you completely blank and you customize them to match your family. So fun if you’re giving your child a dollhouse this year.

What are you giving the littles in your life for the holidays this year?

Bedrooms

Reader DIY: Linen Upholstered Rast

Just try and show me a piece of IKEA furniture that’s been hacked more than the $35 Rast dresser and I’d say you were lying. :) There are SO SO MANY hacks and I think for good reason – it’s a cheap and super versatile piece! And the Rast is the perfect small-bedroom-bedside-table size. Kelly from Hello…

Just try and show me a piece of IKEA furniture that’s been hacked more than the $35 Rast dresser and I’d say you were lying. :) There are SO SO MANY hacks and I think for good reason – it’s a cheap and super versatile piece! And the Rast is the perfect small-bedroom-bedside-table size.

Kelly from Hello Boudreux was inspired by this Martha Stewart tutorial and wrapped her Rast dresser in a lovely charcoal gray linen.

Kelly gives a great step by step here. And I’m crazy for the results:

Have you done any Rast hacks of your own? We’re in need of some smallish nightstands with storage, so I’m thinking of coming up with another Rast project myself.

Thanks for sharing, Kelly!


If you have a project you’d like to see on LGN, feel free to email your submission here. Thanks!

Dining Room

Dinner Party at My Place!

    The holidays are in full swing around here! The tree is up and the house is mostly decorated. But I have some work to do because we’re having a little dinner party tonight! The timing is perfect because I am participating in the Mark and Graham challenge with a few other bloggers. Mark…


The holidays are in full swing around here! The tree is up and the house is mostly decorated. But I have some work to do because we’re having a little dinner party tonight! The timing is perfect because I am participating in the Mark and Graham challenge with a few other bloggers.

Mark and Graham is the newest line from Williams-Sonoma and they focus mostly on personalized home decor. I was asked to style a table with these blue napkins that just happen to work with some of my vintage china perfectly! And I will always and forever love the green squiggle pattern on the salad plates.

Since my new dining room has lots of blues and periwinkle, I decided to run with those colors for the party decor. Even though pink/purple/blue is not usually what you’d think of for a holiday party! The blue tumblers are also from Mark and Graham. The opalescent goblets are vintage (my girls call them the rainbow glasses).  :)
This is the first dinner party we’ll have at our new table, so I wasn’t sure how to approach the table cloth/place mat situation. So I tried something a little different. I bought six black poster boards and cut and glued them together to fit just right. I like how it accentuates the unique shape of the table instead of covering it all up.
Then I used some neon pink washi tape to trim out the top and bottom.
For the center, I gathered up a bunch of crystal and glass candle holders. I had a few on hand, but I did buy some of these. (The shapes!)
Since there was no place to put a floral arrangement in the center of the table, I decided to make little ones for each place setting. ABC Kitchen does something similar in mismatched, tiny little bottles. So I stopped by the thrift store and bought six (very dirty?) glass bottles.

I used teeny tiny flowers like wild roses, small parrot tulips and even a little baby’s breath (I know, shocking!).
I cut down these chalkboard tags from Mark and Graham into little waving flag shapes for the place cards. As a side note, have you tried chalk pens? AMAZING.
I put the beverages on the skirted console. The monogrammed carafe is holding my favorite – sparkling grapefruit juice. Yum.
Trader Joe’s was selling these great boxwood wreaths last week for $10 each. I hung them up using some vintage trim I bought at SAS last time we were in Arizona.

So excited for this dinner now! 
Have you seen my fellow blogger-lady’s tables? I love how each of us went in completely different directions. Check them all out here – Coco+KelleyEmily HendersonCamille StylesSacramento Street.
Now for the important part (you know, the part where you can win stuff). Mark and Graham is giving away a $500 gift certificate if you stop by their FB page and vote on which table setting you like the most. Think of all the goodies you could get for $500! Think of all the future dinner parties! 

Entry and Hallway

DIY: Stair Runner

I’ve mentioned before that one of the first things we did after moving in was pull out the horrible red commercial grade carpeting that covered most of the garden level (other than the floors in my office), including the stairs that go up to the living room. I loathed this carpet and we were relieved…

I’ve mentioned before that one of the first things we did after moving in was pull out the horrible red commercial grade carpeting that covered most of the garden level (other than the floors in my office), including the stairs that go up to the living room.

I loathed this carpet and we were relieved to see that the wood under the carpet was in salvageable condition in most places. But when we started pulling off the carpet on the stairs, we were in a different boat. The wood was full of holes and was covered in paint spills and brush marks.

I like the look of a painted stair tread anyway, so I happily painted the stairs white (well, mostly…) before laying down the stair runner (which is really just a bunch of IKEA rugs)! Much better right?
Here’s the full run down:

I’ve come to love and appreciate the power of a sanding block in an old house. Everything in my house looks better after a good rub down with a sanding block! (it’ll clean up old bathroom tiles like you wouldn’t believe!) I cleaned up as much of bumps and the uneven parts here on the stairs as possible.

Then I primed and painted just the edges of each step. I was going to paint the whole width, but then I though it might be better to leave the wood in case the owner refinishes the floors in the future.

It’s CRAZY how much brighter and cleaner the stairwell felt with just those few inches of white paint!
Once the paint was dry, I pulled out a few of these rug grippers I had picked up at the doller store a few months earlier. I swear, the hoarder comes out in me when I go to dollar stores and Target’s dollar spot! Bad news. But it worked out for me in this instance.

This particular rug pad was the exact size as my stair’s tread and it was sticky on the top and bottom, so everything was really held in place.

When I ran out of the special rug pads, I move to a runner-sized non-sticky rug pad that I cut to size, and that also worked really great. To tell you the truth I can’t tell much of a difference between the stairs with the sticky rug pad and cheapie regular rug pad. So either works well.
So for the actual rug installation, I used four of these runners from IKEA. They were $25 each and I could get about 3.5 steps done per runner. I started at the TOP of my stairs and used a brad gun with 3/4″ brads to secure the runner to just the underside of the step lip.

I put in one brad every 2-3″ along the width of the stair tread. The rug pads helped the runner stay in place on the riser and the top of the tread, where there were no brads. When I got to the end of my runner, I trimmed off the rolled edge.

Without the rolled edge, it’s easier to layer the start of a new runner on top more seamlessly.

Then you just line up the rolled edge of the next runner and staple in place.

I’ll admit, I got a little sloppy when I was doing this project and I wasn’t super-duper exact with my lines. From the top of the stairs, you can see the stipes wander a little bit near the center. :( It’s not that bad in person, but in this photo, I pretty much want to pull out all the brads up to the middle portion and fix it this second. We’ll see how long it’ll last crooked I guess.  Learn from my mistake! Measure your edges. Mark it out with chalk maybe to make it a little easier on yourself?
Anyway, the fourth runner was a little short. I could have bought a fifth runner and cut it up for just this bottom riser, but I decided I kind of liked the runner starting a little higher off the floor. I’m calling it a happy mistake. :)

Then to finish up the look and to make sure the runner were completely secure on the stairs, I used three black nail heads (just eye-balled) on each tread (none on the risers). I thought about doing brass, but I really like the tone on tone happening with the black nail head on the charcoal weave. It’s a more subtle look.

We’ve been loving our revamped stairs for a couple weeks now, and I am happy with the look and how it’s wearing! The dark shows less dirt than I was worried about, and the stairs are much safer now, and about a million times quieter.

One other thing we did was apply Restor-A-Finish to all the floors that were under the old carpet, and they look SO much better. Much less dry. (compared to a few photos up)

I love seeing the stripes peeking into the living room. :)
So with the four runners, three packs of nail head trim and a couple dollar store rug pads, I think this project came in under $125.

So worth it!

PS the vintage runner in the hall was a flea market find. It’s really long and I was hoping I could use it as a stair runner originally, but we were about three feet too short. Bummer.
PPS Another project from the garden level.
Musings

Another Fab Gift Guide

Here’s Part Two of my gift guide for Fab. I have bought literally zero presents for the holidays this year. Boy, do I have my work cut out for me, but all of these below from the Fab Holiday Shop are getting my wheels turning! PS All of my picks are under $60! Colorful Knives for your co-worker…

Here’s Part Two of my gift guide for Fab. I have bought literally zero presents for the holidays this year. Boy, do I have my work cut out for me, but all of these below from the Fab Holiday Shop are getting my wheels turning!

PS All of my picks are under $60!

Colorful Knives for your co-worker who has a night-gig as a food blogger.
A Baby Monkey Print for your little niece who you hear can climb out of her crib unassisted!
A Gold Feather Ring for your very fashionable auntie.
Warhol Phone Case for your cousin who loves art AND shoes! Perfect.
A Honey Pot for your lovely grandmother and her morning camomile tea.
A Funny Tee for me! (cause I’ll mean it)

A NYC Subway Poster for your hip BIL who lives downtown.
Morse Code Necklaces for your two beautiful and hilarious sisters.
A Trio of Cast Iron for your gourmand mother.
A Gold Can Bank for your kid with amazingly quirky taste (which you love).
A Hip Ikat Pillow for your lifeline (aka your babysitter).
A Cheese-Making Kit for your Rad Dad.

Inspiration

Temporary Wallpaper from Spoonflower

Hey, all you renters and commitment phobes! Did you know that Spoonflower prints removable wallpaper!? You can create your own design or choose from their insanely-extensive archives of user-uploaded designs. Here are a few of my many favorites: The price point is reasonable at around $60 a roll. How perfect would some of these designs be for…

Hey, all you renters and commitment phobes! Did you know that Spoonflower prints removable wallpaper!? You can create your own design or choose from their insanely-extensive archives of user-uploaded designs.

Here are a few of my many favorites:

The price point is reasonable at around $60 a roll. How perfect would some of these designs be for a small application? A powder bath, a laundry room, a coat closet that your guests will see, an accent wall or nook…

If you have two or three hours to blow, click away!

Bedrooms

Pretty in Park Slope

Today I am SO excited to share a brand new project from my friends Suzanne and Lauren McGrath from Good Bones, Great Pieces. (Did you check out their amazing book yet? I wrote about it here.) I love how fresh this Brooklyn space feels!  Here’s Lauren: “This apartment is of a lovely young couple that…

Today I am SO excited to share a brand new project from my friends Suzanne and Lauren McGrath from Good Bones, Great Pieces. (Did you check out their amazing book yet? I wrote about it here.) I love how fresh this Brooklyn space feels! 

Here’s Lauren:
“This apartment is of a lovely young couple that found us through our blog. They live in an old brownstone apartment building turned co-op in Park Slope facing Prospect Park. Their apartment is small but Natalie (the wife) who is a real estate agent and often works from home, really wanted a space that felt cozy and chic. Natalie and her husband, a lawyer, are both from the Midwest, and they’re still discovering the wonders of living in New York City. They love living here. It is so refreshing to see their enthusiasm! 
“They chose to live near the park so that they could be able to walk their beloved and ginormous dog :) The dog was in the apartment when we were installing all the furniture and artwork, and it was hysterical trying to navigate around him! Fortunately for us, Natalie and her husband truly wanted to hand over the design of this new place, so with a fresh start, they actually brought almost nothing to their new place. Most of the hodgepodge of merged furniture pieces was sold off on Craig’s List. We were happy because we got to work with a clean slate- every decorators dream. It also helped that Natalie is such a delightful young woman.

“We wanted Natalie’s apartment to feel young and fresh and fun, like her! The first thing we purchased was the sofa at the Lilian August warehouse in Norwalk, CT. Once we had the main seating piece down, we were off and running! In terms of the color palette, we used the framed bird prints above the sofa as inspiration.These were taken from an old copy of “Audubon Birds of America” we found on a dusty shelf at a flea market. 
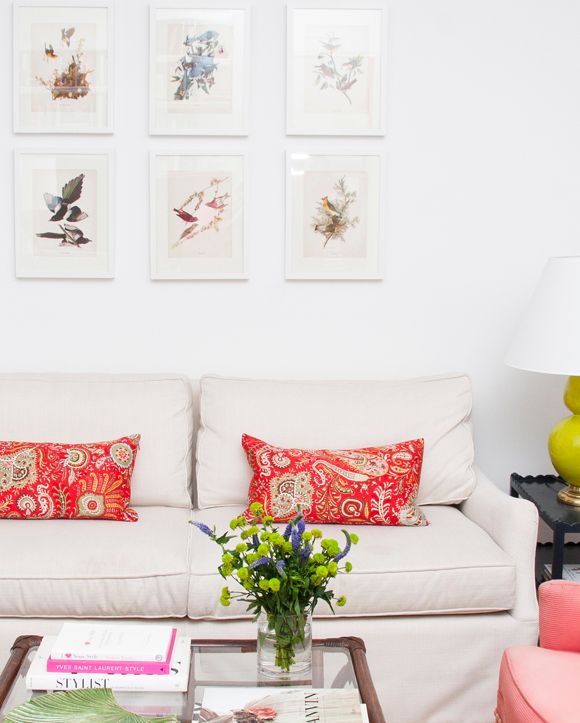
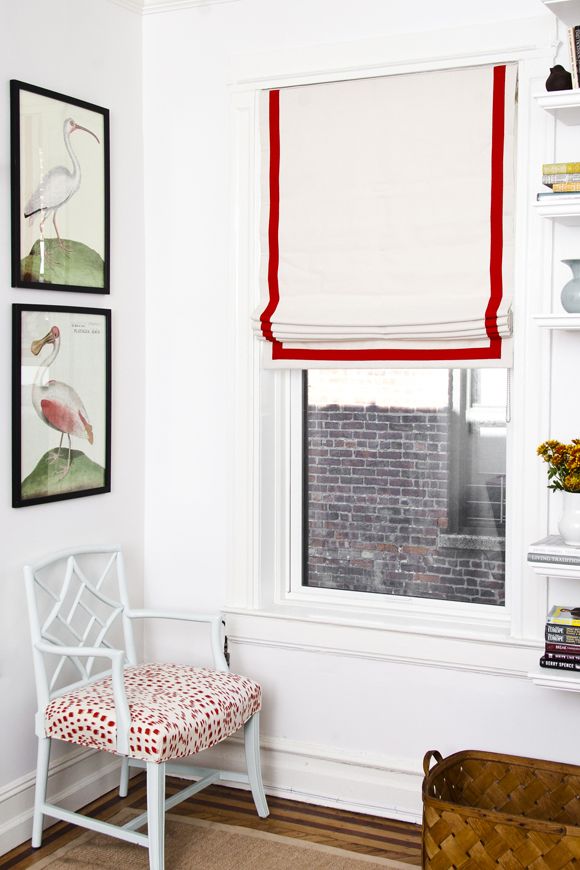
“We kept the largest upholstered piece neutral, as well as the rug, and injected pops of blue, red, green and pink with art, lighting, pillows, and other accessories. The show stopper was probably the amazing bird’s egg blue lacquered Chippendale style chair Lauren found at Circa Who in Palm Beach, Florida. We chose to reupholster the seat cushion in one of our favorite Sister Parish inspired red and white prints. The combination jumps off the wall and makes us smile. Of course, we had to add cherry red tape to embellish the white roman shade on the window. It’s so happy! 
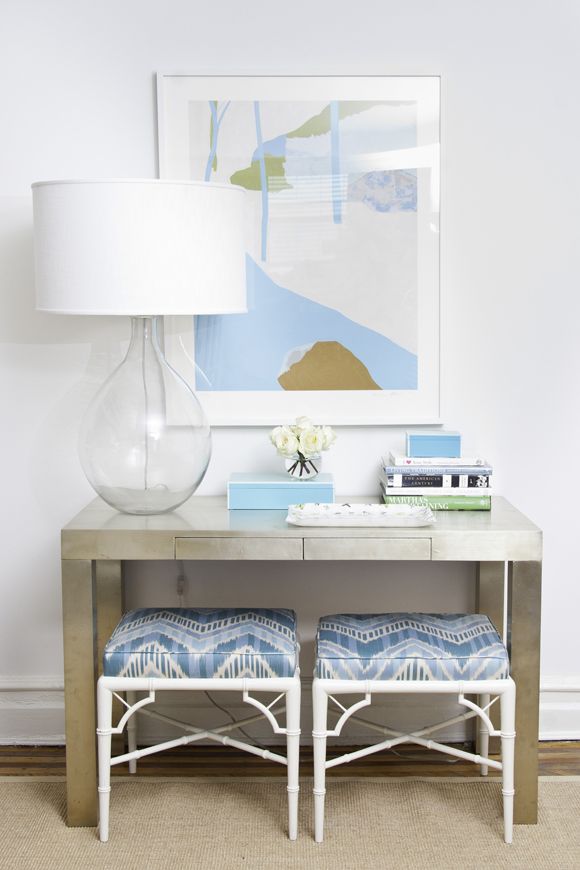
“The lamp on the West Elm Parson’s desk is quite oversized, and we like it that way. It’s important to have some pieces in the room that are of different scale, particularly in small spaces. The LOVE artwork was a small stroke of genius. We fell in love with this textile from Lu Lu DK’s latest collection at Schumacher. We decided to buy a yard and had it strung to a canvas. Apparently this technique was all the rage in college dorm rooms in the 1980’s. We’re bringing it back, with whimsy.
     
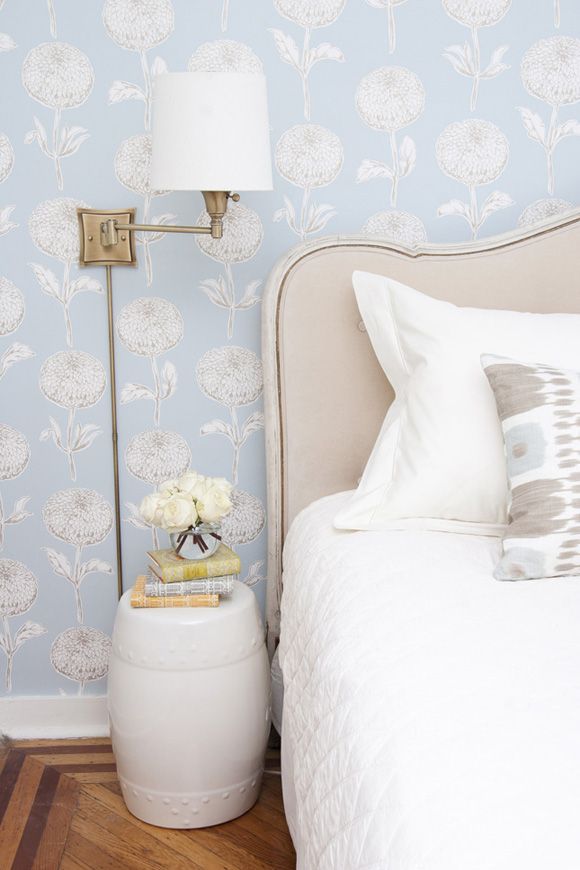
“The bedroom is actually a very small room, but we made it look grand by walllpapering the wall behind the bed- they insisted on a King! We found an amazing headboard at an antique emporium, tucked behind many others. Upholstering it in a cotton velvet just made it look so luxe. Inexpensive swing arm lamps save room when there isn’t any for bedside tables. In the end, it looks quite fancy, but it’s not. Their dog sleeps at the foot of the bed, we think! Whatever, we know they’re happy with their first nest, and so are we.

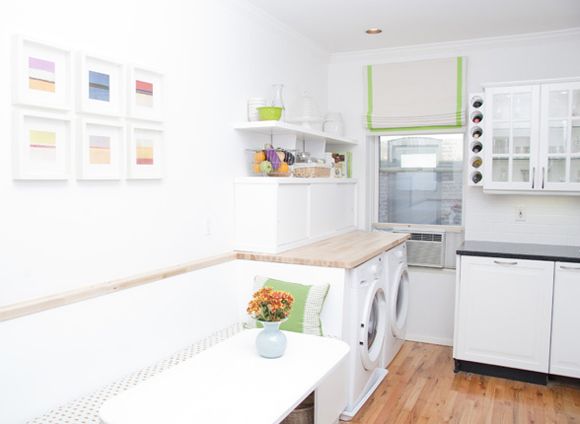
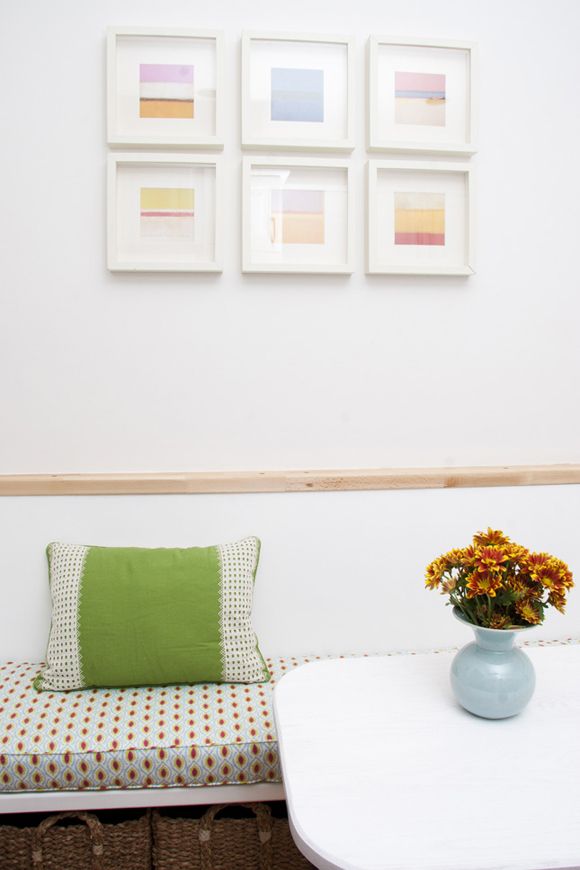
“This kitchen is very long and narrow but it was important to Natalie to have a place to sit and eat (since there is no dining room). We came up with a design for a built-in breakfast nook space which would utilize every square foot of space, and look like it was always there.

“We chose an adorable print fabric to make a custom seat cushion with, and it immediately looked welcoming and comfortable. The client found this table top at a thrift shop, then had a custom pedestal made to allow for leg room.”

SOURCE LIST
Kitchen:
Custom banquette cushion fabric: Pindler and Pindler
Pillow: Pier 1 
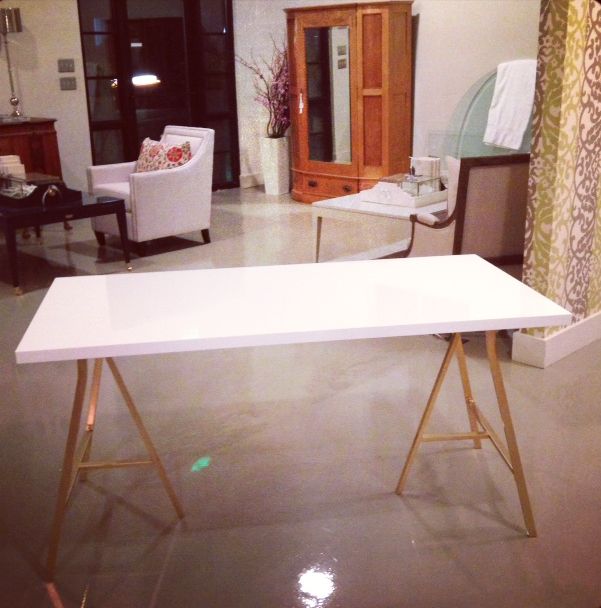
Table (client’s own)
Art: Stolen ;) from a Rothko book and framed in Ikea shadow box frames 
Roman shade: custom designed by us, Bright Apple Green Tape for Accent, Samuel and Sons
Living Room:
Sofa: Lilian August found at the warehouse store in Norwalk, CT
Pillows: custom pillows designed by us in a Brunschwig & Fils paisley 
Coffee table: Found at the Salvation Army in Mount Vernon, NY for $15 
Scallop-edge side tables: found at Braswell in Westport, CT , We lacquered them in a Ralph Lauren dark navy blue 
Rug: Overstock.com
Lamps: Apple green, from Dovecoat, Westport Ct.
Bird prints above sofa: Taken out of the pages of “Audubon Birds of America”and framed in inexpensive frames found at A.I Friedman 
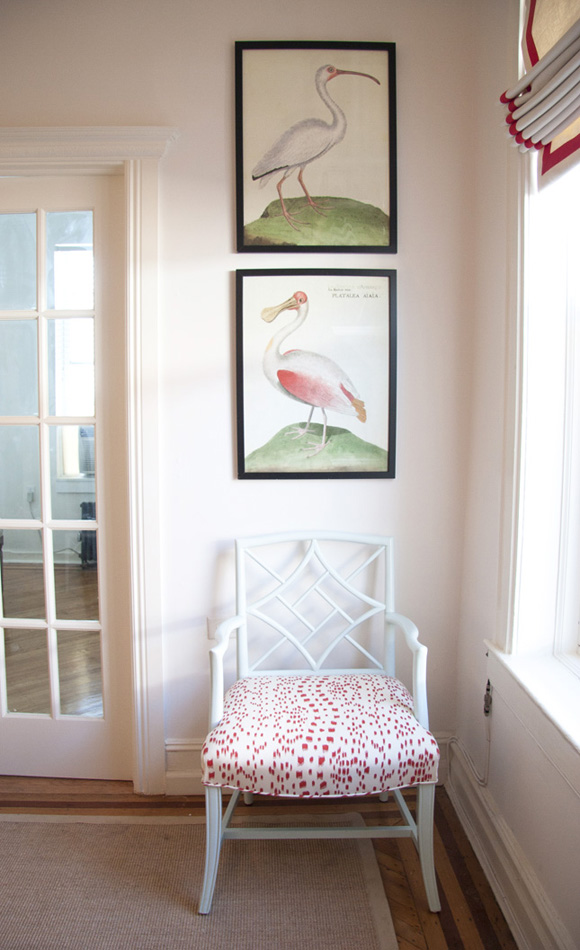
Pink upholstered chair: found at Brimfield, from an estate in Maine
Art above chair: we created this large scale piece of art from one of our favorite Lu Lu DK fabrics for Schumacher. When the budget is tight we like to make our own art by framing a large canvas with a dramatic fabric. 
Desk: West Elm Parsons desk 
Stools: Found at Circa Who in Palm Beach, FL and upholstered in a Duralee ikat fabric 
Lamp: Wisteria 
Art: From the 1970’s, Found at Consign It in Greenwich, CT 
Turquoise boxes: Wisteria 
Occasional chair: Found at Circa Who in Palm Beach, FL and upholstered in a Brunschwig & Fils fabric 
Duck prints above chair: Found at Brimfield, reframed
Bedroom: 
Headboard: This is an antique French king size headboard that came out of an estate with lots of very old French pieces. We found this piece at one of our favorite auction houses called Braswell (unfortunately it no longer exists) and we had it reupholstered in a soft velvet. The headboard cost us $450. 
Wallpaper: The wallpaper is from Duralee
Side tables: Wisteria
Sconces: House of Troy
Bed pillow: custom made by us from a Schumacher ikat fabric 
A huge thanks the Lauren and Suzanne for sharing this lovely project!
All photos by Matt McGrath.
Bathroom

White and Gold Design

Marianne and Jamie from White and Gold Design are based out of Salt Lake City. They are doing some great work and emailed me with one of their simple DIYs for their new office space. Jamie says: “Needing some desks for our new office space on a tight budget, we were inspired by your etageres post…

Marianne and Jamie from White and Gold Design are based out of Salt Lake City. They are doing some great work and emailed me with one of their simple DIYs for their new office space.

Jamie says:
“Needing some desks for our new office space on a tight budget, we were inspired by your etageres post and how the spray paint completely transformed the piece. We bought the Vika Amon table top and it has a thick glossy finish that is actually pretty nice. We also bought plus two of the trestle style legs. Total spent $55. 
“We picked up some Rustoleum Metallic Gold spray paint, did two quick coats on the legs and absolutely love the finished product!  
 
“This DIY was awesome because it was so incredibly simple and best of all, cheap. You could buy any size of the table top from Ikea and create a similar look for a console table or even a small dining table. 
“The legs really look like brass and the ordinary IKEA screws that we all hate transformed into nice brass bolts.” 
Looks great, right? Marianne and Jamie are a really talented duo! Check out these photos from Marianne’s home:
If you’d like to submit a room or project to share on LGN, please email me.
Blue

DIY: Painting a Brass Chandelier

When I was hospitalized with tetanus shortly after we moved to Brooklyn, my mom flew out to help. She saved the day and helped keep the house running and distracted my girls so they didn’t get too scared about the situation. (I’m doing much better, by the way :) One evening when I was recovering…

When I was hospitalized with tetanus shortly after we moved to Brooklyn, my mom flew out to help. She saved the day and helped keep the house running and distracted my girls so they didn’t get too scared about the situation. (I’m doing much better, by the way :) One evening when I was recovering at home, Mom came back from a walk around the neighborhood with the girls. She asked me if I had seen the purple chandelier in the neighbor’s house down the street. “You will die when you see this thing” she said.

In most cities, if you walk around a residential neighborhood at night, you can sort of see into apartments. It is way too much fun to me – probably one of my favorite post-dinner date night activities. I know it sounds creepy, but it is amazing to get a glimpse inside these beautiful homes, and plus, everyone does it (city dwellers, back me up!). I tell myself it’s just like looking at real estate listings. Ish?

So by the time I was feeling well enough, I hobbled down the street in search of a fabulous purple chandelier in one of our neighbors’ houses. I know I gasped out loud when I finally saw it. It is the most incredible blue-purple murano glass chandelier EVER. I snapped a single sneaky photo that doesn’t even begin to show the fabulous-ness of this fixture (trust), and I felt like a total creepster (though I have been known to snap sneaky photos). The whole house looks like it’s amazing – the art! the paneling! the moulding! – so I keep hoping I’ll run into the owners one day on the street. I would shamelessly out myself and beg/plead for a house tour.

ANYWAY (wow, this is going to be a long post), the chandelier has been stuck in my brain for months now. I go out of my way to walk by it often and it’s somehow even more lovely every time I see it peeking through those windows. When it came time for me to choose a color for the big brass chandelier, I knew there was no way I could pull off a lavender or lilac, but I thought a pale blue that leans toward periwinkle could actually be really cool.


Here’s the full run down on how we painted this beast of a chandelier…
I enlisted the help of my girls to tape off the sockets on all 24 arms. Just a little piece of painters tape works fine. Make sure to take off all the candle sleeves first.

While I had the chandelier on the ground still, I wiped it down well and then lightly went over some parts with a leftover can of white spray primer I had lying around. This was a lazy step and I probably should have primed everything here, but I felt like it wasn’t really necessary. Nothing really touches a chandelier after it gets installed anyway. 

My local hardware store has a fantastic selection of spray paint. More brands and colors than the big box stores even. I really liked this Valspar color (Sky Blue) at the store, and then later I was super impressed generally with this paint (first time trying Valspar spray). Good coverage. Not too crazy in the smell department. Fast drying. Easy to spray.

I think the best way to spray paint a light fixture is from the hanging position. We strung up the chandelier on a 2×4 between a ladder and our fence. That way I could easily walk around and under the chandelier and spray it from every angle.
And there were a LOT of angles. 

I’m not going to pretend this was a fast spray job. I went through six cans of spray paint to fully cover this 60″ wide chandelier. I had paint all in my hair and there was a soft outline of a mask on my face. #periwinkleglow

Some of the parts of the fixture needed to be painted on the ground. See the orange chain? I thought the chain that originally came with the light was a little on the wimpy side, so I used a chunkier one from the hardware store.
I was starting to get excited about the color right about here:
So, I wouldn’t really recommend DIYing a big electrical install project like this one, but my super handy and wonderful dad was in town, and he was up for the challenge of hanging and hooking up the new chandelier. We took down the hideous old light and installed a new light kit that is made for heavy fixtures. It stretches between joists and grips into the wood.
While we were working on the new light box, we threw up a ceiling medallion too. I wish I had planned more for this step and had ordered something big and extra special, but this one from Lowes worked fine in a pinch.

Here’s the medallion and ceiling plate in. Wires ready to be spliced into the chandelier’s after hanging it, which was a feat in and of itself – that thing is so heavy! If there had been an extra set of hands in the house, I would have had someone take a photo of that step, but we needed every adult to help hoist while Dad spliced.

It’s hard to really show just how big this chandelier is. It’s enormous, and we love it.

The color is just the right shade of periwinkle blue.
And those 24 bulbs make for a really bright meal!
And the view from below is pretty.
And! I love how it looks with my giant vintage abstract (it’s hung the wrong way so it fits on the wall here, but I still like it).
AND! (best of all) Michael came home a couple nights ago and said there were some girls outside talking about how much they loved the chandelier and sneaking some photos with their phones. I was only creeped out for a second. Then I felt proud and less guilty for doing the same thing weeks before. Hopefully those girls will keep the periwinkle chandelier trend in our hood moving forward!

PS Another huge chandelier DIY.
Inspiration

Reporting on the Brass Faucet

So far, my only complaint about the Kingston Brass faucet I bought (and talked about here, though I ended up getting this one actually) is that it took a while to get here. Like, maybe two whole months? When it did finally arrive though (I guess it was temporarily back-ordered), I was happily surprised with how heavy the…

So far, my only complaint about the Kingston Brass faucet I bought (and talked about here, though I ended up getting this one actually) is that it took a while to get here. Like, maybe two whole months?

When it did finally arrive though (I guess it was temporarily back-ordered), I was happily surprised with how heavy the thing was! And the polished brass was not so ‘bad 80s brass’ as I thought it might be. I was wondering if I would need to strip the lacquer off or sort of buff off some of the shine, but I think it looks pretty good as is. And I actually like it with my boring stainless steel sink. The mix of metals there sort of mimics the mix on the range.

As far as functionality goes, it ran a little slow for about a week after we installed it. The pressure was weak and it drove me completely nuts. I was worried the low pressure was because of the high bridge. But it ended up being a mistake on my part (I put the filter in the wrong way) and now that it’s fixed, this faucet easily has more water pressure than the shower in our last apartment! I could probably put out a fire in our backyard with the sprayer. :)

So, I’m curious. Since this redo was done on the cheap, I’ve been sort of dreaming of what I would have done if we owned the house and budget was no issue (the answer begins with reconfiguring the whole lay out of the parlor floor…). If you’ve redone your kitchen, where did you splurge and where did you save? What kitchen element is most important to you? Appliances? Countertops? Cabinets?

This error message is only visible to WordPress admins
There has been a problem with your Instagram Feed.
© Jenny Komenda. All Rights Reserved.
Site by