
I really wanted old-looking white floors for our new studio space. I actually saw some interesting, beat-up knotty oak at Lumber Liquidators for a little more than a dollar per square foot, which is practically highway robbery when it comes to wood flooring prices. But it was only about 2″ wide and after laying all that tongue-and-groove flooring on the other side of our house this year, I decided to think outside the box and figure out a way to get wide-plank wood flooring to go in the studio for way, way less.
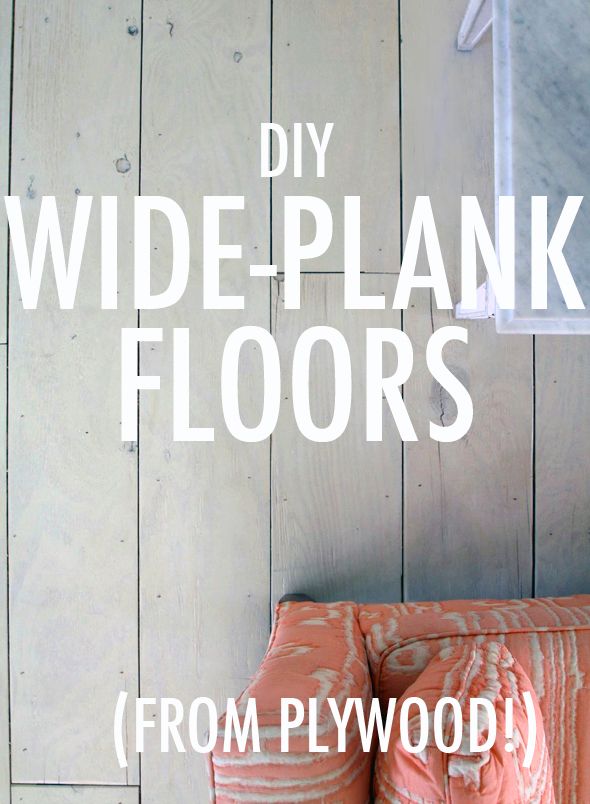
So there’s this really cool event space in Manhattan called Gary’s Loft that companies love to host parties at. One of the spaces is big and open and all white, with gorgeous, gappy wide-plank white wood floors. I loved going to parties at Gary’s.
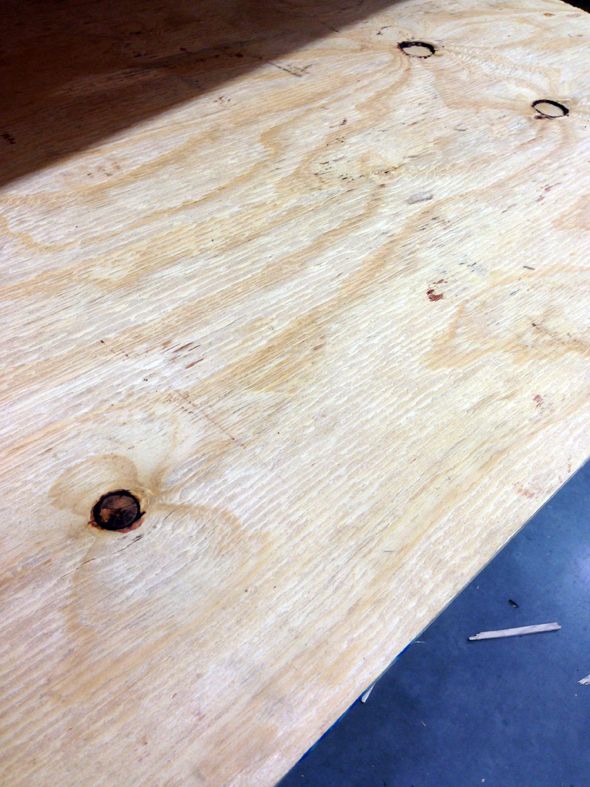
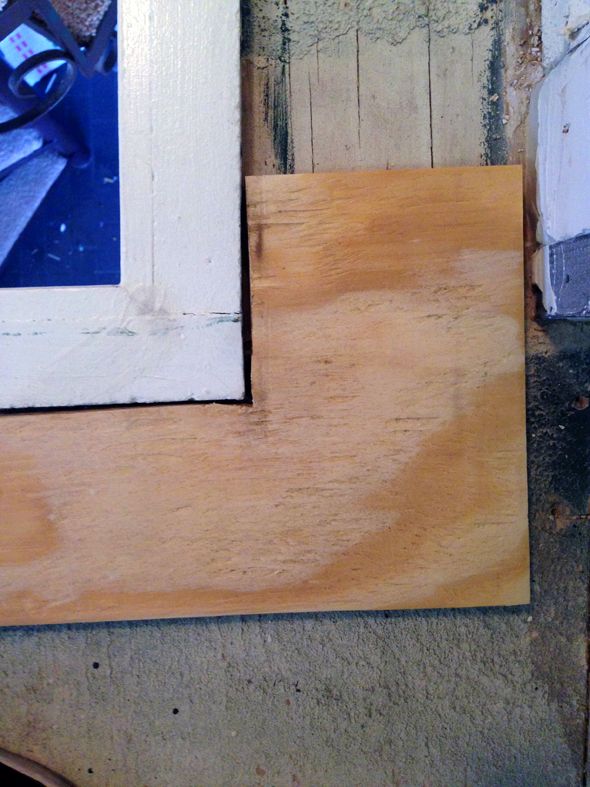
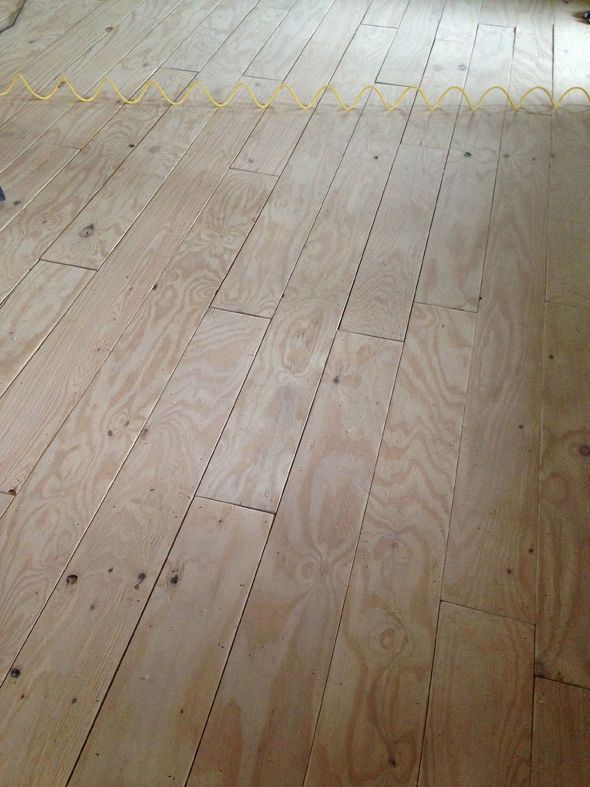
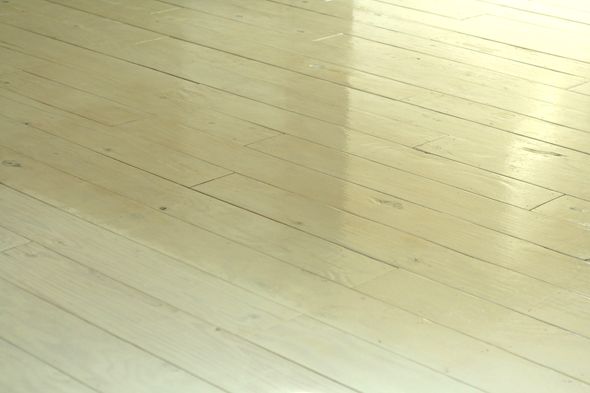
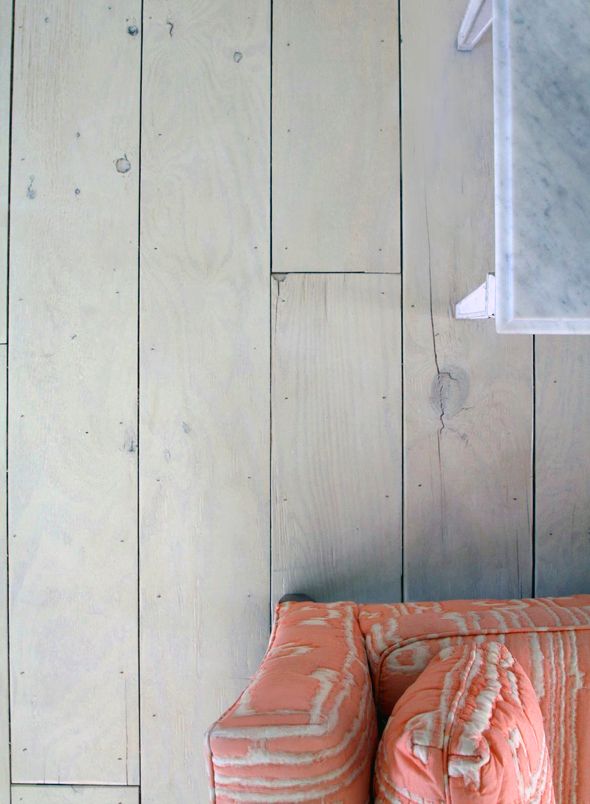
When I was planning my approach to the DIY, I had those gorgeous floors in mind. They were perfectly imperfect and all worn and full of character. I had the thought that cutting down and using plywood as the planks could achieve a similar, and even more rustic (in a good way) look. So I headed to the lumber section at my local Home Depot and found just the right plywood. It’s almost a half-inch thick and one side is more finished than the other.
Plywood sheets are 4×8′, which is 32 square feet. We needed to install about 800 square feet of flooring up in the studio space with the attached bedroom and balcony. Which meant we needed about 25 sheets of plywood. At less than $18 per sheet, my price per square foot came in at about 50 cents, which is complete insanity!
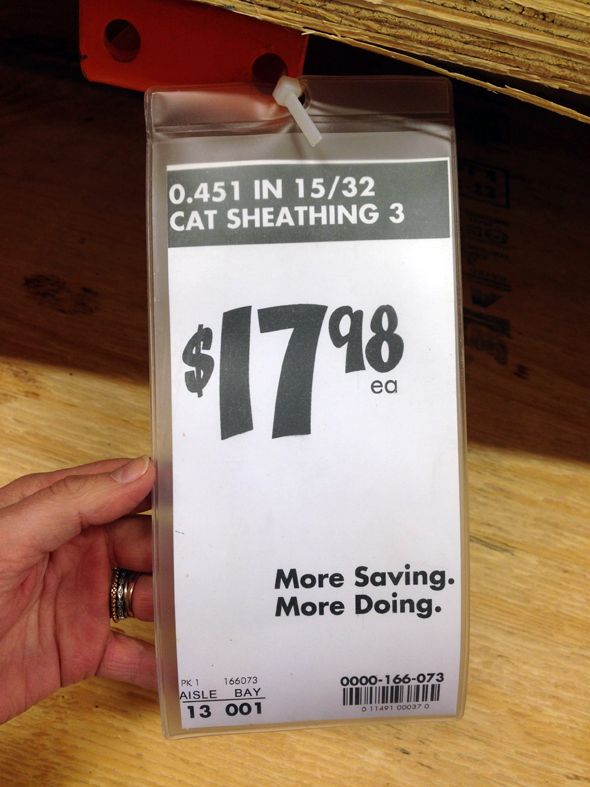
So, I found the plywood I wanted, took a photo of the price tag, and walked up to the customer service desk. I placed an order for 25 sheets and I asked for each sheet to be cut down into 8″ planks, lengthwise (which meant there was no waste – exactly six planks from each sheet). I’ll admit that I did get a few funny looks, but for the most part everyone at Home Depot was incredibly nice and accomodating, given the huge ask. I was more than prepared to pay 10 or even 25 cents per cut, like one of the guys in the lumber department suggested they might charge me at the order desk. I think I paid for cuts when I did the wall planking project in our mudroom, but this time there was no charge for all those cuts! I’m pretty sure it was because I was really flexible on timing and let them take as long as they wanted to get the order finished. And even then, it was less than 24 hours before they called to tell me my planks were ready to be picked up.
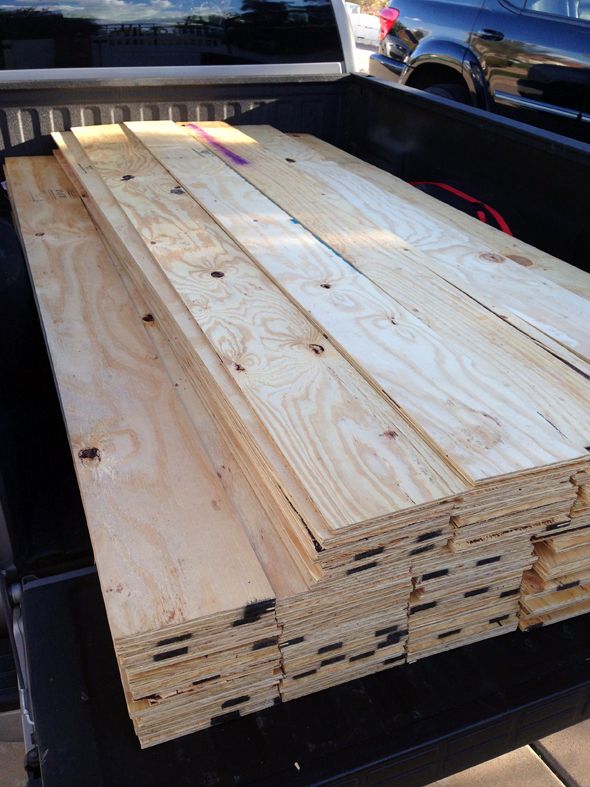
We borrowed a truck from my kind brother in law and he and the Home Depot guys helped us load up the 25 sheets of cut wood. The tricky part was then getting all the wood upstairs! These amazing gloves practically never left my hands during the two or so days I was installing the planks and moving them around. The gloves are thin, but really durable and they grip so well that you almost forget you’re wearing gloves at all. They’re my favorite brand I’ve used so far.
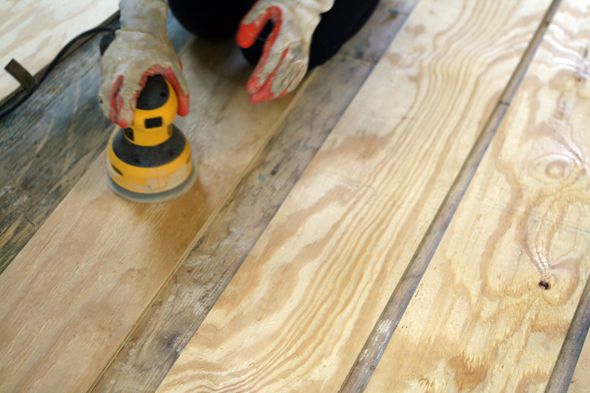
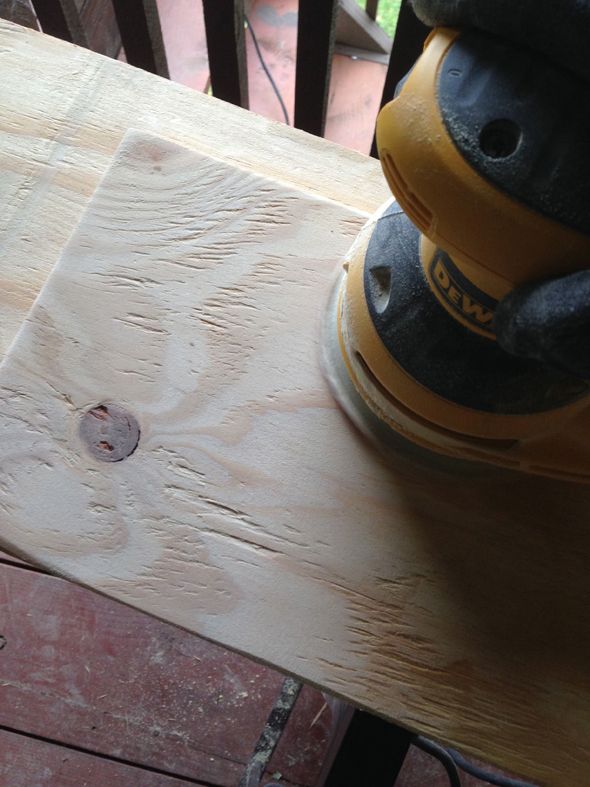
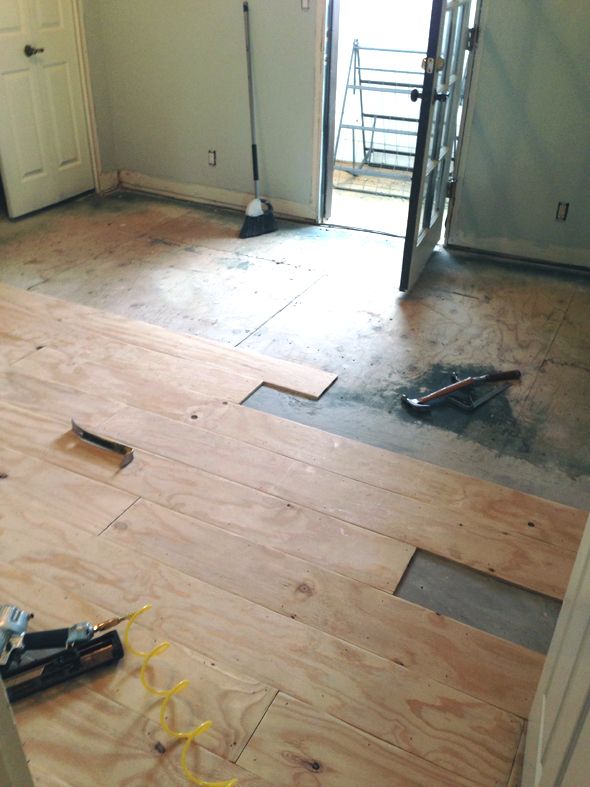
Once we had all the carpet removed and all the wood planks upstairs to the back porch, it was time to start the only tedious part of this project: all the sanding. It was actually pretty easy work, but it just took some time (actually about a minute and a half or two per plank, which really adds up). I asked Heather to sand while I was installing the planks, and usually the timing worked out well and we were able to keep a good pace.
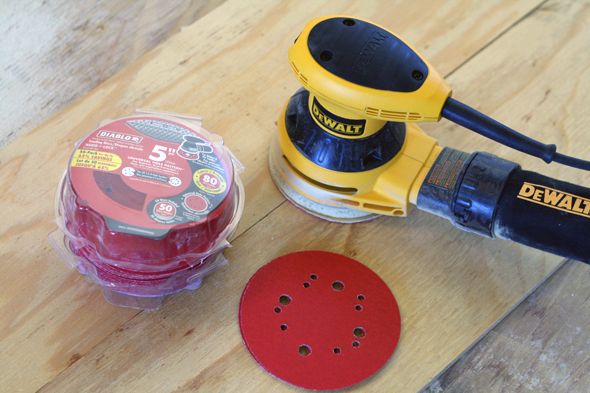
This new orbital sander has changed my LIFE. You guys, what have I been doing with my dorky little Mouse sander for all these years?! Orbital is where it’s at. Worth every last penny.
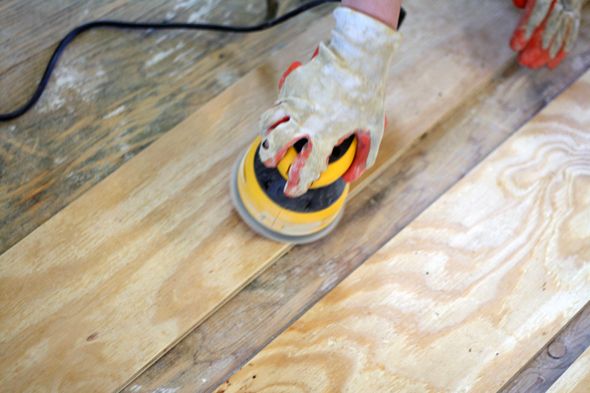
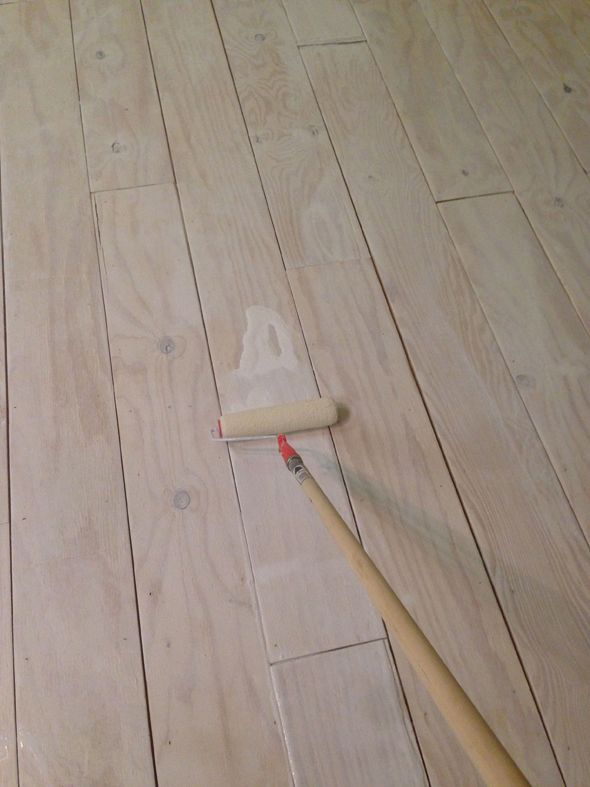
I bought a couple packages of the bulk 60-count course/removal sanding pads and they really worked fast on any rough parts or spray painted markings or splinters on the plywood planks. It worked out best to change the sanding pad every three or four planks. And I didn’t worry about getting every imperfection off – you’re just going for the obvious parts that look bad or like they could hurt a bare foot. We also sanded down the perimeter of every plank so that the edges were sort of beveled. I think this step made a huge difference in helping the planks look like they’re not just cut down plywood pieces.
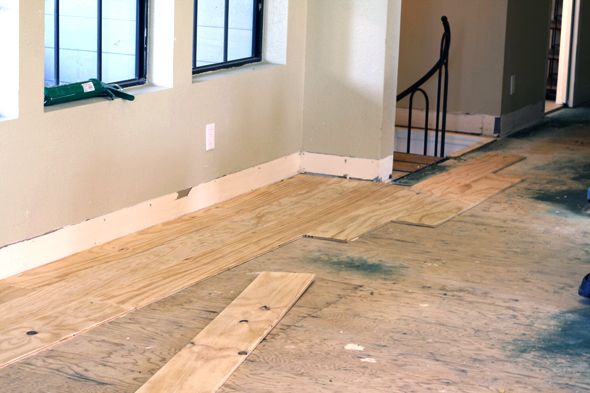
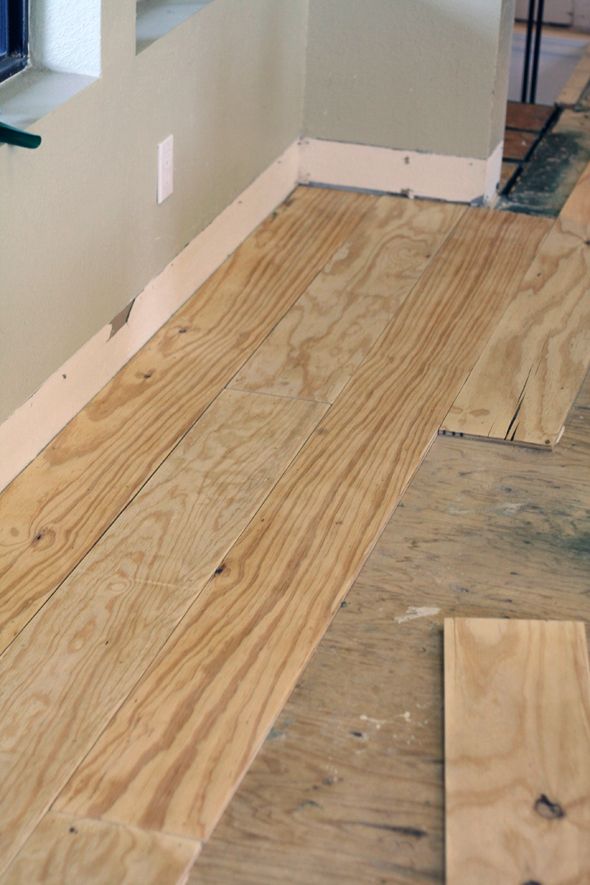
The installing part was so easy, especially when there weren’t additional cuts needed. You’ll want to start on the longest, straightest wall you have. Don’t start on a wall that requires a lot of cuts and notching out – your lines will get messy and crooked really fast. If you start your installation on a long, straight wall and just focus on maintaining even spacing, the planks will look great. You can use a ruler or t-square to help with spacing, but I felt comfortable eyeing it.
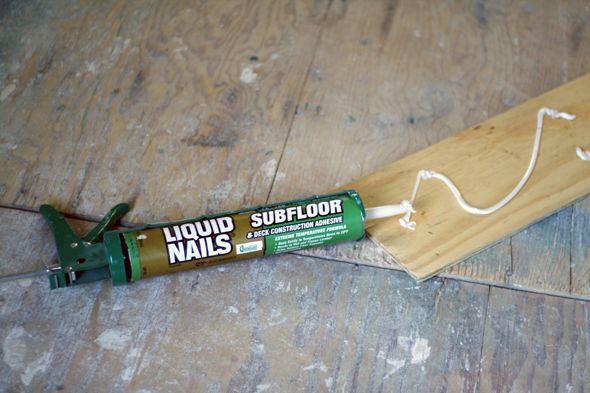
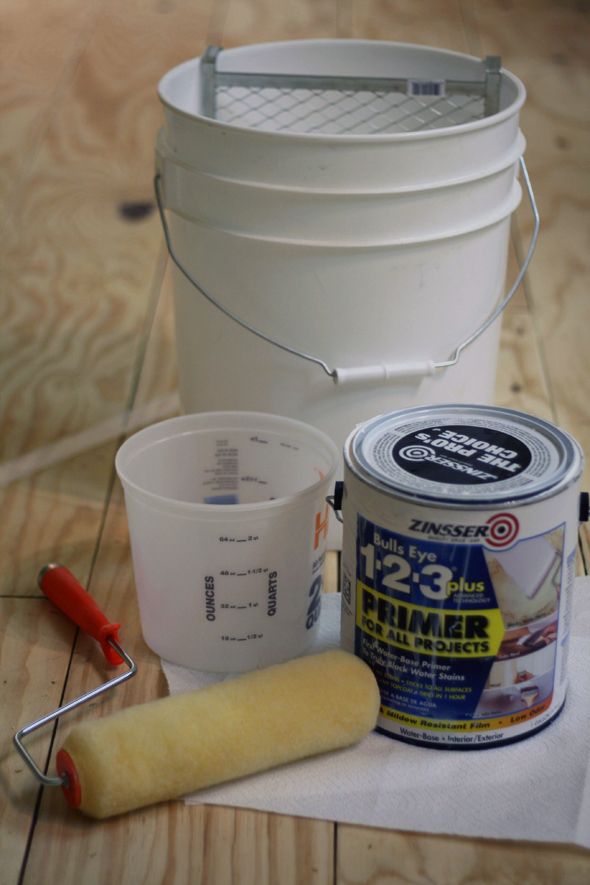
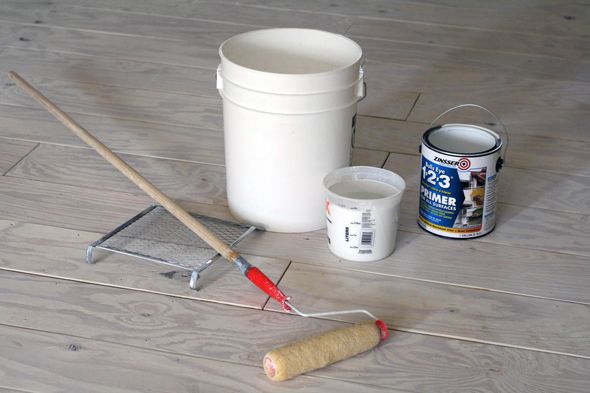
To lay the wood down, I first squiggled on to the back side of the planks a line of Subfloor Liquid Nails (in the big contractor size, using the oversized caulking gun). I went through at least a dozen of these tubes of glue – you’ll need a lot of it!


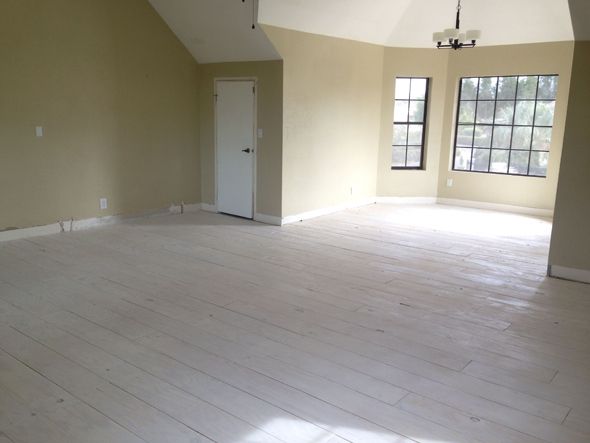
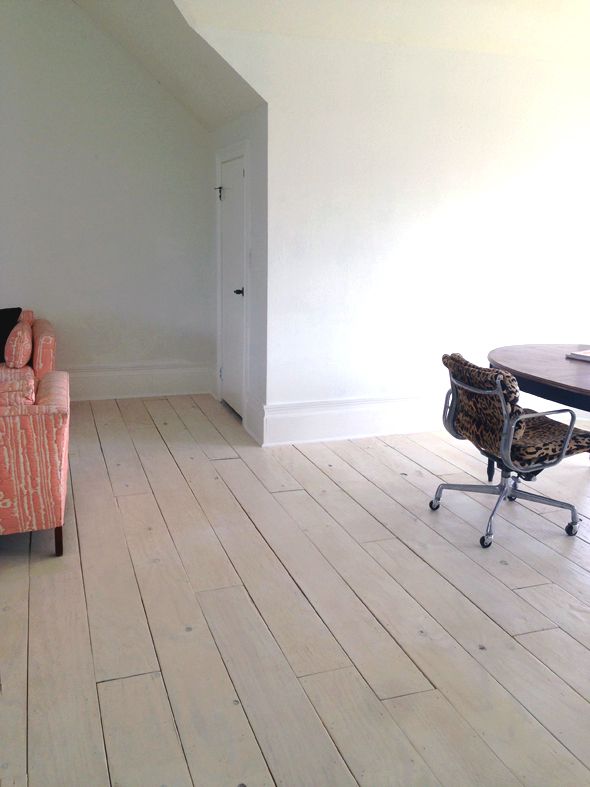
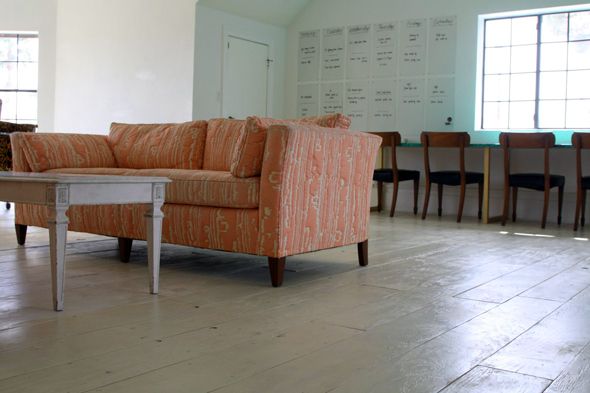
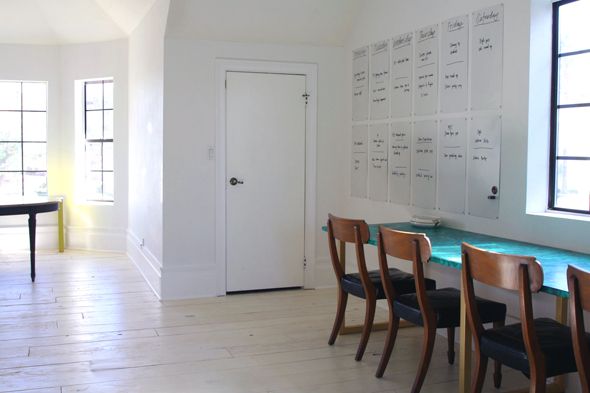
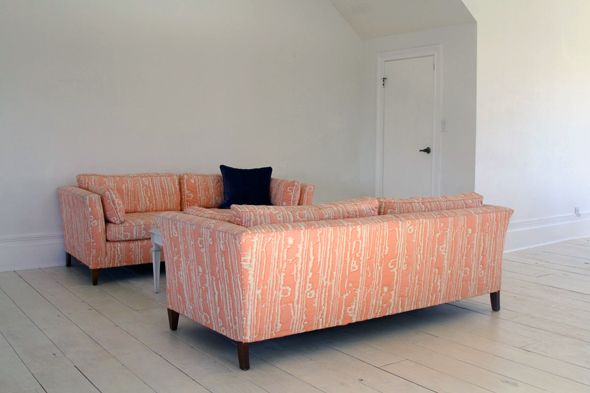
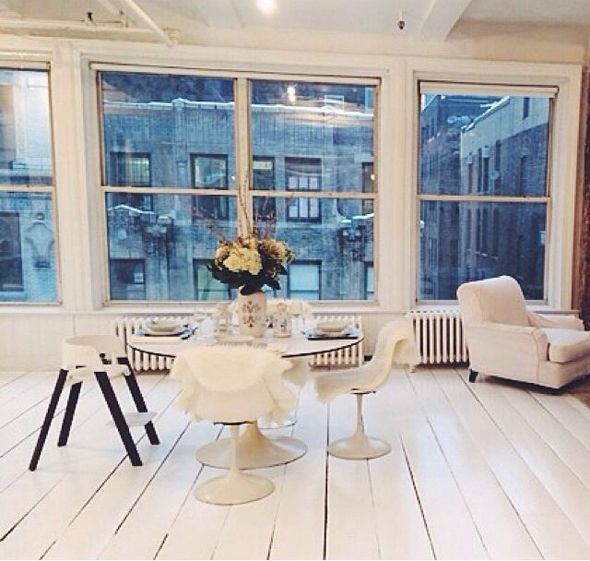
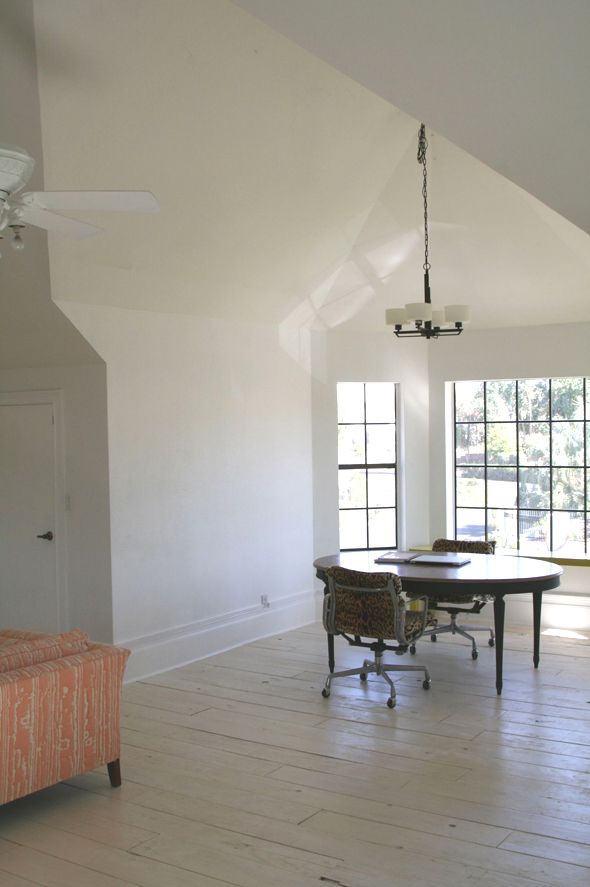
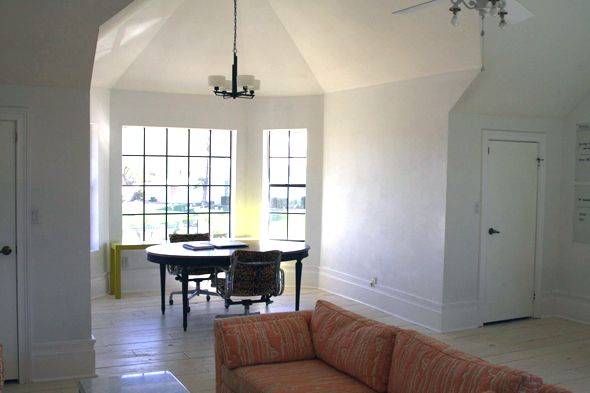
We haven’t even started decorating in here yet, but I LOVE how bright the space feels now! Remember how dark it was just a few short weeks ago?
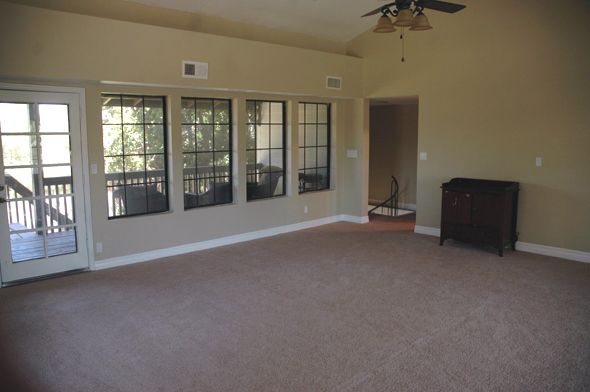
The floors have completely changed the way I feel about this space! Instant character!
And at only 50 cents a square foot for the plywood, it’s hard to find things to complain about. It’s a great look, especially for the price.

The studio is becoming a really lovely place to get work done and I know it will be perfect for photographing projects for the blog and book. We get great light in here all hours of the day and all the shades of white make the room just glow. :)
Now, on to the decorating!


You may not be the first, but you always do it best!!!
Your floor look beautiful. But I'm curious. It doesn't look like you used any underlay. Won't it be very noisy?
After a year, miracle if planks don’t creak. A 1/4 to 1/2 in. padding,l.cheap and fast to lay down.
I am curious about the gaps. They look like a gathering place for dirt. Is a vacuum needed before the floor is mopped?
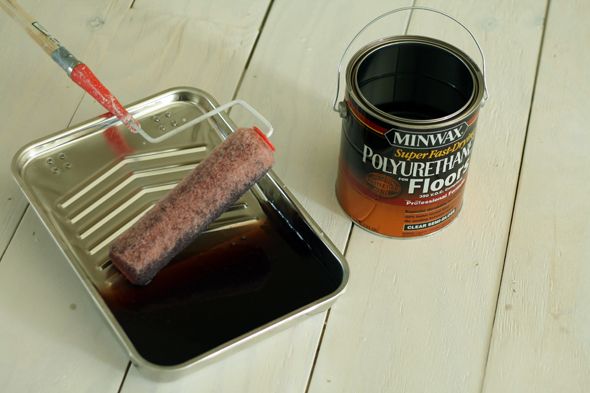
You don’t fill the cracks. Instead you can use a gymnasium type clear coat on the floor. It will fill in the cracks on it’s own. That’s what we use with our solid wood flooring and this has to be done about every 10 to 15 years. We have to sand the floors and then recoat. It’s not hard at all, just apply coats of Varathane (or clear coat) very slowly, to avoid bubbles. You may have to use a few coats, the first time. It will give it a shine too! You can also stain the floor, as opposed to painting it, prior to applying your clear coat. Good luck!
I am so excited to try this in a beach house. Perfect solution to replace uuuuuggggly carpet and even uglier vinyl! Thanks for the easy to follow directions! I'm guessing your subfloors were in pretty good shape?
I am so excited to try this in a beach house. Perfect solution to replace uuuuuggggly carpet and even uglier vinyl! Thanks for the easy to follow directions! I'm guessing your subfloors were in pretty good shape?
Wow, this looks AMAZING! I LOVE the rustic modern tone-on-tone look! You are very creative, Jenny. You may not be the first one who came up with this idea. But it's important you put your own spin on the idea and share it here, so a reader like me can benefit form your creativity. Thanks for sharing! ox
Yuko @ northfield gate
Fabulous. Elbow grease pays big.
The difference is pretty astonishing! A fair bit of elbow grease but an incredible result. Well done :)
This room is simply amazing! Great job on the floors. What an inspiration.
Your floor is really wonderful .I love it.
OSR GROUP
I actually have three bedrooms that need the carpeting replaced and I'd much rather have wood flooring. It looks like this would be a cheaper option (even if I'm pulling up existing hardwood flooring so that it all matches). My house is on concrete, though, no subfloor. How would you suggest doing this? Would just lots of glue be OK?
I would like to know the answer to this too, because I have concrete floors too.
Thanks,
Theresa Floyd
Oh my goodness Jenny, this looks fantastic! We have been doing a couple of projects with ply that we're about to stain dark for the same grain effect, but now you've got me looking for something we can do with white! Absolutely love the grey tones that come through. Next house perhaps we may be laying plywood floors throughout! You're an inspiration, as always :)
I am soo impressed with this I will be studying it again to get cracking on a couple of floors we need replacing in our house!! well done you!! amazing work!
Gorgeous. I have been wanting to do this forever! I remember asking my brother if this was possible before Pinterest was invented. He didn’t think it could be, but I didn’t see why not. I am so glad so many of you have proved me right- just for myself, not even for my brother :) As I am looking at the process though, I am thinking, “I just want an instant floor, not so much work.” But I love the tutorial. I might just try some day, but tonight I am tired and it looks like a long process. Great job! It really is stunning!
How has this held up now that its been a couple years?
Love your flooring. The muted white color looks great with the bright white walls and certainly makes the room look bigger. It’s certainly a big improvement from the previous dark carpet. Nice work!
YOU have inspired me.
Our builder is onboard with this idea!
We’re building right now and doing ALL floors (other than the bathrooms) of our 6300 sf OPEN floor plan with plywood flooring!
-Wanda Brass Goodwin (FB name; if you friend me I’ll add you to my FB group: Our House Is A V-V-V Fine House”
This is not only beautiful, but also real wood floors on the cheap! Great project and I do love the floor color. Although dark wood floors are the current trend, I don’t like dusting the floors constantly and would much prefer a lighter color. Do you have a cost estimate per sq foot that includes all materials, not just the plywood?
Angela, did you ever receive a reply re: inclusive cost? Thanks.
Do you think that this would work in black? I’ve got a basement apt that I’m trying to tame, and it has 1950s multi-colored linoleum floors–which are quirky and great if you don’t have to live with them. The linoleum is over concrete, which presents a different issue. I’m thinking some goooood glue, maybe? Either way, your project turned out very well, and the tutorial was FANTASTIC! Thanks!
Anita…..If your linoleum floors are in good shape (no tears, rips, holes) you can super clean them using TSP, rinse, let dry, paint with good quality porch and floor paint It’s up to you to use gloss, semi-gloss or satin sheen. It’s made for floors and works really well to cover vinyl, linoleum or wood.
Absolutely love this project. I will be trying something similar with narrower planks because it is a smaller room. Gonna also try angling them on a 45. Thanks for the inspiration.
We did it! I used this blog post as the guide for doing nearly 600 square feet of plywood plank flooring in our beach house. Due to space constraints we cut our boards and laid them out before sanding. We used the exact white wash recipe. One mistake though – I purchased the wrong Minwax – asked for the clear but didn’t get it. We ended up with an amber tone to it. I had already opened it and didn’t feel like driving back to the Home Depot so we went with it. It turned out fine. We have one room with pink walls, one with blue and another with turquoise and the floors look different in each. They feel and look beautiful! Thanks for the step by step. Next thing on the list is the chunky baseboards.
Rachel – it’s been almost exactly 1 year since you left a comment. We are about to start our plywood floors. How are yours holding up?
I would so love it if you answered questions for all to see! We also have a concrete floor underneath so will have to GLUE, I suppose!?! If you know of another option, please let me know? I am so excited to hear that the Home/Lumber stores will cut that much lumber in widths! WOW! What a great thing they do!
I would also love to know the size of your Studio, please, so I might compare your costs to our rather large kitchen & breakfast area! (In the pics it looks pretty large, too!)
I’ll be your newest Follower, Jenny ~ I first stopped by to see your painted vinyl chair, then came to this project, and now I’m anxious to see others!
I am very excited about the floors ~ I absolutely love the white, the vintage look, and they will be great with our decor/style!
Kathleen, I’m not from this website, but I can offer some insight on this.
Two things you need to be aware, often HD and Lowe’s plywood will have alot of voids in them. Its usually fine if you’re walking around barefoot, but thin heels can potentially punch right through the floor. For adhering to concrete, you can glue straight to them, but without a moisture barrier likely the floors will swell and warp overtime.
Hello. Are you suggesting there are other sources for plywood that do not have the voids? If so, please name them.
Hi Kristopher, this comment is very helpful. Is there a better place to get plywood for the floors? We don’t have thin heels but I would prefer better plywood!
I was wondering if you could do this in a basement bathroom over linoleum floors
Possibly lay down a sub Floor? Not sure if they are still available but there were 2′ x 2′ squares with a foam rubber glued on one side for a sub floor
I would also love to know the answer to this question regarding installing over an existing floor other than a wooden subfloor. Many of us have homes with rooms of vinyl tile, for instance, as well as linoleum, etc., over concrete (no nails?) In fact, I agree that all your followers can benefit from the answers to questions you receive. Sometimes there are questions we have not even imagined!
I understand the need for a moisture barrier but am puzzled as to how to accomplish layering this in ~ in a permanent way ~ so that the plywood is still glued down and secure. (Oftentimes, chemicals in these strong glues will actually “melt” the product on which they are being applied … ?! ).
Thanks SO much for your great tutorial, Jenny. It is awesome … the most helpful I have seen so far!
for moisture barrier I recommend: Masonry Waterproof paint
For adhesive I recommend: Loctite Power Grab Ultimate (for ALL Conditions, Weather, Materials) Check the label section that says: WORKS ON and DOES NOT WORK ON. Not all glue is the same.
I would like to know how this floor holding up. Normally softwood plywood layers are so thin they can’t handle foot traffic. Perhaps your coating is super tough. Given how many people are using this idea, I think an update would be the responsible thing to do.
Hi Jenny,
I just emailed you about being featured on Remodelaholic, but I wanted to leave a comment here as well for insurance against the spam filter :) Please email me back at hello@remodelaholic.com. Thanks!
Thank you for the inspiration. Love the idea and the look. I have a 600 square foot area I want to paint.
Hi Jenny – I’m curious how your floors have held up after three years.?? We’d love to do this project.
Love the look. Did you use a water based or oil based polyurethane?
These are in fact wonderful ideas in about blogging. You have touched some good points here. Any way keep up writing. Wood Flooring | Hardwood Floors NYC, New York
I too would love to know how this floor is holding up. I am also very curious about how this works on different sub floor types. What a fabulous idea!! Thank You!!
Love the outcome! May I ask how the floors are holding up? Have you had any warping?
I have the same question as Jenny v. How do the floors look after years use? Would you change anything about the flooring process? I am on a tight budget and have been living on unfinished concrete floors for to long. Please help! Any cheap ideas for baseboard or transition pieces? Much appreciation! Crystal