I was thrilled when the good people at Children’s Miracle Network Hospitals reached out to me about developing a DIY gift idea that would be both special and safe for a child in a hospital bed this holiday season. There are a lot of restrictions on hospital gifts (no latex balloons, stuffed toys, sports cards, living plants or flowers, food or candy, etc.), but I think these amazing, brave kids deserve extra attention and support at this time of the year especially. The thought that more than a million children will spend the holidays in a hospital is heart-breaking.

CMN Hospitals raise funds and awareness for 170 children’s hospitals in North America (including Phoenix Children’s Hospital, where my sister in law works!). The hospitals provide $3.4 billion in charitable care every single year. If you’d like to help them in their noble efforts by contributing to the CMN Hospitals holiday initiative, visit here. Donations stay local, and the children’s hospitals use the funds first where there is the most need.

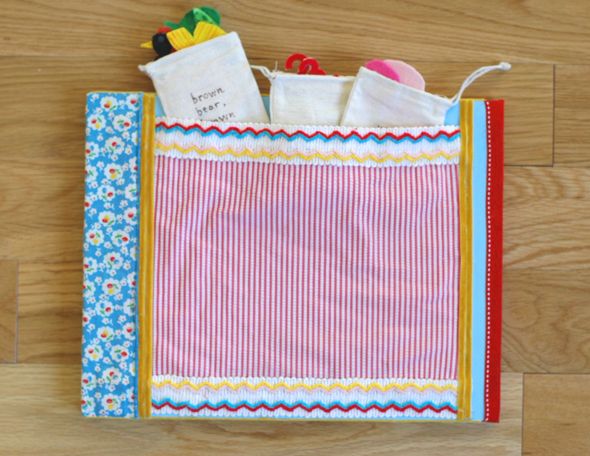
I made this super simple no-sew flannel storyboard for my DIY gift idea – I think it would be perfect for a child that is bed-bound and also a great present for the lucky kiddos that are healthy. I am hoping to make a lot of our Christmas gifts this year, and this one will be for Evie. I had Gracie and Claire do a little secret test drive on it for me this week. I think they would have played with the book all day if I had let them. And both of them requested their own flannel boards for Christmas (and threw in their story choices and color preferences for the binding!), so I think it’s safe to say this gift idea is going to be a winner around here. :)
Here’s the tutorial breakdown:
For supplies, you’ll need:
– 1/4″ thick foam core board (a colored one makes for a pretty cover – I used baby blue)
– Assorted ribbons in different colors, patterns and sizes (ranging from 1/4″ to about 2.5″)
– Fabric glue (Fabritac will forever be my favorite)
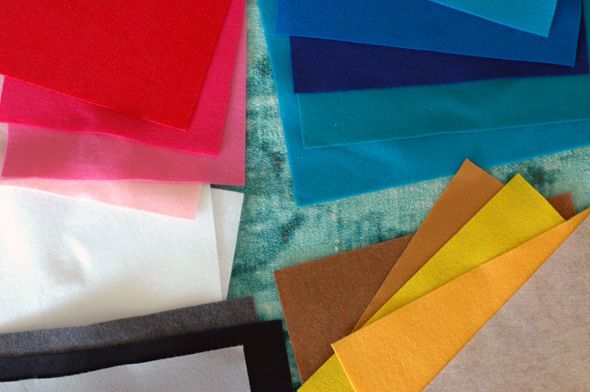
– Assorted colored sheets of craft felt
– Sharpies
– Pencil
– Ruler
– X-acto knife
– Very sharp scissors with a fine tip (I like these a lot)
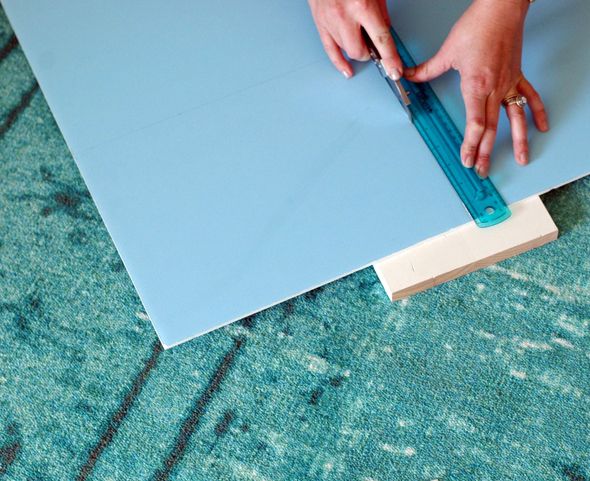
First, use a ruler and pencil to mark out two equal-sized rectangles on your foam board. The book I made is 10×13″ and I feel like it’s the perfect portable size without being too small. If you keep the (new and sharp!) blade up tight against the ruler and push down hard, you should have a crisp edge when you’re done.
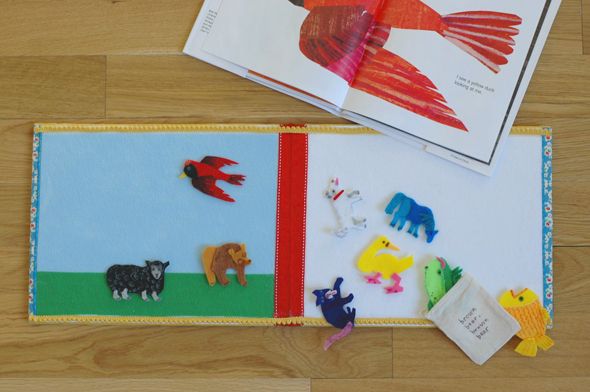
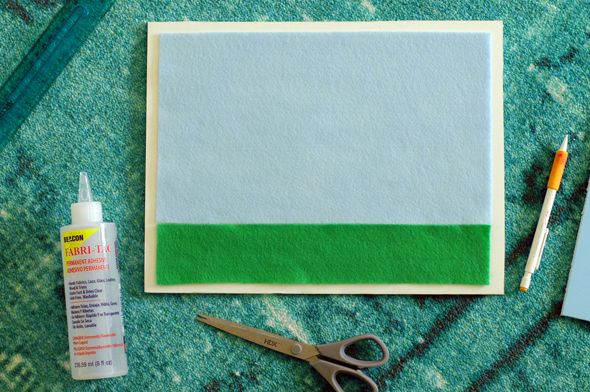
For the left side of my flannel board book, I wanted to simulate grass and sky so I cut the felt to fit and glue them about a 1/2″ set in.
The right side I decided to keep white.
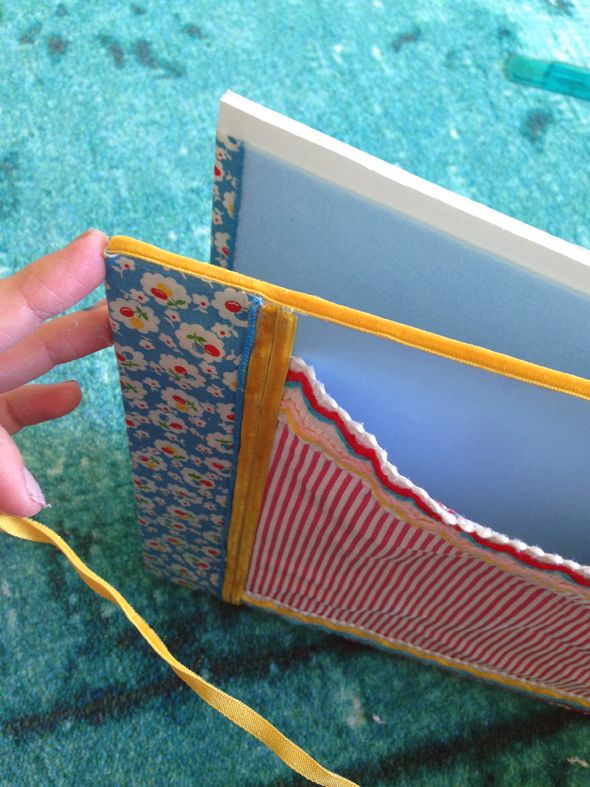
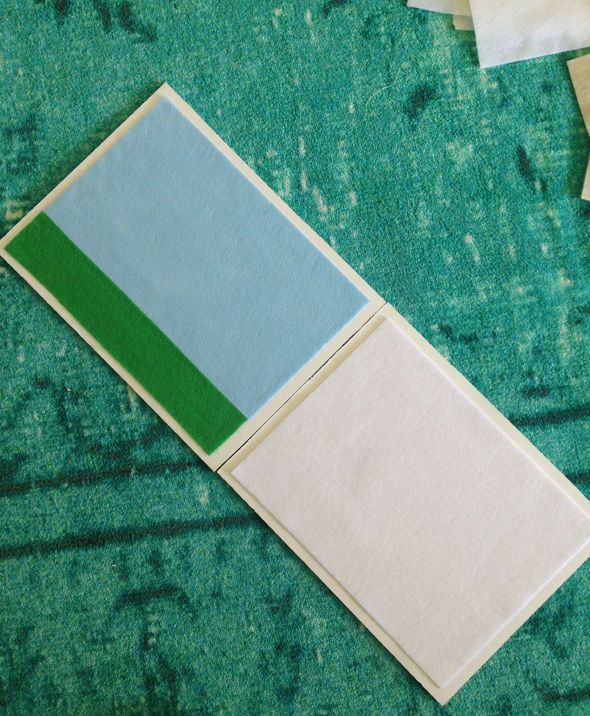
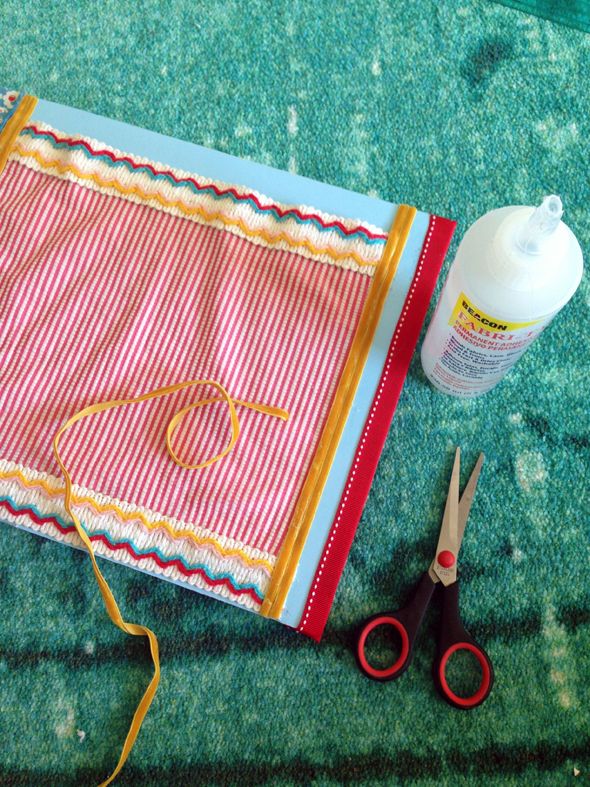
Once the felt for the inside of your book is glued down, run a few lines of glue along the inside center seam of the two boards (you’ll want them spaced just like shown above – close, but not flush) and glue down your 2 or 2.5″ ribbon on top of the seam. Let that dry for a few minutes and then fold the boards on top of each other and glue the continuous ribbon around the other side of the spine. Be pretty generous with the glue.
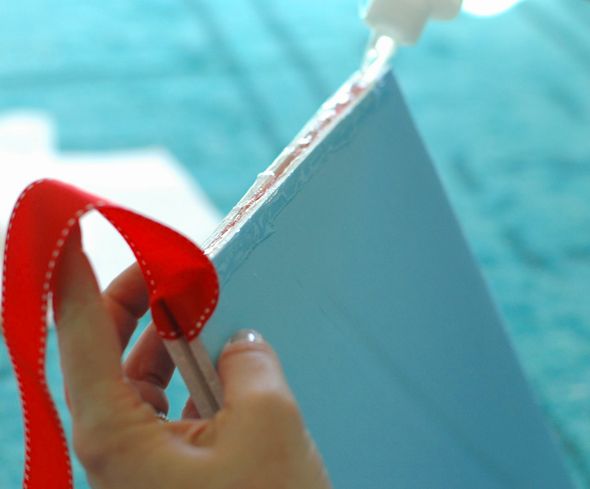
Once you’ve finish glueing the ribbon around the entire board, snip and glue down the edge.
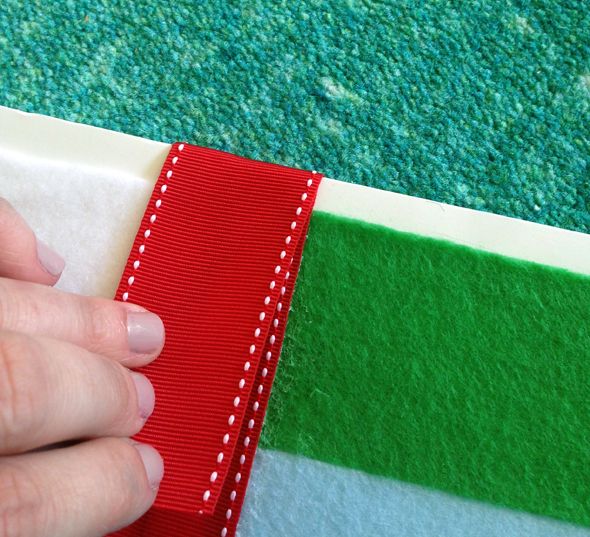
Use various types of ribbons and trims to fill in the gaps where the white foam core shows and where the book could use some finishing.

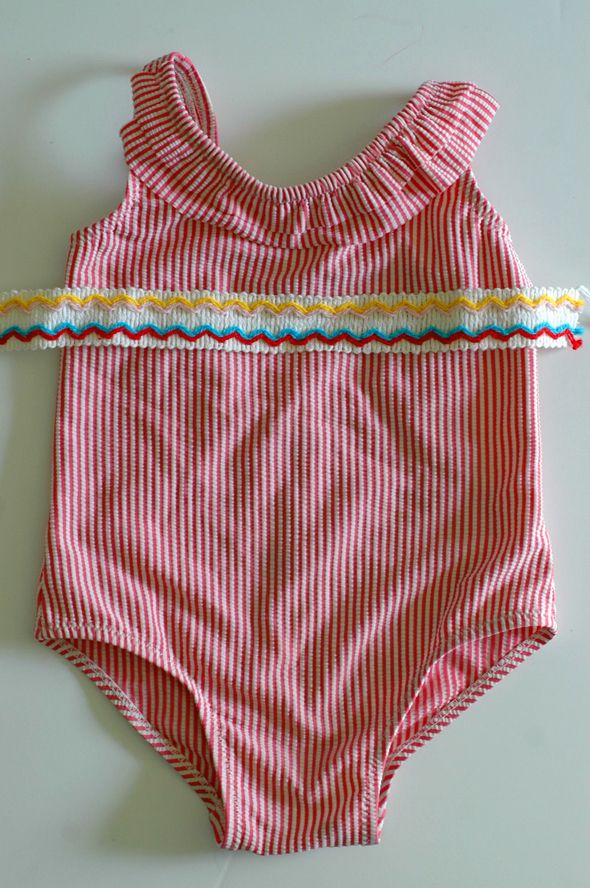
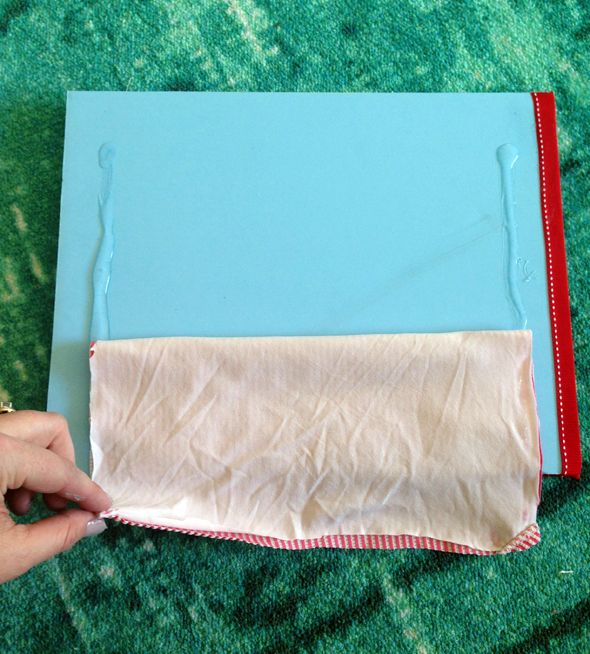
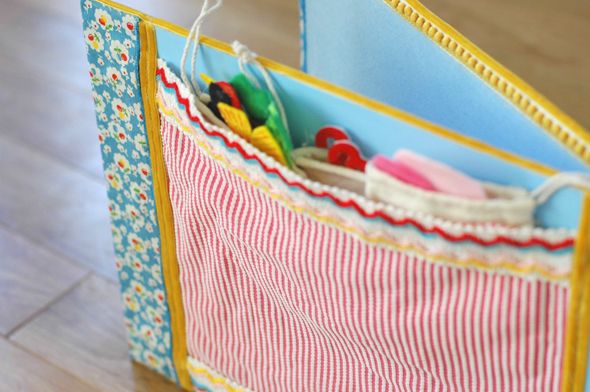
For the back of the front cover, you’ll want to make a little pocket for storing your pouches of felt pieces. I was going to head over to the jersey/spandex section of the fabric store when I remembered this old and too-small swimsuit of Evie’s that was sitting in our donation bin. She loved this suit so much, I’m glad she gets to keep using it in a new way. Plus, that seersucker pattern was a perfect pairing with my vintage trims!
I cut the suit down at it’s widest points and glued a U-shaped pocket down on the back of the cover.
And then added more trim for finishing. I bought this one at SAS in Phoenix. EBay is a treasure trove for vintage trim though if you don’t have a good place locally.
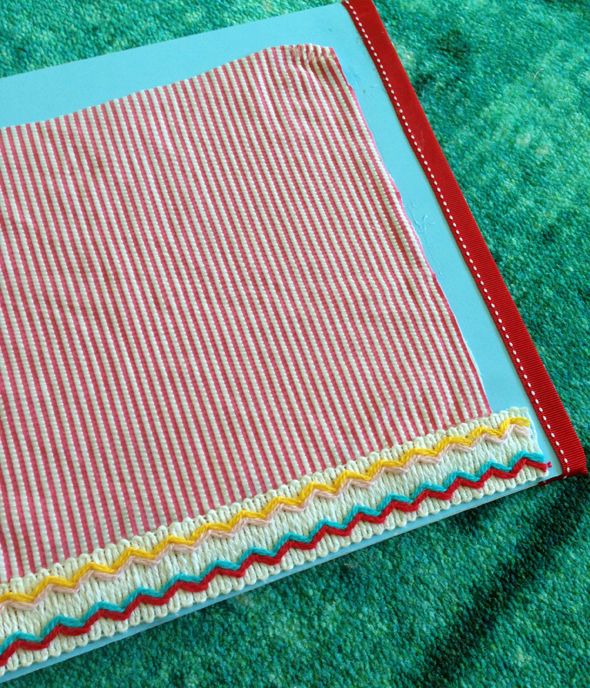
I bought about twenty small bundles of this mustard velvet ribbon on clearance at a teeny-tiny, but so beautiful art supply store in Brussels (we stayed there for a whole summer about five years ago). I’ve used bits and pieces of it here and there and this seemed like a fun place to dedicate a few of the remaining bundles.
It worked beautifully to cover up the foam core edges.
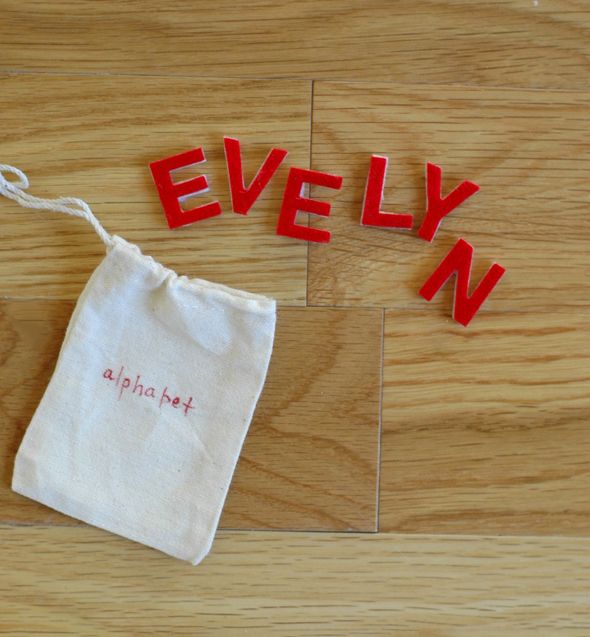
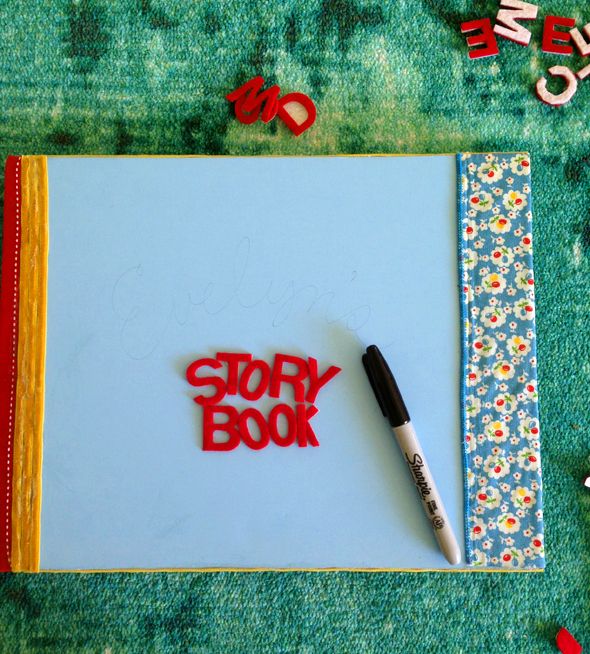
For the front cover, I used some felt letter stickers from the craft store and free-handed my daughter’s name with pencil and later filled in with Sharpie.
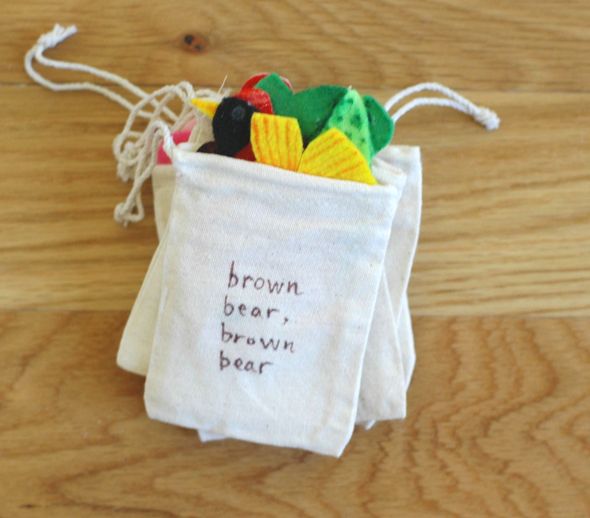
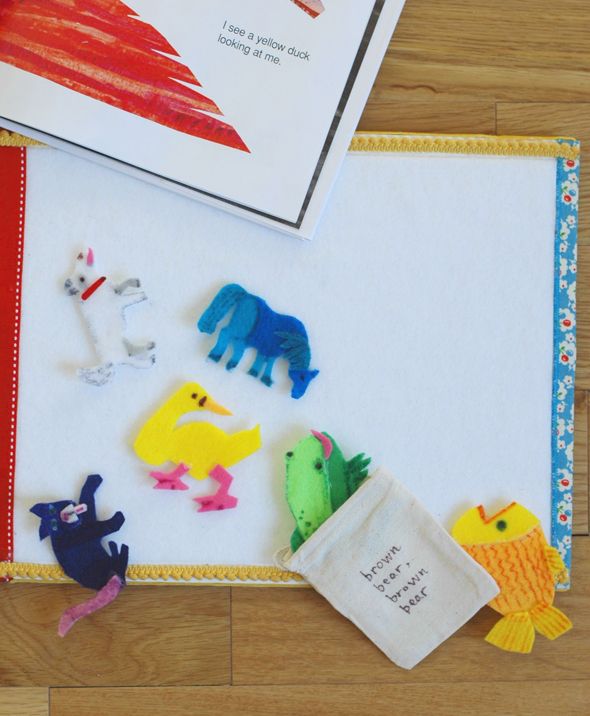
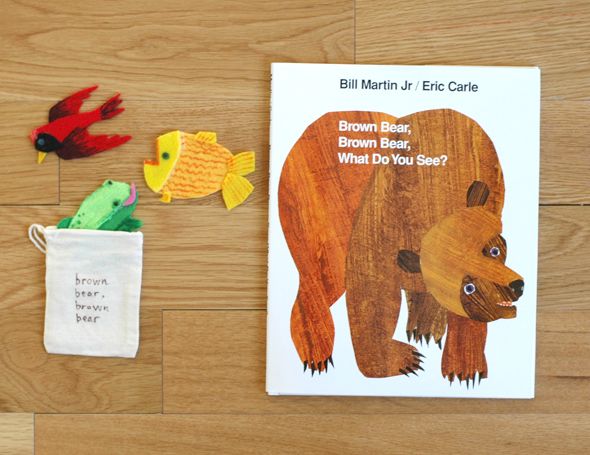
One of Evie’s most favorite books is “
Brown Bear, Brown Bear, What Do You See?” We’ve had the same little board book version since Gracie was a baby and the poor book is nearly falling apart after so many years of heavy rotation from the toddlers. Evie keeps the book by her bed and reads it to herself all the time. I knew I wanted one of the “story bags” to be from Brown Bear.

You can use the book for reference obviously, but I wouldn’t worry too much about cutting out the shapes perfectly or even exactly. I’m actually hoping my girls end up making a lot of their own story bags. You just cut out the rough shapes, glue the pieces in layers, and then use a little permanent marker for shading and smaller features.
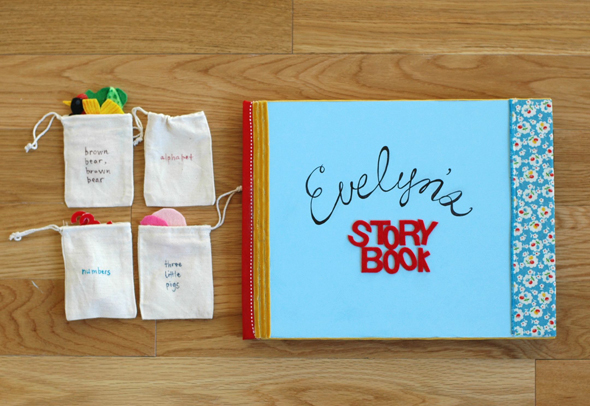
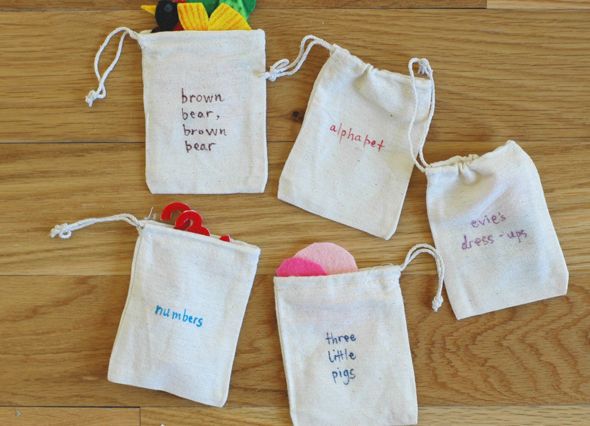
The most important part is to make the shapes and characters small enough to fit in your pouches. The wedding favor aisle at craft stores sells these small bags that are the perfect size.
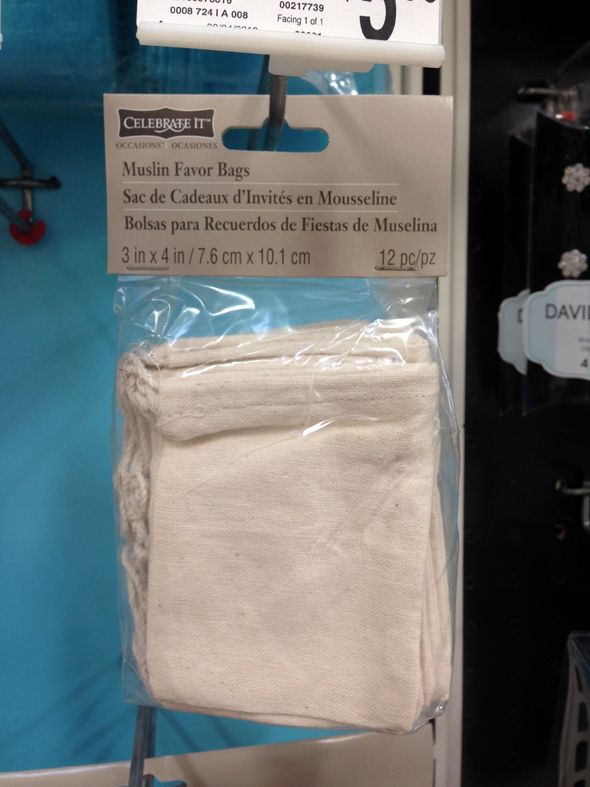
I like these muslin ones best because you can write the story titles right on the pouches using a sharpie.
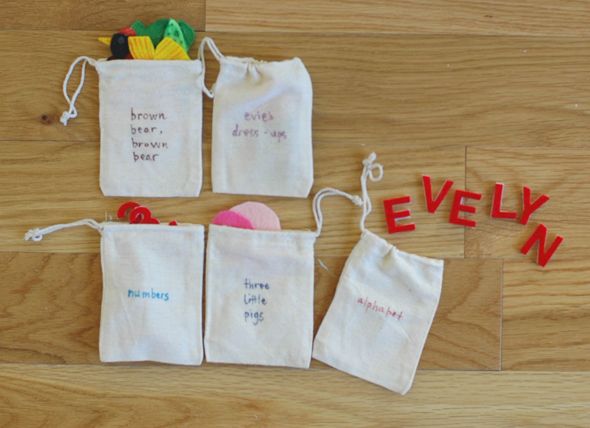
You can fit a ton of these small story bags in the large (stretchy!) back pocket.
The book is a great way to work on spelling and math problems (using those pre-cut felt numbers and letters!) and a perfect way to encourage imaginative play.
I started a new pouch earlier today for Evie with a little paper-doll style dress ups. There’s going to be a princess in there for fun, but mostly occupational dress ups, like a doctor and a scientist and a designer.
It seems like the best way to play with these books though is to let your child reenact the story with the felt characters while you read from the book (or vice versa, where your child reads and you show them the story). It’s a great way to to help kids fall in love with books and characters, even the most simple animal characters!

While it doesn’t take all that long to make the flannel board itself, the felt characters can be a little time-consuming. But they’re easy to do while watching a show or talking on the phone. My mom would make a lot of our Christmas gifts each year growing up. I keep reminding myself that I can hardly remember a thing that I got that was store-bought, but I can tell you every special present she made for me, and I still have many of them now. ♥
This post is brought to you by Children’s Miracle Network Hospitals. Donate $5 and give a miracle to a child in the hospital this Christmas.


This is too good! -Caitlin
What a beautiful idea! It turned out so gorgeous – future heirloom, for sure. xo
This is gorgeous!!!
Your creativity knows absolutely no end, Jenny. This is such an amazing gift!
I love this so much! Going to make this for my boy for his birthday in June.
Terrific and creative idea. It would be perfect for a little one at the hospital, and later at home. What wonderful memories it would make. It would be fun to later let your child help create characters for their own story pouch. My children loved Brown Bear. Sheep in a Jeep would also be very fun!
Your creativity never ceases to amaze me. This is probably one of my favorite posts ever!
I am so impressed and inspired!
This is such an amazing idea, and you've executed it so beautifully. Thanks for the tutorial! I hope I can make some for my kids that looks half as good.
I love this book! Amazing! I also made a flannel board for my little boy a few years ago and almost lost my mind cutting out all the felt shapes–I found some adhesive backed felt, which turned out to be a much faster alternative. I could cut out pictures from the pages of a few fave thrifted books and stick them right onto the felt. I did this with photos of family as well. Anyway, I love the flannel board! Timeless gift!
What a great idea! I'm so happy that you are making gifts for your children, they are so much more meaningful than store bought gifts =)
You are amazing. Love love love it :)
Wow this is absolutely incredible!
I'm speechless!! Everything about this post is SO good. I hope we'll see more of your homemade gifts!!
Too great! Can't wait to do this. Will you tell us what other homemade gifts you remember from your mom?
I love this idea so much, and I feel certain that my boys will love it even more. Thankfully my husband is significantly more artistic than me so maybe I can employ his help for the shading. As with everything you do, yours looks intimidatingly amazing.
So cute!
This is so great because I have been planning on doing a felt board for my little girl and was just about to pull out the felt to start cutting shapes. I love the way you decorated the book as well as how you created the pieces off pictures in the book. I think I will probably do this instead. SO happy I checked your blog today!
Excellent! I love this idea and the detailed tutorial. Thank you.
aww! this is such a great idea! i bet they loved them. very, very creative.
-sweet grace-
As a kindergarten teacher I create flannel stories all the time! The kid love re-enacting the story over and over! Great idea for someone in a hospital bed!
What a beautiful gift idea!
http://www.ahealthymrs.com
This is a lovely and timely idea! I will be making these for my 2 little grand daughters! Thank you for sharing this and the link to donate…I cannot imagine how tough it would be to have a sick child in a hospital. Your energy amazes me:-)
This is absolutely beautiful! Thank you for sharing. I love the idea of making these for kids who are hospitalized.!
This is absolutely beautiful! Thank you for sharing. I love the idea of making these for kids who are hospitalized!
This is beautiful…and so are you!
love this! you might add "muslin pouches" and "felt numbers and/or letters" under the supply list as optional extras.
How adorable!!!!! Lovely idea!!!
xoxo PARIS BEE
Please, please post pics of the dress up characters. My daughter would love that.
This is your cutest, sweetest, thoughtful and most beautiful idea yet, Jenny! What a treasure for Evie!
Great work! I love this craft + Children's Miracle Network Hospitals! High Five!
I love this. And handmade gifts are such treasures. I love giving & receiving them.
This is truly wonderful! Love love love! My son would adore this.
Forex Latest News, Forex Trading Tips, latest forex trading business updates, trading updates, forex trading latest news, forex brokers directory, forex brokers list, Dollars news affairs, Stock Markets, stock market news, stock market analysis, technology news, international forex markets, international forex business news and all updates about Forex Trading
ForexAffairs.Com
I would love this!
I would love this!
This is so, so sweet. You are a lovely mama. A lovely human.
Hi – this is fantastic! I just finished a peg dolly house for my little one for Christmas & you are so right, the homemade gifts are the treasured ones…and it gives us mum's a chance to let our creativity out of the bag too! Thanks for posting.
I hope you are able to share some of the "amazing inventions" in future logs. Click here to learn more!!
This is LOVELY! Love combining arts/crafts with the art of storytelling!