We’ve talked about it here before, but I could use the reminder myself: It’s always best to decorate in layers. Not everything in a room has to get done right away. And usually I like a room that’s been decorated slowly, over the course of many years, much more than a room that was done in a week. Ideas and pieces for a space will emerge over time because you’ll have the chance to actually live in and use the room.
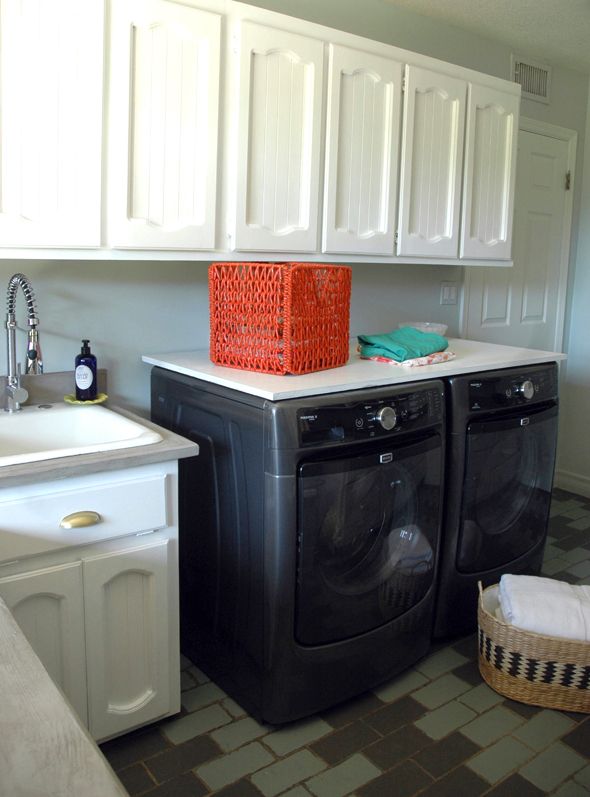
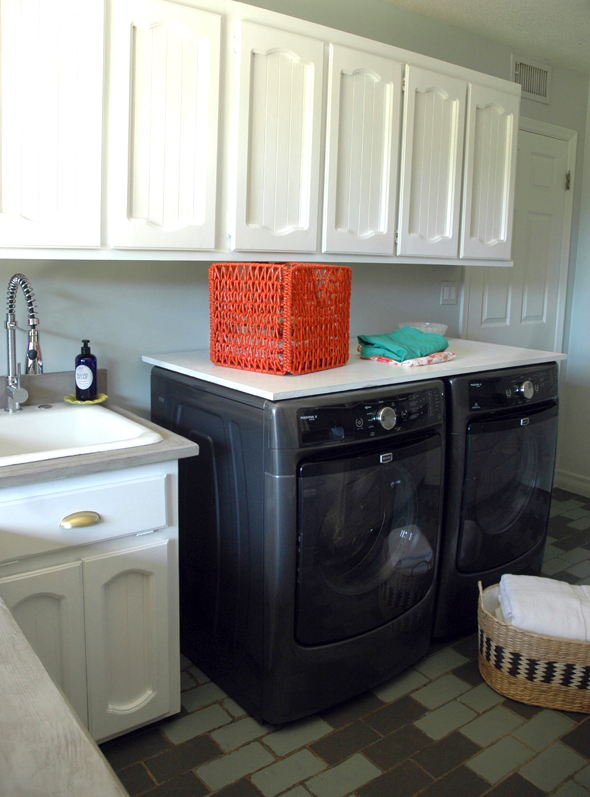
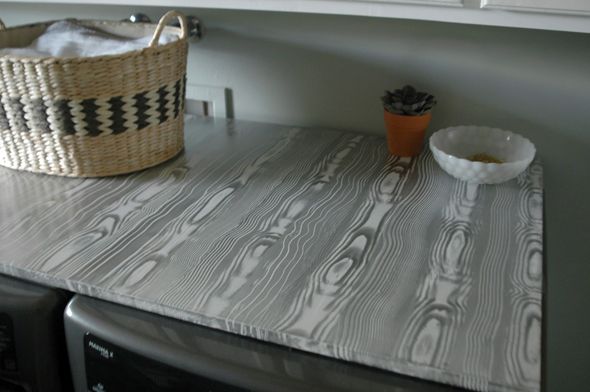
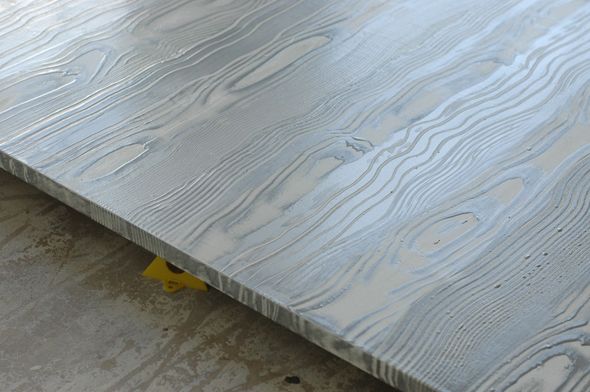
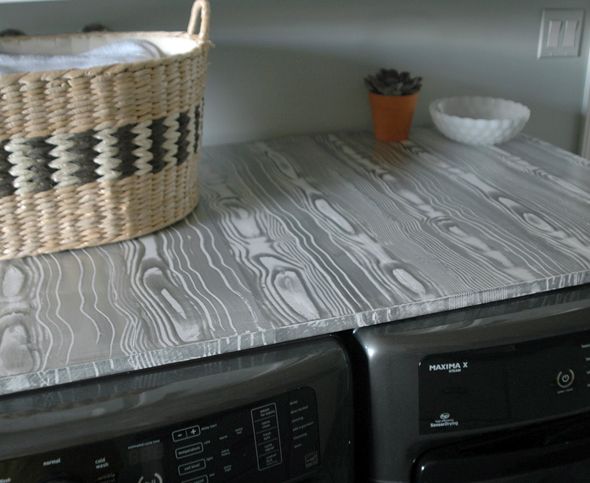
When I redid our laundry room, I wasn’t sure what I wanted to do with the laundry folding tabletop. I went to a stone yard and looked at marble and granite remnants, which were still too expensive for me to get right with, so I bought a piece of MDF and had it cut to fit the top of our new washer/dryer. I thought about painting it a bright color. Then I thought about painting it to match the appliances. Then I thought about doing a faux marbled/malachite pattern with white and gray paint (just like this), but I never got around to doing it. Then I stumbled across this post from my archives and I remembered how badly I’ve been wanting to do a faux bois paint treatment. There’s not any wood in our laundry room, except for the bamboo chair, so I thought it would be great to have something with an organic element and with lots of movement in the pattern.
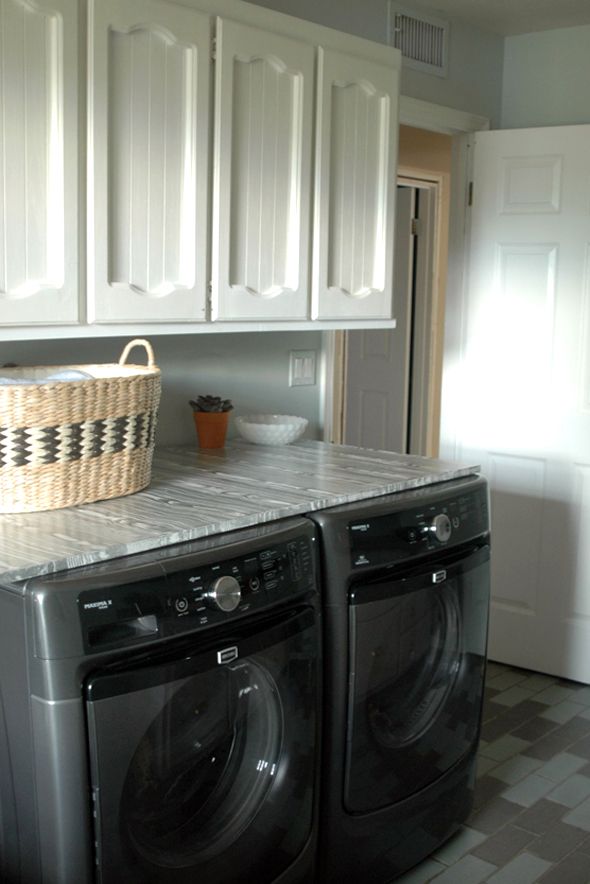
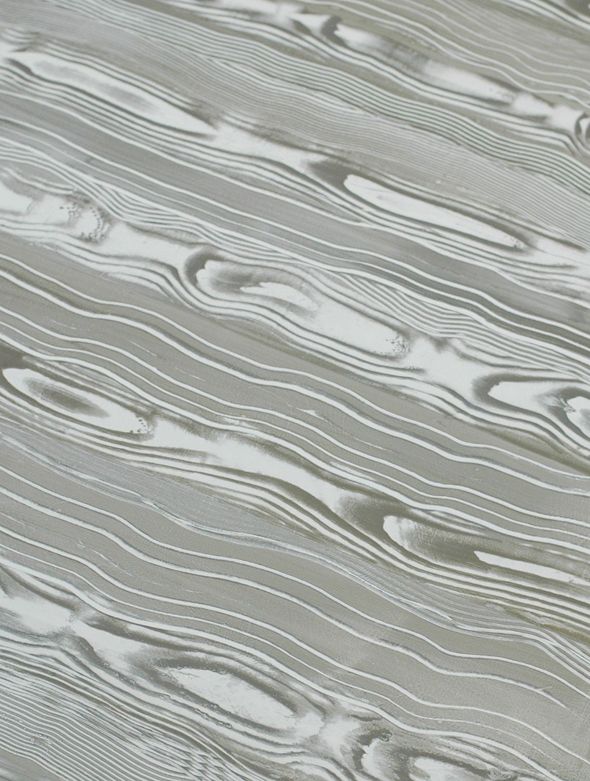
It’s crazy how the faux bois pattern addition makes the room feel so much more finished. And I know I always say this, but truly, painting a faux bois pattern is as easy as can be. If you can paint a straight line, you can do this project. Actually, scratch that! If your lines are a bit crooked or wavy – this project is totally perfect for you!
Here’s how…
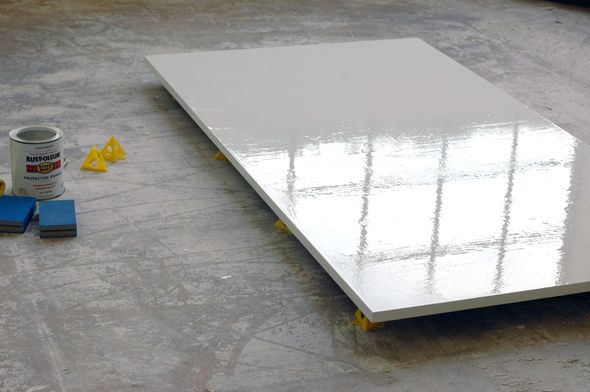
The first step is to paint your base color. I used a glossy oil-based paint, but you can do any type of finish as long as there are no bumps in the surface.

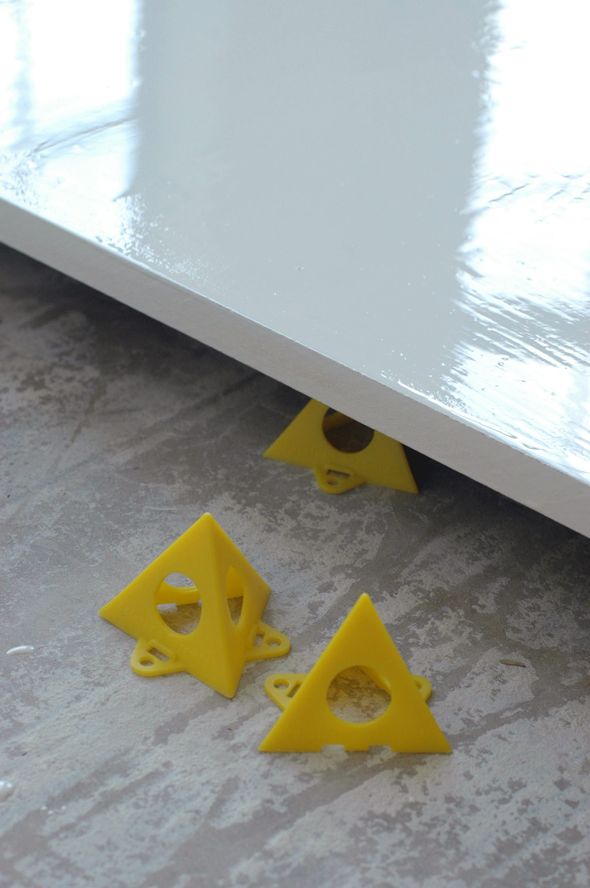
Did you notice my handy new Painter’s Pyramids here? They are so genius and help avoid that painted-edges-sticking-to-the-drop-cloth situation. And the best part is they make it so you can paint one side and immediately flip over to paint the other side. The pointy tops don’t really leave marks on the surface (they do however hurt, like, SO BAD if you step on them barefoot. Ouch.)
Once the base coat is fully dry, you mix the paint color you want to use for the “grain” part. If you’re using latex paint, you’ll want to mix one part paint with one part glaze and one part water. If you’re using oil-based paint like I did, you can use a mixture of one part paint with one part paint thinner or Penetrol. It should be very watery.
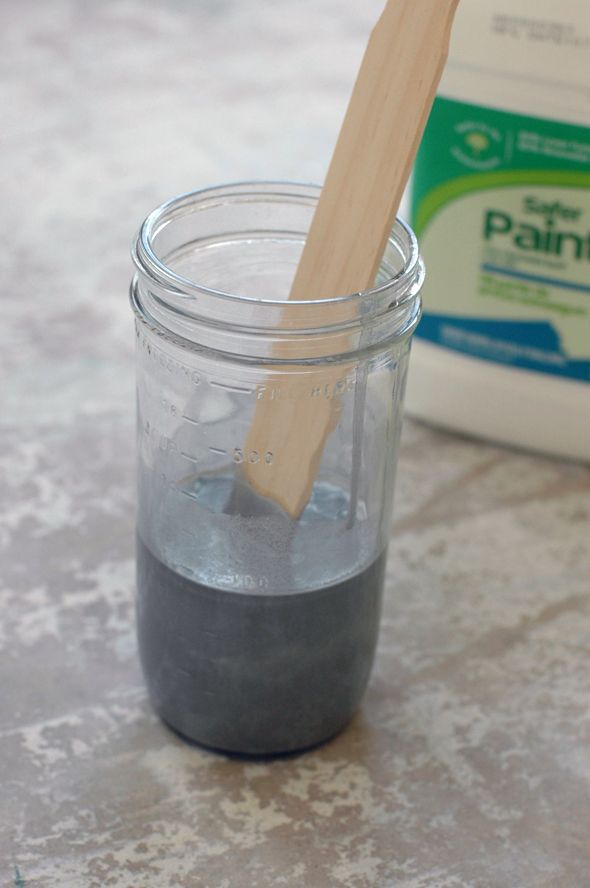
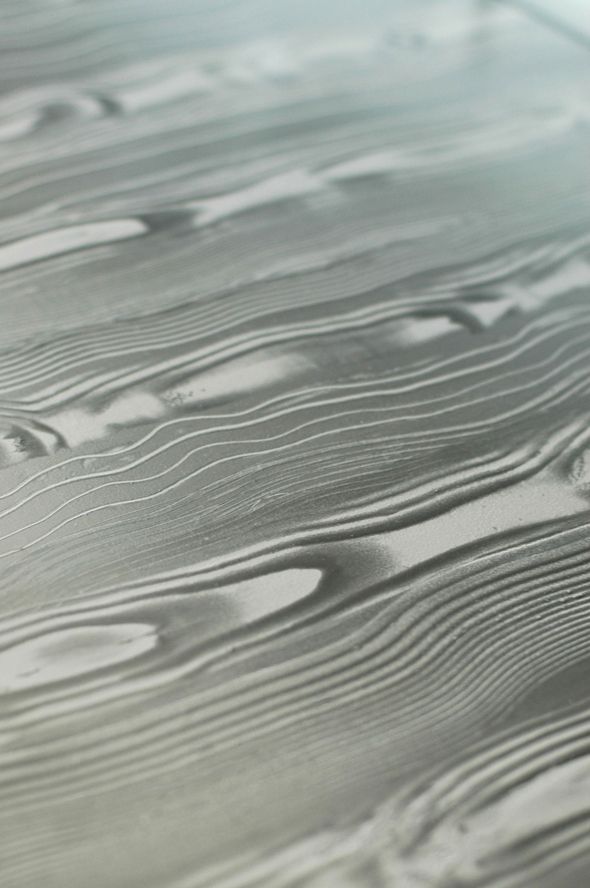
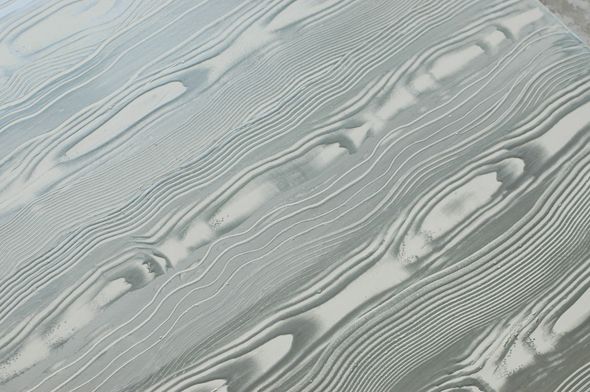
I used this slightly metallic Aluminum color by Rustoleum and I really liked it. I think it actually looked a little like mercury glass or liquid chrome and might be really cool for other applications where it hadn’t been thinned down. I’m excited to experiment more with the color.
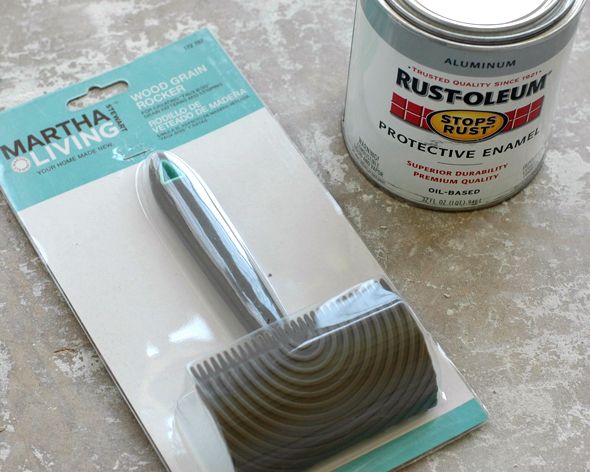
Then the most important thing you’ll need for this project is a wood grain rocker. You can buy them lots of places online, but Martha Stewart makes a good and affordable one that’s sold at The Home Depot. I don’t have a photo of the package here, but I also picked up one of her strie combs.
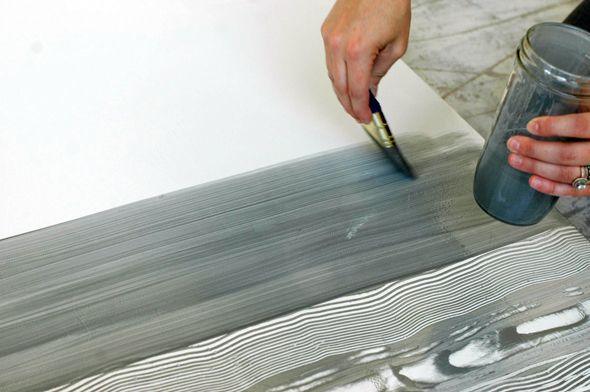
The approach is very simple. I used a 2″ angled brush to paint on a section of thinned paint in long strokes, the size of two or three widths of the wood graining tool. You most definitely wouldn’t want to paint the entire surface all at once – you want the glazed/thinned paint to be very wet still while you’re doing the faux bois technique. It’s important to work in sections, and to do the whole surface in one painting session though so that the lines sort of run together and blur into each other. Also, it’s nice that if you do a part that you don’t like, just brush right over it and try pulling the paint again.
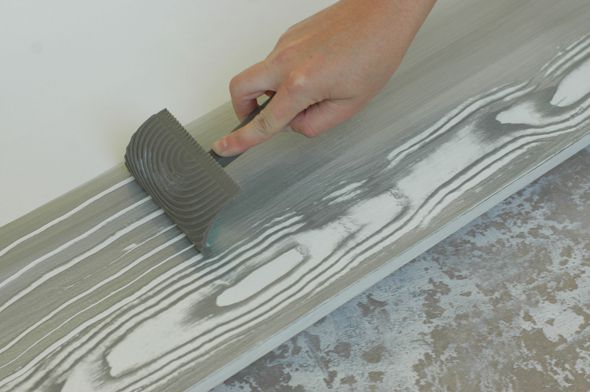
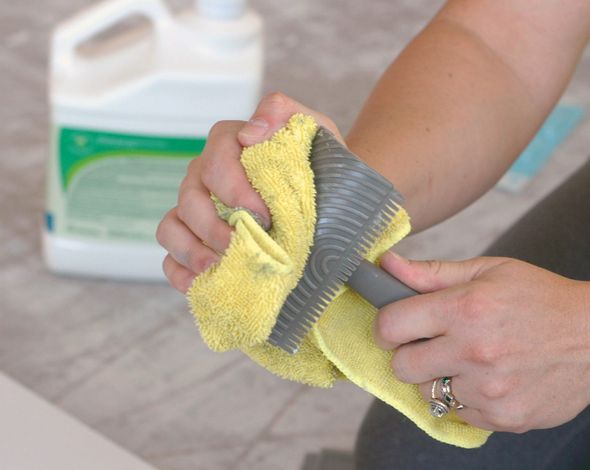
I alternated one row of using the wood graining rocker with a row of straight combing using the back edge of the rocking tool or the strie combs I bought (it looks good to alternate the pattern on the strie comb between the widely spaced comb (above) and the tightly space comb you can see in the photos below). Once you’ve pulled a row, make sure to wipe down your comb or wood grain rocker.
The technique for using the rocking tool is very easy – you just pull down and rock back and forth.
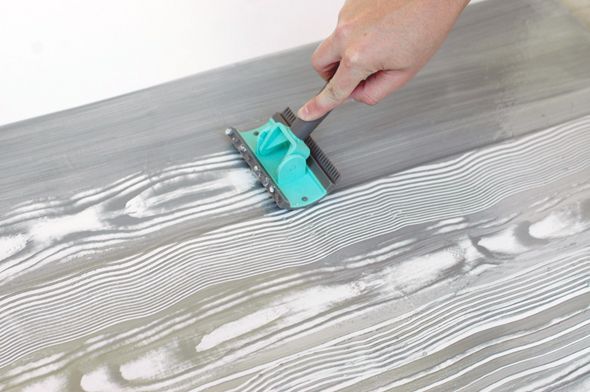
I tried to mix up the speed of my rocking so there would be some variation in the look of the grain lines with longer and shorter knots.
If you’re working on a flat surface like I was here, don’t forget to paint and pull the comb or rocker down onto the edges as well. This makes the pattern look a little more authentic to the eye.
I’m such a fan of how this faux bois tool worked! It was an easy and really satisfying project. This technique would work so well on furniture pieces with really squared off and flat surfaces (hello, IKEA Lack series! I’m looking at you!) and it even wouldn’t be that hard to do entire walls once you’re comfortable with the technique. And now I’m wishing I had a little powder bath to do in the Valley house. :)


This looks great! I've pinned it to remember this one.
I love this and am looking forward to trying it. What I'm most envious of is the fact that the mdf board goes all the way back to the wall, so that laundry doesn't fall or get stuck back there! Genius!
That seems like the perfect place to use a treatment like that. I don't know that I would like it in a living room, but it adds a little pizazz to the laundry room.
Such a cool look! You've managed to make it look not nearly as intimidating as I would have thought it was.
Amazing. Love this look!
I love it! I've always wanted to try this myself. (looks around room feverishly for blank surface)
Looks great. Do you attach the board to the w/d with anything?
I've always loved faux bois. I can picture your powder room, but in a stunner shade, like magenta or persimmon. great tutorial!
Looks beautiful!
I'm so glad you articulated that design philosophy. A look should evolve. Hope the foot is better! ;)
Damn, woman, when do you ever sleep?! Seriously though, it is truly inspiring how many DIY projects you can get through in a week. And so far, there isn't a project that I've seen you tackle with anything less than stunning results. :)
Wow, looks wonderful with the color of your W&D. I'm absolutely stealing the MDF board idea for a folding table that will prevent those pesky socks from falling down behind and between the appliances.
Looks awesome! {www.thepinkzipper.blogspot.ca}
It looks amazing Jenny! Love this.
Champagne Lifestyle on a Beer Budget
Does the MDF scratch the top of your washer and dryer? Did you do anything to keep it from scratching or moving?
Thanks!
This looks totally amazing! I love how you chose a paint with a bit of a metallic sheen. Such a glam yet rustic (if that's possible) touch in your laundry room!
http://www.fullbellywornsoles.com
Jenny,
I also wondered about the board moving…my appliances are not perfectly level! Did you mark straight lines across the board before starting to try and keep the pattern straight as you worked across? Also did you apply a clear seal top coat? Thanks!
So, I know you didn't invent this technique or anything, but I am still prepared to crown you The Queen of Everything. It just looks perfect.
I JUST finished painting a board for on top of our doggie kennel. I was feeling lazy so I did diagonal stripes. Totally modern, but totally boring. I wish I had put it off for another week so I could try this! Drat!
This looks so great, and you're right, it really finishes off the space! The grey feels really modern.
It's nice to hear you again say that rooms should take time. It can sometimes be hard to be patient. :)
Rocked it sister!!!! So modern and fresh!
Love it!! Your tutorials just keep getting better and better!
Thanks for the recommendation on the tool as well. Now I wanna faux bois something… :)
You really are killing it with the creativity in the valley house Jenny!
I'm loving it and can't wait to see what's next!
Annie XO
Wow! I had no clue it was that easy! It looks great and I love the color you used.
I love your blog and am so amazed at all the projects you do—thanks so much for sharing!
Your counter came out so nice! I've wanted to try that technique for a while. Now I just need to find something in need of a new paint job.
I've always wondered how that Martha Stewart tool worked so thanks for sharing!! Your project looks awesome!!
My dad, a house painter, used this exact technique to paint the bottom of our kitchen peninsula, back in the early '80s. Of course he did it in burnt orange, yee-owch. Love seeing a look, and skillset, like this being revived. The grey totally updates!
I absolutely love this treatment! I've been wanting to make a small desk for our porch and this is the perfect accent for the top! Thank you for the inspiration! Do you happen to know what kind of wood you used and if this would work with water based paints?
Haha yes, painter's pyramids are awesome for painting but HORRIBLE to step on!! The worst part is that they're equally devilish every way they fall or are kicked. They're bright yellow, so I don't know how I still step on them! I have recently become an oil-based paint convert after reading your blog and rub my hand along my Rustoleum Gloss Smoke Gray nightstand every night. It had been turquoise crackle – cringe. Thank you for helping me see the light!
You made this look amazing! Thank you for the inspiration!
Ananasa.com- Home For Handmade
Nice. Wondering if this technique could be tweeked further by running the comb through it at 90 degrees, either before or after the wood graining, to achieve a look of moire silk. Your suggestion on using it on powder room walls sparked the idea. Maybe two shades of the same color paint would also help in attaining a moire look?
I absolutely LOVE it! Question for you: Did you do any sort of top coat to avoid chipping? Perhaps that's why you used oil-based paint?
I did a men's closet in faux bois a few years ago in a Designer House. I used a gray background with red paint for the wood grain. It was a great pop in a small space!
I love your blog! Thanks so much for so many design inspirations!
This looks simply AMAZING. I've often contemplated buying that Martha brush (is it a "brush?!") but figured I'd screw up the results, so why bother? How cool would it look to paint that faux bois effect in little molding frames straight unto your wall, to look like panels of expensive faux bois wallpaper?!
I sense an experiment coming up . . .
Looks great! diferent with a little change.
I wouldn't have thought of this in a million years. It looks great!
I've always wanted to try this, thanks for sharing!
Another awesome transformation. Thanks for sharing.
Sarah
wow, Jenny that turned out really well! Those "little" projects can feel so good when you finish them.
I'm SO impressed. Can't wait to copy!
I'm eyeballing my IKEA desk now… Thanks for the fun project idea – the faux bois looks great!
You made this look so easy. I’m looking at a cheap way of renovating my old kitchen cupboards. They’re painted cream gloss with loads of horrible brush marks. I see them as a white or silver grey grain. Just plucking up the courage to have a go!
That’s such a great idea, and like you said it’s doesn’t cost much to give a new look to a room that needs some renovating.
Great Fashion of women that ever liked by Me. Nice emmy. Good sharing.
Great instructions, thanks! Gorgeous results.
That’s such a great idea, thanks