This post is part of an ongoing series presented by Lowe’s. Never Stop Improving.
We’re making some progress on the back yard!

But first, I still get a lot of questions about our renting/renovating situation here at the brownstone, so I thought I’d clarify again.
I’m sure you can imagine how expensive it is to own a home here in New York City. The prices are crazy, as well as the maintenance fees and taxes. We would love to own a home some day soon and are saving to make that a possibility, but for the next few years or so, we’re feeling really lucky that we found a comfortable house in a great neighborhood, with a landlord that lets us do whatever we want.

He’s giving us a break on rent in exchange for fixing and updating the home and he’s paying for a lot of the renovation work we’re doing. There was a long list of projects made before we moved in that the landlord agreed to fully pay for, and the things above and beyond that, we can approach him with separately. So far he’s been willing to cover most of the things we felt like were his responsibility. Then there have been other random things that he doesn’t care about that we’ve had to pay for ourselves (like refinishing the floors – which we ended up not doing. Sad, I know). We knew that would be the case though, so we don’t mind still taking on many of these projects. We’ll just do them for the least amount of money as possible!
The landlord is not too anxious to put money into the yard (understandably), so we’re paying for everything there. I mentioned earlier this week that we don’t have any lighting in the backyard. I’ve ordered some globe string lights for the upper and bottom decks (hopefully they’ll come next week), but I also wanted something a little brighter for the upper deck.


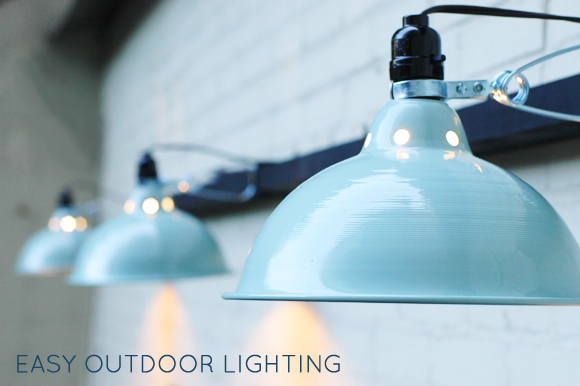
I found these outdoor grade (which is important to have for this project) clamp lights and extension cord at the hardware store. The largest size clamp light was only $7, so I bought three.
I took off the bowl shades and spray painted them with this really pretty Rustoleum enamel called Glacier Ice. It’s a soft bluey green-gray. (how’s that for a description?)
I just did the outside of the bowls because I wanted to leave the inside the reflective chrome. I love how the color is so vintage looking!
At the same time I spray painted a couple of pieces of scrap wood I had left over from the bookshelf project we did this week (pictures coming soon!!), that I cut to be about 2×3. The total length with the two pieces was about 125″. I sprayed the wood and some metal L-brackets with a flat black enamel.
When those were dry, we evenly spaced and screwed the L-brackets to the wood.

We drilled some pilot holes into the brick using a masonry bit and then hung the wood on the brackets using anchors and masonry screws.
Once the ledge was installed, we just clamped on the three lights. Part of the reasoning behind using a deeper piece of wood as the ledge to clamp the lights to, was so we could hide the cords easily.
I did end up putting a handful of staples down to keep some of the cords in place, but for the most part, the system is completely moveable, so if we ever want to take down the lights it would be super simple.
Here’s the view from the ground. Pretty clean!

The back doors are not centered on the building, so the lights don’t line up with the door, but it doesn’t really bother me. I’d rather have the lights more closely centered on the house.
We ended up sort of splitting the difference.
We used the lights for the first time last night and they worked great! We even pushed the lamp heads up to have more light out in the back of the yard.
I’m so excited to get the string lights too. I think the two will look so pretty together!
We might be ready to do something different by next spring, but for about $30 in supplies, I think this was a great solution for us right now.


There's a little awning above the ledge that helps protect the wires from rain, but I love the electrical tape idea. Off to do it!
xx
Wow, Roger, thanks for the mock up! We put the lights far to the left so we can have some lighting over the soon-to-be-purchased grill, which will go in the corner there. I should have explained that better, but you're right that it does look nice centered. :)
Also, the lights are not meant to be a permanent fixture, but they are outdoor grade, so I think we're good for a while. Thanks for your concern.
j
Hi Tom! I would just do some quick googling on the paint you're hoping to use and see what it's heat tolerance is. The shades on these lamps are pretty wide and lots of fresh air can circulate around the bulb.
Good luck with your project!
xoxo
Great improvement! Do I spy a fiddle fig leaf tree? Or maybe it's cousin? Ha! I want one sooooo bad.
My husband has these same lights in his workshop I love the idea of painting the top portion!
I think it's so awesome that your landlord is on board with these updates, willing to support your vision, and actually pay for a lot of them!
My husband and I currently rent the home that we live in- he owns a small condo that we rent out, and until we sell that I'm not too eager to buy a house. We've been here for a year now and plan on staying at least another year if not two until we buy a home. So I totally understand putting a lot of effort into your rental. My philosophy is that I will be spending years of my life living here and I want my home to feel very comfortable and am willing to put in a little elbow grease to have this space feel personal and enjoyable. Thankfully for us there haven't been any major projects to complete but we have painted nearly every inch of the space and are currently landscaping a portion of the yard so the space works for us (more outdoor living please)!
I find your projects so interesting so I am very much looking forward to seeing all your progress!
Love your DIY style! You should have your own show!
Well, that's just an ingenious use of those clamp-on type lights! What a big improvement with very little cost!
Love the color you chose! Looks great!
Jenny, could you please share the link for the globe lights you bought? Thanks!
This looks really great, I like how the lamp shades look sculptural. You might want to wrap black electrical tape over the plug to protect the outlet from water.
Wow, what a great solution! Do you think the clamps would come off easily? I'm picturing one of these as a corded pendant lamp above my kitchen table…
just love this idea. i've been looking for something to light up our lower deck area & since my husband & i can't find anything we agree on yet, this might just hold us over for what remains of Summer/Fall. have these been in the rain yet? if so have they held up well?
I love those clamp lights. My local hardware store had some mini versions that have scalloped shades. Very cute and super cheap! Great idea for painting the outside, too. I'm planning on getting a few once I get the shelf up on the wall in my workspace (so I have something to clamp them to).
what are you going to do when it rains? Did you protect any of the electrical elements from nature?
Jenny, every day you amaze me with your ingenuity. Great work!
I love clever ladies…success
You always have the best DIY's! I'm constantly blown away by your ingenuity and do-able projects (price and work.) Thank you!
There's a little awning above the ledge that helps protect the wires from rain, but I love the electrical tape idea. Off to do it!
xx
What a great, good-looking solution.
Jenny, What a great project! The color is awesome and it looks so classy. I think this solution is beautiful enough to use indoors, too!
Love this idea Jenny. I wanted to get some of these lights for my terrace, but didn't like the look of them. Spray painting them is such a great idea. I'm going to give this a try.
Looks fabulous! Love the color too.
Great concept.
I think I would prefer the lights centered on the doors.
Here is a photochop comparison
http://www.anony.ws/image/J5h
Also, I'm pretty sure the wiring would make an inspector cringe.
What an awesome idea and I love the color you sprayed them!! Your back porch area is really starting to take shape! I know it will look amazing when all is said and done!
Wow, Roger, thanks for the mock up! We put the lights far to the left so we can have some lighting over the soon-to-be-purchased grill, which will go in the corner there. I should have explained that better, but you're right that it does look nice centered. :)
Also, the lights are not meant to be a permanent fixture, but they are outdoor grade, so I think we're good for a while. Thanks for your concern.
j
So creative! Nicely done!
What a clever way to have out door lighting that is cheap and attractive looking. I love the color too. My Hubby has used the same lights in our unfinished portion of our basement to light up two dark corners. He has them plugged in to turn on with the overhead light.
That is genius. I might have to appropriate this idea and do something similar above our kitchen sink.
Thanks for sharing!
So cool! Although the lights being off-center from the doors would drive me bonkers.
A very inspiring post!
Wow.. that is definitely pinterest-worthy. I like the idea of painting the wood dark to hide the extension cords. The lighting looks great!
It looks fantastic and so simple! I love all the creative DIYs you come up with
Love it! I think I would like 4 lights so the it was a little more centered looking, but LOVE the icey blue and the retro vibe:)
I'm in agreement with the other visitor-you need your own show!!
Or rather we would love for you to have your own show! I know you are a busy lady so your eyes are probably rolling at that comment! hahahaha
This is such a great idea! I would have never thought to spruce these guys up and I use them on every painting project I do!
Hey Jenny, Hello from Jolly old London!!! I ADORE your style and you have been an inspiration to me time and time again! I’m so excited to follow your future projects. Do you mind if I ask a quick question? Do you think the heat from the bulb will affect the new paint? I ask because I was thinking of spraying some picture lights of ours, but the metal bulb cover gets very hot and I’m concerned!!! Yours with much respect. Tom xxx
So cool! Great addition to your balcony. And I love that you do these projects yourself and on the cheap!
Hi Tom! I would just do some quick googling on the paint you're hoping to use and see what it's heat tolerance is. The shades on these lamps are pretty wide and lots of fresh air can circulate around the bulb.
Good luck with your project!
xoxo
Love the colour you chose! You're right, its the perfect vintage hue.
Lucky you to have such a cool landlord! :)
Not that I ever doubted you in the least, but this post and the envelope pillow post from yesterday really have me thinking you are beyond genius! and that you need your own HGTV show immediately!
Oh I think it's great! Simple and it looks really clean and beautiful. The globe lights will add all the ambiance you need!
Genius! What a creative solution for lighting!!
Hi, jenny – this is a lovely idea. I'm curious why you didn't pop a fourth up there at equal distance for the right hand corner?
love it! i am bookmarking that color. it's gorgeous!
Your landlord knows what he is doing. I think he is a very clever man. When the day comes for you to move, he will have people fighting for this property.
So everybody wins!
You are an inspiration Jenny. I adore your blog and use it as reference on many of my little projects. Thank you!
Lilac, Sydney, Australia
Seriously, You're amazing. Every post inspires me.
very clever. Love the faux enamel look the spray paint gives – very vintage vibe
The robin's egg blue is beautiful! However, the exposed indoor-grade extension cord exposed to the elements is definitely a fire hazard. Hopefully, you can come up with a modification that is safe and allows you to keep all the beautiful elements of this light fixture. There is always great inspiration at the hardware store!
Your lights turned out so pretty! I would love to add some lighting to our deck, but it's so buggy in our yard, I dread going out there. Anybody have any miracle mosquito solutions?