This post is part of an ongoing series presented by Lowe’s. Never Stop Improving.
We’re making some progress on the back yard!

But first, I still get a lot of questions about our renting/renovating situation here at the brownstone, so I thought I’d clarify again.
I’m sure you can imagine how expensive it is to own a home here in New York City. The prices are crazy, as well as the maintenance fees and taxes. We would love to own a home some day soon and are saving to make that a possibility, but for the next few years or so, we’re feeling really lucky that we found a comfortable house in a great neighborhood, with a landlord that lets us do whatever we want.

He’s giving us a break on rent in exchange for fixing and updating the home and he’s paying for a lot of the renovation work we’re doing. There was a long list of projects made before we moved in that the landlord agreed to fully pay for, and the things above and beyond that, we can approach him with separately. So far he’s been willing to cover most of the things we felt like were his responsibility. Then there have been other random things that he doesn’t care about that we’ve had to pay for ourselves (like refinishing the floors – which we ended up not doing. Sad, I know). We knew that would be the case though, so we don’t mind still taking on many of these projects. We’ll just do them for the least amount of money as possible!
The landlord is not too anxious to put money into the yard (understandably), so we’re paying for everything there. I mentioned earlier this week that we don’t have any lighting in the backyard. I’ve ordered some globe string lights for the upper and bottom decks (hopefully they’ll come next week), but I also wanted something a little brighter for the upper deck.


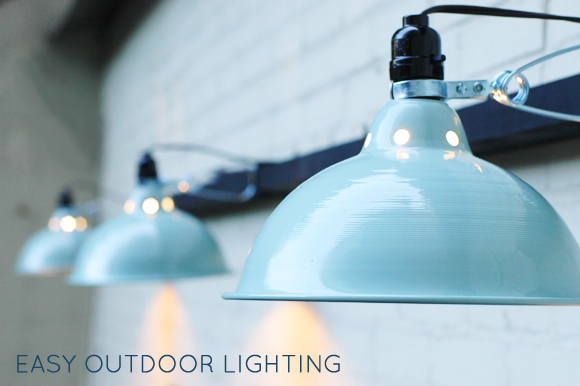
I found these outdoor grade (which is important to have for this project) clamp lights and extension cord at the hardware store. The largest size clamp light was only $7, so I bought three.
I took off the bowl shades and spray painted them with this really pretty Rustoleum enamel called Glacier Ice. It’s a soft bluey green-gray. (how’s that for a description?)
I just did the outside of the bowls because I wanted to leave the inside the reflective chrome. I love how the color is so vintage looking!
At the same time I spray painted a couple of pieces of scrap wood I had left over from the bookshelf project we did this week (pictures coming soon!!), that I cut to be about 2×3. The total length with the two pieces was about 125″. I sprayed the wood and some metal L-brackets with a flat black enamel.
When those were dry, we evenly spaced and screwed the L-brackets to the wood.

We drilled some pilot holes into the brick using a masonry bit and then hung the wood on the brackets using anchors and masonry screws.
Once the ledge was installed, we just clamped on the three lights. Part of the reasoning behind using a deeper piece of wood as the ledge to clamp the lights to, was so we could hide the cords easily.
I did end up putting a handful of staples down to keep some of the cords in place, but for the most part, the system is completely moveable, so if we ever want to take down the lights it would be super simple.
Here’s the view from the ground. Pretty clean!

The back doors are not centered on the building, so the lights don’t line up with the door, but it doesn’t really bother me. I’d rather have the lights more closely centered on the house.
We ended up sort of splitting the difference.
We used the lights for the first time last night and they worked great! We even pushed the lamp heads up to have more light out in the back of the yard.
I’m so excited to get the string lights too. I think the two will look so pretty together!
We might be ready to do something different by next spring, but for about $30 in supplies, I think this was a great solution for us right now.


Love the color and the black doors! Great DIY for next to no money!
You are ingenious! Those look so great.
I would also love to know where you bought the string lights.
Thanks!
This is absolutely gorgeous! Very clever…
Nice. I would center it too. Our BBQ came with a brignt bendy light that we use at night.
Very clever. How is this plugged in? I see the cord hanging down on left side. Did you tape or staple it to the wall so it lays flush against the wall? Is it plugged into an outdoor outlet? Lovely home.
Great job on the lights! I second, or third, or 25th the idea of sharing how you are planning on doing the globe lights. We are thinking about that ourselves and wondering about if we need to string a stronger lead wire; quality of commercial grade not-going-to-break-during-weather globe lights, etc. It seems simple but I think if we don't want sagging and glass all over our patio we need to think it through a bit more…
WOW! Attractive, inexpensive, functional. You never cease to inspire. It's so fun to see what you are doing in the new place! What a cosy stylish new nest for your darling family.
Great idea on the lights. I think it would look great if you extended them to the width of the building, maybe the door wouldn't look off kilter. Either way, it is a great inexpensive idea, love that you can adjust them to shine further out if you need to.
Love the solution you came up with!
My husband and I are in the same situation- we live in a suburb of DC and are renting. We aren't putting as much into the property as you are, but we are fixing up the backyard (it had not maintenance in years- full of crickets) as well as replacing the screens in the house. My husband and I also do most of the routine maintenance as well. Our last landlord's maintenance team put a ladder through the side of my great grandfather's kidney desk, and having that repaired will cost a whole lot more than us doing this stuff. And it's done to our liking much faster than it would have been otherwise. It's just a choice you have to make personally.
Brilliant! Is the glacier ice spray paint from Lowes as well?
Love them!
What you did to the top part of the lights was amazing. It added a boost of appeal to it. This is such an inspiring blog!
Love this! Such a great idea. I've been searching for that exact color so I can spray paint my teepee poles:) but I can't find that color of rustoleum paint anywhere. Any idea where I can score it??
Gorgeous lights! But I would be really worried about using indoor extension cords over heavy duty outdoor extension cords. Please consider a safer alternative for your wiring!
here's a buying guide:
http://www.homedepot.com/webapp/catalog/servlet/ContentView?pn=Extension_Cords_Reels
Here are some options from ACE:
http://www.acehardware.com/family/index.jsp?categoryId=2632265
Hey Jenny,
I love that color but can't seem to find it online or in my local store–is it just such a new color?
Thanks!
I think you did a terrific job! Just a simple fyi- When we lit up our backyard, my husband made sure to wrap all of the extension cord "joins" with black electrical tape, just to be safe against the elements. It hadn't occurred to me, and I was really appreciative of his insight.
Is this 20th street? If so, I think I recognized the front of the brownstone!!! (I used to live on 20th also, now SC…)
I love this so much! I may pull from your idea for our outdoor, night wedding :D