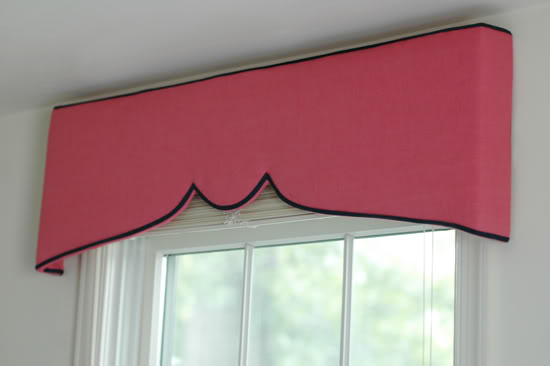
Many of you asked about the pink pelmet boxes in my girls’ room and I’ve been so excited to share the mini-tutorial! It’s an easy and inexpensive one!
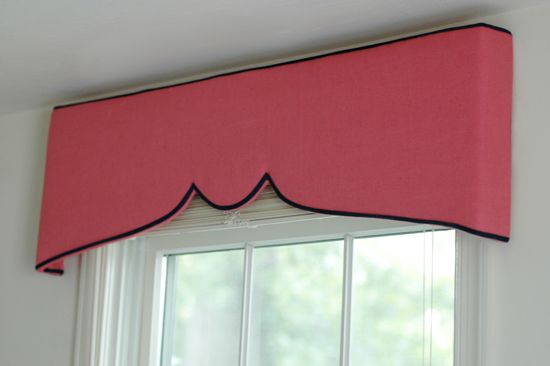
Two of the three windows in the bedroom were obstructed by furniture, so curtain panels (my default window treatment) weren’t really an option. I thought about transforming the mini-blinds into fabric shades, but I was really hoping to find a way to make a structured valence or pelmet box.

In the early planning stages, I was going to buy some plywood at Home Depot and use an electrical saw to cut out a fun design. That was intimidating for me though, and the price of the wood and a new saw (or a carpenter) was going to add up. Then I realized that I didn’t need anything fancy in this room – just something flat that could be cut easily and that was sturdy enough to hold up some batting and fabric.
Enter: foam core board.
I picked up three sheets at Michael’s for $1.99 each. I carefully drew one half of my pelmet shape on to the foam core, cut it out with a box cutter and used that piece as my template. I also cut some short pieces that would be my sides.

I had bought some L-brackets, screws, nuts and washers to assemble the corner pieces, but I ended up just duct taping the whole thing!! This project was SO easy!!
 Duct tape holding the two halves together (above) and the side/corner pieces (below)

I don’t have a photo of this step, but to hang the pelmets, I simply epoxied some wall hangers to the back of the foam core, and hung the boxes on the walls with nails.
And that’s it! It took me about two hours to do this project – from design conception to hanging the three pelmets. So fast and so easy!

–P.S. Our internet has been down all weekend (I’m posting this from my husband’s office), so if I owe you an email I promise to have something to you as soon as possible. We’re hoping to have the situation fixed in the next couple days. Thanks!!


Very cute! I just finished making mine. Phew!
The 1/4 staples did not work for me, I ended up getting slightly longer staples.
It was a little hard to connect to the wall..but with a lot of duck tape, and playing around, it is up!
Looks cute!
They are beyond gorgeous and look very high end!
Work from home India
I have done 3 Pelmet Boxes and all of them turned out very well. I'm so excited of showing them to my family that is visiting us for Christmas.
Thanks for the instructions!!
I think my fav part of the room is the yellow mirror. Or the window treatments. Or the headboards. Or the nightstand.
Wagyu Steaks
I love these!!! And I adore your blog – you're so talented.
Quick question about the pelmet boxes… would they work on a really wide (59") window? I would love to do these in my living room, but I'm wondering if I'd need some sort of extra support for something that wide.
Thanks!
Jenny, I finally did a pelmet box for my boys' room today! Thanks so much for the inspiration. (And now, comparing your photos to mine, I am SO jealous of the natural light in your home…)
I saw the same episode of Rachel Ray that the original commenter mentioned and have thought about it on occasion since then. The segment isn't on the show's web site, but Google brought me to you :)
I noticed recent comments about a longer one – that's my plan too: 12 feet! I'll probably put brackets up every two feet or so to keep it from sagging/support it since it's only held together with duct tape. But I'm hoping other that that adjustment, it'll work just fine.
I tested the project on a smaller scale in my "office" first. I went for straight lines – it's just more my style (and I figured easier). Here's the public link to the final product of the test run: http://www.facebook.com/photo.php?pid=31208245&l=2cecb09bf3&id=123701161
If anyone is wondering, supplies for this were less than $25. I'm still unclear on how you hung this, but I made mine with a top piece, so I just used 2.5 inch corner braces as "hanging brackets".
Yay! Thanks for the step-by-step instructions — it really helped give me the confidence to try it, and I love the end result!
This tutorial was wonderful! I was looking for something to do to finish off my windows and this was perfect! I used Micheals velcro hangers so it was removable since I live in an apartment, but love the idea of using foam board.
I linked your blog and pelmet post here, http://2catsandarental.blogspot.com/2010/02/diy-pelmet-boxes.html
Thank you for the inspiration!
those look amazing! Thank you, posted a link on my blog for a future to do project.
Thanks
http://www.craftyjules.com
Hi! I want to make a pelmet box with a canopy beneath, but I'm having a hard time finding inspiration photos. Have you seen anything like this?
Here's an example:
http://xoxodecoratewithlove.blogspot.com/2010/03/dream-guest-bedroom.html
It looks pretty straightforward, but I would love to see more images that also include a headboard. I know that Sara Gilbane has done a couple.
What a great idea; super simple and super chic!
For those interested [especially renters] check out COMMAND picture hanging strips – "the versatile attaching solution with firm holding power and clean removal. Picture Hanging Strips are easy to apply, easy to remove and leave no nail holes".
Jenny thanks for sharing your gift of imagination and creation…
~Enaid
I love this project, and have bought all the supplies I need. But I'm still not clear on how you hung them. Can you help? I'm doing this as the window treatment for my baby girl's room – due next week!
Thanks!
Oh my goodness – what a great idea!!!
:)
ButterYum
has anyone tried this with particle board? the reason I want to make it out of wood is to hopefully be able to screw (or attach some how) a roller shade in the box. But I don't know how they attach it to the wall and I"m afraid by pulling down the shade I'll pull down my box and rip some holes in my wall. Any ideas?
This blog is absolutely amazing, i really like the way how it was written. I must to say it catch my attention since the first time that i read this whole information.Wonderful.
costa rica homes for sale
Thanks for the great idea about the foam core board. It was so easy to make.
Here is mine: [url=http://a3.sphotos.ak.fbcdn.net/hphotos-ak-snc6/183818_10150092592025658_549480657_6770473_3850967_n.jpg]HERE[/url]
Hope that works. BTW, I used velcro to hang on the wall since I could't find thick core board. I got heavy duty and they are staying up just fine.
BRILLIANT!!! Okay – I am just discovering this a few years later because I'm sort of new here but….I can't wait to try this {and the duct tape? – this is something I could really have fun with!} Can't thank you enough for opening this door for me. Very high end looking – I never would have imagined. What a talent you have!
I read your blog regularly. I googled how to make a pelmet box and came upon your diy directions. My husband gave it a shot. I love the finished product. I blogged about it with a link to your blog. Thanks for all your awesome posts!
thank you so much for sharing this tutorial! I am going to make one .. how thick was your foamboard?
These are great! I'm looking to do these for a kitchen. How do they hold up? I'm thinking that they are exposed to steam in there so… does the foam board hold up well?
I am just in love with these for our nursery. Thank you for such a wonderful and easy idea!! I went to Michael's and found the foam core in two thicknesses…how thick was the foam core did you use?
past due balances school loans northwest iowa credit union. first time instant approval credit cards, [url=http://freeloansmoney.com/]free loan[/url]. liberty reserve offer debit cards fha loans and arsenic remediation.
Oh I have been looking around for this tutorial and I finally found it again! Hooray. I think I will be making one of these for my super small craft room window. Thanks for the great tutorial!
Thank you so much for this tutorial! I made a Miles Redd inspired pelmet box for my son's playroom! http://belclairehouse.blogspot.com/2011/12/edwards-playroom.html I could never have done it without your help!
I made mine last night and love it! I have no idea how to hang it on the wall now! I'm thinking I should have made a top to hang it on.
Wow, popular post! I've linked this to my pelmet box post too today, for inspiration!
I made mine! They are on my website. Thanks so much for creating this tutorial.
I saw your post ages ago and thought it was ingenious! I finally put some up in my own home. This project is perfect for my lo/no budget style. I linked to your post and blogged about it here: http://nolocomo.wordpress.com/2013/06/24/upcycled-pelmet-boxes/ .
Thanks for sharing your creativity!
Great job!!! I’ll be very happy if you can please tell me which thickness of foam that was used for this pelmet board; thank you.
Wow!! Wow!! Absolutely classy and soooo easy. Where can I buy the foam core board from? I want to hang lightweight drapes under my pelmet box and use trim with tassels on the pelmet box.
Should I just glue or staple the lightweight drapes to the under/back side of the pelmet box or???? I appreciate any advice. Again…wow!! I was beginning to think it was going to be impossible to make the box. You’re a genius!
I have noticed that your page needs some fresh articles.
Writing manually takes a lot of time, but there is tool for this time consuming task,
search for; unlimited content Wrastain’s tools
I am currently attempting one of these. How did you handle the sharp corners on the bottom? I don’t feel like my fabric is going to wrap the corner properly.
thanks
I absolutely love this pelmet, it’s beautiful!
OK….I’ve done my research so now I’m ready to get this project going. FYI, I’ll be using the cheapest way out from my fave’ store the Dollar Tree. I’ll be sharing the results in just a few days I hope!
OK, I’m up for this one. I’ve done my research and I’ve decided to use foam board and as much as the ingredients from the Dollar Tree, the rest from my tool box and the Home Depot. I’ll be letting you know in a few days or so. Yee-Haw!
Hi,
Love your curtain pelmets! I was wondering what you used to put the pelmet on the wall?
Thank you in anticipation
A fan idea I am moving house so going to have ago many thanks jean.