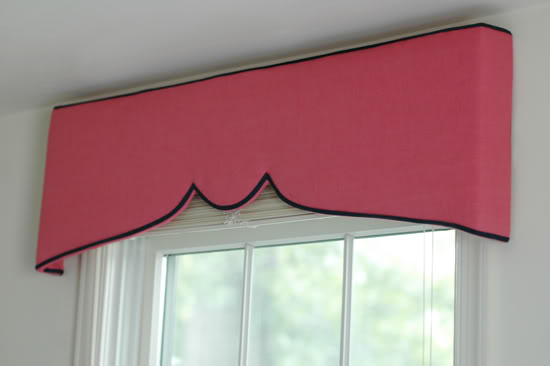
Many of you asked about the pink pelmet boxes in my girls’ room and I’ve been so excited to share the mini-tutorial! It’s an easy and inexpensive one!
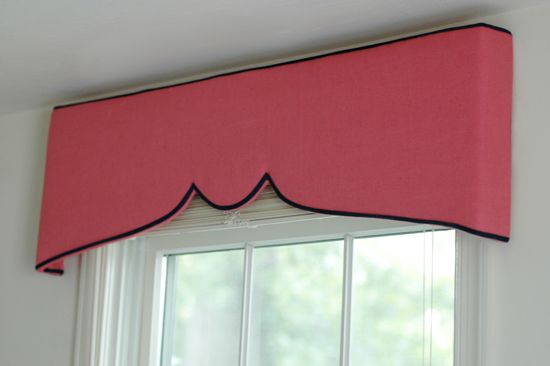
Two of the three windows in the bedroom were obstructed by furniture, so curtain panels (my default window treatment) weren’t really an option. I thought about transforming the mini-blinds into fabric shades, but I was really hoping to find a way to make a structured valence or pelmet box.

In the early planning stages, I was going to buy some plywood at Home Depot and use an electrical saw to cut out a fun design. That was intimidating for me though, and the price of the wood and a new saw (or a carpenter) was going to add up. Then I realized that I didn’t need anything fancy in this room – just something flat that could be cut easily and that was sturdy enough to hold up some batting and fabric.
Enter: foam core board.
I picked up three sheets at Michael’s for $1.99 each. I carefully drew one half of my pelmet shape on to the foam core, cut it out with a box cutter and used that piece as my template. I also cut some short pieces that would be my sides.

I had bought some L-brackets, screws, nuts and washers to assemble the corner pieces, but I ended up just duct taping the whole thing!! This project was SO easy!!
 Duct tape holding the two halves together (above) and the side/corner pieces (below)

I don’t have a photo of this step, but to hang the pelmets, I simply epoxied some wall hangers to the back of the foam core, and hung the boxes on the walls with nails.
And that’s it! It took me about two hours to do this project – from design conception to hanging the three pelmets. So fast and so easy!

–P.S. Our internet has been down all weekend (I’m posting this from my husband’s office), so if I owe you an email I promise to have something to you as soon as possible. We’re hoping to have the situation fixed in the next couple days. Thanks!!


What a wonderful idea. This really does put design within reach of everyone!
This room is fantastically original. I love your details and your DIY style tips. Thanks for the how-to on the pelmet boxes. I think I want to do this in my powder room.
wow- foam board. You're too clever, and they look fantastic.
Lovely post, really enjoyed it – & I'm loving your blog ! Best wishes..
I love this! It's so easy and no one would guess it wasn't MDF. I may be using this in my kitchen.
Thank you so much! I'm off to Michael's and I can't wait to report back to you on how mine went!
I might even try this now that I see how easy it is!
Andrea
I guess they are light too? Can't wait to try something like this with foam board!
Wow, these are so wonderful! The perfect solution to the impossible-to-curtain windows in my living room, too. I'll have to try it.
I absolutely love the fabric on the headboard too. Did you make that? I'd love it if you could tell me where the fabric is from!
Brilliant idea to use foam core — it's not like the pelmet boxes will get heavy use so a weaker material isn't an issue. Plus, they're lightweight and much easier to hang than wood/MDF!
Hi, I LOVE this idea. I am having trouble figuring out how you hung the boxes. Is there any way you can take a picture of the side of the box (where I think the hanger is) and add it? Thank you so much!!!
I LOVE these, but I had to comment because I made something similar for my living room windows a couple years ago using the same methodology – foam board and lots of TAPE. Worked like a charm. :-)
You are a genius. I am so happy to have found your blog. I'm sure you hear that all of the time but really. Amazing. I think I'll do something around the house tomorrow instead of just thinking about it(like I do most days).
now that's a great idea. foam board instead of wood!
That photographed so beautifully, I would have sworn it was solid wood. Totally genius. Love this idea so much. Bookmarking now !
Kate
http://www.centsationalgirl.com
How do you know how big to make the pelmets?
Now that's clever!! LOL Good on you!!
really phenomenal. love the fabric, the colors. just beautiful!
Hooray!!! Thank you SO much! You have just solved the window issue in my boys' bedroom! I now officially adore you. :)
this is a really neat idea. the room looks cute too, especially the beside table.
That is brilliant. I have two problem windows and have been thinking about wood pelmets, but like you, didn't want to deal with saws, wood, etc. Thanks for sharing the how-to.
Basha – I'm not sure that I would make a headboard out of foam board, but if you do want to try it, make sure you get the double thickness version (available at Michaels). I also like one commenter's use of insulation board. That comes in larger lengths too and might end up being the less expensive option.
Elise – to get the fabric to lay flat around the rounded corners, I cut a line up to basically the top of inverted peaks and then pulled the fabric to the sides. Does that make sense? Really the trick with any upholstery project is to pull the fabric tight, especially when working with curved designs.
Kath – Sorry, no template! I wish I could help there. I just sort of eyeballed it for the design. It's really easy if you just draw one half of the design and then flip it over and trace that half to draw the other side. Hope that helps!
Liz – I made my pelmets so there was about 2" of clearance on every side of the blinds hardware. You don't want the box too big, but there should be clearance enough for the mechanisms. Just measure the width and depth of your window casement or blinds and add a few inches to your design to be safe.
For those with questions about hanging the boxes, I don't really have a way to upload any new pictures of the pelmet backs right now with my lack of internet situation, but the idea is very basic. Just epoxy some hanging loops/hooks/teeth/other mechanism to the backs and use said mechanism to hang the pelmets on some long nails you put in the wall. The boxes are so, so light that it really doesn't need to be more complicated than that.
If anyone does their own version of the foam board pelmets, I'd LOVE to see pictures!! There are so many cool shapes that these could be made into, I know I'll be using the project idea again myself!
Wow! That's awesome! I can't wait to make some!
Just thought I should let you know that I purchased some fabric and am going to try this project this weekend!
Jenny, you are a goddess!
We LOVE this project and your Little Green Notebook is addicting. We love all things smart, gorgeous and easy! OK, we're hooked! We'll be visiting often. Hope your computer problems get fixed soon!
Hi Jenny – I've never upholstered before but these would be perfect for my husband's office (not in pink, of course!)…
How did you get such a perfect pattern? And how do you pull into the tight edges without getting wrinkles? I'm fascinated by this one, I must admit. Thank you again for the inspiration!
precious! just precious! my sister and i shared a room growing up and my mom made us a lovely pelmet box for our window too! what lucky little misses you have!
Wow!! Just discovered your site and just love your DIY style. Wish I could make a pelmet for my daughter's room but her lone window is tucked into a corner, bordering a closet. Would you suggest a roman blind or a cafe curtain? More for colour/finishing off the room than for light control. There's a vanity in front of the window. Tan walls and blue/white foral quilt, accessories with a white iron bed and small chandelier. Any ideas welcome!
Really, really, really cute. I'm so impressed!!! Your girls are lucky to have such a stylish room! Cool.
Is there ANYTHING you can't do with foam core?!? I love this. I bookmarked all the posts with this room, it's just fabulous and wonderful inspiration for the guest room I'm creating with two twins. I even have the same window! Thanks so much for being so generous with your creativity! I'll be linking to this.
Hi Jenny. I am now obsessed with doing this, but what I **REALLY** want to know is:
WHERE IS THAT FABRIC ON YOUR DAUGHTER'S HEADBOARD FROM?
it is so beautiful I want to eat it.
i love your blog!
You have inspired me. I will be doing a like project in my home this weekend (my son permitting.) Thank you for your genius.
I've wanted these in our master bedroom ever since we moved in (4 yrs ago,so sad…). Yours look so spectacular–I'm doing it! (btw, I just found you via one pretty thing and your blog is quite addictive! Love it :).
This is truly beautiful! What a great idea. I've linked to your tutorial. Thank you so much!
Gorgeous!!! What a great project! I am adding your blog to my Reader IMMEDIATELY!
SUCH a GREAT idea! I love this! Your girls' room is beautiful. I just love it!
I just came over from Design Dazzle. This is great. I am very excited to snag this idea for my little girls room!
Chelsea
Such a great idea! And really, why not use foam board? Its' not like they're going to get a lot of wear and tear hanging up there on the wall! Love it!
How pretty! I love your daughter's room – that headboard is scrumptious!
http://girlwhimsy.blogspot.com
I love your Pelmet Boxes, but DID YOU MAKE THE BEAUTFUL HEAD BOARDS AS WELL???? Love love love them.
I was at a thrift store today and found (3) 5 foot wooden pelmet boxes with batting and fabric for $3 each. I just need to recover them or possibly use fabric spray paint. I'm not sure which. I'm thinking a deep plum with white ribbon trim to go with my turquoise, gold and black room.
Anyone else have a a good color combo for my pelmets?
Question?!?!?
How did you get the fabric to wrap around the bottom/center section? I tried to copy your same exact design and I could not get the fabric to work with me. The point where the curve met the angle was the hardest part! Can you help me??
tottyvb@gmail.com
Hi … I love these, and we are renting a home right now … and they are perfect because they look amazing, and won't break the bank! ;')
Can you help me with the last step please?
"I simply epoxied some wall hangers to the back of the foam core, and hung the boxes on the walls with nails."
What glue did you use? Did you glue it to the top of the pelmet? what hangers did you use?
myenglishgarden@hotmail.com
Many thanks!
Nancy
I love this!!!!!!! They are so beautiful! I am featuring this at somedaycrafts.blogspot.com Grab my 'featured' button.
I'm so glad I found this tutorial. I had a vision for doing something like this for our daughters' room but thought it would be too hard — until I found this tutorial!
I banged it out in a weekend. I was perplexed on the hanging instructions so I used a safety pin that I fastened vertically to the top inside of each end. Then I hung the "ring" part of the safety pin on a nail head. Perfect. EASY.
These look great. About a year ago Michaels had some instructions on how to do something similar with the long styrofoam sheets. Here's the link, http://www.michaels.com/art/online/projectsheet?pid=e06216
Fabulous! I think this is just thing thing I've been looking for to do in my babies room! LOVE that it looks so easy and do-able AND affordable.
Well done!!!
You are genius! I love your blog!
Thank you so much for this tutorial. I was looking for something lightweight that I could make on the cheap for my client and I am so happy to have found your pelmet post! I linked your blog and pelmet post here
http://christiechase.blogspot.com/2009/11/106the-pleasure-of-pelmets.html
thanks so much!
I really love this! However, we have a really large window. Well, its really 2 windows but they are side by side in one frame.
So, should I make one really large pelmet or make 2 and butt them right next to each other?
Do these look just as cute with curtains underneath?
Thanks! :)