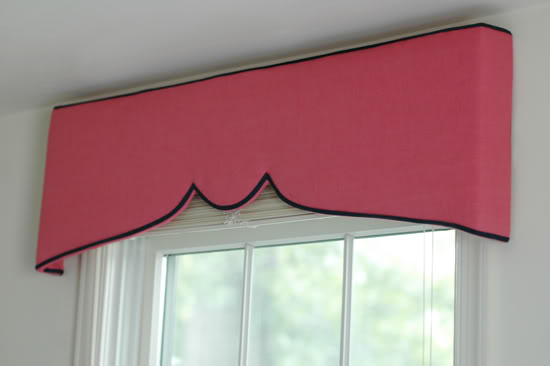
Many of you asked about the pink pelmet boxes in my girls’ room and I’ve been so excited to share the mini-tutorial! It’s an easy and inexpensive one!
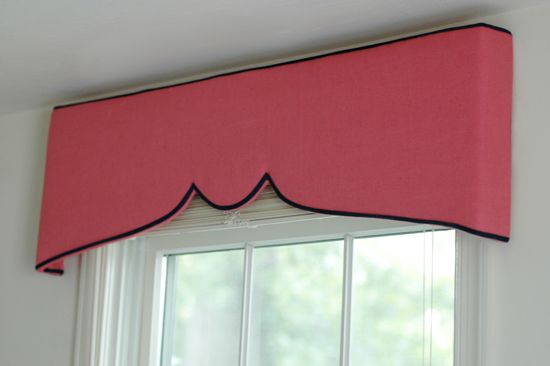
Two of the three windows in the bedroom were obstructed by furniture, so curtain panels (my default window treatment) weren’t really an option. I thought about transforming the mini-blinds into fabric shades, but I was really hoping to find a way to make a structured valence or pelmet box.

In the early planning stages, I was going to buy some plywood at Home Depot and use an electrical saw to cut out a fun design. That was intimidating for me though, and the price of the wood and a new saw (or a carpenter) was going to add up. Then I realized that I didn’t need anything fancy in this room – just something flat that could be cut easily and that was sturdy enough to hold up some batting and fabric.
Enter: foam core board.
I picked up three sheets at Michael’s for $1.99 each. I carefully drew one half of my pelmet shape on to the foam core, cut it out with a box cutter and used that piece as my template. I also cut some short pieces that would be my sides.

I had bought some L-brackets, screws, nuts and washers to assemble the corner pieces, but I ended up just duct taping the whole thing!! This project was SO easy!!
 Duct tape holding the two halves together (above) and the side/corner pieces (below)

I don’t have a photo of this step, but to hang the pelmets, I simply epoxied some wall hangers to the back of the foam core, and hung the boxes on the walls with nails.
And that’s it! It took me about two hours to do this project – from design conception to hanging the three pelmets. So fast and so easy!

–P.S. Our internet has been down all weekend (I’m posting this from my husband’s office), so if I owe you an email I promise to have something to you as soon as possible. We’re hoping to have the situation fixed in the next couple days. Thanks!!


This is just so smart! I saw a quick and pretty-much-disastrous tutorial on the Rachel Ray show once not long ago, but it all kind of fell apart due to the time constraints and quick-messy work. They added a ready-made strip of nailhead trim in lieu of your ribbon. (I like yours much better!) I'm happy to see that this can really work, and a super inexpensive window treatment really MIGHT be in my near future!
Wow!!!!!!! How neat and beautiful!!!
That looks fantastic and you've just helped me figure out a decorating dilemma I've been losing sleep over! BTW- I'm completely obsessed with your blog and I linked to you here:
http://bibbidi-bobbidi-beautiful.blogspot.com/2009/09/girls-shared-bedroom-reveal.html
Brilliant!! Marking this idea for sure. I do love your daughters room. My daughter is all about pink. I call her room the pink palace but have slowly been adding a bit of color other than pink or white. I think my fav part of the room is the yellow mirror. Or the window treatments. Or the headboards. Or the nightstand. Or the duvets. Hmm….I just like it all!
Jenny! How fab is that!!! I totally thought it was MDF!!!!! Amazed by it. Great idea!
I would have never guessed! I guess I have a new project to work on:)
Hooray! I've been checking for this post religiously. (And subsequently bummed out all weekend) Sorry about the internet, hope it gets sorted out quickly!
wow, that is INGENIUS
Wow!! What a great idea. They look great. I love the look of the entire room.
So awesome! I love love love that you do things we can all do. It's totally achievable you just happen to be super creative, too!
They are beyond gorgeous and look very high end!
Janell
I cannot believe how incredible those look! You are brilliant!! I am totally going to borrow that idea some time in the future.
you are soooo CREATIVE!!!!!!!! LOVE it and thank you for sharing!!!
The colors in the room are so lovely! I wish I had such a good eye.
So genius! Can't wait to try this in my bedroom! You are such an inspiration — keep the great ideas coming!
that looks great!
Seriously. You kill me – in the most awesome kind of way! Knock my socks off each and every post!!
Wow! Genius, I just might have to attempt this myself!
What a wonderful idea! I am afraid that I am not crafty at all but I am inspired. The room is a charming retreat for a litte lady.
Foam core board – very smart and creative!! Love the bedroom.
what a great idea! I'm dying to make this for my daughter's room –
No WAY!! I love this! I can't believe this was so easy! I must admit to chuckling just a little when I read that it was foam board!! This is SO inspiring!
Boy oh boy, I am bookmarking you right NOW. You have beautiful taste and after reading through many of your previous posts I am so inspired. Just because I live in No. California doesn't mean we can't be best friends :)
Hi Jenny! I just LOVE your blog and especially was so amazed at this entry….
I decided to feature you on my blog because I love it so much! :) Thanks for all the posts and I look forward to seeing more.
-Jane @ http://brunchatthebeach.blogspot.com
I'm not quite sure I know of anyone else in the world that could have come up with that idea! You are amazing!
Wow, I can't belive you made those yourself! I did a post about your bedroom makeover on my blog btw :) Very impressed!
This is so awesome, creative, and seems pretty easy. What do you think of applying this concept to a queen size headboard? I am intimidating by cutting my own wood too.
I love your creativity! The fact that it's inexpensive is also a plus :) Thanks for sharing!
So smart- as usual. I just love your ideas and that you take the time to share them!
I just love when things are "rigged" but can still wind up looking so completely hi-end and custom. So smart!
Wow. I was away last week and am just catching up on my blog reading, and I can't believe how beautiful you made your daugthers' room. You are incredibly talented and creative, and thank you so much for all your tips.
You did an amazing job! It looks totally professional!
I am amazed at this idea! Thanks so much for the tutorial!
wow! I never would have guessed that they were foam board! It's fabulous
Thanks for continuing to share your projects. Your talent is incredible!
You are awesome – I love getting my daily dose of inspiation from your blog! Thanks!
Genius!
These look great. I was just wondering how you got the fabric to be so smooth around the curved area. Could you explain how you attached it?
I can't believe how quickly this came together and how finished and professional it looks. Really, I bow to you. Another amazing transformation!
oh my word! you are amazing! Those are so beautiful!! WoW!
Ridiculous. If I could have just an ounce of your creativity, my rented house would not look like a one bedroom mess. Thanks for sharing. I look forward to copying more of your ideas. ha ha
I really love these. Do you have a template for me to follow as I make them ? That I can print out. Also what are the measurements I didnt see that? Maybe you can just let me know how to measure my windows and how much to go over off each side. I am so excited I found these. Now a blog follower to keep up with you and your life. I am having a blog contest right now. Come follow me and enter to win a few things. Kath' at dublshot@comcast.net and http://www.lilbitoldlilbitnew.blogspot.com
This is fantastic! I've been thinking about how to turn my study into a nursery and one of the things on my list was Pelmet boxes. I was just crossing it off my mental list for the same reasons you mentioned- cost of wood/parts and sawing/creating the thing when this post comes along! I can't wait to try it out. Also, your little girls new room looks AMAZING! An excellent job as always.
You are pure DIY magic :-)
Your daughters room looks fantastic!! I absolutely love your style. It's so fresh and easy. Thanks for writing such a great blog. It's one of my favourites to read each day.
you are so inspiring! I love to see what you come up with…it makes me more bold in trying to DIY in my home.
shut up! foam board…wow. I have got to try this. you are a master!!
GENIUS! Omigosh I love this! This whole room is just the cutest thing!
I've done the same thing before, but I used a piece of insulation board. You know that stuff they put on the outside of a house before they brick or put siding on it? Anyway, you can get a pretty large piece (about 3×5 feet) for like $8. It is a about 1/2 inch thick. It works really well. We used long T sewing pins to attach the sides and top and then "upholstered" them. Then, we screwed L brackets into the wall and just sat the finished pelmet board (didn't know they were called that until I heard Candice Olsen talk about them!) on them. Yours look awesome!
this just blew my mind! FOAM CORE!!!!!!!!!!!?!?!?! Brilliant darling… just brilliant!