I love the look of using an ottoman as a coffee table. But large upholstered ottomans can be so (!) expensive.
 I think I shared this story before, but a few years ago we lived in Washington D.C., where there is a Restoration Hardware outlet. One magical/terrible day I walked into the store and there, right in front of me, was the most gorgeous and glorious upholstered ottoman (normally $1200). Price tag? $150. No joke. With the understanding that the salesperson knew I wanted to buy the ottoman, I stepped out of the store (no reception inside) to call my husband about the purchase (our rule is no purchases over $100 without a team discussion). I skipped back inside the store after getting the go-ahead from Michael, only to find the ottoman no where in sight. Someone else had bought it in those few short minutes and I felt like such a fool. Saddest. day. ever.
Fast forward two years and I’m still thinking about the gorgeous velvet ottoman. Since I don’t have $1200 to spend on the same RH ottoman, I decided to try and make a similar ottoman out of a coffee table.
I decided that I needed a smaller size ottoman for our living room. I thought 35-40″ would be the right size. And it couldn’t be more than 16″ tall. And I wanted a square table, not a rectangle. And I wanted sort of chunky, turned legs. I know, picky, right?
But Craig’s List came through for me again. $25 for this heavy, solid wood piece.

Perfect dimensions (36x36x16). Just needed some paint on the legs for that dark-stained look I wanted. I used Ralph Lauren’s “Galvenized” in eggshell for two coats and sealed it after that.

I marked out where I wanted my 16 tufting buttons to lay and drilled holes in the table top.

Then I used a little spray adhesive to hold my 2″ foam (from JoAnns) in place.

I also cut up some of the left over foam and adhered foam strips to the apron of the table to fill in the empty space under the lip.

Then I wrapped the apron in batting and then the whole table was covered in a sheet of quilt batting (no photo of that step, sorry).

Using the 16 drilled holes as my guide, I adhered the tufting buttons (which I made with a button kit from JoAnns) with upholstery thread and a long needle.

I used regular plastic buttons to anchor the tufts on the underside of the table.

Once all the tufts were in place, I stapled the fabric edges to the underside, being sure to pull the fabric really tight. Then I tackled the corners, which was the trickiest part.

I decided to use upholstery nails on just the leg area where I did sort of hospital bed corners with the fabric. I might end up redoing this part, but I think it’s fine for now.

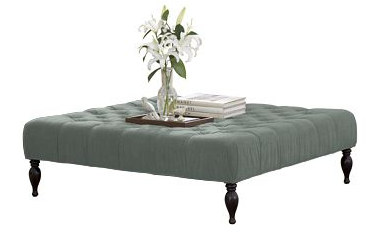
Here’s the finished product. What do you think? Does my $60 project compare with the $1200 Restoration Hardware ottoman? Maybe not, but it will do for now!


Hi! I’m coming over from Nesting Place and I’m SOOOO glad I did. You did an incredible job. I love your creativity and ingenuity. And truly, I think this compares with the RH version. I also love the color of the fabric you used.
Thanks for showing us how you did this!
That is AWESOME. Great job thinking through the whole process and coming up with an amazing end product! And thanks for posting all the pictures along the way!
FABULOUS! What an awesome idea and thank you for sharing this.
Wanna see my redo? Come visit!!
that’s amazing. i love it. how you do all this with your girls, I’ll never know. i can barely clean, let alone do my own projects. . . it seems impossible!
I think that came out really great. I can imagine doing the same thing with plywood and stock legs from the home improvement store. I will keep it in mind for the future!
Jennifer
WOW! When can you come over? Turned out beautifully!!
That looks fantastic!! My sister is in the process of using Galvanized on her kitchen cabs. It’s such a great color!
That looks fantastic!! My sister is in the process of using Galvanized on her kitchen cabs. It’s such a great color!
I am SO doing this. Awesome job!
Karol :0)
No way! That is the coolest trick ever. It looks totally fabulous!
Oh, it’s just awesome! I’ve been thinking about slipcovering my coffee table but you’ve given me something else to think about!
I found you through the Nester. You did a wonderful job with the tufts! They look great!
Fabulous!! I have thought of doing something similar…now I may just try it. I’m so impressed!!
Thank you for posting this. Nester sent me over. i have had the fabric draped over my coffee table for a month now & just been too chicken to do it my self. Off to Jo~anns to get the foam. Thanks
A few years ago I did this project using our breakfast table rather than a coffee table. Got the idea from Trading Spaces. My husband cut the legs and added casters for easy rolling. I did the foam thing as well as batting, muslin then made 2 slipcovers – one for fall/winter and one for spring summer so I can change out the look and wash at will. The ottoman is large, comfy for extra seating if needed and a creative approach to using what you have to fill a need. :o)
jAne
http://tickleberryfarm.blogspot.com
THIS IS GREAT!!! Thanks for the step by step how-to. it’s beautiful, you did a great job with that!
This is brilliant! Your ottoman turned out great and it looks very professional, too; I’m quite impressed.
I saw this on Apartment Therapy and WOW-I love it! What a great use of a coffee table. In fact I have the exact same one in my garage! I got it at a yard sale a few years ago and used it for board games. I would love to link to this if you don’t mind, it’s such a great project, one that is totally going on my to-do list!
I have a table just like this that I HATE and now I know exactly what to do with it! HOORAY! Great idea!
Wow! That is fantastic. I love this idea. Your instructions are so helpful, too. Plus, I just saw a similar sized coffee table for sale!
Oh. My. Gosh. This is the most ridiculously beautiful thing I’ve seen in such a long time! I want one. Now! :-) I would never have thought it was possible for a “normal person”- ie. not an upholsterer- to do this, but you’ve given me the confidence and tips to think I can! Just sensational. Well done.
Absolutely awesome!!! Thanks so much for sharing.
I have wanted to do this for a long time. Yours looks fantastic!!
OMG thank you for this idea, I have been wanting a coffee table and this has given me inspiration for a really nice one now.
Great transformation!!
that totally ROCKS.
Thank you so much for posting this! I’ve been wanting to make one. Do you mind if I ask what the name of the paint color is in your room? I’ve had such a hard time finding one that shade that works.
Wow!!
muchas gracias esta buenisimo!!!
Gorgeous!! Great job!
Utterly brilliant. I’m sitting here looking at our ugly pine coffee table and thinking “Viola!”
I need an ottoman and this is the inspiration I need for a diy project. I am scanning Craigslist as we “speak”.
Beautiful work. And an inspired project. Thanks for the tutorial!
(spotted featured on CRAFT Magazine’s blog)
Thanks for the nice comments, everyone! After living with and using the ottoman for several weeks now, I’m still really happy with the project. I’d love to see pictures, if any of you make your own!
Sarah – my living room color is Martha Stewart’s Moonbeam (from Lowe’s). It is the greatest shade of pale blue-gray. I think it is subtle and fresh. Love it!
amazing. you really know your stuff! love your cozy home!
Hi Jenny, just wanted to thank you for this post, which inspired me to have a go myself — much easier when you know someone else has already tried (and succeeded!!). I took a broken coffee table and used the legs as the starting point for a bed-end bench. If anyone's interested, you can see pics on the Living Etc forum:
http://www.livingetc.com/forums/showflat.php/Cat/0/Number/70511/page/0/fpart/1/vc/1
That's a wonderful idea :) Thanks so much for posting this.
gorgeous job! now i'm gonna scour cl until i find a cheap coffee table to experiment on. your tufting procedure is so much easier than what i would have thought of.
on another note, i absolutely love galvanized by ralph lauren. just enough black, just enough brown.
I love your ottoman! I made one using your how to. Pics and stuff here if you want to see
http://rcandkd.blogspot.com/2009/08/house-fun.html
Thanks for the great idea!
Love your style! I found your blog through the Nester's. You have given me great inspiration! Love the ottoman- old and new!
Thank you for the post! My boyfriend actually found it and we got the motivation to create one of our own!
Photos are in the post below!
http://marilyn-elizabeth.blogspot.com/2009/09/finally-finished-product.html
h漫,成人漫畫,免費A片,色情網站,色情遊戲,情色文學,麗的色遊戲,色情,色情影片,同志色教館,色色網,色遊戲,自拍,本土自拍,kk俱樂部,後宮電影院,後宮電影,85cc免費影城,85cc免費影片,免費影片,免費小遊戲,免費遊戲,小遊戲,遊戲,好玩遊戲,好玩遊戲區,A片,情趣用品,遊戲區,史萊姆好玩遊戲,史萊姆,遊戲基地,線上遊戲,色情遊戲,遊戲口袋,我的遊戲口袋,小遊戲區,手機遊戲,貼圖,A片下載,成人影城,愛情公寓,情色貼圖,情色,色情網站,色情遊戲,色情小說,情色文學,色情,aio交友愛情館,色情影片,臺灣情色網,寄情築園小遊戲,情色論壇,嘟嘟情人色網,情色視訊,愛情小說,言情小說,一葉情貼圖片區,情趣用品,情趣,色情漫畫,情色網,情色a片,情色遊戲,85cc成人片,嘟嘟成人網,成人網站,18成人,成人影片,成人交友網,成人貼圖,成人圖片區,成人圖片,成人文章,成人小說,成人光碟,微風成人區,免費成人影片
This is awesome. I am so going to do this in June (when my Mom comes up to help). Thank you so much. I found your blog through a friends blog and LOVE it. Very creative and inspiring!
Absolutely amazing!! Cant wait to get started on my own DIY Ottomon. Thank you for sharing this real easy DIY – Simply love it!!! WOW
I'm curious how you do the button tufting. Does the button kit from Joann's come with more instructions? I'm having trouble envisioning how the needle/thread/button is set-up and which direction you go through… and how it becomes secure. I'd love to do this on a DIY headboard that I have plans to make. If you could e-mail bits.and.pieces@hotmail.com to let me know, that would be great! I would so appreciate it.
Thanks,
Amanda
I've been so inspired by this post for about 2 months now..my difficult part is finding the right table..ugh, some people in this area really think $50 is a reasonable price for a janky ol' table..but, anyway, I wanted to tell you how insanely great I think this project turned out..and how sorry I am that you didn't end up getting your 'Restoration Hardware' version..I'm sad also because the store here had their final warehouse sale @ some point last year..and I missed it :(
Thanks for the inspiration!! I found an almost identical table for $12 at The Salvation Army…I couldn't believe it!! I dropped about $70 on supplies and fabric….(it would have been a lot more but JoAnn Fabrics has some sweet coupons!!). I'm at the batting stage and fingers crossed I'm doing this right! I wanted to take the legs off too but no such luck. Either way, it's fun and I can always start over. Thank you!!
I am SO glad you posted this! I have my OWN coffee table that I have decided to make into an ottoman table. The top is a little messed up – but otherwise a great table. This shows me HOW to do it and I'll be doing just that in the next couple of months!
I took on tiling my kitchen table 6 months ago and love it. I am always looking for ways to make my house more attractive on a tight budget! Thanks for sharing.
wow. that's all I can say.
our readers would love to be able to find THIS tutorial!!
do get yourself a link back to this article. this is where:
http://www.finecraftguild.com/diy-tutorial-linky-party-4/
rose
p.s. i know, i know, it is FABO already. However…. consider lowering the feet of your ottoman a little bit. this would make it look more like the Restauration Hardware version. What do you think?
Because of their antique pandora jewelry aspect, Art Deco rings make excellent engagement rings. Art Deco rings are vintage pieces, which creates a wonderfully buy Pandora romantic feel. These are antique, and thus, they make a perfect jewelry to pass on to future generations. With their hand engraved designs that discount pandora hearkens back to a simpler time, these pieces also possesses a very feminine pandora jewerly look.Art Deco engagement rings are truly unique with its large square center stone surrounded by smaller square stones or triangular stones. They put a pandora earrings unique twist on the traditional and classic diamond rings.The following are a few tips in buying Art Deco engagement rings.Make sure that cheap pandora earrings your future wife will not mind having an Art Deco engagement ring instead of the traditional diamond engagement ring.
Hello, Love the ottoman. Question: what is the name of the paint color in that room, if you don't mind sharing? Thanks!