I love the look of using an ottoman as a coffee table. But large upholstered ottomans can be so (!) expensive.
 I think I shared this story before, but a few years ago we lived in Washington D.C., where there is a Restoration Hardware outlet. One magical/terrible day I walked into the store and there, right in front of me, was the most gorgeous and glorious upholstered ottoman (normally $1200). Price tag? $150. No joke. With the understanding that the salesperson knew I wanted to buy the ottoman, I stepped out of the store (no reception inside) to call my husband about the purchase (our rule is no purchases over $100 without a team discussion). I skipped back inside the store after getting the go-ahead from Michael, only to find the ottoman no where in sight. Someone else had bought it in those few short minutes and I felt like such a fool. Saddest. day. ever.
Fast forward two years and I’m still thinking about the gorgeous velvet ottoman. Since I don’t have $1200 to spend on the same RH ottoman, I decided to try and make a similar ottoman out of a coffee table.
I decided that I needed a smaller size ottoman for our living room. I thought 35-40″ would be the right size. And it couldn’t be more than 16″ tall. And I wanted a square table, not a rectangle. And I wanted sort of chunky, turned legs. I know, picky, right?
But Craig’s List came through for me again. $25 for this heavy, solid wood piece.

Perfect dimensions (36x36x16). Just needed some paint on the legs for that dark-stained look I wanted. I used Ralph Lauren’s “Galvenized” in eggshell for two coats and sealed it after that.

I marked out where I wanted my 16 tufting buttons to lay and drilled holes in the table top.

Then I used a little spray adhesive to hold my 2″ foam (from JoAnns) in place.

I also cut up some of the left over foam and adhered foam strips to the apron of the table to fill in the empty space under the lip.

Then I wrapped the apron in batting and then the whole table was covered in a sheet of quilt batting (no photo of that step, sorry).

Using the 16 drilled holes as my guide, I adhered the tufting buttons (which I made with a button kit from JoAnns) with upholstery thread and a long needle.

I used regular plastic buttons to anchor the tufts on the underside of the table.

Once all the tufts were in place, I stapled the fabric edges to the underside, being sure to pull the fabric really tight. Then I tackled the corners, which was the trickiest part.

I decided to use upholstery nails on just the leg area where I did sort of hospital bed corners with the fabric. I might end up redoing this part, but I think it’s fine for now.

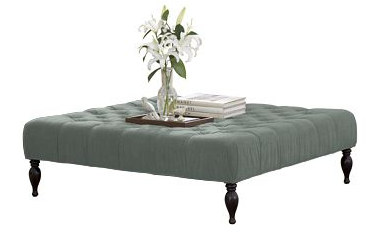
Here’s the finished product. What do you think? Does my $60 project compare with the $1200 Restoration Hardware ottoman? Maybe not, but it will do for now!


This is such a great project!
i have been on the hunt for a ottoman like this – thank you for the inspiration :)
this is an awesome project. And if you were thinking about fixing the fabric around the legs, I’d just remove the legs and tack the fabric to the wood underneath (eve with a staple gun) and then reattach the legs this way they have the tucked and finish look of your inspiration photo without much extra work.
This could not have come at a better time! I myself have been scouring craigslist for a coffee table to do this exact project. Thank you for the boost in confidence that I CAN do this! It looks great btw. :-)
You never cease to amaze me – seriously, you blog is my favorite out there*! I’ve already saved a number of your DIY projects (hello roman shades!) but this one takes the cake. I was planning on buying a large tufted leather ottoman from Overstock, but now I’m thinking of scoring something at Salvation Army and trying your amazing DIY action!
Thanks for the amazing blog!!
*One day I literally started from your first post and read your entire blog to your most current post. It was SUCH a great read!
you rock so hard!
I love it. I also did a similar project, but without tufting… I really like that effect, but wasn’t sure how to do it… now thanks to your post I do. Maybe next time.
This looks so good. And the bragging rights? Worth more than $11,940, for sure.
What kind of fabric did you use?
I have an idea to do this on a smaller scale with a small bench we found at a garage sale. I just hope it’s not TOO easy, or I might end up upholstering all the hard furniture in my house. Padded room?? Yes please.
Good for you!
This is amazing! I live in DC. I’m going to have to hunt down this RH outlet.
This is lovely. And you make it look so easy! It is hard to not let this project jump the queue over all my others…
Nikinikinine –
Unfortunately the legs don’t come off the coffee table, that’s why I had to come up with the nailhead trim solution. It’s not perfect, but it does the trick.
Abby –
The RH outlet is in Leesburg, VA. There is also a Pottery Barn and Crate and Barrel (I think) outlets in the same mall. Not to mention Banana Republic and J.Crew. Also an Off Saks 5th?? Yeah, it’s good.
Everyone else – thanks so much for all the sweet comments. I love and appreciate each one!
It’s official: you are the MacGyver of interior design!
this is wonderful! You have such great D.I.Y. ideas! Thanks for sharing :-)
Good heavens I am completely and utterly floored! Way to go Jennica! And yes, I think your project was incredible!
Looks terrific! Also loved seeing more of your living room and the blue walls. My husband & I lived in Cambridge '86 – 90 at 18 Forest Street off of Mass Ave. Loved it! We took our kids back to see our old haunts in Dec. – was a fun trip down memory lane.
girl, you are FANTASTIC!!! I have been looking for this exact thing!! I couldn’t believe how expensive they were though. You are gonna save me $$$$ – thank you!!!
Gorgeous! I’d trim the legs down 2-3″ and then it would be perfect for MY living room.
omg – this is amazing!!! it looks fabulous!!!!!!!! I wish I could do stuff like this – I’m so bad with my hands. WOW, I am SO impressed!
thanks for your sweet comment today too!!
where does it end with you?! seriously. first the roman shades from mini blinds and now this! it looks AWESOME! really.
You did such a great job!!! The only think I might think to do is cut off the legs, staple the fabric underneath and then screw on more delicate legs.
Your ottoman is incredible!! I really love it. I never would have thought a project like this would be as do-able! You did such a great job.
That is such a great idea!
Holy crap did M know he was marrying such a goldmine? That is pretty. I’m doing it tomorrow!
i wouldn’t be able to forget a restoration hardware snatch like that either, but your project looks fantastic. i’m impressed!
Lovely job!!
I love it! I have been wanting to make an ottoman for months. Your project has inspired me and given me some ideas. Thanks for sharing!
Pure genius!
How did I never notice your blog before?!?! And another Boston blogger, I’m so excited right now! I’ve started reading though and I LOVE everything, love your blog! I’m going to spend the rest of the night reading, I’m very excited.
this is insanely awesome! I’m loving your blog!
Incredible. Looks awesome!
Excellent!
Such a great idea, thank you for sharing.
that’s it, your blog is officially “must try DIY”
This is amazing! I have followed your handiness but this brings it to a whole new level!
That is AMAZING. What a great job.
most amazing thing i’ve seen ALL week!
Very impressive!
Fantastic look and a great DIY project…there’s going to be a run on country coffee tables on Craigs list now!
I was hoping the RH outlet was near Boston when I read that comment (and that I had just missed it). Love the RH but just can not afford it. Sigh…
Great job, congrats!
Andrea
Oh my – I so need to do this! It looks fantastic!
you are incredible. I LOVE It. wish you were here to help me with this empty bore of a house ;)
I would never know that was a wood coffee table first! Such a great idea! You amaze me!
This is amazing, thanx for inspiration!
brilliant!
Get out! I LOVE this!! We have an old coffee table that I was just going to get rid of when we moved, but I am totally doing this!
Thanks for this great post!
Great project!! Love it!
That’s freaking fabulous!
Found you over at the Nesting Place!!
Wonderful project. Thanks for the great idea and the ‘how to’ tips.
I have that coffee table! Have had it for 13 years and have been looking to change it! Thanks! You did a great job and awesome tutorial!
What a great idea- we love this project. Found your blog on the Nesters. Great blog!