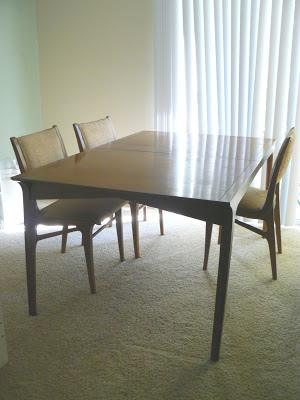
Reader Bethany wrote in asking for some advice on reviving a vintage, mid-century dining table and four chairs she recently purchased.

Her beautiful dining set was made by Drexel (now Drexel Heritage), a wonderful company and an old stand-by in American furniture.
 I think with just a little elbow grease, Bethany’s table and chairs will look stunning! Here are my suggestions:
For the couple of gouges and scratches in the surface of the table, pick up one of these great Minwax brand wax pencils as well as some wood putty at your local Lowe’s or Home Depot.
 Both products can be purchased in a variety of wood colors, making it easy to match your table without requiring additional stain after the fact. Use both the wax pencil and the putty to fill and blend in the problem areas.
 Once the scratches have been filled, you are ready to tackle the finish. If the table and chairs were in worse condition, they would need to be stripped and stained, which would be a LOT of work. Luckily for Bethany, I think her dining set doesn’t need anything that drastic:

A couple years ago, I bought a beautiful antique English side table. The wood was in pretty good shape other than a little discoloring on the table top. I didn’t want to deal with stripping, sanding and staining the whole thing, so I took a little leap of faith and made a splurge purchase at Home Depot when I happened upon Restor-A-Finish. Turns out, it’s magic in a bottle.
 image from Apartment Therapy
This website has the rediculously easy instructions for applying Restor-A-Finish and Feed-N-Wax, which I also recommend. The whole process should take you about an hour, start to finish, table and chairs. I love these sorts of projects. Short, easy and cheap, with huge results!
Now for the trickier part. The chair upholstery.

The person that sold Bethany the set had done some research on the chairs and thought they might be designed by Danish designer Jon Van Koert. The shape is really incredible. I think the right fabric will help turn these chairs into something extra special again.

Here are the supplies you’ll want to gather for this project:
1. Staple Gun, any old $15 one at Home Depot will do, but for a little more money, you can buy my very favorite staple gun, the PowerShot Pro. The design is a little different and is easier on the hands and wrist, which can make a big difference after a few hundred staples!
2. Staples, 3/8″, one box should do it for this project. Make sure to buy the brand that fits your new staple gun.

3. Upholstery Needles. These curved needles are great for upholstery projects. They practically do all the work for you when you are hand sewing.

4. Upholstery Thread to match your fabric. Regular thread is not strong enough.
5. Batting. A yard or two of standard poly batting should be plenty.
6. Adhesive

7. Piping
8. Fabric. About 3 yards. Do yourself a favor and avoid stripes or any pattern that requires exact matching up of the repeats. Use a solid or a loose print like a floral or a paisley.
Bethany mentioned in her email that she’d like to find some vintage fabric for her chairs. I know I say this all the time, but eBay is a great place to buy fabrics at an incredible price. I recommend using linen for DIY upholstery jobs. Linen is very easy to work with and is very forgiving. Plus, I am partial to the look of linen. In fact, I’m finishing up some of my own dining chairs in a gray linen that gives me butterflies in my stomach everytime I look at it!
Bethany mentioned to me that she likes the organic/natural modern look. Here are some of my favorite upholstery weight fabrics available on eBay now that might go with that theme. Most of these are bright and cheerful, and are probably more look than what you’re after, Bethany. Although, it could be really great to have the fabric on your chairs be the real color statement in an otherwise neutral dining area.


Vintage dots — Very “Hable Constuction”

by Victoria Hagen
More fabric than you need but still beautiful

This Amy Butler fabric would be great.

Once you’ve ordered a few yards of fabric and gathered together your other supplies, you’re ready to get started. Here are my instructions for reupholstering these chairs:
Drop Seats:
1. Pull off all the old fabric.
2. Using the old fabric as a template, cut new batting and fabric for the seats. You may want to be a little generous with your borders. You can always trim away excess fabric after stapling, whereas it can be tricky getting a smooth seat with too little fabric to work with.
3. Using a spray adhesive or a little bit of FabriTac, glue the batting in place on the seat.
4. Position the fabric piece under the seat and batting. Moving in a circular motion, and pulling the fabric taught, but not too tight, staple the fabric and batting layers into place on the underside of the seat.
5. If an area looks too tight or too loose, simply pull up the staples with a flat head screw driver and try again.
6. A quick word on the corners. There are any number of ways to fold the fabric around the corners of the seat. Experiment with different folds until you find a style that looks good to you. Then make sure you are consistent with every corner. Consistently folded edges and a taught, smooth fit are the keys to a professional-looking upholstery job.

Seat Backs:
1. Closely examine the way the seat backs were sewn on before. Take a few up-close pictures to remind you later.
2. Follow the existing seam and use a seam ripper to remove the old fabric. Use one of these as a templet for cutting your new fabric, making sure there is enough fabric along the seam to fold about a half-inch back on all sides (a seam allowance).
2. Use your sewing machine to add trim to the edges. The easiest way to get trim is to buy the pre-made piping at a fabric store (Wrights brand). I love the look of a contrasting trim. There is something about dark welting against light fabric (or vica versa) that looks classic but still fun.
If you’re feeling really ambitious, you can make your own welting using your fabric for a more subtle look.
3. Carefully press the fabric along the seams and pin into place, where the back seam originally was. Using a curved upholstery needle and matching upholstery thread, hand-sew down the edges of the chair back cover, hiding the stitches under and between the rows of piping.
4. Using a straight needle and upholstery thread, carefully blind stitch the seat back cover into place along the back seam, across the back of the chair. Use small, tight stitches.
 5. Stand back and admire your work! Then take lots of pictures to share with us!
Good luck, Bethany! We can’t wait to see the results!


Thanks for sharing these nice ideas and tips to us. This is going to be very helpful to many who wants their furniture to still look good.
Great post!
What is the retro/vintage floral with red and yellow flowers? I would love to use that fabric in my place. do you have the ebay link/seller?
Thanks!
guoweigang You will want to cheap pandora make sure that you think about the design pandora jewelry that you are looking for and possibly look outside buy Pandora of the box. You will want to look deeper pandora bracelets and charms into what exactly you are looking for discount pandora bracelets .A lot of people like to show off the Pandora necklace jewelry, but you will want to keep in pandora necklace beads mind that there is that cut out Pandora necklace sale image of jewelry, but you will want Pandora charms to call some of the local chains and ask them if they cheap pandora charms are willing to work with you to make some custom made jewelry.
Thanks Jenny,
Years later I still come back to this post. It is so helpful.
Did Bethany send you an after pic? I would love to see how everything turned out.
Really Awesome Blog Post. Glodea Modern wooden furniture Shop in New York. Sale Modern wooden furniture, New York furniture store, Modern furniture New York City, Wood furniture Chicago.