Black

Dreamy Art

I am so drawn to the art in these images from Habitually Chic taken on Heather’s visit to the Oly Studios showroom at High Point… It reminded me of these big (and completely affordable!) posters available in Debbie Carlos’ Etsy shop. Here are a few of my favorites that have the same dreamy landscape feel….

I am so drawn to the art in these images from Habitually Chic taken on Heather’s visit to the Oly Studios showroom at High Point…

It reminded me of these big (and completely affordable!) posters available in Debbie Carlos’ Etsy shop. Here are a few of my favorites that have the same dreamy landscape feel. I love them all so much!

Musings

Block Printing

Oh my goodness. Is it seriously the end of October already? Where did this month go? Also, happy Halloween! I hope you have a fun night planned. We’ve already got so much candy at the house from parties over the weekend, that I’m seriously considering not trick or treating tonight. We’ll see if the girls…

Oh my goodness. Is it seriously the end of October already? Where did this month go? Also, happy Halloween! I hope you have a fun night planned. We’ve already got so much candy at the house from parties over the weekend, that I’m seriously considering not trick or treating tonight. We’ll see if the girls can convince me otherwise. :)

I’m ready to tackle a couple more house projects this month. I ended up getting that really cute antique settee from Craigslist a month or two ago. I added more down to the seat cushion and took it to the cleaners. It needs to be picked up tomorrow. So now the settee is ready to be reupholstered!

I went back and forth about what fabric to choose. I have always loved this one from Lee Jofa and then seeing this image made me seriously think twice. But the rust color is not great with my mustard rug and the price is insane considering I need about 10 yards.


Design by Meagan Camp, who has a lovely blog HERE

I love the busy-ness of the pattern. It feels happy to me and seems perfect for a secondary sofa (still doing the white slipcover on our roll arm – that’s happening this month too!). Then when I was thinking of doing the sticker walls in my girls room, I decided a similar idea would make for a really cool fabric. I found or made some quick clip art of things that have special meaning to our family. Mostly reminders of places we’ve lived.

This is a really really rough draft. I only spent a couple minutes putting this one together, just to get an idea of where this could go. I think there’s potential! There will be probably twice as many little objects and the colors and detailing will have to change. I might make a second design to alternate in and create a damask pattern. Each one will be about the size of a salad plate. I’m thinking of just making a couple lino cuts and block printing the whole thing myself on a heavy, inexpensive linen (thinking of sky blue right now). The other obvious option is using Spoonflower, but upholstery weight printing is almost as expensive as trade fabric. I kind of want to just try the hand-blocking project anyway. It seems like an easy and fun thing to do. I feel like the hardest part will be the carving.

Have you ever hand-blocked fabric before? I think I mostly excited by the idea of have a truly special fabric that can’t be found anywhere else. Speaking of which, I found some AMAZING custom fabric prints on Etsy. Check them out HERE.

Musings

Jenny's Favorite Things Part 2!

Get excited! It’s another Favorite Things give away HERE!!

Get excited! It’s another Favorite Things give away HERE!!

Musings

Jenny’s Favorite Things Part 2!

Get excited! It’s another Favorite Things give away HERE!!

Get excited! It’s another Favorite Things give away HERE!!

Give Aways

Jo Totes Give Away

Up for grabs is an adorable camera bag from Jo Totes! Each bag is lined and padded with completely customizable interior compartments. I think I would pull out our fancy camera more often for day outings if I had one of these. To enter to win any bag on their site (check them all out…

Up for grabs is an adorable camera bag from Jo Totes! Each bag is lined and padded with completely customizable interior compartments. I think I would pull out our fancy camera more often for day outings if I had one of these.

To enter to win any bag on their site (check them all out HERE), leave a comment on this post before Tuesday November 1 at midnight. For a second chance to win, join the Jo Totes Facebook page.

**CONGRATS TO LIZ!!! and thanks again to Jo Totes!**

Why Don't You

Fancy Fridge

I’m running out the door, but wanted to say a big THANK YOU for all the living room submissions. I’m a little blown away by how many we got and I can’t wait to look through all the emails this week! Thanks again, this will be fun. I’m renting a car today to buy some…

I’m running out the door, but wanted to say a big THANK YOU for all the living room submissions. I’m a little blown away by how many we got and I can’t wait to look through all the emails this week! Thanks again, this will be fun.

I’m renting a car today to buy some finishing materials outside the city for a bedroom that is getting photographed this weekend. I can’t wait to share the photos with you the first week of November hopefully.

In the meantime I thought I’d share some clever ugly fridge cover up ideas from around the web. I will always love Nick Olsen’s Brunschwig wallpaper solution.

via domino

And how can you go wrong with a chevron chalkboard?

image via apt therapy

My friend here has a great prewar apartment, but her refrigerator looks a little prewar too :) so we’re going to cover it up. The cork option HERE is my very favorite I think. I don’t really need to cover up our fridge, but I would do it anyway. It looks amazing and seems more functional than the regular magnet situation.

Have a great day and see you back here tomorrow. xx

Living Room

Wanted: House Tours!

I loved getting to share the nitty gritty details in Emily and Todd’s house tour recently. It’s so fun to hear about the thought process behind design decisions! I’ve been thinking that it would be really exciting to add detailed house tour posts into my regular posting schedule here on LGN. But rather than showing…

I loved getting to share the nitty gritty details in Emily and Todd’s house tour recently. It’s so fun to hear about the thought process behind design decisions! I’ve been thinking that it would be really exciting to add detailed house tour posts into my regular posting schedule here on LGN.

But rather than showing a whole house in one post, I want these tours to be room-specific, sort of like the format we used with Emily’s house tour. I like focusing on one room at a time so that we can get all the angles and details.

This month I’d love to feature living rooms. If you’re proud of your living space and think it’d be a good fit to share here on LGN, feel free to email me a couple of your images and I’ll get back to you with a questionnaire.

jenny @ jennykomenda .com

I’m also looking for project-specific submissions to share here and on my Babble blog. Look who I featured today.

I’m so, SO excited to see what all you amazing, talented, creative readers have been up to!

Images by Aubrey Trinnaman shared in this D*S post. Check it out for more images of Jordan’s beautiful apartment, which was so fun to collaborate with her on! Everyone always wants to know where we got the ikat settee (Nate Berkus for HSN) and the drapes in her bedroom (the fabric is by Thomas Paul for Duralee) :)

Inspiration

Fresh Off a Mini Shopping Spree

[Get it? Mini. Because I was shopping for dollhouse furniture. I’m hilarious on Fridays.] While I haven’t had much time to dedicate to fixing up the dollhouse yet, I’ve been keeping my eye out for great deals on vintage dollhouse furniture on etsy and eBay. I’ve been trying to buy only wood pieces, but those…

[Get it? Mini. Because I was shopping for dollhouse furniture. I’m hilarious on Fridays.]

While I haven’t had much time to dedicate to fixing up the dollhouse yet, I’ve been keeping my eye out for great deals on vintage dollhouse furniture on etsy and eBay. I’ve been trying to buy only wood pieces, but those Petite Princess pieces are just too cute to pass up, so I nabbed a few favorites from that line to round things out. Want to see what I’ve got so far?


Brass bed!? You know it!


Either the chairs or the sofa (or both) will get reupholstered.


Look at those teeny tiny little pulls!


For the foot of my brass bed. You know I love my florals, but this bench is crying out for stripes.

Getting a new picture.


Pink phone for the desk probably


Every room needs a mirror!


I got this WHOLE LOT for $5! Check out all the brass pieces.


Including a brass high chair? Not so comfortable for baby, but very chic looking.


Pretty secretary and a demilune.

Big (well, about the size of a piece of paper) persian rug for my living room!

Pretty folding screen that needs some paint desperately.


Yup, that’s a zebra hook rug.

I’m sure, like in real life, I’m mess with most of these and paint or reupholster, but I think it’s a good start. I’d love to DIY most everything else going into the house. I spent about $100-$150 on all these pieces, which is about what I planned for. The goal is to have the finished dollhouse, including a custom (rotating!) stand, ready to give to the girls on Christmas. They’re going to help with the actual house repair projects, but everything else will be a surprise.

Who else joined in on the challenge? I’d love to see what you’re up to!

Furniture

DIY Campaign Style Side Tables

Yesterday’s post on campaign furniture in the kitchen reminded me that I hadn’t shared this easy DIY yet. These photos are old in-progress shots from an eDecorating client. We bought two of these Lack tables in the sky blue color: And 16 of these brass corners (they’re about $5 for a set of eight) and…

Yesterday’s post on campaign furniture in the kitchen reminded me that I hadn’t shared this easy DIY yet. These photos are old in-progress shots from an eDecorating client.

We bought two of these Lack tables in the sky blue color:

And 16 of these brass corners (they’re about $5 for a set of eight) and just tapped them into the very outside corners of the tables (tops and feet).

So easy and very inexpensive!

It looks like the light blue Lack table is not available any more, but there are some very pretty high gloss versions at IKEA now. (Wouldn’t the birch be just gorgeous with the brass? Or that glossy gray!) Prices range between $7.99 and $12.99 each, which is about the cost of a sandwich here in NYC. Not too bad for a pretty and unique version of a classic Parsons style side table.

Black

Campaigning in the Kitchen

I’m still loving campaign furniture. I think it looks especially fresh in the kitchen (like in this CHH spread)! Christie had a local carpenter build a campaign style storage piece for her beautiful kitchen and I love the look. I’m thinking of using my campaign chests together to replace my island (which is on it’s…

I’m still loving campaign furniture. I think it looks especially fresh in the kitchen (like in this CHH spread)! Christie had a local carpenter build a campaign style storage piece for her beautiful kitchen and I love the look.

I’m thinking of using my campaign chests together to replace my island (which is on it’s last leg – the drawers are getting really hard to use). I did some measuring last night and if I wanted to reuse my marble top, it would fit perfectly. I’m considering doing butcher block instead, but we’ll see.

To make the dressers counter height I was thinking about adding a row of drawers (salvage a third dresser with the same dimensions?) but I’m leaning toward building up the height with legs, like the island in this AMAZING kitchen below, though not quite as much leg, I only need about six inches.

image via Plain English

Think I can pull it off? Any tips?

Also, today on Babble, a round up of some of the most affordable furniture the interwebs have to offer!!

Entry and Hallway

Real Estate Dreaming

It seems like a lot of people say you either really love living in NYC or you really hate it. After more than a year here, I think I can safely say we love New York. I’ve been surprised at how doable it is with kids. Who knows if we’ll stay forever, but it is…

It seems like a lot of people say you either really love living in NYC or you really hate it. After more than a year here, I think I can safely say we love New York. I’ve been surprised at how doable it is with kids. Who knows if we’ll stay forever, but it is great for right now. My husband is loving his work and I’m having a great time. I do worry a teeny bit about my girls here though. They say they love it here, but they also talk a lot about wanting a dog and they reminisce about our backyard in Cambridge and in Delaware (they mostly miss the family of bunnies that lived in our backyard in Dover). Part of me thinks we should consider moving up to Connecticut or Westchester next year so the kids can have a more normal childhood, but I just can’t wrap my mind around adding a three hour commute to my husband’s already too-long work day.

Lately Brooklyn is feeling like a good in-between option. The commute to my husband’s downtown job would be super easy. And most Brooklyn neighborhoods feel a little quieter on the streets (more kid-friendly) and it’s easier to find a place with outdoor space. I keep telling Michael that we just need a cool 10 million so we can buy a townhouse in Brooklyn Heights. No big deal right?

Check out this one that’s available for (only!) $14 mill. What? Don’t you real estate stalk all the crazy expensive homes in your city?

This townhouse is HUGE for NYC (or anywhere I think) at 7,000 square feet. I want to marry that front door. Completely amazing.

The view’s not bad either.

Welcome home, Mrs. Komenda.

Oh my word, that moulding! Those doors!

Here’s the back parlor. (‘Parlor’ is such a great word, btw. Let’s bring it back.)


The butler’s pantry is on the first floor by the back parlor. This house was MADE for parties. I think the rolling cabinet is a cool idea for storing away drinks and bigger counter items (like blenders and toasters and stand mixers)

LOVE the thick counter tops in the kitchen, and that range of course.

Another one of the sitting rooms (there are a few). This one feels perfect for teenagers.

This is such a cute girls room. This is purple done right. I really like how there is a great mix of super modern and very traditional antiques in this home. I want that rug for my living room.

And if you’re crazy like me and get a ridiculous kick out of floor plans (even when they’re super pixilated! sorry), here are the bottom three floors:

and the top three:

While I don’t think the decor is completely my style, the place is gorgeous, right? If you want to see even more of the house (in FULL SCREEN!!) click here. But if you buy it, please let me decorate it for you and help you throw your first party! :)
Accessories

Ikat Table Cloth DIY

Ikat patterns are trendy and can be expensive, but because the patterns are very organic and loose, it’s an easy DIY. There are endless ikat patterns to recreate, but I love Lee Jofa’s Ikat de Lin in Brick and used this image for my inspiration. I used four yards of ivory linen (available at Joann’s…

Ikat patterns are trendy and can be expensive, but because the patterns are very organic and loose, it’s an easy DIY. There are endless ikat patterns to recreate, but I love Lee Jofa’s Ikat de Lin in Brick and used this image for my inspiration. I used four yards of ivory linen (available at Joann’s or Gray Lines Linen) and Procion MX fabric dye in Bright Scarlet.

To mix the dye (it comes in powder form), add 1/8 tsp of powder with 16 oz of cold water. This is for a very pale result. If you want a richer, deeper red closer to the colors in the inspiration fabric, double or triple the amount of powder.

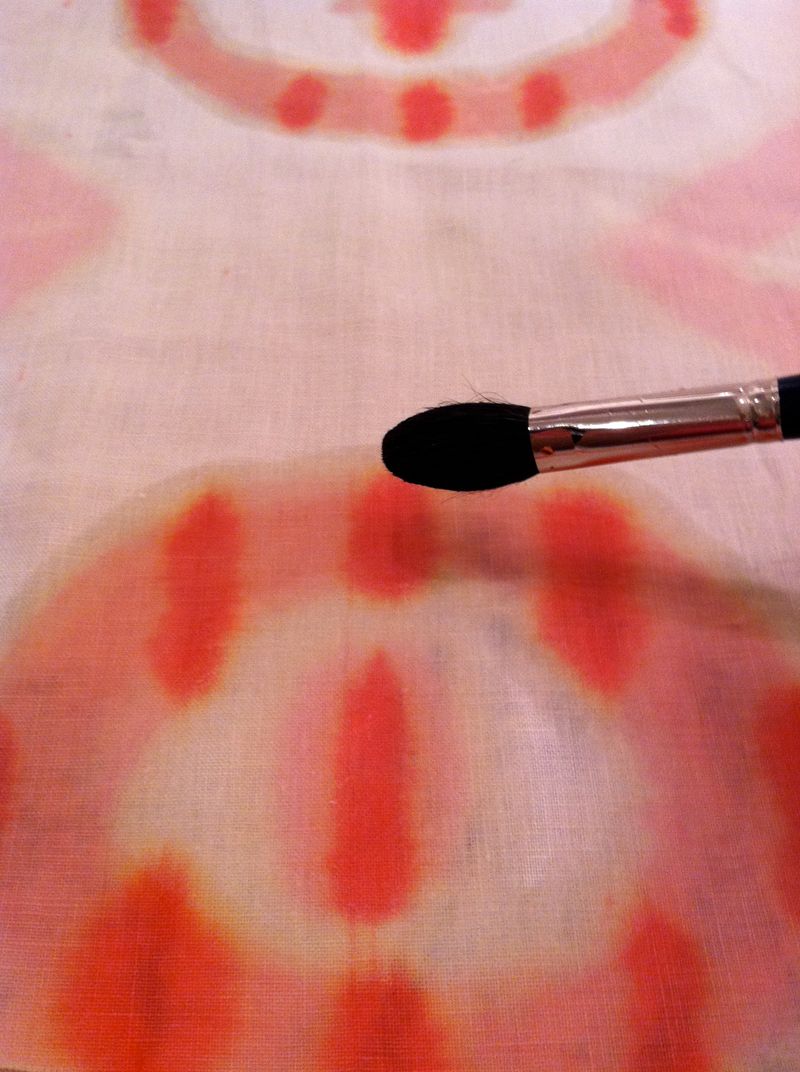
Mark the center of the 60″ wide fabric and then free hand paint the base design using a thick, soft paint brush.

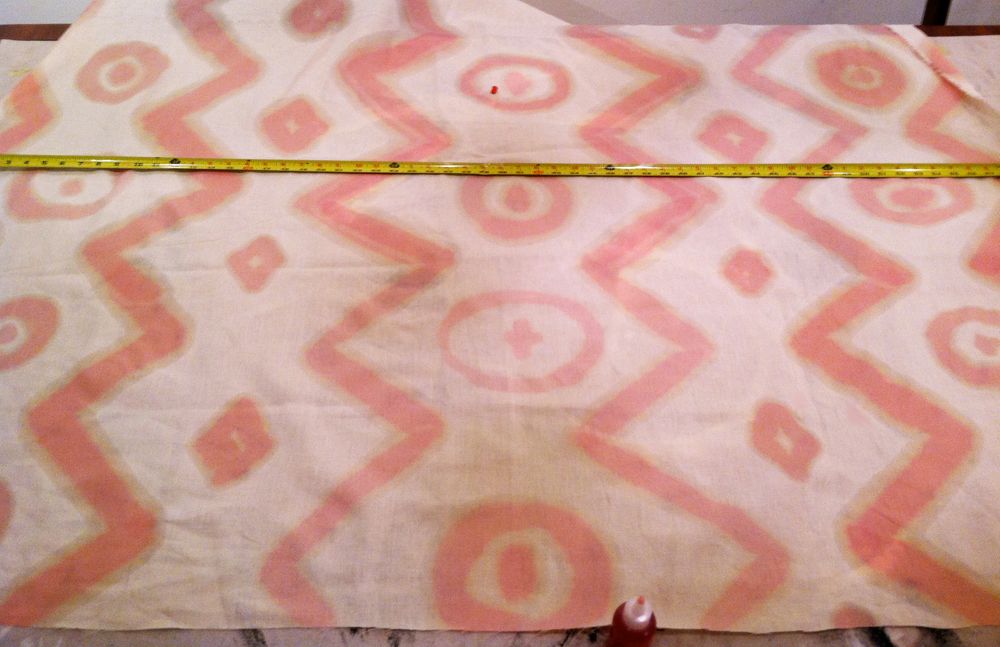
Once the base patten was finished, mix a stronger concentration of the fabric dye in a small squeeze bottle. Use about 1/8 tsp again for only about 1 oz of cold water. Then use the squeeze bottle to add lines to the ikat pattern. The idea is for the darker lines to line up with each other as if part of the weft of the fabric. It is easiest to work from top to bottom for the straightest lines, rather that right to left.

The pattern will look more like real ikat if there are layers of dye, where everything sort of bleeds into each other. So once the lines are added with the squeeze bottle, go over the design again with the soft brush.

The entire process moves very quickly. This portion was finished in only 15 minutes:

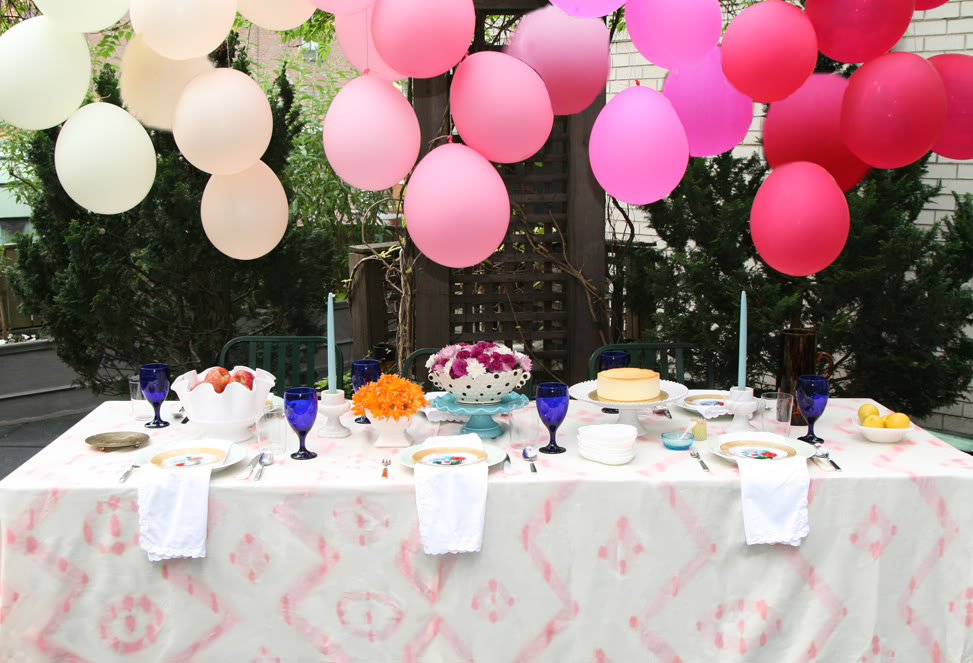
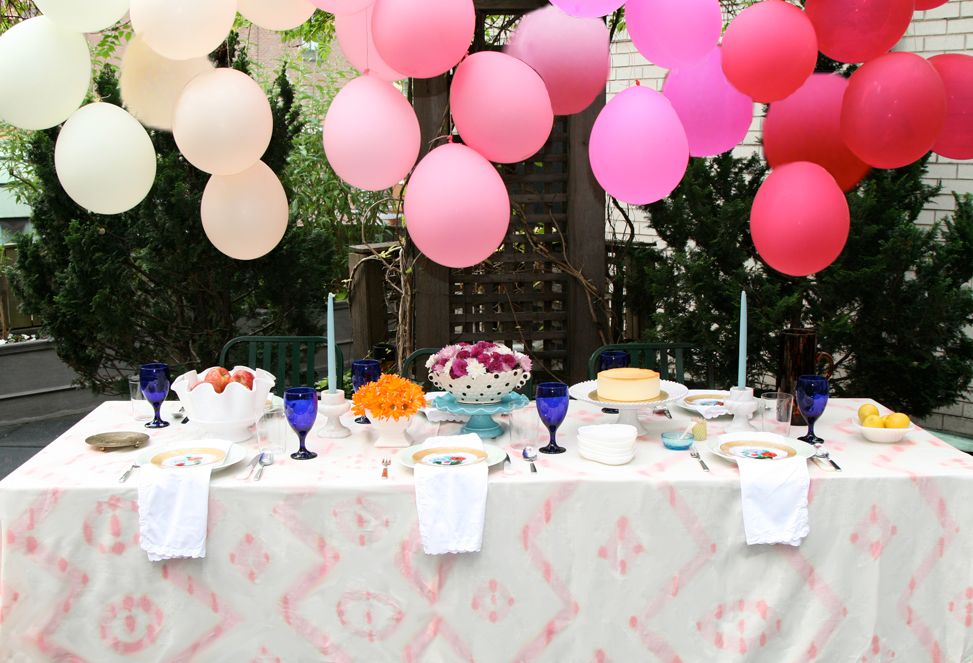
The dye dries on the lighter side, so if you want the pattern darker, maybe try using more powder in the dye solution. You can stitch the two 2-yard pieces of DIY ikat together to make a long table cloth, but it would be just as easy to overlap the pieces on the table and call it good.

I was obviously painting pretty fast and loose here, but if you were a little more careful (and actually marked out some registration marks with tailor’s chalk), you could make the pattern exact enough for a big project like curtains or a duvet cover.

PS I did a round up of really cool projects that involve fabric dye HERE.

This error message is only visible to WordPress admins
There has been a problem with your Instagram Feed.
© Jenny Komenda. All Rights Reserved.
Site by