Shibori patterns are EVERYWHERE right now! I am obsessed with this loose, organic look that’s created through different methods of folding and binding fabric before dyeing. What I didn’t realize is that it is incredibly easy to DIY!
I really wanted to do a pillow for my house and a baby blanket or two (I have SO many pregnant friends and family members right now!), but after doing a couple and realizing how easy it is to mix dyes for custom colors, I went crazy. My girls and I dyed dresses, t-shirts, onesies, bedding and tea towels on Saturday morning. No fabric item in my house was safe this weekend! :)
Rit Dye invited me to try these shibori projects and share them with you, and I couldn’t wait to experiment! I love Rit Dye, which is completely non-toxic, and use it often for home projects that range from dyeing curtains to overdyeing rugs like the one in this photo. You can use all-purpose Rit Dye on any natural fiber (even wood and paper!) and I always have a selection of colors in my laundry room to refresh dulling clothes, especially black or dark denim jeans. You can grab your bottles in the laundry or craft aisle of practically any store – Michaels, Joanns, Walmart and even my grocery stores all have Rit Dye!
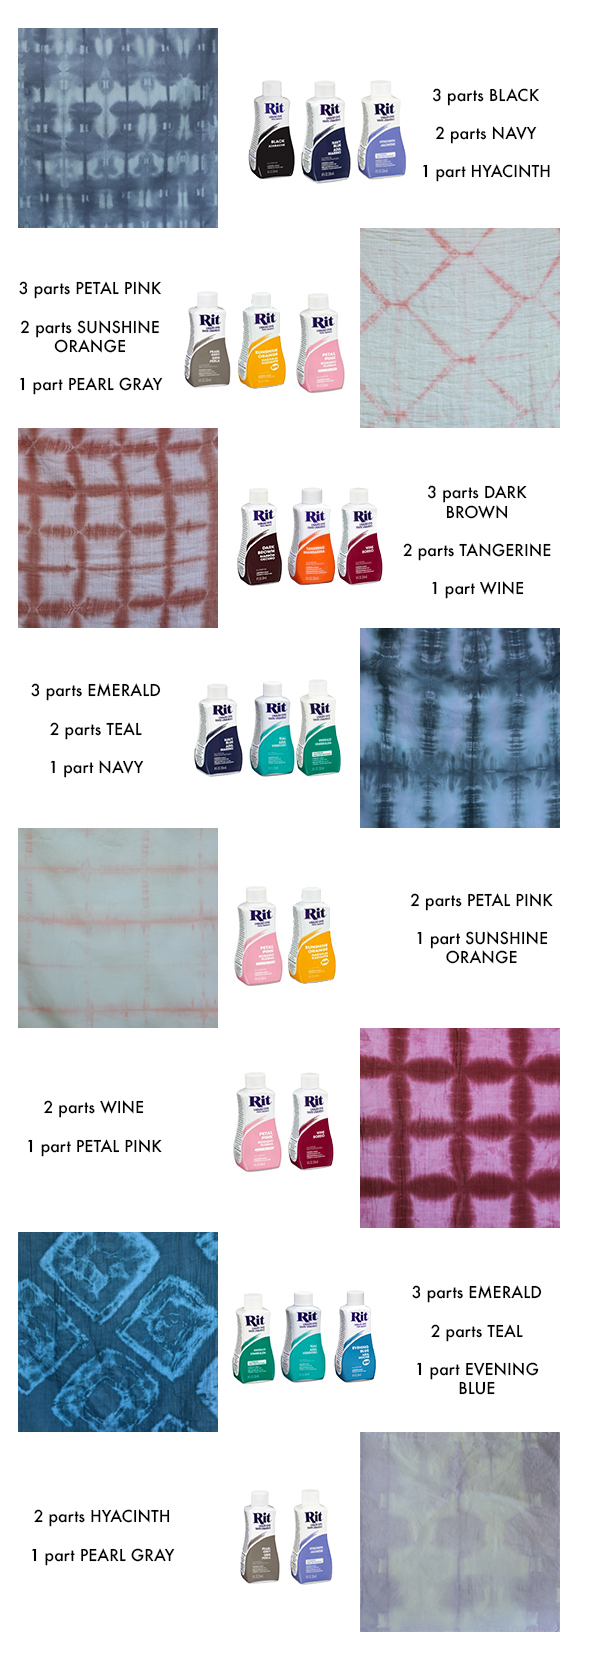
There are 32 base colors available in powder or liquid (the liquid is my favorite!). It is SO easy to mix the base colors to make your own custom color! You can even color match to a Pantone color with their custom color formula tool HERE! How genius is that?! These are a couple of formulas that I mixed over the weekend and had great results!
I used 100% cotton products in these projects here, but Rit also has a line called Rit DyeMore that works for synthetic materials too (including PLASTICS!). You also don’t have to use items with an all white background like I did here. Just keep in mind, the base fabric color will mix with the dye color to create a new color – the rules of color mixing apply.
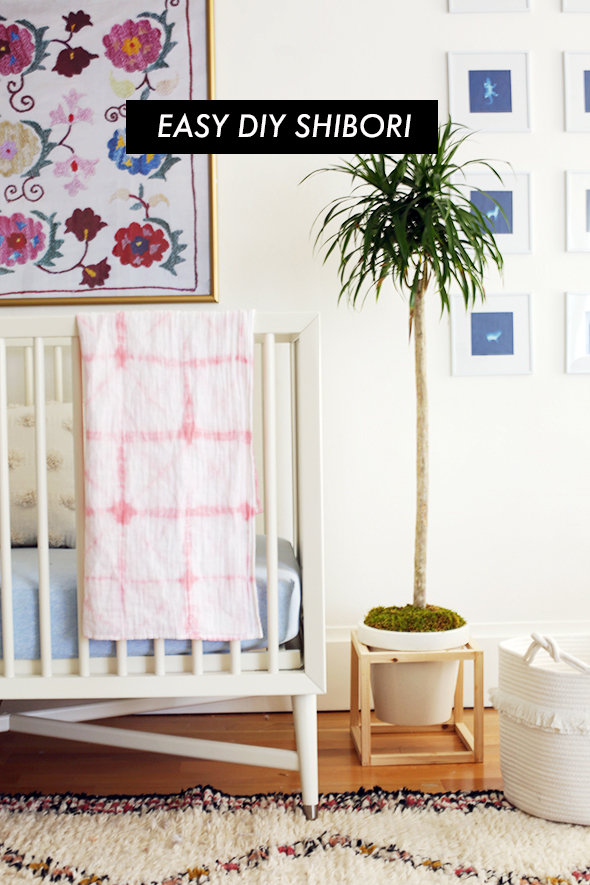
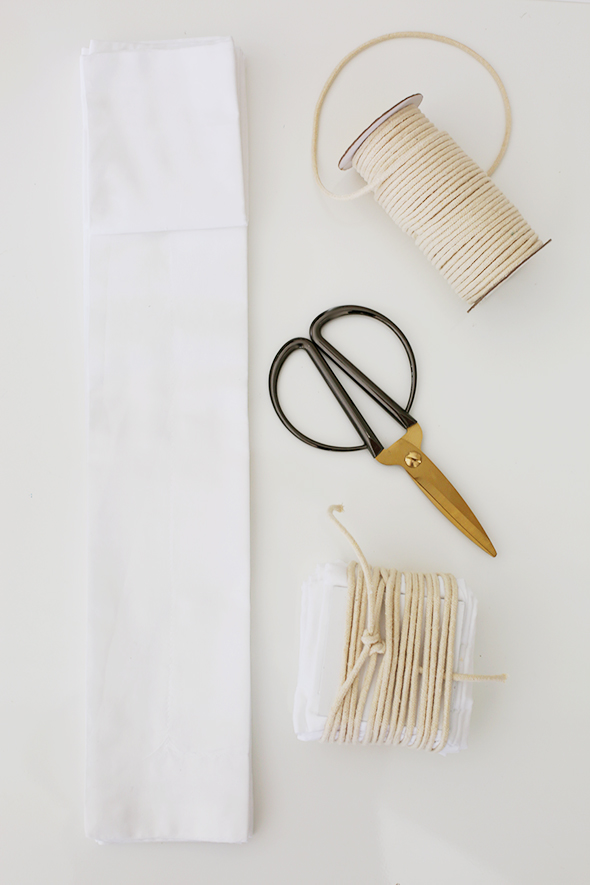
To get started, you’ll have the best results if you wash and iron the item you want to shibori dye. The ironing is not a necessary step, but I liked the patterns of the items I pressed the very best! I used these cotton swaddling blankets and these white cotton pillow shams, though truly, any solid color fabric item will work!
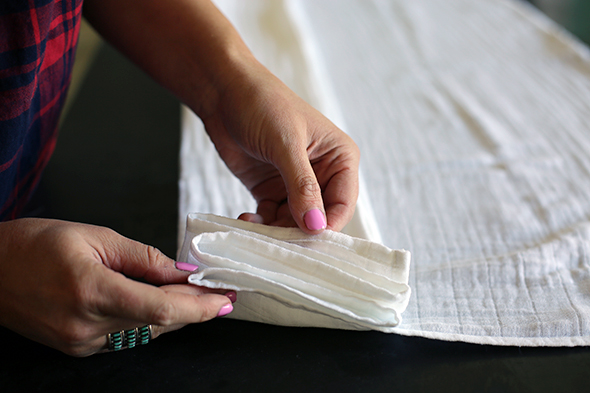
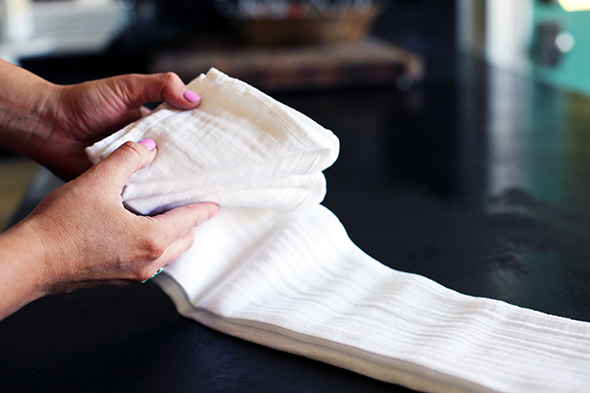
There are a million different ways to shibori dye to achieve different patterns (and I can’t wait to try more!) but the two I focused on here are what I’m calling the fold and bind method and the fold and clip method. With both methods, the first step is to fold the fabric item in flat, tight accordion style folds.
I have to admit, I was most nervous about getting the folding right at first, but I learned pretty quickly that there’s no need to stress! Do you remember making paper fans when you were a kid? The fold – flip – fold – flip thing? You do the exact same thing with shibori! You literally can’t screw this project up, as long as you accordion fold every time! Just remember that the shorter the length of your folds are, the tighter your pattern will be in the end.
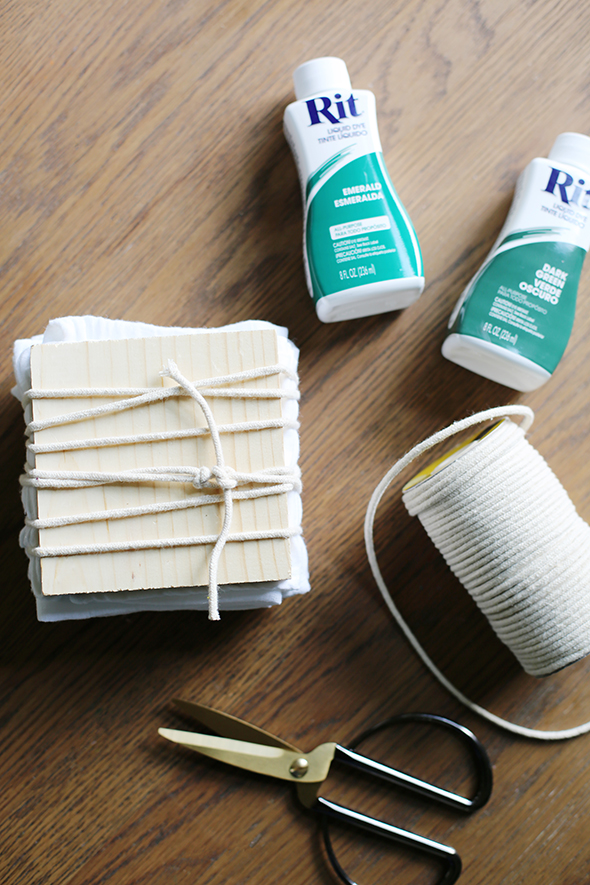
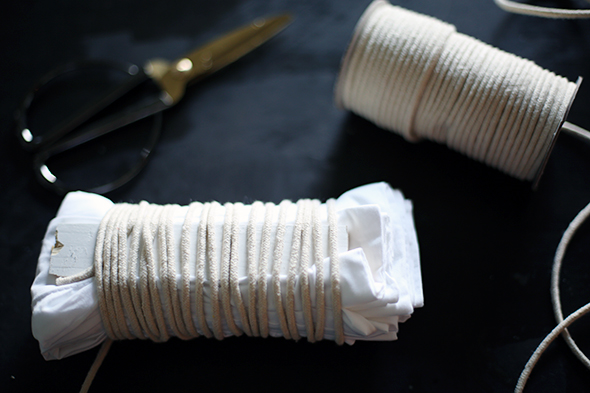
For the fold and bind method you’ll want to find two matching pieces of wood or even foam board that will act as the bookends for your folded fabric bundle. The fabric under the bookends will be bound up so tightly that the dye will only soak up around the edges that are peeking out. So pick items for your bookends that are about the size of the pattern you want in the end. Smaller bookends work great for pillows, but I’d use something closer to 4″ wide for swaddling blankets. I used just some random things I found around the house for bookends, though you can easily get craft wood from Michaels or Home Depot that will work great!
To see the end result of this pattern using a paint stirrer snapped in half (!), check out the center green image in the formula round up above!
You can use your bookend pieces to help you know how big your folds should be. You will fold it the long way, like a paper fan, and then again the short way (all accordion style folds), so that in the end you have a stacked bundle. You can fold in a triangle shape or a square/rectangle shape. Square folds give you a grid pattern and triangle folds give you an asterisk pattern. Again, the smaller the fold, the smaller the pattern!
Triangle fold! I cut two triangle pieces out of foam board for the bookend pieces here.
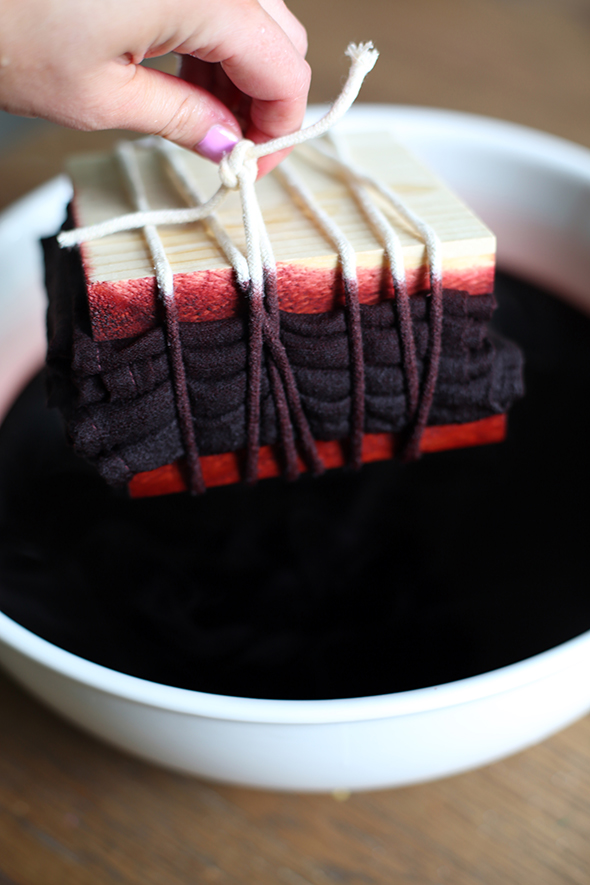
After folding, you place your bookend pieces on either side and bind everything up really well with cotton or jute cording. The pattern will be more distinct if you bind the folded bundle very tightly.
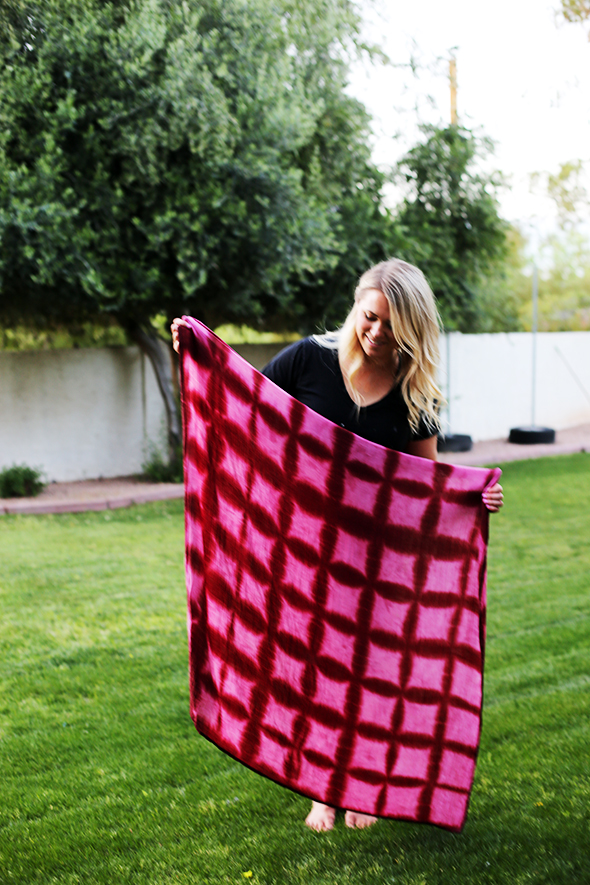
This square fold will make a grid pattern.
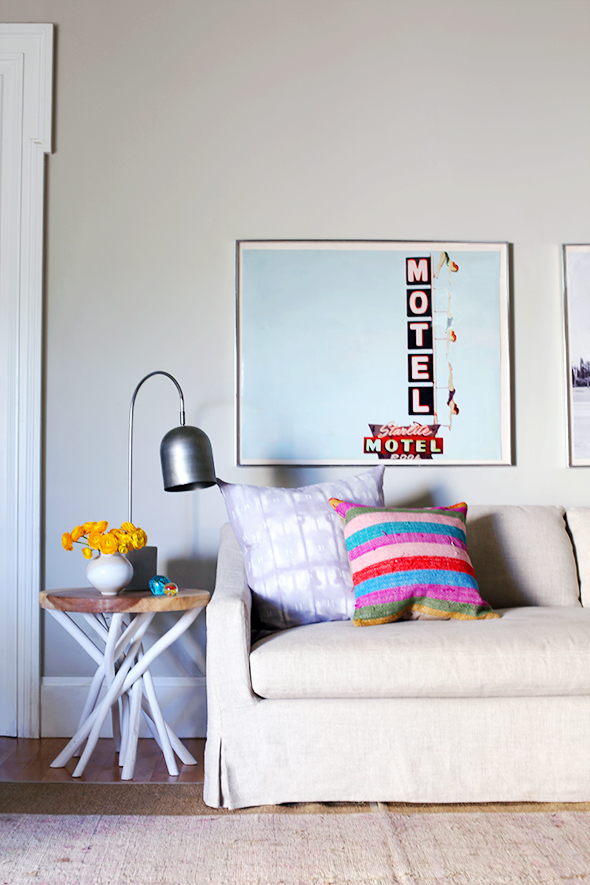
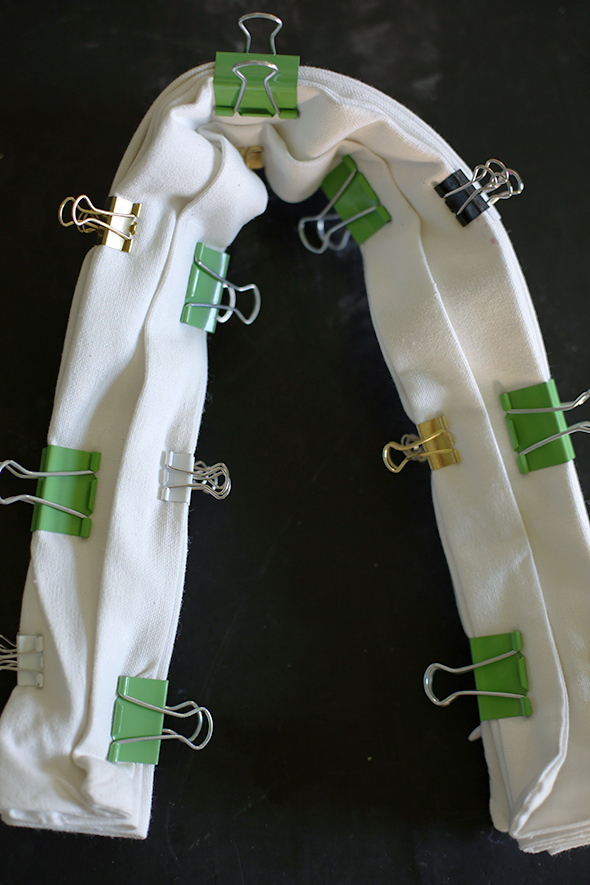
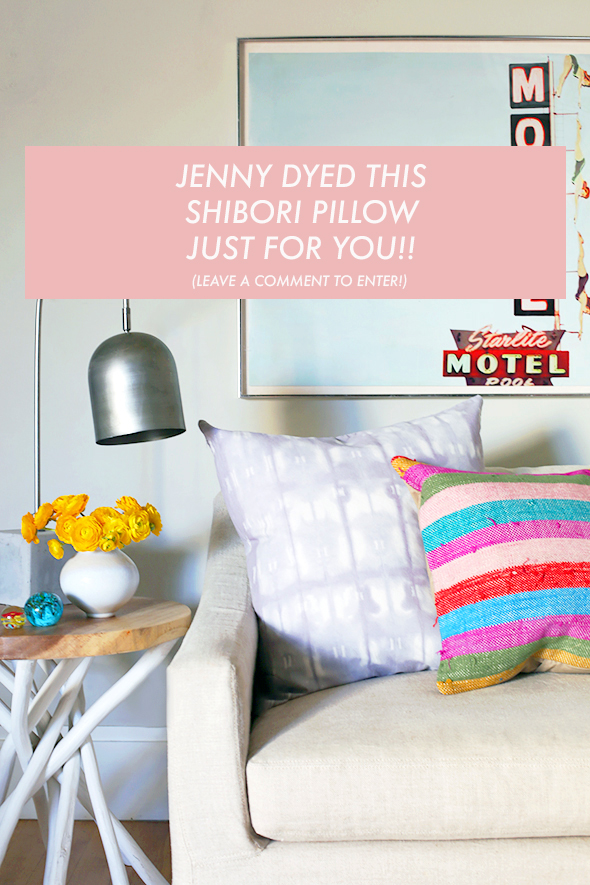
The fold and clip method is even easier! You just fold the long way and then clip the edges with binder clips. My favorite results (like on the lilac gray pillow on my sofa above) were made with a mix of large binder clips and the mini ones! The more clips, the busier the pattern.
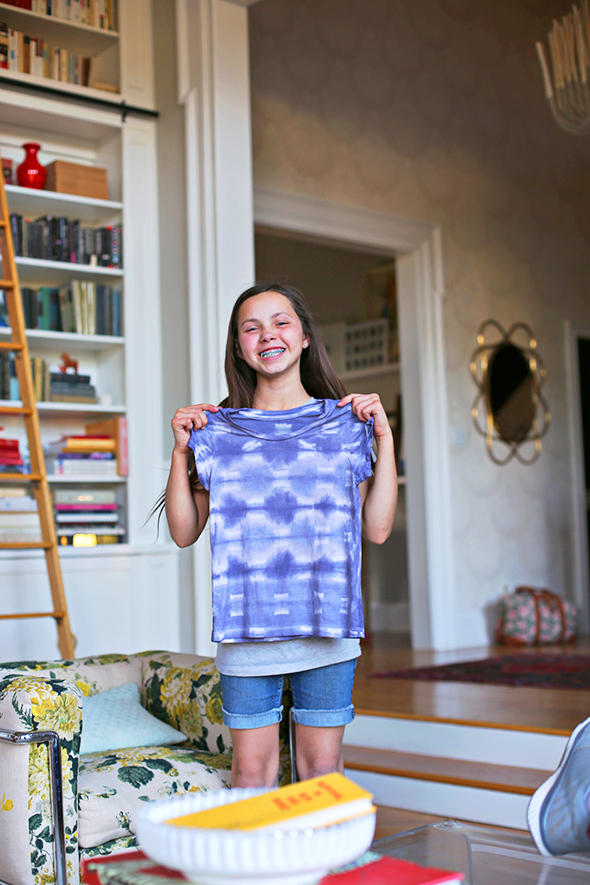
Grace made this t-shirt using the fold and clip method all by herself! She’s 11, guys! Shibori is SO SIMPLE!
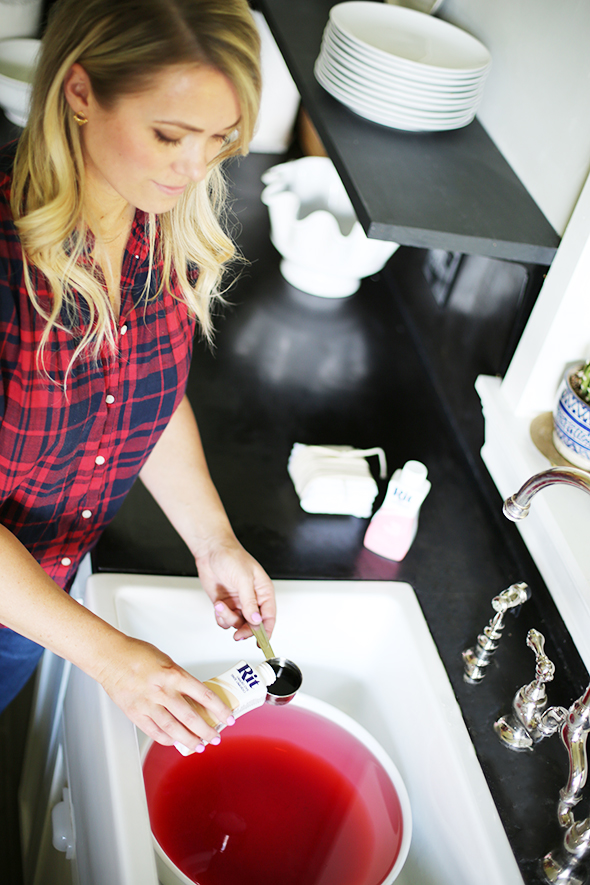
The liquid bottles of Rit Dye make it really easy to make small dye baths. Since Rit Dye is non-toxic and won’t stain ceramic or porcelain sinks or bowls if they don’t have cracks, I just used a big mixing bowl in my kitchen sink. I followed the super simple instructions on the bottle and boiled some water, added salt and played with different combos of colors to get the end result I was after. You don’t have to use huge quantities of dye to get results, especially with these smaller batches. The more dye you use, the more saturated the end result will be. But for some of these lighter pastel colors, I only used about a tablespoon of dye! Even the saturated colors didn’t need more than a quarter cup of dye.
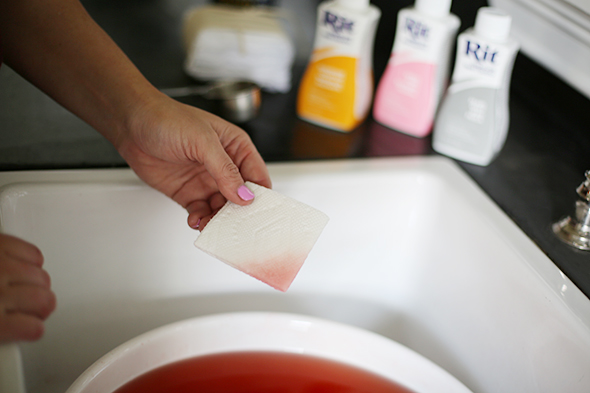
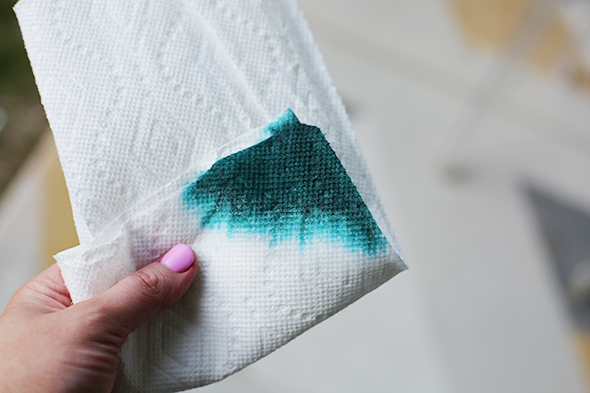
My best tip that I hadn’t thought of before this is to use a paper towel to check the color and saturation while you’re mixing your dye. If it’s not saturated enough, add more dye. Too saturated? Add more hot water. It couldn’t be more simple!
 The very nice people at Rit Dye also taught me that you can add a touch of Pearl Gray to any of the base colors and it helps to sort of muddy the color up in a way that looks SO pretty. I ended up adding a drop of Pearl Gray to most of the projects here.
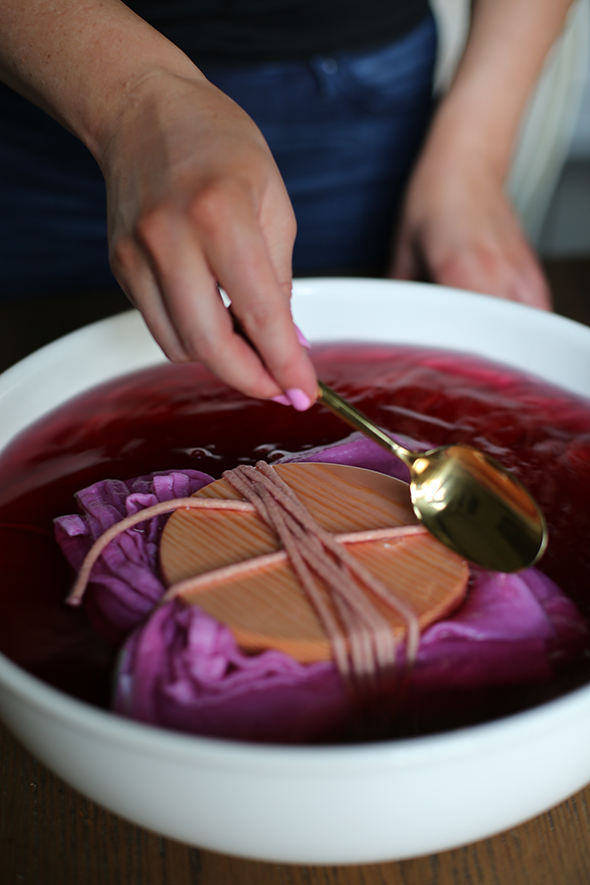
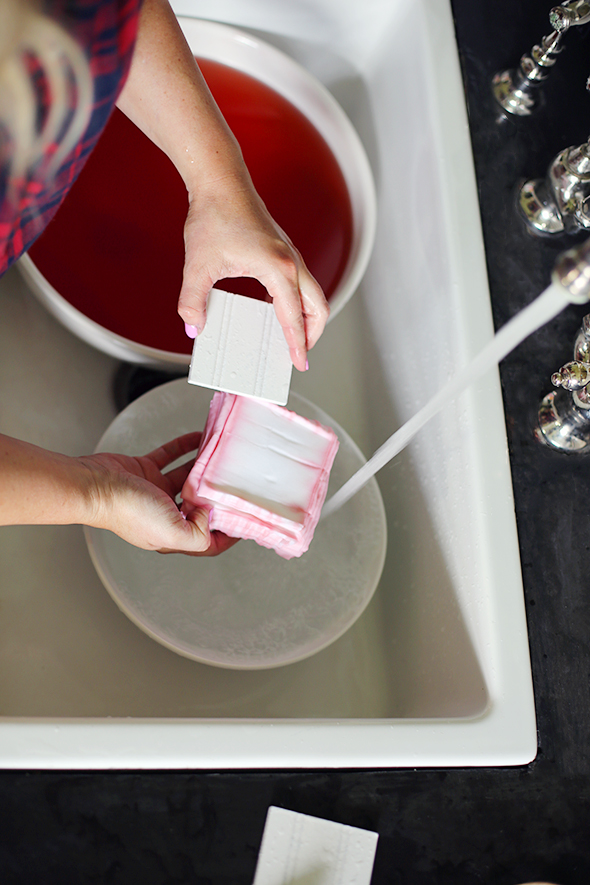
Once your dye color is spot-on and your fabric is folded and bound up, you just submerge the fabric in the dye bath. Obviously, the longer you leave it in, the more saturated the color will be. After experimenting a bit, I figured out it works best to keep the bundles in the dye for only about a minute to keep the bound up part dye-free and to make pattern high contrast.
Once you pull the bundle out of the dye bath, rinse it out for a few minutes under cold running water while still bundle up, then unwrap it and give it a really good rinse until the water runs clear.
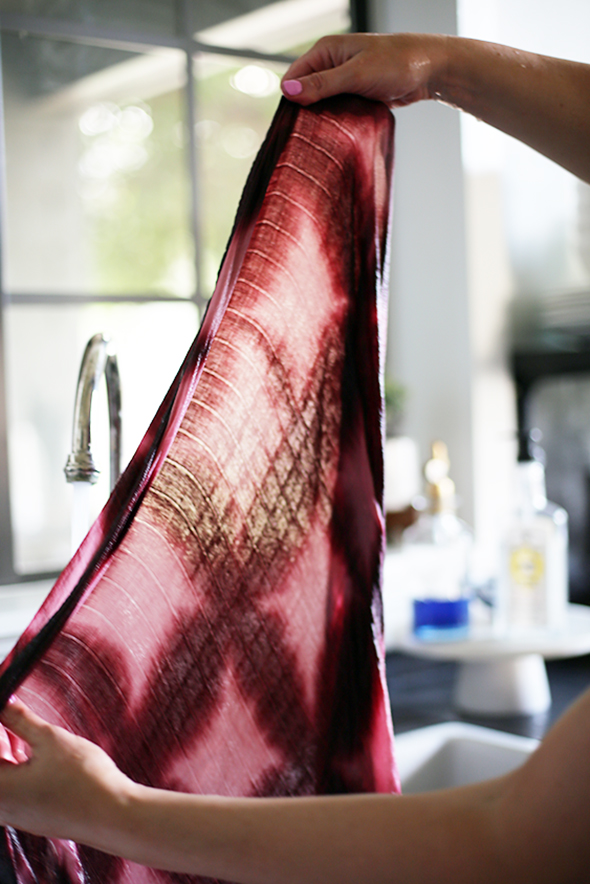
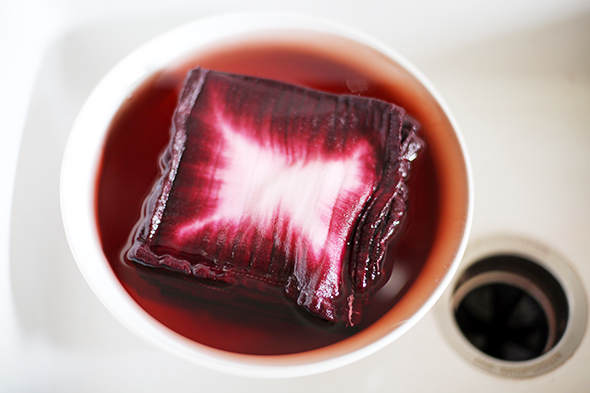
I let this grid pattern (made with the fold and bind method using wooden squares) sit a little too long in the dye bath, so instead of a white center, I got pink. BUT I LOVE IT! That is truly the best part of these shibori projects, you will be surprised at the results every single time! And every single time it looks GREAT!
The most exciting part is taking off the binding after the dye has been rinsed out. It’s like unwrapping presents on Christmas morning.
Do you see the soft lines made by cotton cording I used to bind up the squares? SO PRETTY!

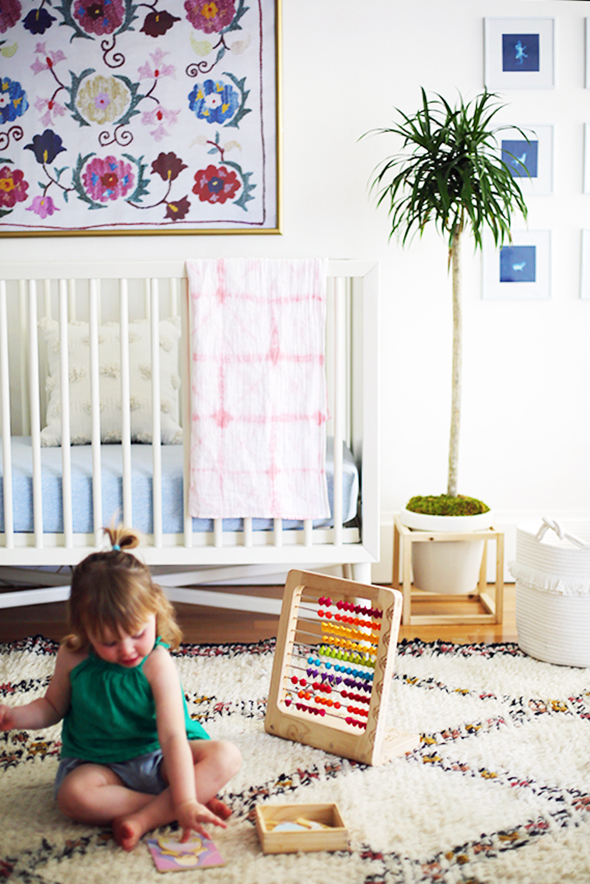
I love love love the blushy color that I made with 1 quarter cup of Petal Pink, 2 tablespoons of Sunshine Orange and 1 tablespoon of Pearl Gray! I used it over and over again for tea towels and euro shams for Claire’s room and for a couple of baby blankets, like the one below in Margot’s room. I used a triangle fold on this one for a subtle asterisk pattern!
To finish up and set the dye, you’ll just want to run your items through the wash with regular detergent. And that’s it! If you want to go the extra mile, you can you this Rit ColorStay Dye Fixative to help the color set further. I can’t wait for you to try this yourself! I’m warning you though – it’s addicting. I’m dying to get my hands on more white cotton pillows! And in the meantime, I’d LOVE to give away one of the pillows I made today! To enter, leave a comment here with your favorite Rit Dye color and I’ll choose a winner one week from today!
Thank you to Rit Dye for sponsoring this post! Learn more about Rit Dye HERE and click HERE to see where you can find Rit Dye near you!


Love the project!! Off topic but can you source your scissors for us? I’ve been on the hunt for some like that! Thank you ;-)
Hi Angie! Believe it or not, these are from TARGET!! Yay!
I have a stack of white tshirts that my mom gifted my 3 year old that are super stained (who gives a 3 year old white shirts?!). I’d love to dye them to lengthen their life span! Loving the tangerine color since orange is her “most most favorite”!
Love this!! Every time you post a DIY I always get super inspired!
OMG I am obsessed with the lilac and the blush pink but I think the lilac wins. Claire’s shirt tipped the scales! I have GOT to try this!
These are so fun! Loving the lilac color.
This will now be on our spring break list of things to try…..thanks for sharing!!
Dark green!
Love the pink!
The hyacinth is so lovely!
Now I need all the white pillows!!! Petal Pink has got me!
Love the hyacinth! I gotta try this asap!
I will be trying this ASAP! We are building a house and of course I will need ALL the pillows!
These are gorgeous! So far the only Rit dye color I’ve used is black to freshen up faded jeans, but I love it. My fave color you created is the pillow you’re giving away. So lovely and would be perfect in my new Master Bedroom! If I don’t win (fingers crossed!) I may have to make it myself! Thanks for sharing
Would love to try something with the Hyacinth for my master bedroom!
So cool!! I’m totally gonna use that oxblood color you made. But as a stand alone color, navy is my jam!
I love shibori! Your projects turned out beautifully. Would love to try it myself, and will happily display that pretty pillow if I am the lucky one!
Love this! Petal pink all the way, I’m always looking for fun projects, I wonder if I’m too messy for this one.
Petal pink! I am going to do this project with my daughter this weekend. She will love it. Always so inspiring! I hope you have more posts coming soon!!!
Wow I’m so impressed/amazed at the process! I’m definitely going to have to try this for some baby quilts and maybe some kitchen towels. Thanks for the details! I think I’m digging hyacinth but love how you toned it down with grey.
I have thought about doing a dye project with curtains, but I rent and I”m scared to use my tub!! Saphire blue is my favorite color (and is also what I’d use to dye my curtains)
How fun! The indigo dye is my favorite, with hyacinth right up there, too!
I love this! I will definitely be trying this over at print break with the kiddos!
Over Spring break, not print break! Ugh, auto correct!
I love the hyacinth!
Thanks for a great tutorial. I can’t tell you how much I have missed your DIY posts lately_ the reason I started following your blog! I love deep, inky indigo on anything and Sodalite Blue looks like the closest match for this color.
I can’t wait to try this! Thank you for the wonderful tutorial!!
I have 3 daughters, so petal pink is an absolute favorite around here. Love the tip on adding a touch of grey to make it a bit muddy and sophisticated
I’m having a blue and pink moment so the petal pink or navy.
Every time you post a DIY I always get excited to try out new things. pearl grey is lovely!
Thank you for such clear and inspiring instructions! This is definitely going on my list of summer projects. I love the apple green dye but would also like to mix my own colors as you did.
At dubaiflooring.ae we have wide varieties of interior and exterior products with exciting patterns and colors. Products available at dubaiflooring.ae include Hand tufted Rugs, Mosque Carpets, Custom Sisal Rugs, Shag Rugs, Customize Mats, Exhibition Carpets and much more.
I have 2 favorites, teal and hyacinth.
Wow! I really like be this. Thank you for sharing. The self dying idea has always scared me, but now I that I see how easy it is, I can definitely do it! There are so many colors to choose from, however I think I’m partial to the emerald or blue azul.
Thanks! How ironic…Blick has a demo this weekend on this and now I don’t have to go. I was going to take my daughters to make curtains for one of their rooms…one is 11 too. We just start instead :). I love the hyacinth!
Love the petal pink/blush colors & hyacinth :) Can’t wait to try this. I just did this with the indigo dye kits a few weeks ago, but look forward to trying it with the rit dyes.
How beautiful!!!
I love these! I want to run out right now and buy the materials! So inspiring.
This is so cool! Love the pillows!
So very beautiful. I see a new project in my future. I’m already glancing around my house wondering what I can do this to.
Love the combination of wine and petal pink, although they all are beautiful!
What a great project! Can’t wait to try!!
Oops, forgot to leave my favorite RIT color: rose quartz. I would drench my house in this color!
This is so inspiring. Once I have a space where I can drip and be a bit messy, I’d love to try it.
Beautiful! My favorite combo is 4 parts petal pink + 1 part violet. In fact, I have something to dye right now, and that color stay dye fixative tip is exactly what I was waiting for! I hope I do win the pillow, but I also hope I have the chance to get some made ASAP. xox
I will be trying the denim blue for a project next week! Thank you for such thorough instructions and inspiration!
Ah! This is so cute and looks so simple. This might be the thing I need for new throw pillows. Definitely going to try this out!
Tie between petal pink and navy!
Love this! So great the evening blue and the denim make the best blue for tye dyes, plus the the lemon yellow is great for spring! Have to try that trick with the grey! Best.
Oh, dear. I foresee a trip to Publix with my children very, very soon. Their creativity will explode with this one, no doubt about it. I am voting for the workhorse Pearl Gray. Always the bridesmaid, never a bride, right?
So creative!! What a great idea for a one of a kind baby gift! Love, love,love!!!
Thanks for the easy tutorial….I’ve been a bit hesitant to try as it seemed a bit more complicated. I would typically go for an indigo blue but now that I see some of your results that petal pink has won me over.