I was stocking up on some gold leaf at the craft store last week and saw this variegated rose gold leaf next to my regular yellow gold stand by. The wheels in my brain starting turning and I knew I had to use it for today’s vase project!
I worked with a great online florist called The Bouqs on this post. I used their company to send one of my friends a bouquet recently (they have a promotion right now where you get a free bouquet with your first order!) and she was super impressed and begged to find out where I could find such pretty ranunculus at this time of year. The Bouqs ships their flowers directly from their sustainable, eco-friendly farms on the side of active volcanos (!) in Equador right to your door, so the buds are always fresh and so beautiful!
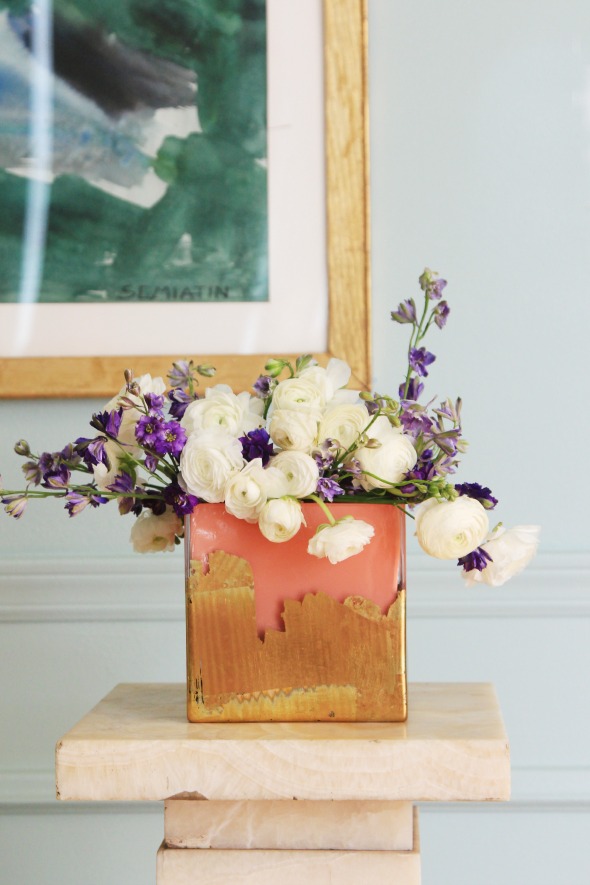
There’s no silly teddy bears or weird upselling, just beautiful flowers at great prices and always free shipping. It’s a perfect solution for when you want to send thinking-of-you flowers to your friends, but you don’t really want to spend a ton of money on a dumb arrangment. These flowers are from the Marshmallow bouquet (one of my favorites on their site). I love how the bright white buds pair with the pretty purple larkspurs and the coral color of the DIY vase.
To do the quick and easy leafing project, I picked up a couple of clear glass vases at the craft store, cleaned them well, and taped the entire outside of the vase with painters tape before spray painting the insides.
I used Rustoleum’s French Lilac (can’t get enough of that one!) and Design Master’s Coral. I sprayed on a couple of very, very thick coats and let the paint dry for at least 12 hours.
When the paint is dry and the tape is removed, the paint looks like milk glass! It’s such a pretty effect – I did a similar project here to get a blue opaline look for my jewelry trays.
I wanted to go a step further on this project though and give the outside of the vase some metallic love using the variegated rose gold leaf. Any leafing project can get a little messy (but it will be the most beautiful mess you’ve ever laid your eyes on!). I like to lay down a sheet of thick brown kraft paper before starting, which makes clean up a breeze.
I poured a small amount of leafing size on the top of the vase and used a 1″ brush to very loosely paint the size on the bottom half of my vase. I went really easy with the size – being careful to not overly smooth out the brush strokes and to leave little gaps here and there too. As you let the sizing glue dry, watch for drips and either brush them off or lightly dab them up with a paper towel. You want the coat to be thin and even.
The size will be completely clear and tacky to the touch when it is ready for the leaf. I applied the sheets with a soft bristled brush, but it’s fine to just use your (clean) hands too! You want to really flatten the leaf sheets against the vase, making sure there are no air bubbles or wrinkles.
The leaf will magically stick to where ever the size was painted on, but will brush right off the rest of the vase.
If there are any cracks or gaps, I just use some of the extra leaf bits on the table and rub them onto the size with my fingers. It’s really so easy to get a smooth finish!
I think the dimension of the finished vase is so pretty with the bright color inside the glass and the rose gold on the outside!
After the leafing is done, you’ll want to paint on a layer of sealer to help protect the gold leaf.
When the sealer is all dry, you’re ready to start arranging your bouquet! I know it’s tempting to do a blunt cut at the bottom of your flower bunch and just toss them in a vase, but I’m learning it makes for such a more beautiful bouquet if you cut and arrange the flowers one by one. The Bouqs is also a great place to get tips on floral arrangement and care (here’s the page on ranunculus).
I tried to keep the arrangement organic and swoopy (the tall larkspur stems helped there!).
This arrangement was a gift for my friend, who needed a little extra love this week, and I love how it turned out. The Bouqs suggests that if the water is changed every few days, the flowers will last an additional 1-3 weeks. They suggest adding a little sugar or Sprite to the fresh water once you’ve run out of the flower food that comes in the packets.
A big thanks to The Bouqs for sponsoring this post! Check out all their amazing bouquets here, and get a FREE bouquet with your first purchase! I think this one would be perfect for a holiday gift to a far-away loved one. :)


Once again, you are our online retailer sherpa! Everything you bring us is new to me and has an interesting value proposition (boxed, framebridge, bouqs). Also, in case you have any haters out there, I really like how you handle sponsored posts, both in terms of weaving in original content and selecting the right sponsors. Also, the road to success for women is paved with smart business models where you get paid for your time and efforts. It makes me happy that you are able to make these posts work for your readers, and your business.
Ditto.
Jenny, beautiful, as always! How long did it take you to receive the flowers from the time you ordered them?
Zoe, thank you for the continued support! I so appreciate you taking the time to make an uplifting comment here – you made my morning! Thank you and happy holidays! xo
Kackie – I think I ordered them on a Friday night and they came on Tuesday? It's just a few days. The blooms were still pretty tight when the bouquet arrived, but they have a little note about letting them open up in warm water and they opened right up! xo
I LOVE this idea!! I have some extra spray paint, unused gold leaf, and a few more Christmas presents to make…thank you for the inspiration!
I LOVE YOUR VASES! I am so going to run out to my local craft store tonight.
A really lovely post Jenny. I love how you go beyond a basic DIY. The flowers would have looked just fine in the coral vase but the variegated gold leaf is that extra LGN touch that we've come to appreciate.
Beautiful choice of flowers and a thoughtful gift for your friend. Happy holidays to you!
This may be noted somewhere else, but who is the artist of that lovely abstract piece that you can see the corner of in the photo?
These are gorgeous! Well done.
I ave been reAding your blog for years, and i feel like it is time to speak up. I am so tired of all those sponsored posts. I like your diy posts but i really cannot keep on reading your blog. Sorry and good luck.
Oh boy, I think I need to speak up too. Blog content is free to the reader and a lot of work for the blogger. Especially when it is as well done as this blog. I say if you can get some sponsorship and do it well, then more power to you. I, for one, will stick around and read and be inspired by your blog every day. Also…the vases are gorgeous :)
So cute!! Love the story behind the flowers!! The vases look gorgeous – I have never heard of rose gold leaf!
Gorgeous! You don't have any issues with the spray paint inside the vase? Do you seal it? Seems like it would be prone to scratching or flaking from the water?
Love the vase project. I don't necessarily pay attention to where my flowers come from when I buy them, but it's worth noting that sourcing out-of-season blooms from Ecuador isn't really eco-friendly or sustainable since the carbon footprint required to bring them to America is sizable. But I still really like the project.
This looks so cool! absolutely love it!
x Lily
http://whilemyboyfriendsaway.blogspot.com/
I love the vase! The dimension is awesome, thinking of making it as a gift for my mother in law :) And your bouqs post is perfect timing, I was just looking at 1800flowers to send out a get well bouquet but bouqs is much prettier! Thanks, Jenny!
Your content is always top notch. These vases are cute, style forward, and accessible to most diy'ers. Thanks for sharing a new resource for eco friendly flowers. AND you get paid?! You so so so deserve to get paid. :)
so cool!
Beautiful, artsy. Love these vases!
Jenny! This is such a beautiful gift idea. I plan to gift these to my mom, mother-in-law, and boss! I do have a question about sealing the inside of the vase- After spray painting, what do you seal the interior with in order to keep it waterproof? I am worried about giving a gift in which the paint eventually peels off. Thanks for the wonderful idea!
Thanks, I am glad to read your topic and could participate comment here
I keep visiting your blog every day to find out the latest topics that you share here
Glad to be begabung here, salute
If there is a turning please visit my blog
Vimax
Vimax Asli
Vimax Canada
Obat Vimax
I just completed a gold leaf project, much larger and pretty ambitious of me…I can't believe you didn't use gloves! I found the process more efficient by wearing cotton gloves. Check out my gilding here
http://thefolia.com/2014/12/13/let-them-eat-cake-and-my-first-ever-giveaway/
Wonderful diy vase! Love these colours. And the flowers are so beautiful. Thanks for sharing.
Domestic cleaning Clapham
I love their flowers! Wow! And those vases. Just stunning. I love the contrast of elegant gold with the more casual brush strokes. So pretty.
How does the interior spray paint hold up? I love the idea but can just imagine paint floating up into my flower stems, with my luck. Have you had good luck with vases you actually use with flowers, or is it sort of a one-shot deal?
Hi guys!
As long as you clean and dry the inside of the vase well and then use a good spray paint (especially one that's enamel-based, like Rustoleum), you'll have great luck with the paint sticking! I mentioned this in the post, but it also helps to put on multiple thick layers with drying time in between.
I did a similar project here a year ago, and I use the vase all the time, including this week for a Christmas arrangement for our coffee table! :)
http://littlegreennotebook.blogspot.com/2013/12/diy-splatter-vase-and-trick-for-grocery.html
xo
I think this project is brilliant! How many people have boring glass vases hanging around and this is such a clever way to make it look high-end.
great idea!
https://www.etsy.com/shop/OneofakindVintage1