I’ve been pretty obsessed with raised paneling lately and when it was time to figure out something to do with the closet doors in the studio, I knew I wanted to experiment a little with moulding and see if I could make the cheap hollow-core door look more interesting for not a lot of money.
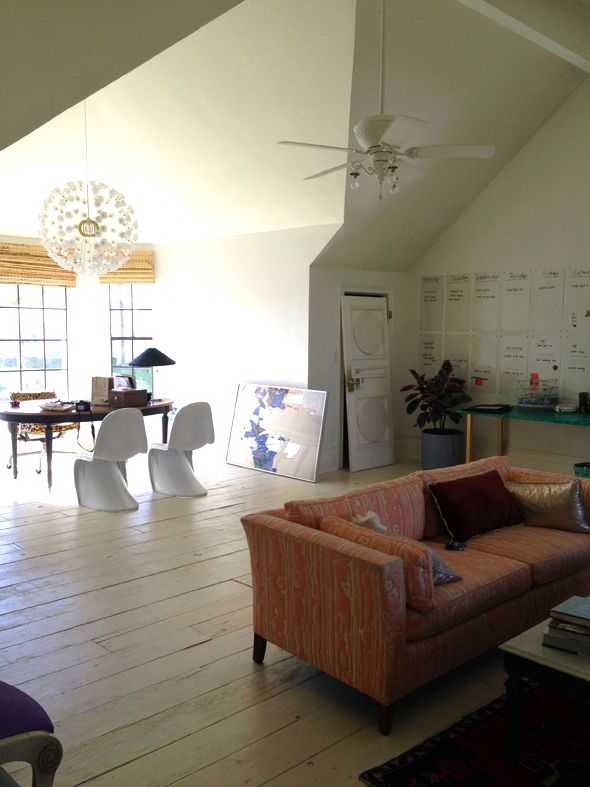
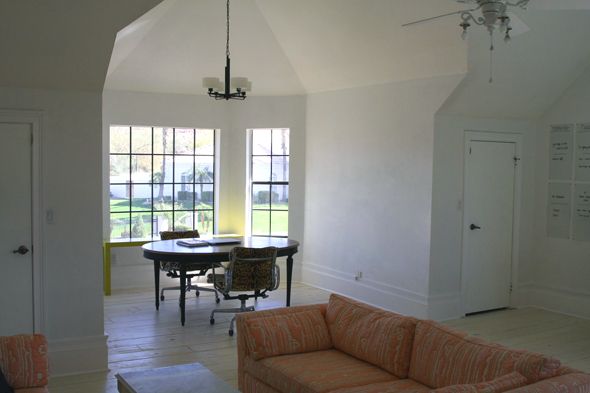
Here’s a sort-of during shot of the studio, after we had painted the walls and done the floors and other trimwork, but before I did any decorating.
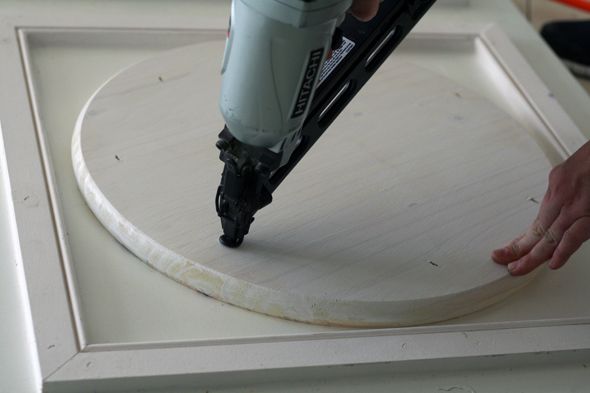
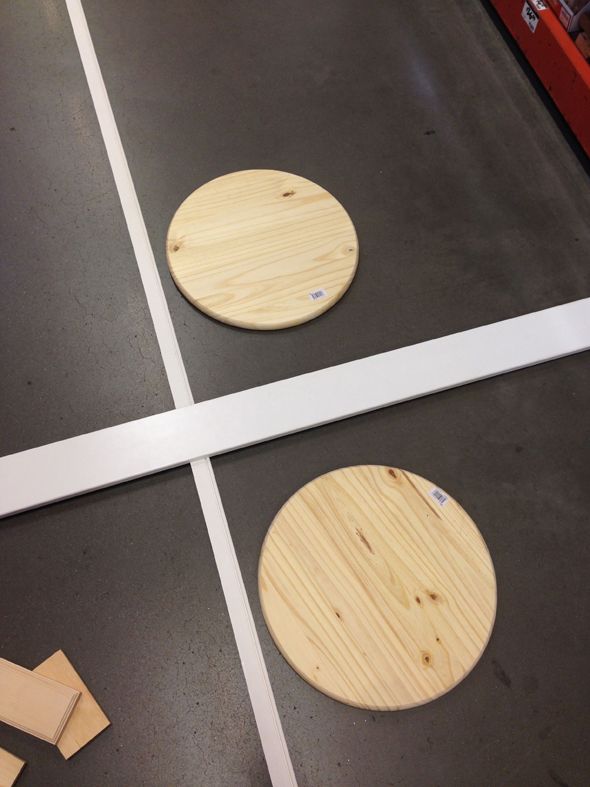
I remembered these wooden rounds from Home Depot and found some trim (it’s called brick moulding) that was the same thickness as the rounds.
When I got home I experimented with tape patterns to try and figure out something that would work with the door proportions. It can be a little tricky to get it right with the door hardware and while leaving a sort of toe kick/kick plate area at the bottom. These doors are short too, so it felt extra difficult. At first I tried to make three circles work and they didn’t really fit, but mostly it just looked like a giant stop light. Not cute.

I knew what my circle + square dimensions had to be, so I cut out four of the squares first for the two doors. Then I played around with the scrap moulding to figure out a rectangle for center area. I tried a few different sizes and even tried a rectangular panel to match the layering of the circle + square, but in the end I decided to keep it simple and small with just the brick moulding.

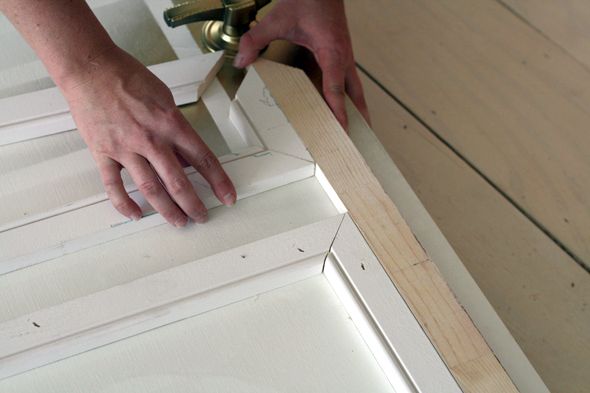
So the real trick with adding moulding to any door is to spend your time on the top shape and get that one perfectly perfect and squared with the edges of the door. And then the other shapes can just be placed using the lines of the first shape. Hopefully your first square is not at all crooked, but if it is, it’s better for the other shapes on the door to be equally slightly crooked. That sounds weird, but your eye won’t really notice if the whole thing is just a little tiny bit off, but if the individual shapes have been corrected and are off in relation to each other, that’s when thinks start looking wonky and bad-DIY.
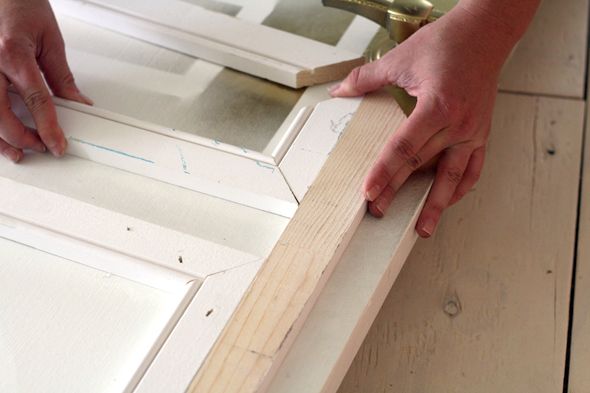
So, after I measure out and spend a lot of time getting that top square right, I just used a piece of scrap wood to line up the trim for the next square. The line will be perfectly even and straight this way.
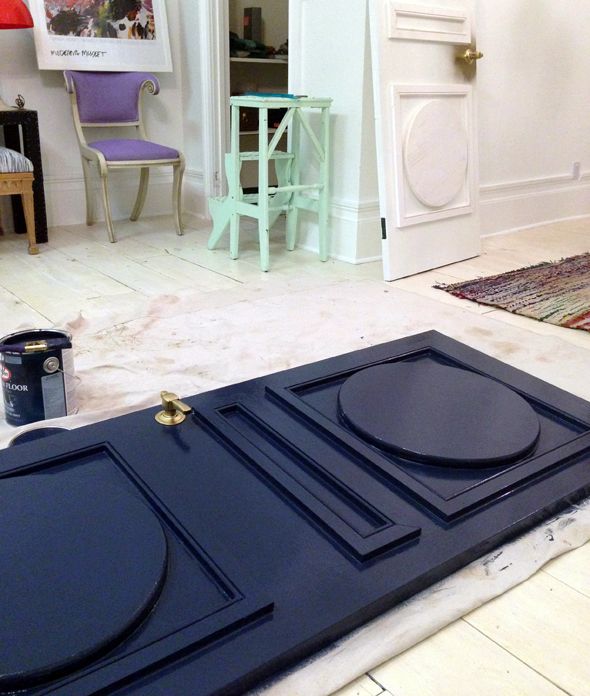
I nailed on the paneling with my angled nailer with 1 1/4″ brads, since the wooden round and brick moulding were so thick. And then everything got caulked and a light sanding.
I guess I didn’t take a photo of this step, but before I painted the doors and paneling, I sprayed the door handles gold outside (without removing them first! Rebel!). I also replaced the old door hinges with new solid brass ones.
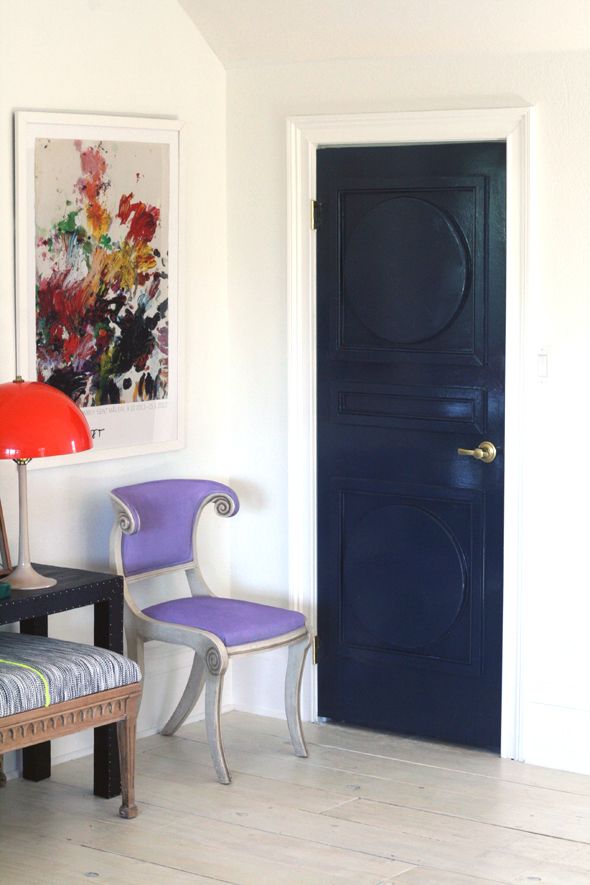
I regret not taking the time and effort to spray the doors with my Critter spray gun, but I was up against a time crunch, so I just brushed them with oil-based paint tinted to Benjamin Moore’s Gentleman’s Gray, which is actually a really beautiful, deep navy.
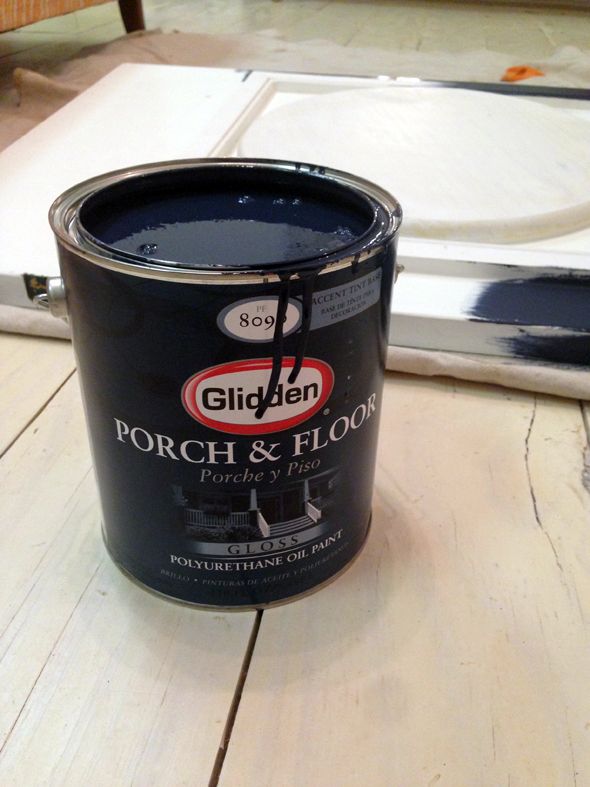
The finish is not bad since I laid the doors down to paint them and oil-based paint spreads really beautifully. But it’s not exactly perfect like it could have been if I had sprayed them. :(
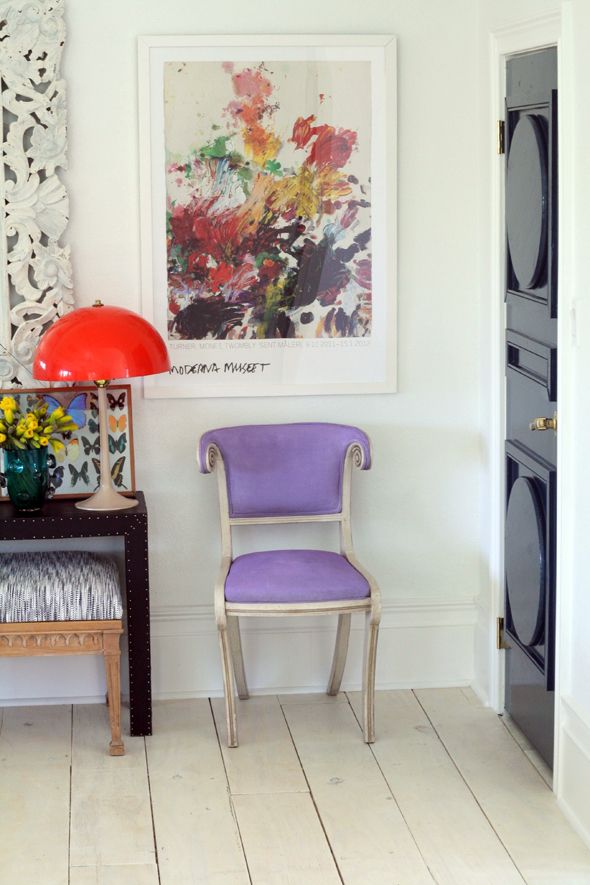
I’m still happy with the doors though! They make the weird closets that flank my desk sort of a fun part of the room now. Eye-sore-turned-room-feature is my favorite kind of DIY.
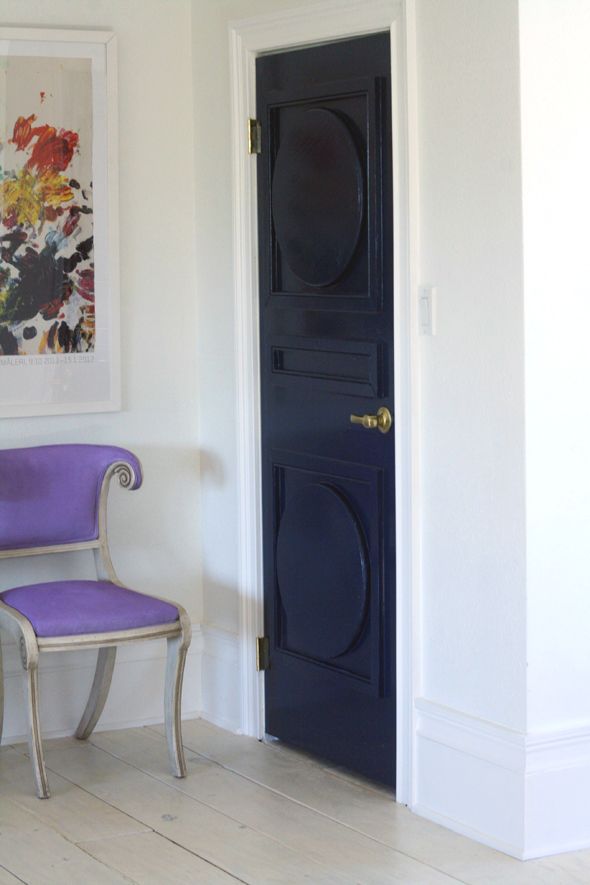
I especially like how the light catches the dimension of the paneling in such a pretty way. I love all the shadows.


Pretty! They look expensive. I wouldn't worry about brush strokes because I feel like most painted doors have them.
Just beautiful!
It looks stunning! Now I'm considering something similar on my front door. But would it look strange to just do one side? On the outside, we have a security door, so unless it follows the pattern of the door (which is what I originally planned to do, and then decided to just leave it bare), it would look strange. Could I just do it on the inside? Decisions, decisions…
Your creativity amazes me! ….. I'm always in awe of your ideas and how you can turn ordinary objects into grandness!
I'm in love with the plank flooring and would love to do this in my bonus room. But with kids and dogs I worry of spills seeping through the seams. Can you think of any
Thing that could prevent that? even ifit was applied as we installed it?
Any ideas would be much appreciated
Lara
Love this use of those wooden rounds!
I absolutely love this. Moulding makes just about anything better, in my book!
i love this room! very cool idea for the doors.
So pretty and creative! Love the color you chose.
I noticed these doors in the reveal the other day, and thought to myself, "where did she get awesome doors like that?" HA! It is a brilliant solution. You are so awesome Jenny!
I've often thought, "she either has a lot of patience, or really loves caulking and sanding" you do a lot that requires these things! :)
Looks so beautiful!
Brilliant as always! would've loved to see them with three circles just to see the street light effect :)
x Lily
http://whilemyboyfriendsaway.blogspot.com/
It's like Louise Nevelson and a door had a baby! Beautifully done! They're art pieces!
Nice work Komenda! I feel like you could do an entire post for uses of those "hobby rounds" or whatever they call them at Home Depot. I always look at them and think "WWJennyD"? :-)
I'm shopping for doors right now. They are PRICEY. I love that you updated these to a livable condition for way less than pricey.
There are various reasons of pimples and but the most prominent is the impurities in blood. To permanently get rid of these skin disorders, you need to get natural detoiificatxon of your blood with herbal blood purifier such as Glisten Plus capsules. This natural blood cleanser helps you to detox your blood and removes toxins out of the body. It is the safest and most recommended herbal remedy for and pimples.
Beautiful work!
I'm in LOVE with this door. It's amazing how trim or molding make things look so expensive or chic. How cool you used those wooden rounds! As always, you do such beautiful work! Great job on your office.
So beautiful! What you did to the door made it look classy and expensive! Great idea! –Patrick Tan
Love, love, love! The pattern and the color are great. Looks super high end and brings character to the space. Great job!
I have never been a fan of ceiling fans (LOL!) but I love yours! Could you tell me more about it?
I am so happy for this post. I searched and searched your last office tour post for details on that awesome door! Such a cool way to upgrade!
I’ve been exploring for just a little bit for any hihlq-uagity articles or weblog posts in this kind of home . Exploring in Yahoo I ultimately stumbled upon this website. Reading this information So i am glad to show that I have an extremely very good uncanny feeling I identified out just what I needed. I such a great deal indubitably will make certain to do not disregard this site and give it a appear on a constant.
As Charlie Sheen says, this article is “WINNING!”
– Wow. These photos are AMAZING! What a beautiful family you guys have I really love the one of the kiddos watching thier mom and dad kissing, so sweet
Virkelig fin frisure!:DNår du benytter fletningen fra dagen før som krøller, reder du så dit hår ud om morgenen? og putter du noget i det så krøllerne holder?(:
This is genius!! I LOVE it!!!
Gorgeous! Looks like an awesome idiosyncrasy that came with the house, not like a diy project at all.
This adds so much character. I love it! The finish on the doorknob turned out especially well. Would you mind sharing with us what kind of spray paint you used?
Wow, how cool! This adds a lot of interest.
Love it! makes me wish I had flat hollow core doors somewhere in my house.
I was looking forward to you showing the diy to this door as I was loving on it when you showed off your office! So great!!!
Do you have any tips for cleaning brushes (and anything else) after using oil-based paint? I apologize for the comment if you've already written a post about it!
Your work is ALWAYS beautiful. I will be painting my outdoor furniture navy because of you. :)
Oh, I just knew when I first spied that beautiful door that you had worked your magic on it! So glad you provided the tutorial and gorgeous paint color. Honestly, you are SO inspiring! Your studio is breathtaking. So creative. Thank you SO much for sharing your amazing gifts and talents with us!
Jenny, another hit outta the ballpark! Can't tell you how much I look forward to & am inspired by your posts. So happy you decided to keep blogging!
Beautiful! These are lovely and so unique! Perfect for spicing up the room a bit!
xo
Christa
http://www.gardeniasandmint.wordpress.com
LOVE that door! It is one of your MANY amazing transformations!
Thank you so much for this tutorial! I adore these doors…what a big impact they have in your studio space!!!!
I'm pinning this! They look great!
Thanks, we appreciate your articles. Good day! DB Product Review
These are really good,Jenny. I love taking a sows ear and making it a silk purse.
L.
Girl, you are are straight up genius!!!! Just saying…
What a great idea…love how they came out!
Thank you for the information you have provided, I am really happy because this post with my knowledge increaseth, visit our website manuel
Prediksi Bola | Judi Online | Agen Casino | Taruhan Bola
Casino Online | Agen Bola | Prediksi Dan Berita Sepakbola
Agen Bola Online | Bandar Bola | Agen Casino| Situs Judi
Agen Bola | Taruhan Bola Online | Agen Casino Terpercaya
Taruhan Bola | Judi Online | Agen Casino Terpercaya
Agen Bola Online, Situs Judi Casino Online, Bandar Taruhan Bola
Prediksi Akurat | Prediksi Bola | Berita Bola | Bursa Bola
Berita Bola Online: Z Score | Review Akurat
Berita Bola: Kumpulan Informasi, Prediksi Skor
Absolutely brilliant! It adds so much more personality to the space and I love the color you chose! Great DIY!:-)
Spectacular! I never expect that a fancy design is not made of dimes. I’m totally hooked to see the whole studio, and it’s because of the blue door. Can I follow your style? That chandelier! Gorgeous!
Sebastian of
Granny Flat Super Store
GREAT idea — I’m going to adapt your idea and perhaps add a step using my router around the edges of the circles to add an even more “hand carved” look.
I’ve kind of fallen in love w/ my router as a way to take many of my DIY projects to another level. It was easy to master & can be addictive (plus there are so many different bits to achieve many different trim looks, etc)