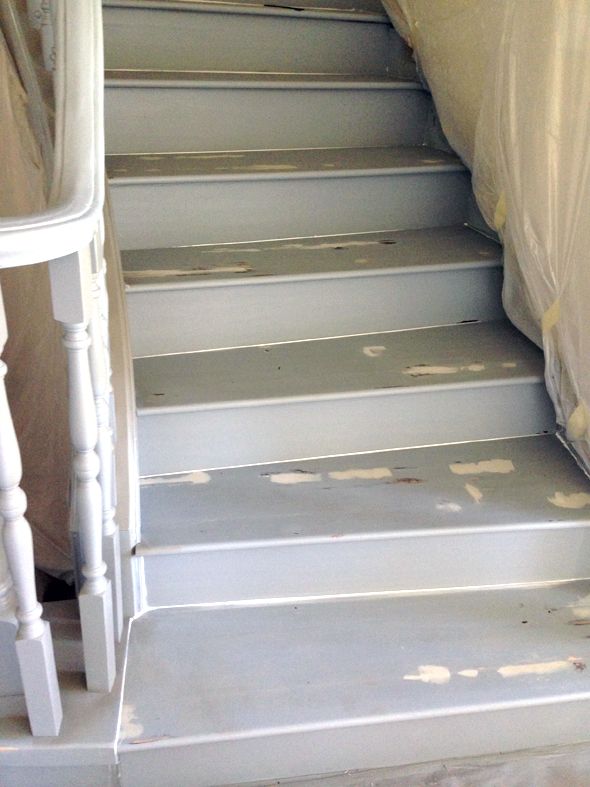
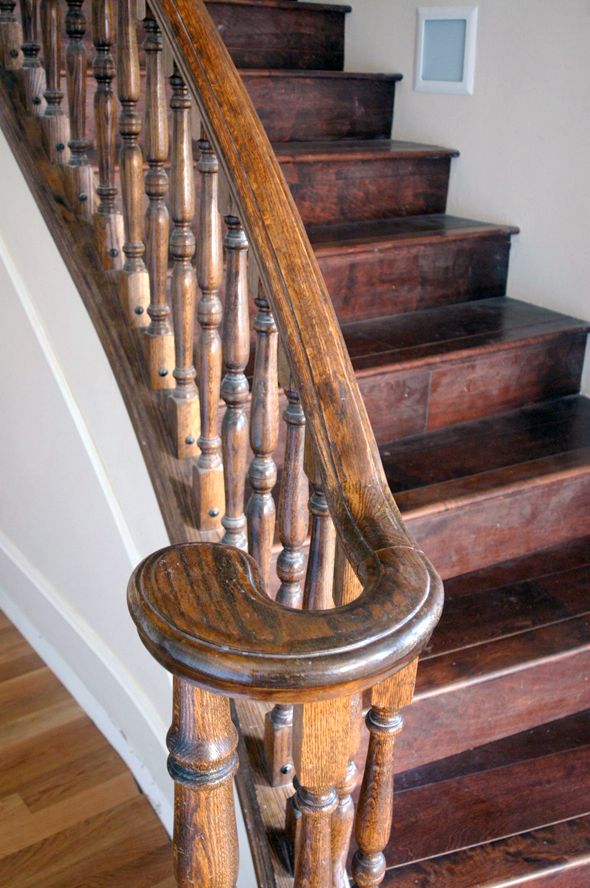
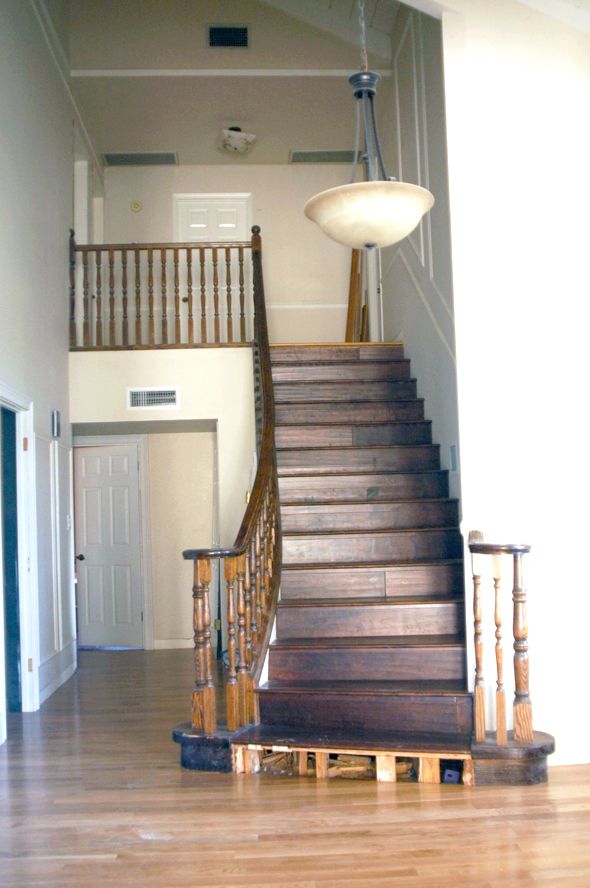
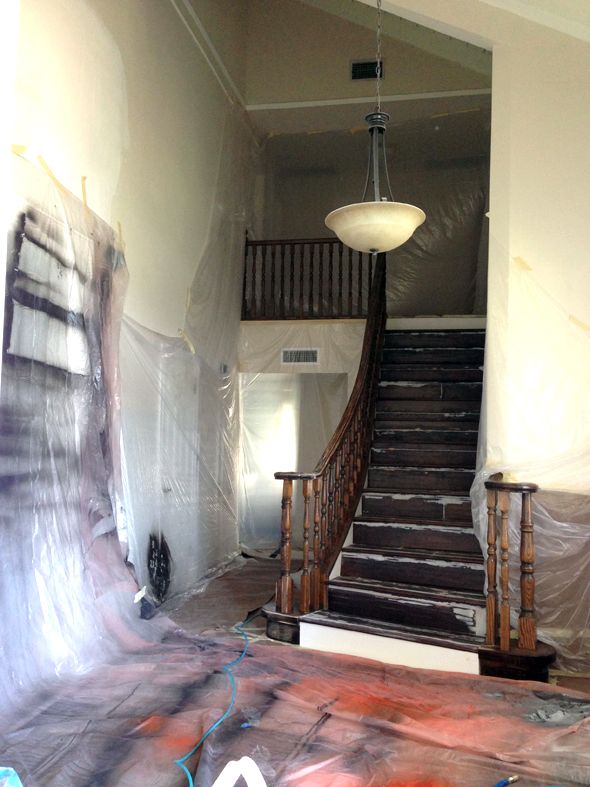
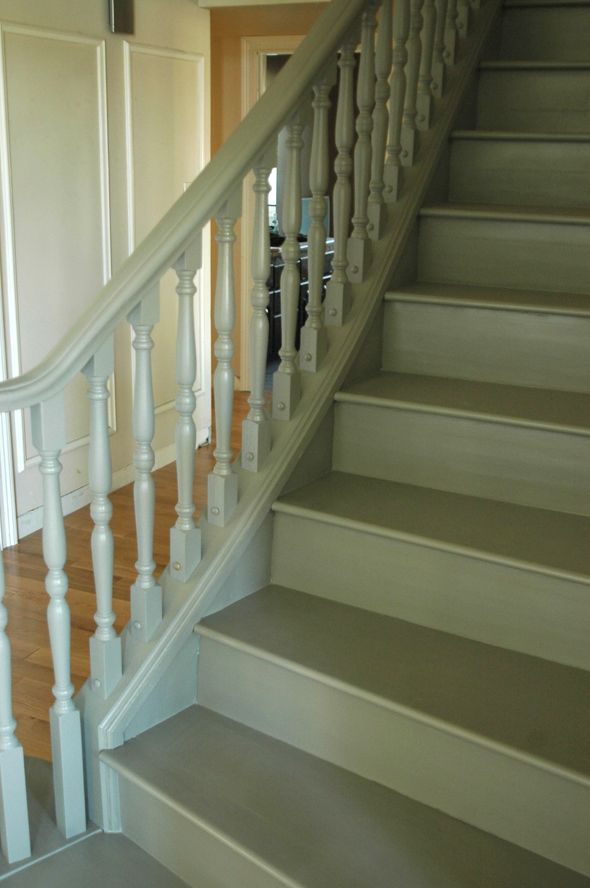
I’ve decided I definitely want to change the stairs (treads, banister, balusters – everything) down the road a bit. But for now, I knew it made sense to just paint what I’ve got. Most of you agreed that I could change the look enough with paint that it would be worth the time and effort.
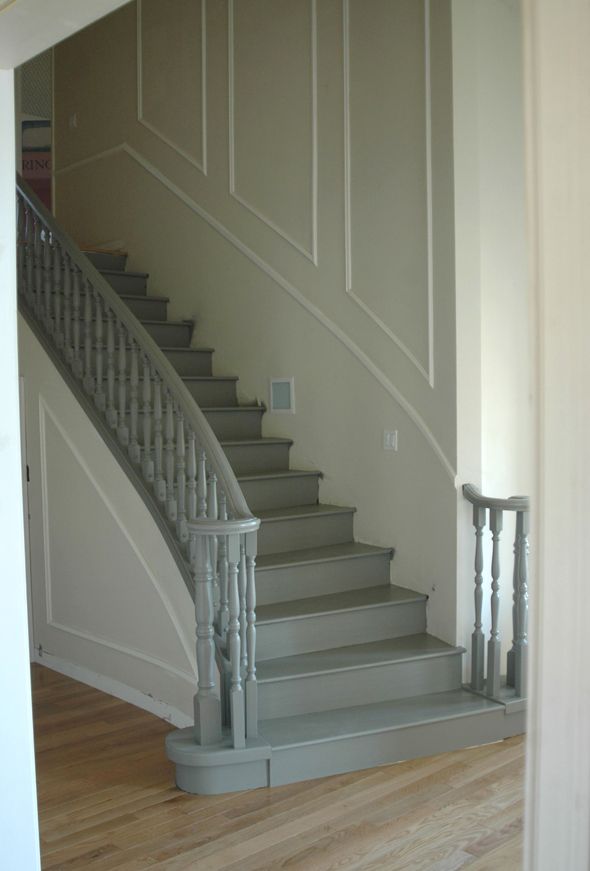
Well, there was definitely time and effort spent! And I’m pretty happy with the change the color makes in the space.
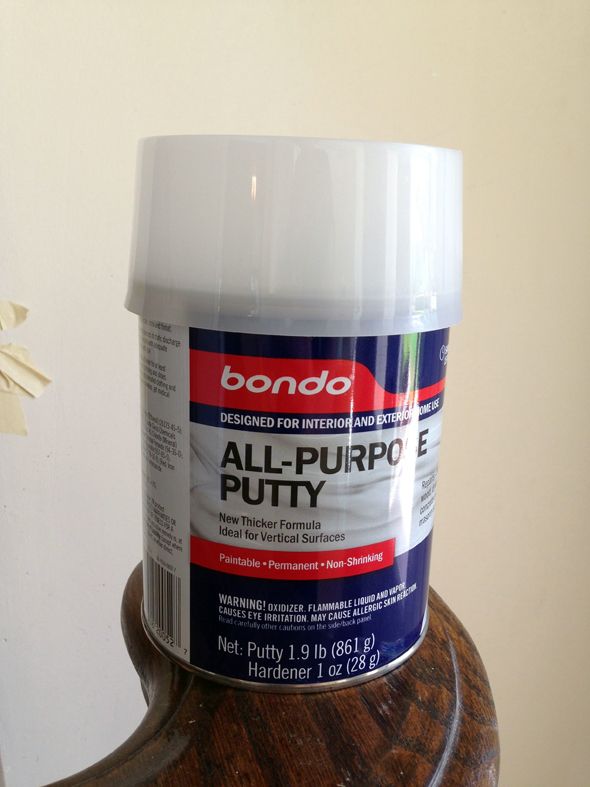
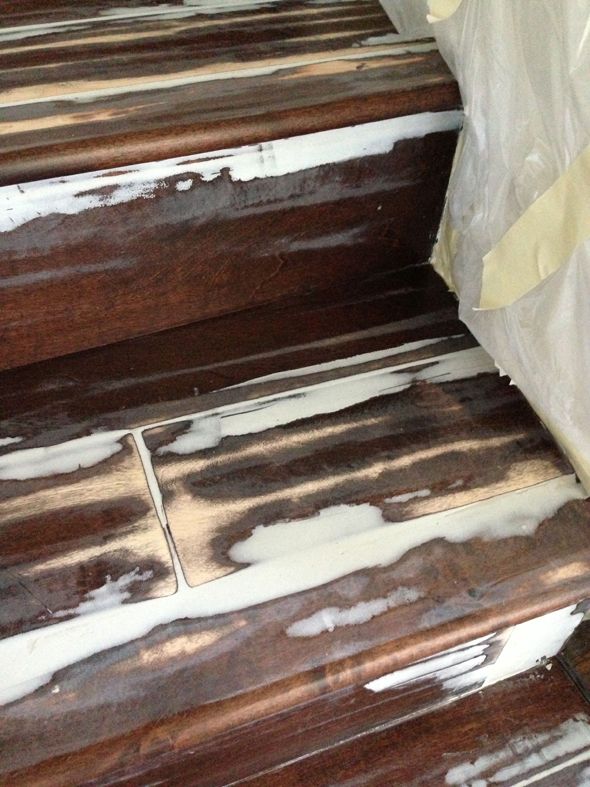
I think it will be worth all the effort in the end, once the runner’s installed. The hardest part by far was all the sanding. And thank goodness for Bondo!
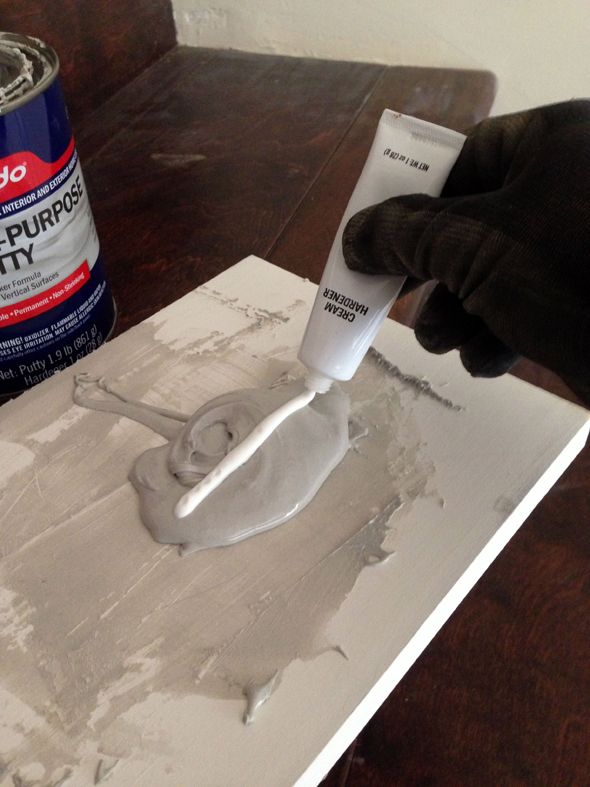
Bondo is one of those products that might look intimidating, but is actually pretty easy to use. You mix a hardening cream with the epoxy base putty in small batches and then smear on the mixture quickly before it starts to set.
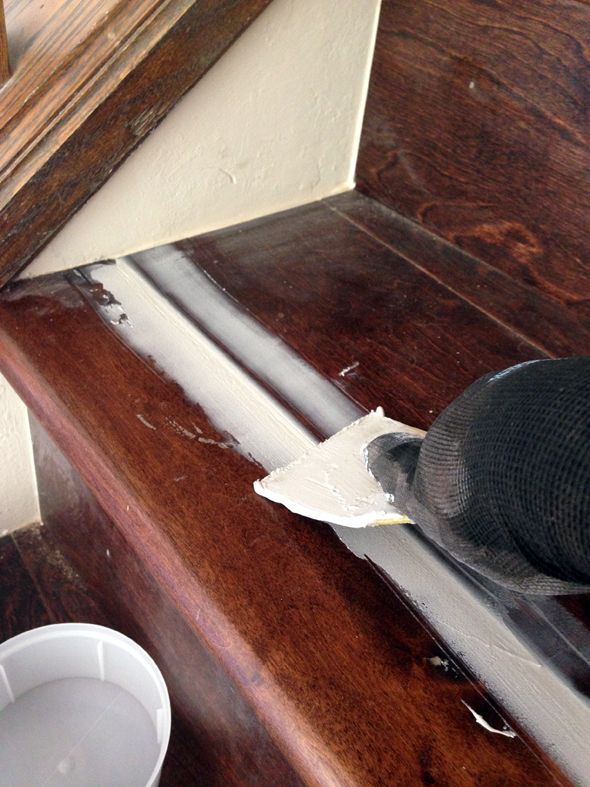
The stuff stinks bad, but it works miracles and fills any hole/crease/crevice/seam you present it with.
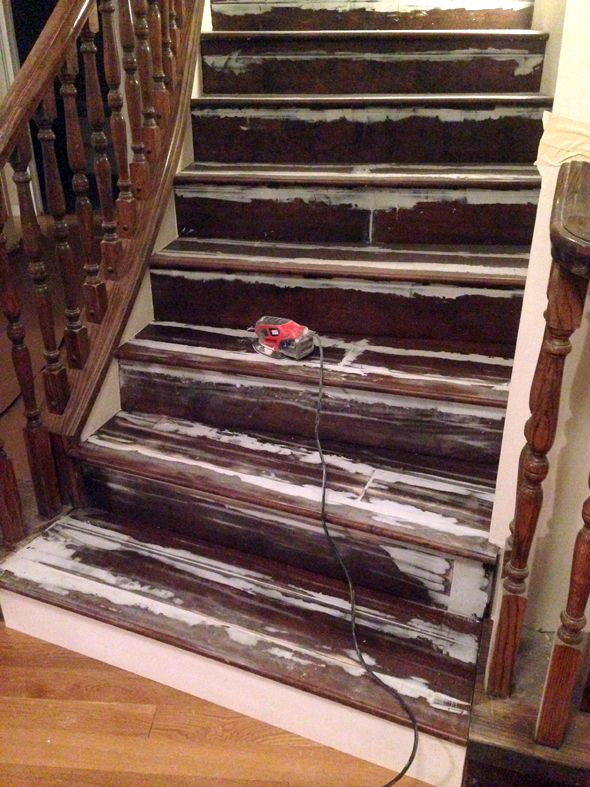
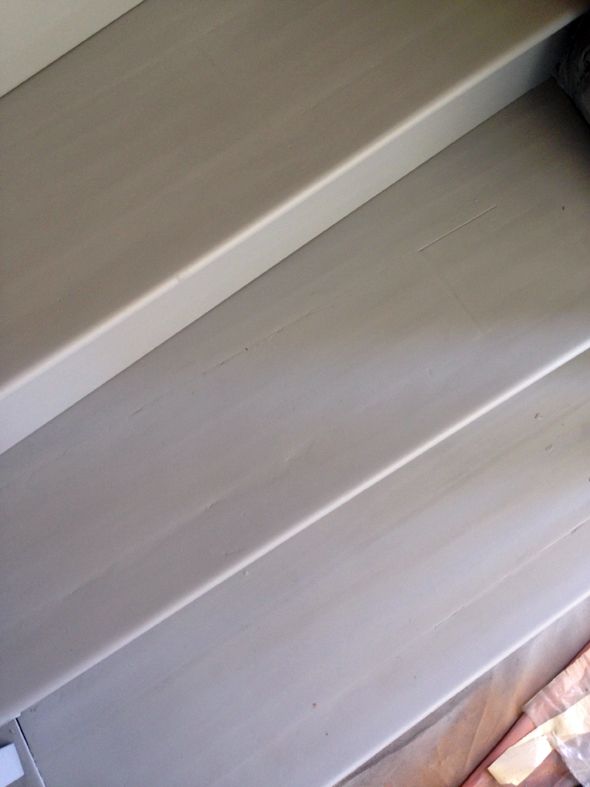
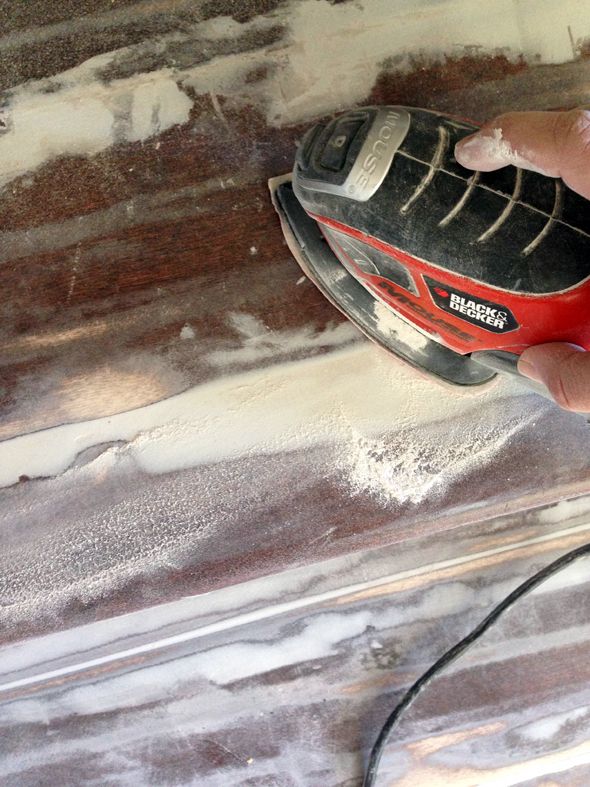
After the Bondo had dried for a few hours I sanded the filler down. This was seriously a full day’s work. Every tread took about an hour. But by the time I was finished, the Bondo had perfectly sealed all the imperfections and all the hand-scraped detail on the old wood had been sanded away.
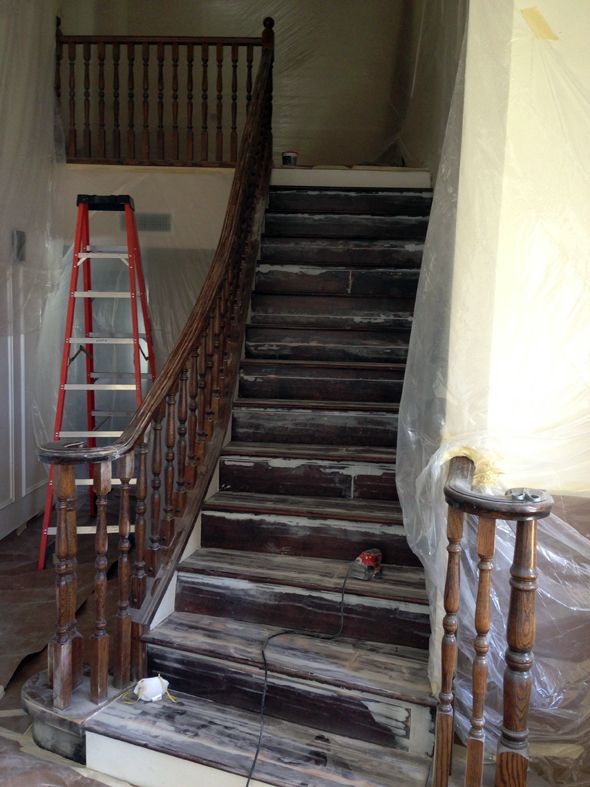
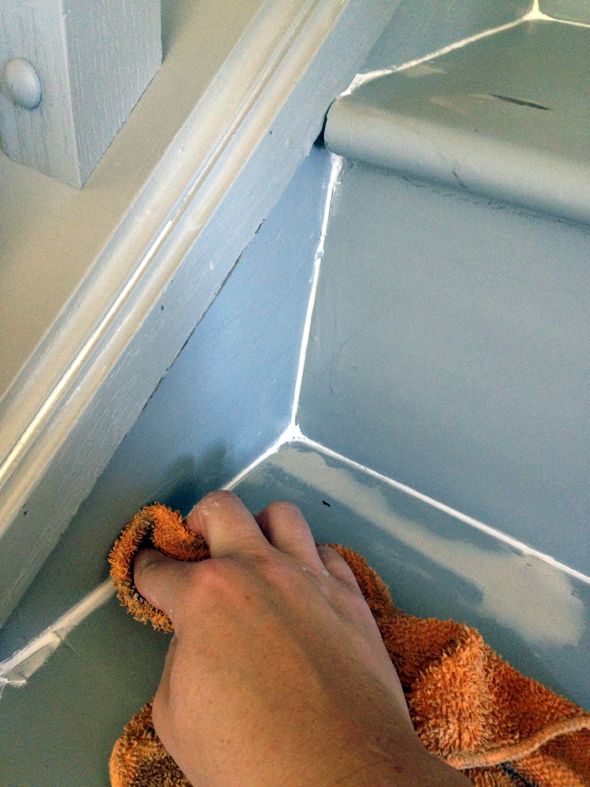
Michael helped me hang plastic sheeting on the walls and we wiped everything down twice.
And some of the imperfections started to reveal themselves.
As Linus would say – Ruh-ro.
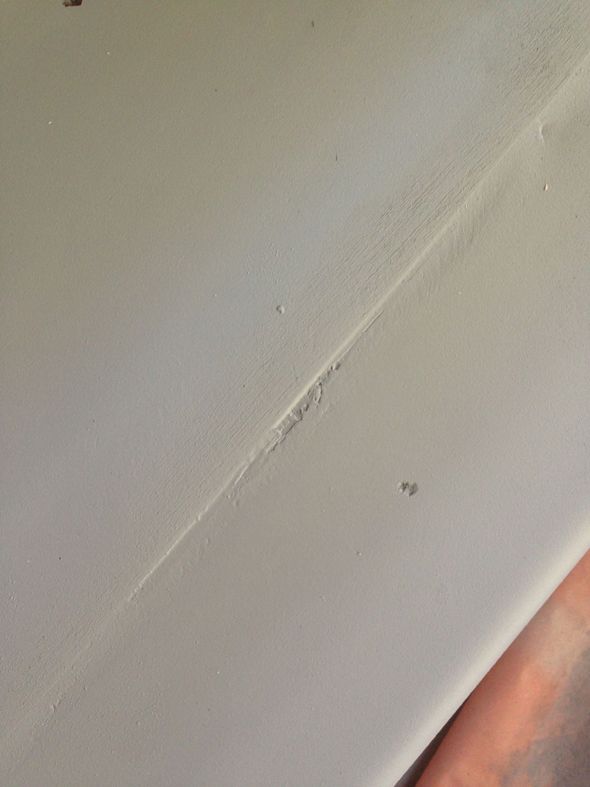
So I caulked and did another coat of Bondo where it was needed and then sanded the whole thing again. (and sniffed and sneezed and coughed the whole time – stupid cold.)
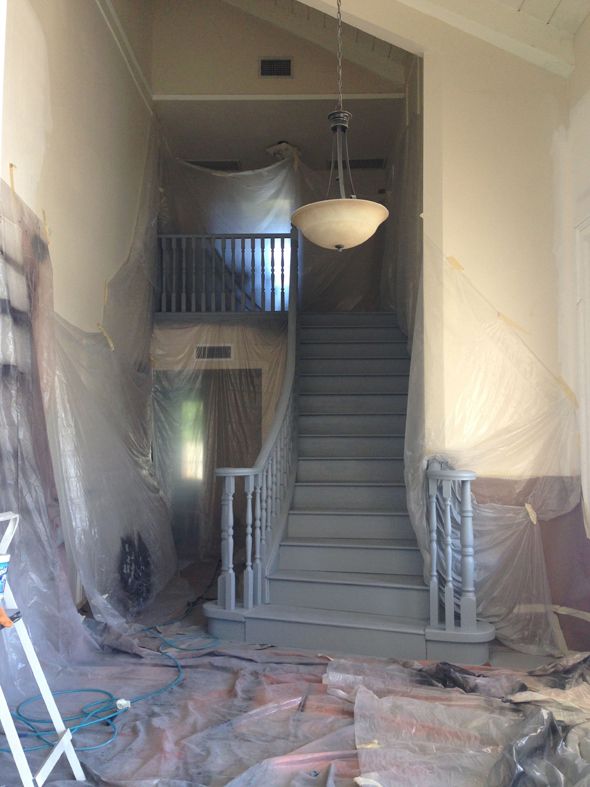
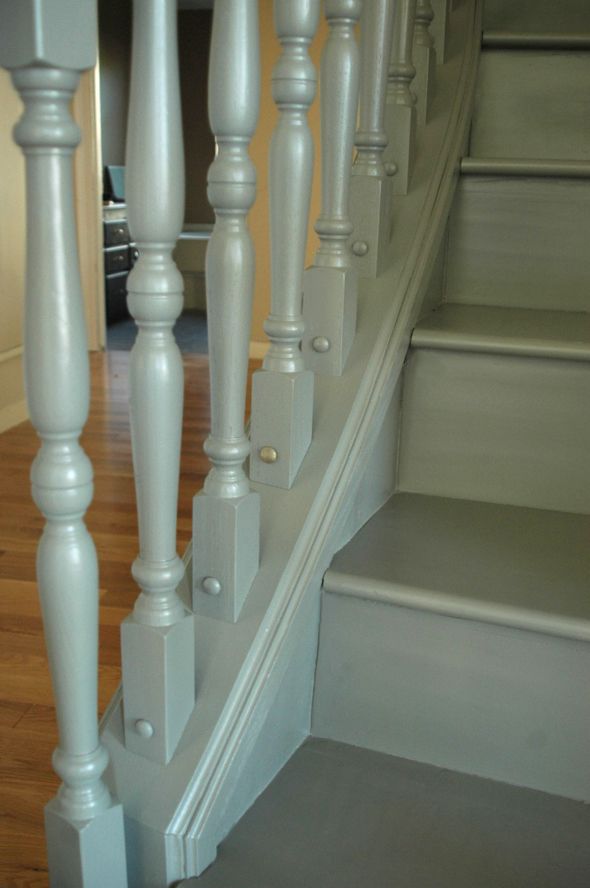
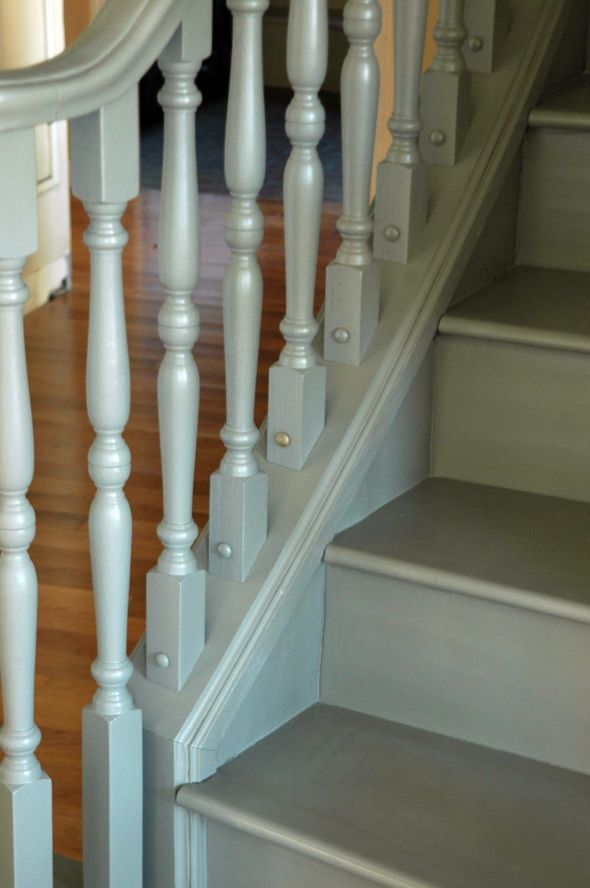
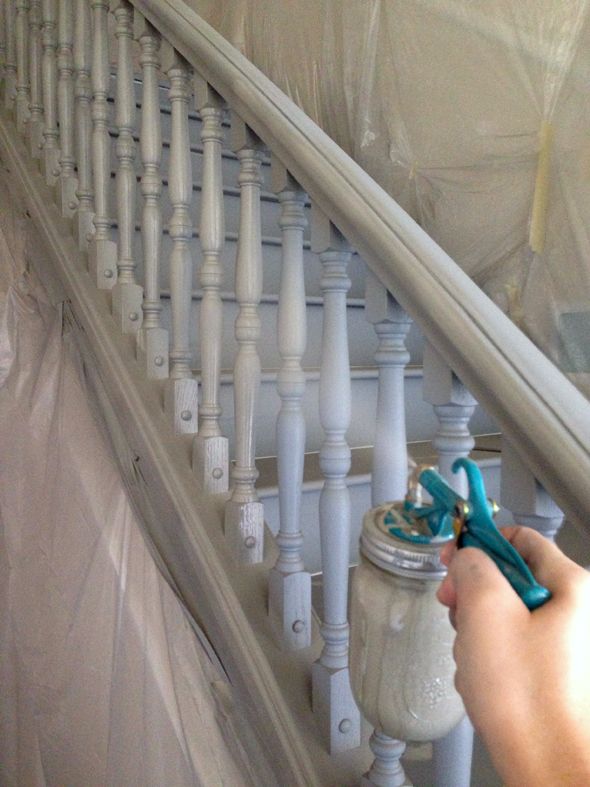
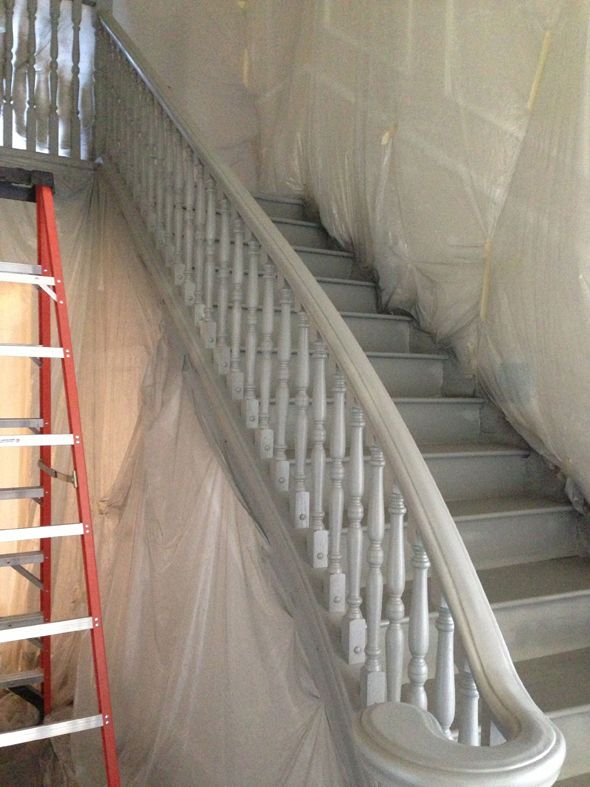
I sprayed a second coat of primer on and then the first of two coats of Benjamin Moore’s Chelsea Gray in the Advance line paint.
The color is light enough to brighten the space a bit, but dark enough to hide dirt perfectly I think.
The treads look almost like solid planks now! I’m so happy with how they turned out. We just saved ourselves a couple thousand dollars by not replacing these oversized treads!
I have no ideas yet for what I’m going to use for a stair runner, but I’m really excited to pick that out next. I’ll be trying something similar to
this tutorial.
Also, on a whim I pulled out one of
my old gold leaf pens and painted one of the round screw covers. The pen was pretty dry so the color’s not very saturated, but I kind of like the look. What do you think of the gold just on the screw covers?
Before I buy the runner I have lots of touch ups to do and I think I’ll paint the walls before installing the runner as well. But at least I’m happy with the direction we are headed in. It was well worth the labor, paint and about $12 in Bondo!


Giiiirl! Those stairs look incredible! But have mercy, what a lot of work! The bondo is a great solution. I love that you decided to spray it all one color. It's such a different look, and for something you know you'll eventually replace, why not try something fun?
I thought you were doing black and white, but grey is interesting too and can't wait to see what you've envisioned for this foyer!
Hi Kelly!
You're right – that is an important part of puzzle. We did NOT use the stairs for the two days I was painting them. We blew up two air mattresses and had the girls sleep in the play room for those nights (they thought it was awesome, of course). The primer coats are dry and ready for recoat in about four hours I think? So I did those two primer coats (with the bondo and sanding in between) on one day and then early the next morning sprayed my first Advance coat and then late that night sprayed the second coat. It was dry and ready for us to walk on the next day. Hope that helps! I would get your kids out of the house for the weekend if at all possible. It's so much work that it's not worth risking smudges! :)
Hi Katie!
The planks that the old owner used to cover the treads and risers were really bumpy and uneven. The edges of the planks were beveled too, so the seams were giant. Unless I go with a super thick carpet on the runner, the unevenness would show through the runner. I'm not totally sure what I want to do there yet and probably won't have it figured out until I start decorating the house (which could be another month or two at this rate). It was extra work for sure, but if I was going to have to Bondo the edges of the treads and risers, might as well do it right and make everything smooth and flush.
xo
Taryn,
Thanks for bringing up the primer question! I meant to address that in the post but forgot (I'll blame the Nyquil that was in my system last night when I wrote the post!).
The guy at the BM paint store said he actually really likes Glidden's primer, which seemed strange to me. The Home Depot guys are always trying to get me to buy the glidden primer too, but I always go with Zinnser. This time I tried the Glidden though and so far so good. It's a little thinner than Zinnser, which worked well for the spray gun.
Worth a try for sure! xo
Vintageviolet –
I need to do some touch up (the painter's tape moved and covere up the old wood in some places), but YES! The critter sprayer did all of this. No brushes used yet. It's seriously my favorite tool to use right now. A little miracle worker! :) Totally recommend.
xo
Wow, I'm speechless! It's truly beautiful! I am amazed at the hard work and the color is perfect! How inspiring ;)
Jenny, beautiful! When I saw the 'after' picture, I was thinking that is her inspiration picture, right? I couldn't believe that was the 'after'! Good job!
You seriously amaze me! What a great job and fabulous results!
You seriously amaze me! What a great job and fabulous results!
Did you know you can attach a shop vac to the back of any sander that has a bag attachment? Just a thought to help you cut down on inside dust ;) lots of work but the stairs look great! You are so busy you make me tired just reading about what you are getting done…
that look is so classy! i was actually wondering if you were still using your mason jar sprayer. that's the coolest thing! and i can't believe it got you through such a big job!
I just can't keep up with the pace at which you are working – and sick too! The stairs are amazing. After all the hemming and hawing I've done about what to do with my white stairs I think I may just have to do exactly this. Gray will really hide the dirt in just the way white and black don't.
Ooh, this colour helps the stairs blend into the rest of the space so much more nicely! Which is exactly what you want, since the stairs are not your style.
Not a fan of the gold leaf on the screw covers though. I think those screw covers are sort of old fashioned and grandma looking and the gold leaf just draws your eye to them. Otherwise, love it!
http://www.fullbellywornsoles.com
Love, love, love those stairs! They look amazing, not sure about the gold "button" covers though.
Love, love, love those stairs! They look amazing, not sure about the gold "button" covers though.
I love the grey paint choice!
I pained two sets of stairs this summer, so I know how much work went into this — yours look amazing!
Can't wait to see what you choose for your runner!
What a lot of work you've done! Very inspiring! Personally, I'm not a fan of the all matching colour – gray on gray with gray treads. I would have loved to see a contrasting colour on the ballusters. Looking forward to seeing the runner you choose!
What a lot of work you've done! Very inspiring! Personally, I'm not a fan of the all matching colour – gray on gray with gray treads. I would have loved to see a contrasting colour on the ballusters. Looking forward to seeing the runner you choose!
I love the gray!
I think that it looks awesome! I completely understand why you did all one color; being able to spray it must have been such a time saver! And you can add as much as as little contrast with your runner! Smart choice!
whoa!!! that's a transformation! and a good way to save money!
I love how your stairs look! We have carpeted stairs in our home and I'd do anything to have simple wooden treads (carpeted stairs are kind of a nightmare to clean). I actually really like the gold on the screw covers. It makes them look more like they're a special-order bolt you used instead of the old-fashioned wooden screw cover it really is.
Love the way the stairs look. Two thumbs up on the gold screw heads. Gives them a little bit of interest. You can always paint them back if you don't love it.
This is absolutely stunning… i can't believe how amazing this looks!…. you are not afraid of hard work… how can I catch that bug? Love the gold on the stairs… (breaks up the gray a tiny bit) You are so fun to watch create… thx for inviting us in. Also love chelsea gray… almost picked it for my exterior paint color but went with BM secret instead. Get better quick.. i check your blog obsessively lately hoping your energy will inspire me.
I love how this looks. What a great way to tide you over for now. I do prefer the stairs without the gold, though.
Wow the stair case looks amazing! I went back & read the tutorial of the stair runner & this is something that I am going to do over the winter to the stairs leading to the basement.
The best mornings are the mornings when I wake up to an LGN update! I am eating up the content on your blog these days. It's so fun to watch you transform this space! The stairs are gorgeous – Bravo lady! The amount of physical labor you put in each day, in addition to raising your 3 kiddos and keeping up this blog literally blows my mind.
That is a serious undertaking but the results are worth it- they look great against the floors. Can't wait to see the runner you pick out!
Such an amazing difference. Well worth all your hard work.
I have a super important question since I'm in the midst of a staircase remodel as well. Did you not use the stairs during this process? I really want to paint our stairs but we need to use our stairs to go to bed at night! Wondering if I should plan to do it when the family is away for a weekend and just sleep on the couch. :)
I love the touch of gold. Go for it!
You are amazing. WOW. Those stairs are gorgeous.
I would say YES x1000 for the gold buttons on the stairs and to use gold accents in different places… classy.
So amazing! Love the color – and the touch of gold – can't wait to see the runner – Do take care, though!
Yes to the gold!
You are amazing. I cannot believe that you did all of this yourself. It looks so good. I love the color and I think the gold on the screw covers is a nice detail.
You are Superwoman! I've always been impressed by your energy and stamina but this surpasses everything! I can't believe how sophisticated it looks now. Wow…it's beautiful now!!
Also…I like that small touch of gold because it's like a touch of jewelry was added.
These tips are great and your stairs look awesome after painting, gonna use this very soon. Great work
Wow, I never comment on anything but that is an amazing transformation!!! Looks fabulous.
You astound me with every post. Well done! They look absolutely fantastic! The gold is beyond amazing. Yes!!!
Looks good! BUT I think the risers should be white.
I couldn't love the "after" more. You are always thinking outside the box. I have a very similar stair situation and I was anticipating a two toned paint choice… the all over gray surprised me but I really love it. Just gorgeous.
I couldn't love the "after" more. You are always thinking outside the box. I have a very similar stair situation and I was anticipating a two toned paint choice… the all over gray surprised me but I really love it. Just gorgeous.
Please forgive my ignorance, but why did you go to the trouble of bondo-ing/sanding/bondo-ing/and sanding again if you are just going to cover it with a runner?
The stairs are beautiful! I can't believe how much difference the Bondo and paint made.
I gasped! Amazing job!
Do you also use the Advance primer? I've used the Advance paint line on a few furniture pieces that get heavy use and have had a few chips appear after only a short time. I'm wondering if using their primer would help that — currently I'm using Zinsser.
Loving all that you are doing with the new house — what a fount of inspiration for your readers!
You are just crazy inspiring, Jenny! Another vote for the gold! Feel better!
Jenny, you are AMAZING!!! I'm sick too and in the middle of a home renovation and couldn't possibly muster up the energy to do that!! Looks great!