This weekend’s give away is a great one. Legrand is expanding its North American presence and has a wonderful line called adorne, featuring truly beautiful and well-designed light switches and wall plates. It amazing how doing something as simple as swapping out a light switch and plate for something special can really elevate a room. Design is in the details!
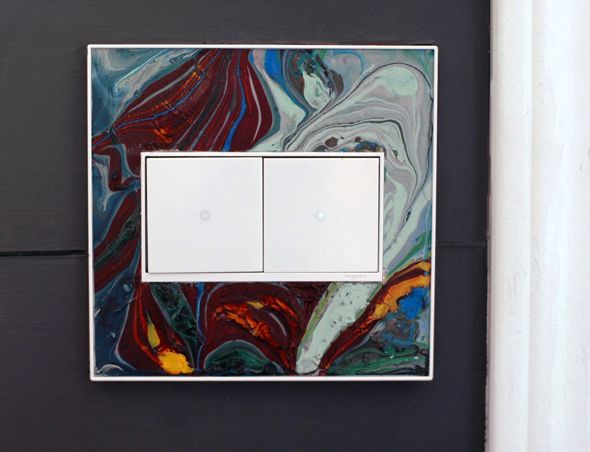
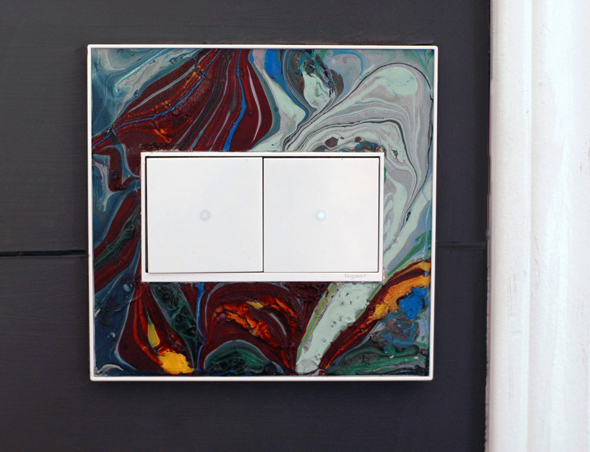
For our mudroom, I chose to replace our old school double toggle switch with a double sofTap switch. You can choose other switches that operate with motion sensors (walking by or waving your hand in front of the switch), whisper switches, dimmers, remotely-controlled smart switches – they’ve thought of everything. I liked the extra clean look of the sofTap and I love that there’s a tiny little light that very softly illuminates the switches when they’re off, which is shockingly helpful for supporting my midnight snack habit.
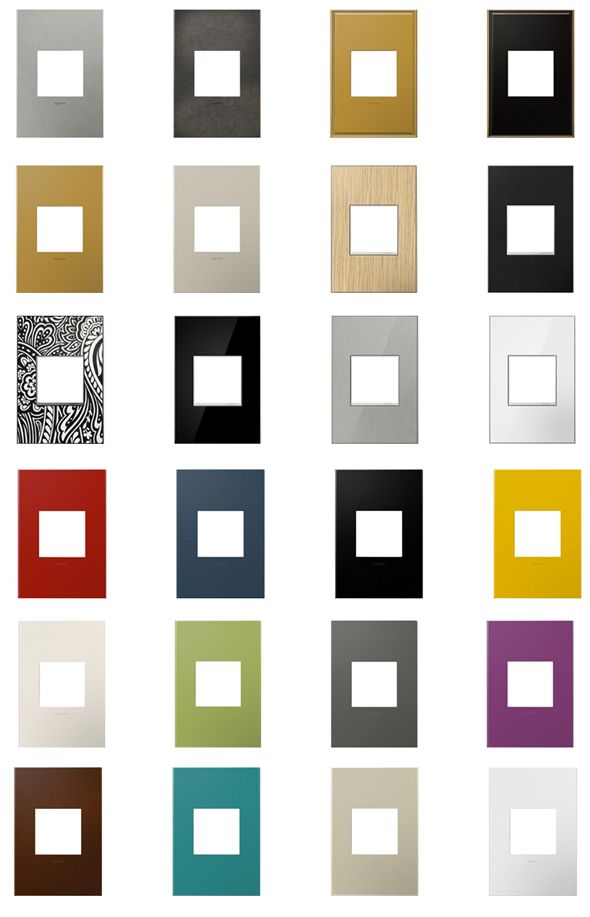
They’ve also covered the gamut of wall plate possibilities (above). You can go glossy modern (like the white I have in this post), mirrored, metallic, leather, all sorts of colors, or the customizable option I used here in the mudroom. That option comes with a paper mat template that you can use for wallpaper or any art project you want to create. (The tutorial for the marbled paper is after the jump.)
To enter to win a $200 shopping spree with adorne, visit the site and choose your favorite switch and wall plate combos. (PS This video really helps the switched come to life – worth a watch!) Leave a comment on this post with your choices and where you’ll use your new switches. Contest ends Friday August 16 at midnight. Winner will be emailed. Good luck!!
And don’t forget to click through for the marbling tutorial…
I’ve been dying to try a marbled paper DIY for a really long time. I LOVE marbleized anything so this felt like a natural choice for my customized wall plate.
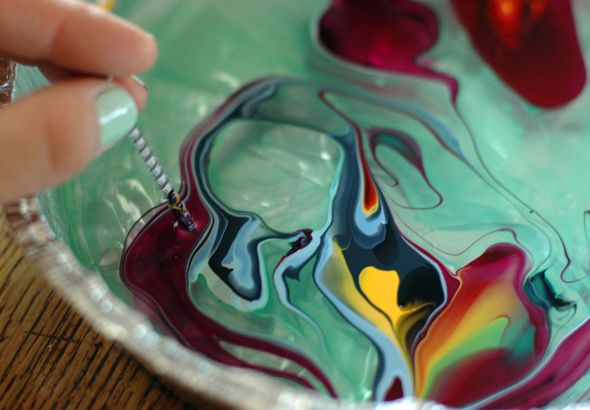
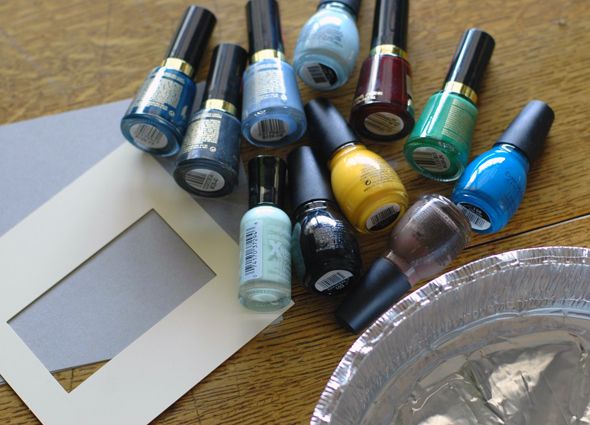
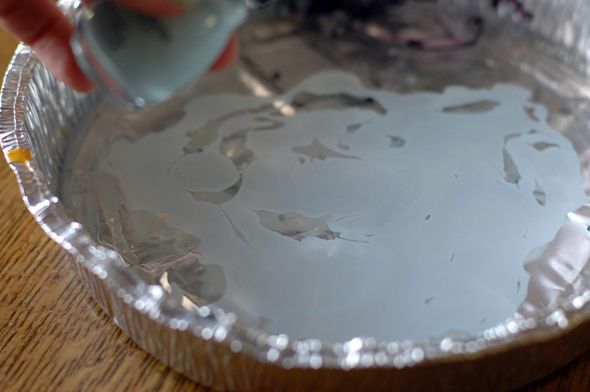
You’ll need: a variety of nail polish colors (try the dollar store or CVS is having a 2 for $3 sale right now on some brands), water, a disposable container that’s bigger than the paper or item that you’re marbling, a toothpick or anything long and pointy (I used a long screw because our toothpicks are still packed away :)), paper or whatever you want to marble and a place to dry the items (I used a drop cloth). Also, you might want gloves, as my messy hands below will demonstrate.
By the way, I think most anything can be marbled with nail polish – the possibilities are pretty endless. Flower pots and vases, finger nails (obvs), picture frames, jewelry boxes, chair legs. There are lots of tutorials floating around the web that show all sort of cool ideas. I loved this one on Design Mom.
So, to start, fill your container with a bit of water. If you’re marbling paper, you’ll only need about an inch of water.
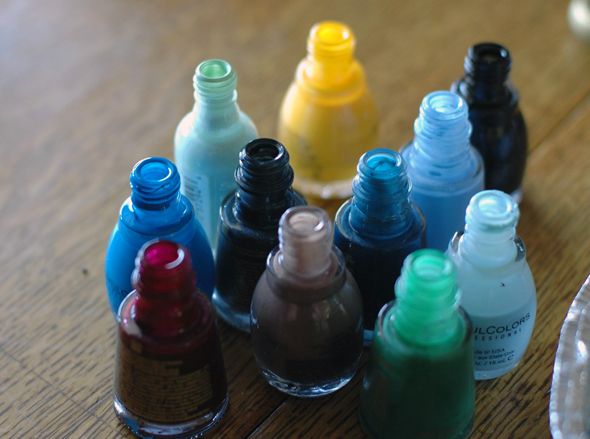
Take off all the lids to your nail polish to make the process go faster. You’ll need to work pretty fast so that the polish doesn’t start drying.
Pour your colors in rings, one on top of the other. There’s no right or wrong way to do this. Just pick colors and pour. If you pour slowly, the nail polish shouldn’t sink.
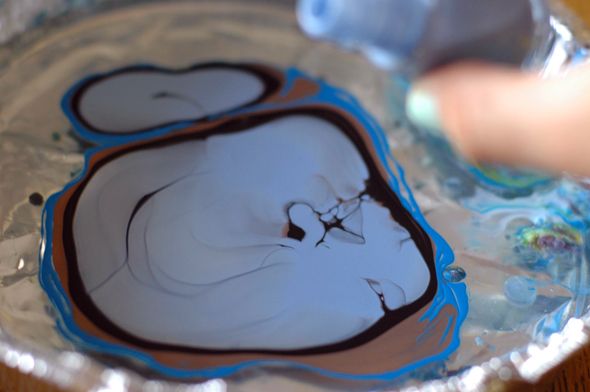
After pouring your rings, use a toothpick (or a screw) to pull the color. You’re not mixing it – you’re just going to move the colors around gingerly. Don’t over-swirl and don’t take too much time to do it.
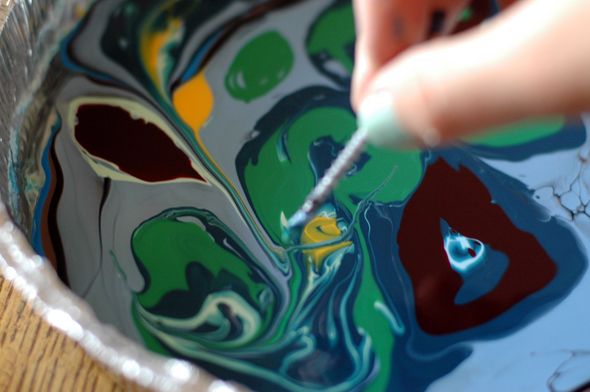
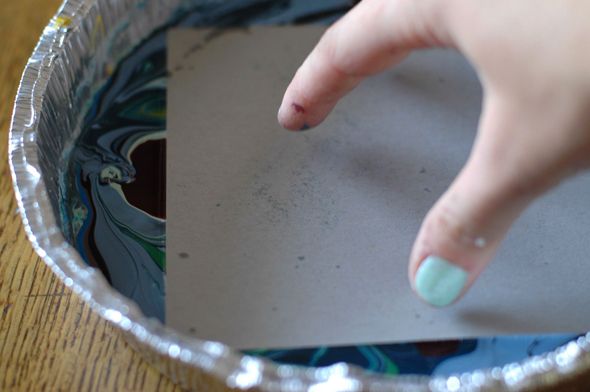
Then drop your paper onto the pattern, press softly to make sure the surfaces fully connect, and then pull off the paper and flip it around quickly but carefully to make sure the paint doesn’t run. And then put it down to dry on your drop cloth.
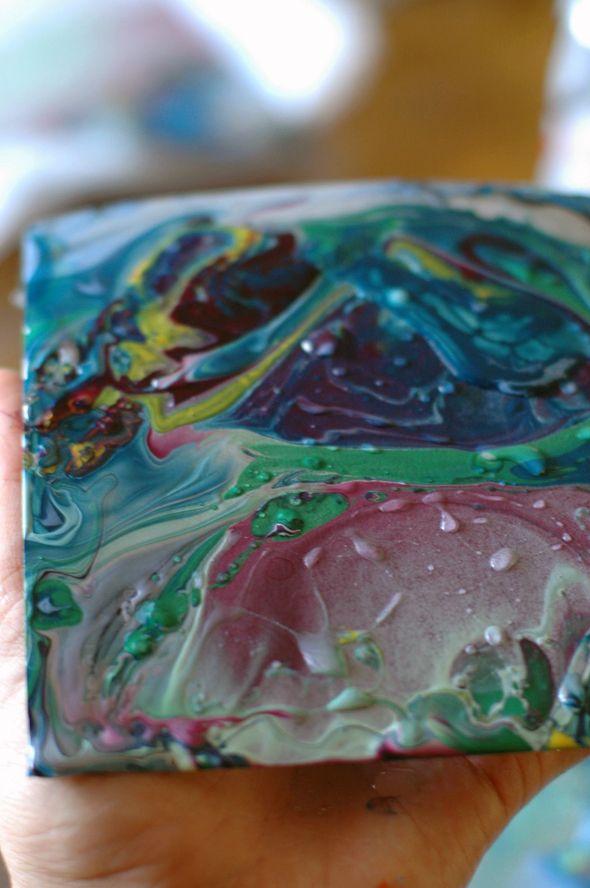
Now, don’t swirl again – the new pattern will be soft and completely lovely, so just get your next paper ready and dip it. I got at least three dips from each round of pouring. And I usually ended up liking the second or third papers the very best. The paint will be thinner and more dreamy-looking.

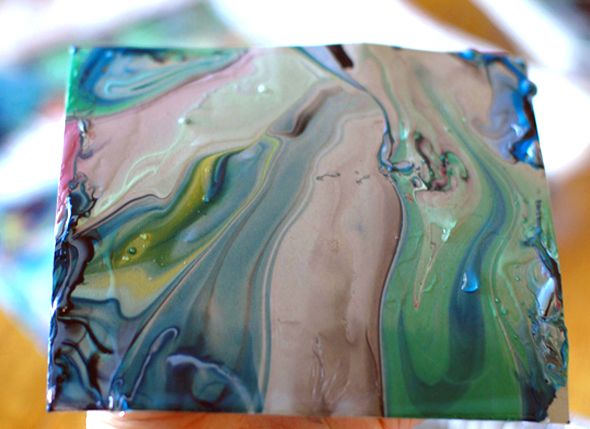
I ended up doing three or four rounds of paint pouring (I’m swimming in marbled paper if anyone wants any:) ), but these were the ones I like the best for the switch/wall plate application. I had to pick ones that had more interesting perimeters since the middle was going to get cut out for the switches.
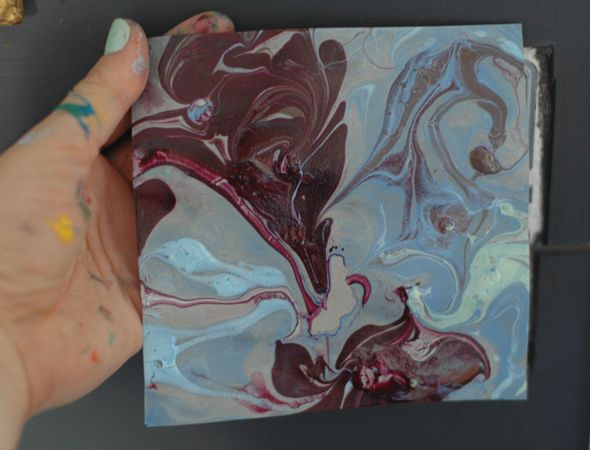

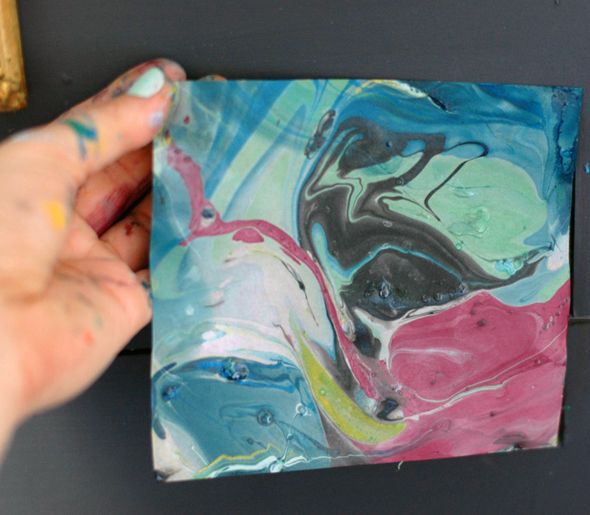
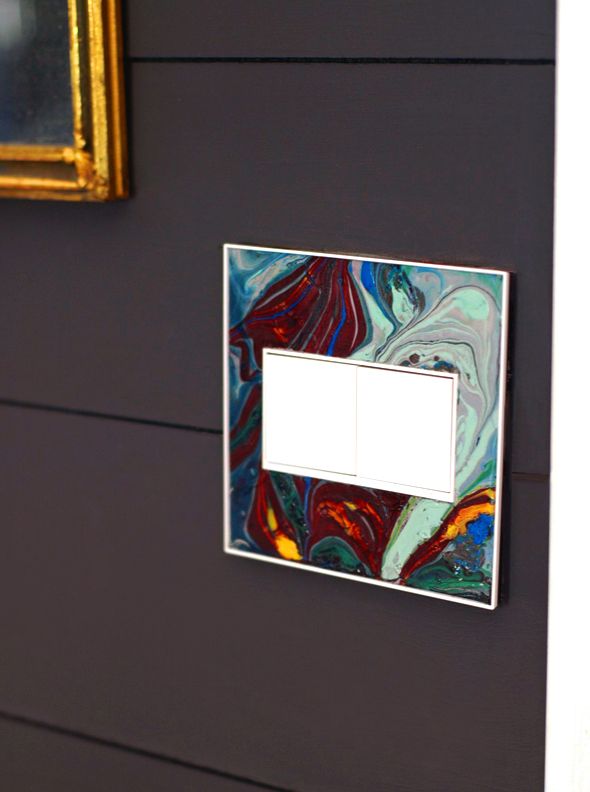
I ended up going with a darker pattern because I liked how it looked with the wall color.
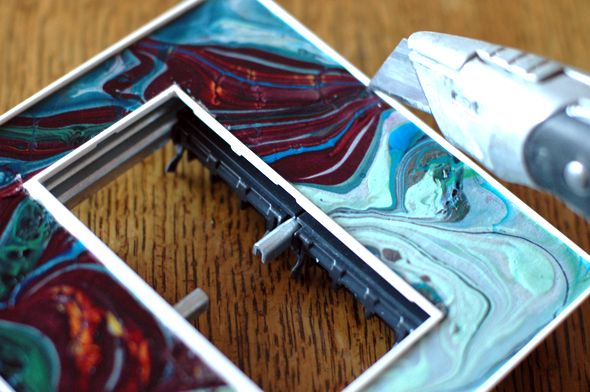
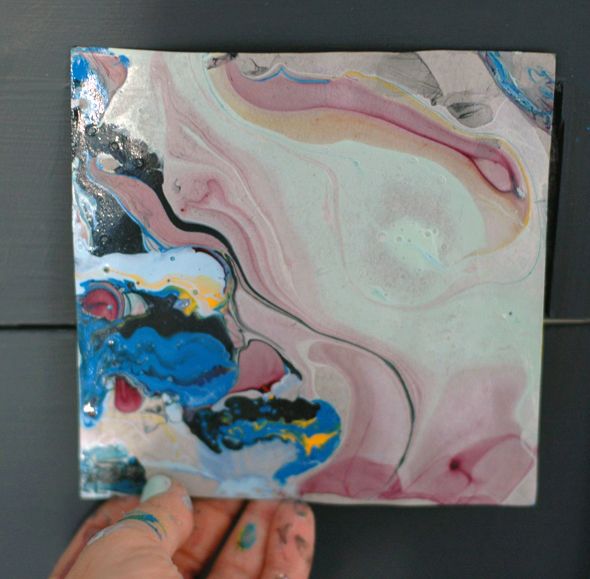
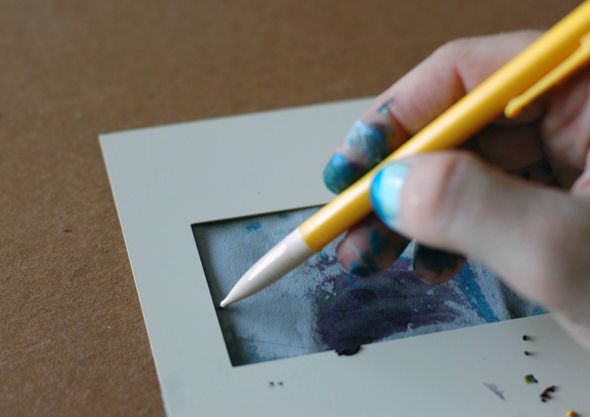
The customizable wall plate comes with a paper template that I used to trace out the hole for the switch.
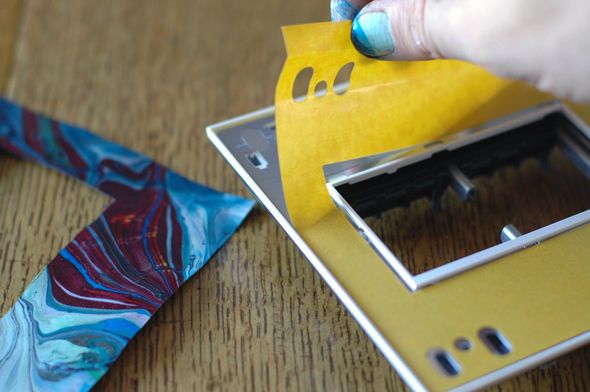
You just remove the sticker on the plate to expose the adhesive and then place your art paper.
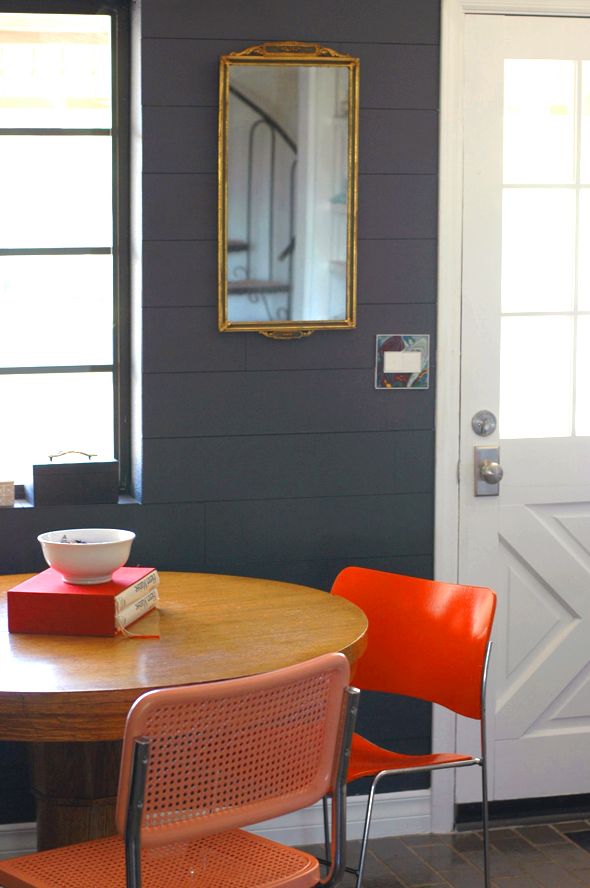
I really love how the wall plate turned out. It looks so pretty with the orange chairs. :)


The Dark Burnished Pewter, 1-Gang Wall Plate with the soft touch switch would be perfect in our newly remodeled kitchen (last piece needed to complete the look!)!
I love the customizable option with the soft touch switch! I looooove the project you did! It's beautiful!
Gloss White, 2-Gang Wall Plate with Two Paddle Dimmers, 700W, Incandescent / Halogen. These switches are beautiful but pretty costly if you want to update an entire house.
I think I'm going to marble an old light switch for now ; )
Gloss white with the Wireless Master switch. So cool. Didn't even realize those existed.
Gloss White, 2-Gang Wall Plate with Two Paddle Dimmers, 700W, Incandescent / Halogen. These switches are beautiful but pretty costly if you want to update an entire house.
I think I'm going to marble an old light switch for now ; )
Jenny! This is so cool! LOVE the marbled look! I actually posted a little shout out to you today. :) xoxo
http://www.astoriedstyle.com/index.php/2013/08/from-closet-to-laundry-room-plus-500-home-depot-gift-card-giveaway/
I love the glossy white wall plate with the soft touch switch. These really are beautiful!
I only wish the customizable cover that you made came with a clear cover to protect the paper.
I love the white softap light with a bright-colored wall plate in an accent color for the room – the honey-colored one would look GREAT in my bedroom!
In other news, that pop-out outlet is pretty awesome, too!!
Really, Jenny, you never do fail to amaze. I think id love just what you've chosen and attempt to copy it myself.
Gotta go with wave switch in gloss white in our new kitchen/hallway!
This giveaway comes at a great time. We have to replace ALL the switches and electric sockets in the whole house. My husband and I are bemoaning the cost. We like the basic soft tap with the glossy white plate the best. Neat design! *fingers crossed*
I love this, I am going to give this a try on something!
{www.thepinkzipper.blogspot.ca}
These are great. I think I would go with the whisper switch and plate in white. I've got several places in my house where I could use new switches and outlets because I just painted. But my half bath needs it the most. It currently has 2 switches and 2 plugs all on one plate.
Wow- Loving the idea of the sofTap Switch, Wireless Remote for our living room – we could have a switch at both entrances to the room!
Also I like the sofTap Switch – because it looks so clean!
The French Oak plate also looks pretty modern – I would choose that or the gloss white- they look great!
Oh wow! These are great! I would probably go with a white paddle switch with a brushed brass cover plate in my living / dining room. Might get a little more adventurous in the kitchen. We're right in the middle of redoing an old fire station, and it would definitely benefit from shiny new devices!
Wow! Every single time!! Love it! My favorites are the stainless!
Love the soft touch and glossy white plate. These would look good in just about any room in my house, but would probably start with my living room!
The Sensa Switch manual in auto off would be so great in a bathroom!
Brush stainless steel with the paddle!
Would love to upgrade our NYC apartment…
That marbelized paper is out of this world awesome. It looks like actual stone. I can't believe you did that with nail polish, you magician, you.
http://www.fullbellywornsoles.com
I hate ugly switches!
sofTap Switch Brushed Brass
couldn't find the custom option…
I hate ugly switches!
sofTap Switch Brushed Brass
couldn't find the custom option…
That looks so pretty with your dark walls!
I like the timed sensa switch and the custom plate.
Your post is so timely! Tonight I was looking at the entryway of the apt we are moving in and thought that the 1st thing I want to do is to change the ugly light switch! I really want to try to do your nail polish marble one – love the idea and the look! SoftTap switch would be awesome!
These are awesome! And I love the marbled paper technique! Push Button switch, with the brushed brass 1-gang wall plate!
Would love to upgrade to a Touch Dimmer, Wireless Master (my house is full of dimmer switches) or even the sofTap Switch, Wireless Remote paired with the Gloss White 1-Gang Wall Plate.
These are awesome! And I love the marbleized
paper technique! Push button, with the brushed brass 1-gang wall plate.
I'm a fan of the classic look Brushed Brass plate, but love the modern SensaSwitch with the auto-off… then my husband won't have to come in the room after me and turn off the lights!
Love the sofTap switch with just the gloss white plates and the two paddles dimmers. Love your marbled plate!
These are so awesome! I had no idea something like this existed. Would love the Gloss White with the Wireless Master switch
I love the Touch switch with the Custom plate. Your marbelized paper version came out so good! I'd probably try to do something similar if I won. :)
I like the brushed brass plates. I'd out them in the living room and office!
Whisper with the moss gray!
I am digging those GFCI outlets! We need to have some installed in the kitchen and bathroom, since none of our outlets are GFCIs. :P
Oh boy, these are beautiful! A cherry red 4-gang plate with paddle switches would be just the thing for my entry way!
So many great choices! Custom Wall Plate, 1-Gang, Magnesium Trim and Wave Switch in silver.
When is your book coming out?!
I love the French Oak /wthe soft touch. I'd used it for my basement reno.
I'm a sucker for simplicity. Love the paddle switch and gloss white plate!
These marbelized ones are so cool! I love the satin bronze plates too, with the sofTap switch.
Paddle switch with aged brass! So beautiful. There are so many cool things on this website.
I love the wave switch on the brushed stainless steel plate!
Love! I already loved the plank walls, but that marble plate is just fantastic. I think the Brushed Stainless 3 gang wall plate would be perfect for our living room with the sofTap Switch (what fun technology!).
I'd choose the wall plates according to the different rooms in my house. I don't think I could pick just one!
Would love the antique bronze wall plate with the Paddle switch.
love the SofTap option! I have an unhealthy obsession with that pale grey blue color so that would be my choice. It would be perfect for my bedroom!
These are amazing! We are building a new house which is in a race to the finish with my due date for our first little baby due Nov 30th. I would LOVE to have the customizable plates and whisper switches in every room of our house for a clean and modern look. Would love to upgrade the regular switches the builder will use for these gorgeous options! Might have to splurge on just the bathrooms or bedrooms if I don't win this contest :) Thanks for the great post!
Really inspiring. Thanks :)
I would go with the touch dimmer wireless remote in turquoise blue. Our living room is longing for colours.
So so neat! I love your plate. If I were to win, I'd shamelessly copy you and marble away. I love the soft touch feature.
Love the switch plate – My daughter is sourcing her nail polish stash now to try the marbling! :) Love the giveaway – I'd change out our hall switches & plates (to encourage turning off the light!) with the adore Soft Touch Switches and the Custom 1-Gang Magnesium Trim Plates. Love adore and LGN!
My husband and I just bought our first house and it needs some seriously upgrading! These switches would be perfect if we could install them everywhere – but we might start with the entry. Love the SensaSwitch for an entryway!