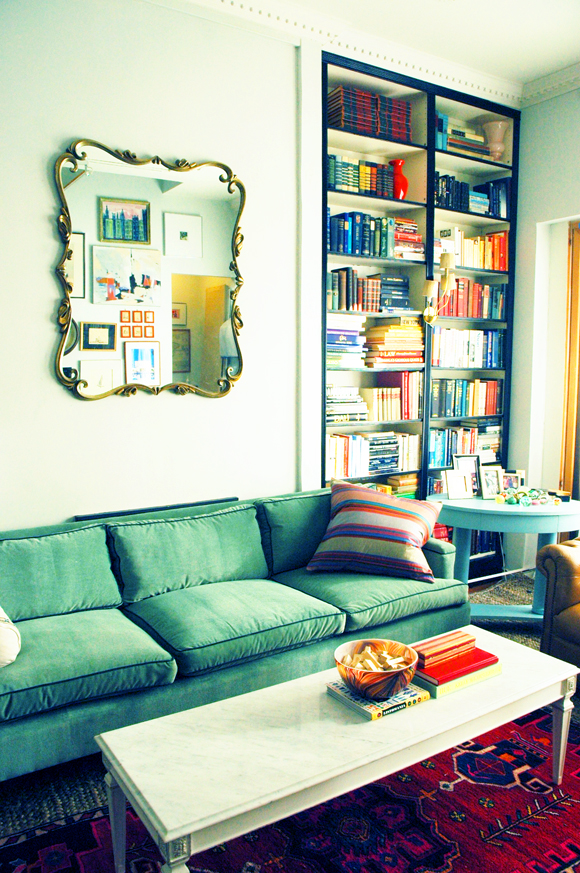
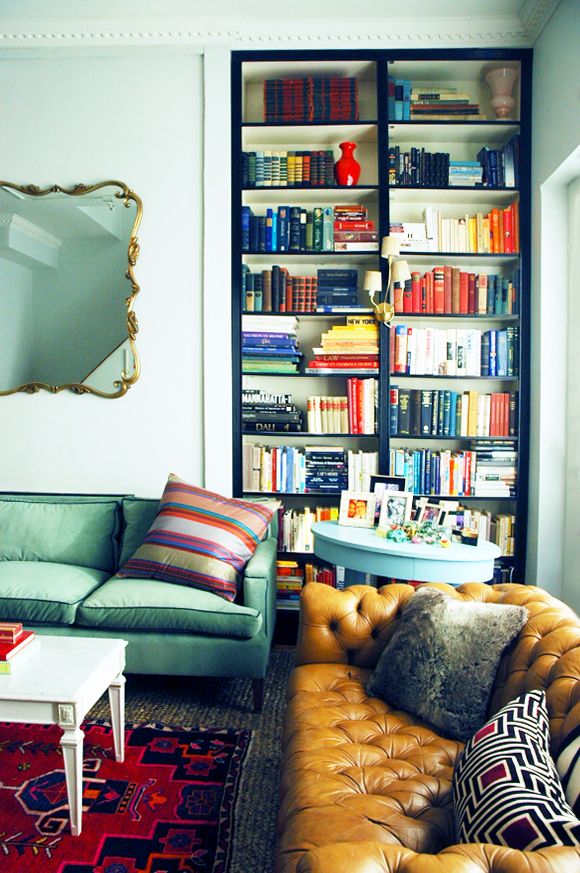
I’ve always loved the way that books make a home come alive. When we were planning on where to put all the books from our office in the loft, there was only really one place to put the Billys – the living room. So we bought four more sets of the extender shelves and spent a few days last fall “building in” our IKEA bookshelves.

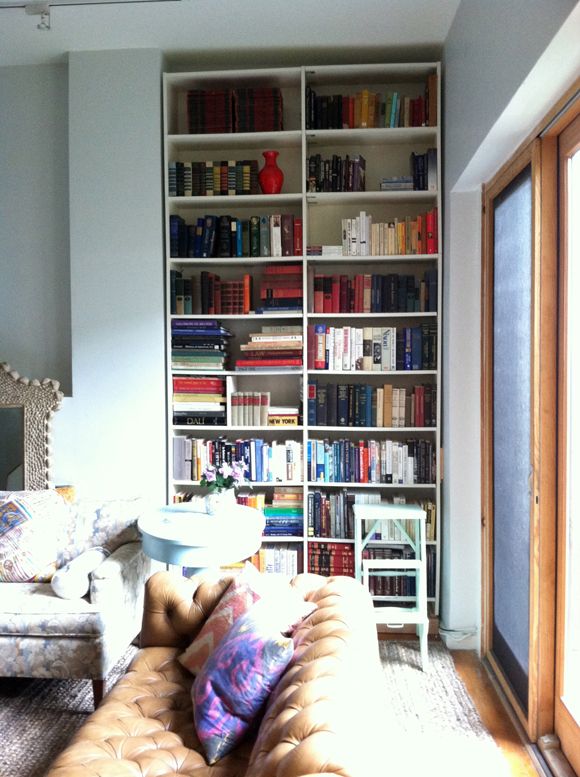
Here’s how the space looked on move in day. It looked like a giant H to me.

I love it all so much more now. That nook was the worst! Ready for all the details on how we filled the nook and built up and in the Billy bookshelves?


We all signed the inside of the wall. :)

Drywall was marked with chalk tape and cut with a razor blade knife.

And the first pieces went up and we happily said goodbye to the nook.

Once the drywall sheets were screwed into place, we taped the seams.

Then we went over the drywall and the tape with joint compound.

Meanwhile, after “wet sanding” the joint compound with the big grout sponge, we also started the crown moulding. Also, I’d love to point out the obvious here – that we should have taken down all the books first. They were a dusty mess after all the work we did! I just didn’t really have a place to put all of them before we started. I told you this was a spur of the moment project!

Probably my favorite part of the project was the footing of the shelves. Like I said, we sat the bookshelves on three 4x4s running lengthwise. This gave the bottom a lot of height.

Then we framed out the whole bottom with 2x8s, which gave the bookshelves a really chunky base and made them look less IKEA I think.

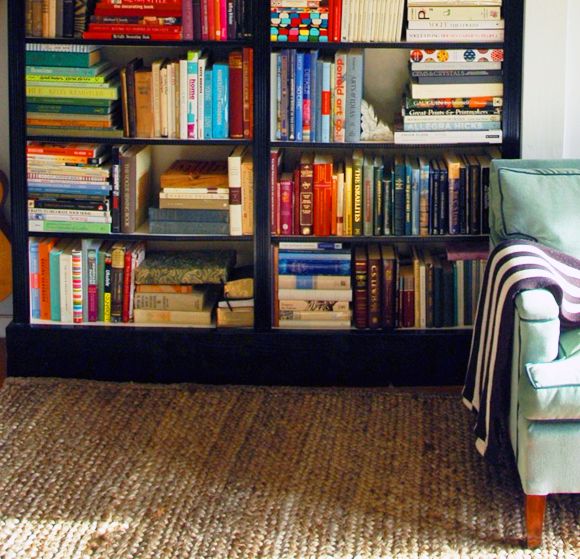
For the face of the bookshelves, we found this great small moulding at Home Depot too. We measured and cut everything to size and then sprayed it with a black gloss enamel.

It was so easy to add the moulding with my brad gun. We used thicker stripe moulding for all the vertical lines.


And also, to make a sofa back table to help hide the fireplace a little more and to hold a pair of lamps.


Looks gorgeous Jenny! I've just done a bit of a project with a client where we used her existing Billy shelves to make a reading nook around her sofa. I love your moulding though – perfection! xx
Anna (My Design Ethos)
I love that everyone signed the wall behind the nook, in the future someone will love to find that! Interior archeology.
Fabulous! Loving the black trim with the white. Love those hard working dyi parents!
This looks wonderful! I can't wait to own my own home and be able to do projects like this. One of my dreams is to have floor to ceiling bookshelves someday. Thanks for sharing this!
Margeaux
margeauxknight.blogspot.com
clever! they look great, jenny (+ parents:). looking forward to seeing the sofa table/lamps addition. xx
Wow-that's a big room! I love the shelves. The black trim looks so good in there and overall they look much more expensive/custom than ikea shelves.
This looks incredible. I might be hacking this same project. Loving it!
This came out so great, Jenny. What a huge impact!
The crown moulding make such a great impact! I love this living room!
A fabulous job Jenny and family! I just Love it!!
wow this looks absolutely great! i am always amazed by your DIY's :)
Molly – http://dreamsinhd.blogspot.com/
Do you find that the shelves of the BIlly bookcase sag? I had some cheap IKEA bookshelves that I had to ditch because the shelves sagged and it looked horrible.
First it was those arches you added in the loft, now this amazing built-in look. You are the Billy master. The living room is looking gorgeous!
Those book shelves look great. I need to get back to business on little projects around the house this year.
Really beautiful! You guys never cease to amaze. What a genius way to add character.
Those look amazing. I need to get to upgrading my billys.
I can't believe the amount of stuff your landlord let's you guys do! It obviously increases the value of the home, but geez, my landlord would never let us make changes like this. Maybe it has something to do with you being a super talented interior designer. ;)
Where is that amazing mirror from!?
Jenny, we've got a similar set-up in our apartment, right down to the H and the nooks! You can see it on our house tour here:
http://gallery.apartmenttherapy.com/photo/lauren-kevins-house-tour/item/377276
I can't wait until we finally own property of our own so I can try out the Billy built-in look!
That room is really coming together, nice work!
@Grace, we have four sets of Billys at our place and after two years, some of the shelves are starting to sag a bit (nothing extremely noticeable). When I saw that, I made sure to reorganize the shelves to try to distribute the weight of the books a bit more evenly and intersperse objects and frames between heavier titles.
Thanks Lauren!
Tell your parents they're welcome at the Clark house anytime! I've got a long list :)
Covering up the nook was the best move yet!
Amazing! I think nothing adds life to a home more than books. I love that you painted them black, too.
Gorgeous room, I'm always so jealous of your layouts and colour. Beautiful :)
Beautiful transformation, it doesn't even look like the same space! Your shelves are always one of my favorite projects of yours. :)
As always, amazing job. I am in love with all the colors and tones in your living room. Beautiful!
Um can you and your parents come to my apartment and do this? Seriously, this is gorgeous. It's like a mini-rental version of the library in Beauty and the Beast. ;) It's amazing what you've done to the place (and that your landlord is so cool about it!)
this looks so great! And I love that you hid your fireplace. They're beautiful and wonderful in many rooms but such a waste of valuable wall space in others.
Wow this ought to be the best Billy hack I've ever since. I love that you added painted mouldings and trims around the built-in. We also put together a wall-to-wall built-in based on Ikea Billy bookcases in our basement, but it seems so amatuer work compares to yours.
Hey Jenny-
I was planning on building a bookshelf in this super-odd nook in my dining room, and I was hoping to top it off with some dentil trim. I was hoping that you might give a closer look at the crown/dentil trim combo that you used, because I haven't really got a clue and I love how yours looks. Pretty please?
This is just so inspiring! Thank you for breaking down your DIY's. As my family & I are on the hunt for a new house when I now see those awful TV nooks over fireplaces it gives me hope I can change them! Thanks again.
Jenny – is the fireplace totally nonfunctional? Why did you decide not to wall it up when you filled on the nook? Just wondered….
Hi Grace!
The sagging situation is one thing I forgot to mention! Thanks for asking!
So, we've had these Billys (or at least two of them) since 2007-ish? And they've always held lots of books. I noticed in the loft that the shelves were starting to sag a little. And when we took on this project here, I meant to replace the worst offenders (you can buy new shelves for $10 at IKEA). I also had a thought that flipping them upside-down would be an option.
Anyway, I think the black moulding makes the sag less noticeable than the white edge, but it's still there. I don't mind horribly though, and for the price, I think it's worth it. It would have cost me thousands and thousands to pay my guy to make a wall like this out of furniture-grad wood, you know? Still might replace those shelves down the road though!
xx
Thanks for the advice! I did not know you could buy replacement shelves. I'll keep that in mind.
ABSOLUTELY FANTASTIC!!!!
jtc – The fireplace smokes badly I guess. The previous tenants had it serviced, but it still wasn't in the best working order. I covered it up because it wasn't pretty at all (including the hearth) and I didn't want the focal point of the room to be the TV we'd be forced to hang above the fireplace if we'd left it uncovered.
If it had been an original, pretty fireplace, I would have kept it out though. I love most fireplaces :) This one just looks very 70s to me.
xx
you are so amazing!!! what an incredible transformation. I'm always wowed by what I see on your site!
I love that this was just something you decided to do "on a whim"! I would think about this project for months deliberating over colors and timing and "how on earth am I going to get to Ikea!". The end result is absolutely stunning (as usual). I also love that your version of just quickly unpacking books to get them out of the way results in incredibly beautiful styled shelves. You are truly talented, my friend!
I have been following your blog ever since someone sent me a link following my own unexpected home birth experience! This project is fantastic – I already copied your first Billy Hack, and now I'm itching to check out trim options. That black trim on the shelf fronts looks amazing!
Also, was it just an amazing stroke of luck that two Billys happen to fit that space perfectly? That's amazing.
Why not just do a moulding/trim border around the mirror and leave it there. The fluid lines work so well with all the other straight lines you have going on. Would make the mirror more substantial/or the wall less substantial, I suppose. When you add a table and lamps below . . . .
That looks fabulous! And the black is such a great statement.
Amazing tutorial. The shelves look amazing, and I hope I would have reason to do something like this someday. I was thinking sofa back table behind your sofa, so I am not surprised you were already thinking that! The room is looking beautiful.
Looks great!
I am so just incredibly jealous of how beautiful you make a space. I wish I could afford to have you come to Virginia so you could make my whole house fabulous. I am also willing to place myself up for adoption if it means I could just live in that living room. :)
Wow!! What an absolutely amazing transformation. These look gorgeous. I would never have thought they were Ikea bookcases.
Ruth
Whoa that is amazing.
I also love, love, love your paper weight collection on the side table.
THIS IS THE COOLEST PROJECT I HAVE EVER SEEN YOU DO. This is flat out amazing!
I like your idea of using substantial trim on the base-it really gives the bookcases the look of custom build ins. Great job Jenny.
Looks fantastic Jenny. Just wondering what size your billy bookcases are in width?
Thanks
Tarnya x
What a perfectly timed post Jenny! They look fantastic with the chunky footing. Currently trying to find a solution for my own boxes of books. Have you read The Perfectly Imperfect Home by Deborah Needleman? She also talks about how to organise books. Would love to hear your thoughts!
Morgan (http://theretrosmith.blogspot.com.au/)
What are ur thoughts on using polyurethane dentil crown molding?
http://reviews.homedepot.com/1999/100011966/fp23500-7-8-in-x-5-7-8-in-x-8-ft-primed-polyurethane-dentil-crown-moulding-reviews/reviews.htm