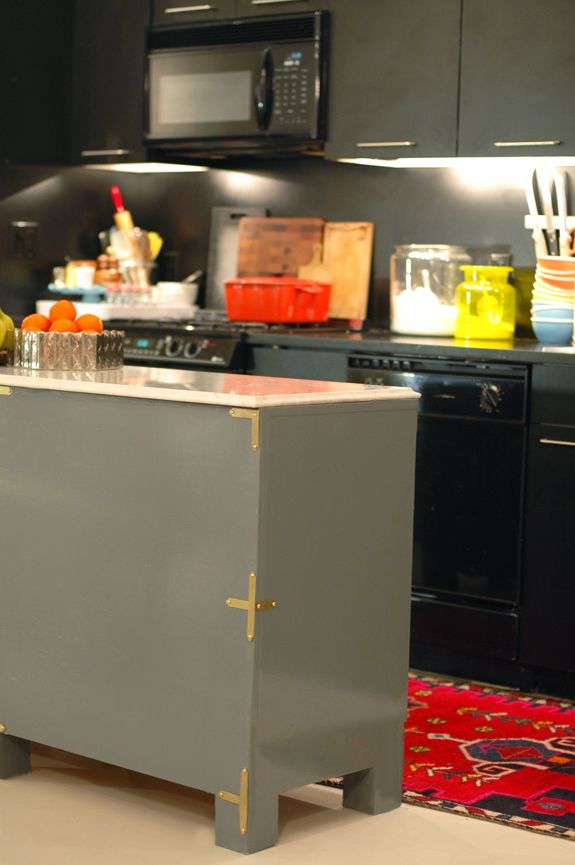
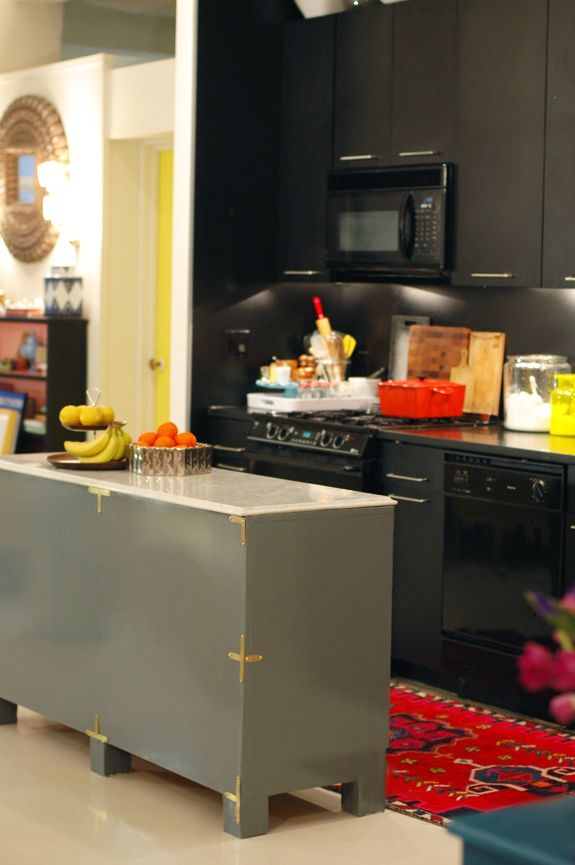
I was really happy to use an antique dresser as a kitchen island in our apartment for the last year and a half. It’s worked really well. My only complaints were that the dresser was a couple inches too high and the drawers were a little sticky. When I found some replacement dressers for our bedroom, so it was time to try the DIY I had been dreaming of for months and I wanted to do the project for as little money as possible.

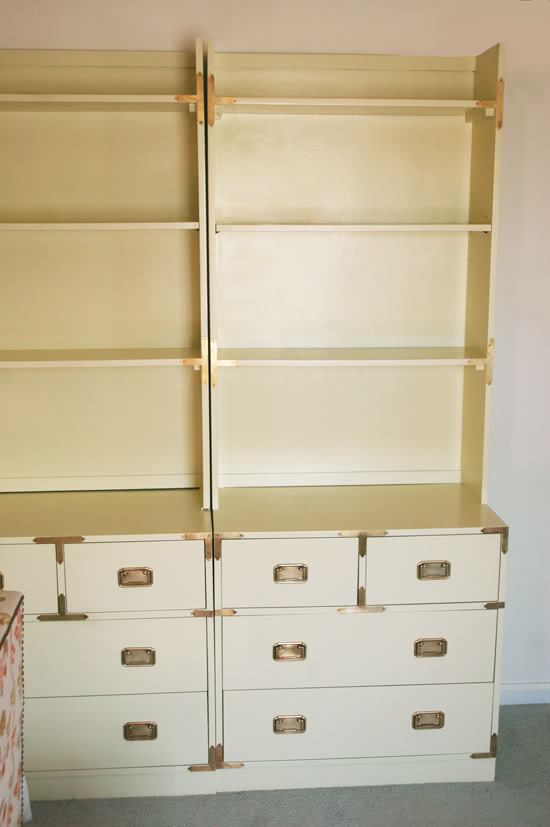
So to begin with I had a pair of campaign chests that were 31.5″ tall and 30 wide. I used a power drill and a handful of drywall screws (which are really sharp) to screw the two dressers together from the inside.
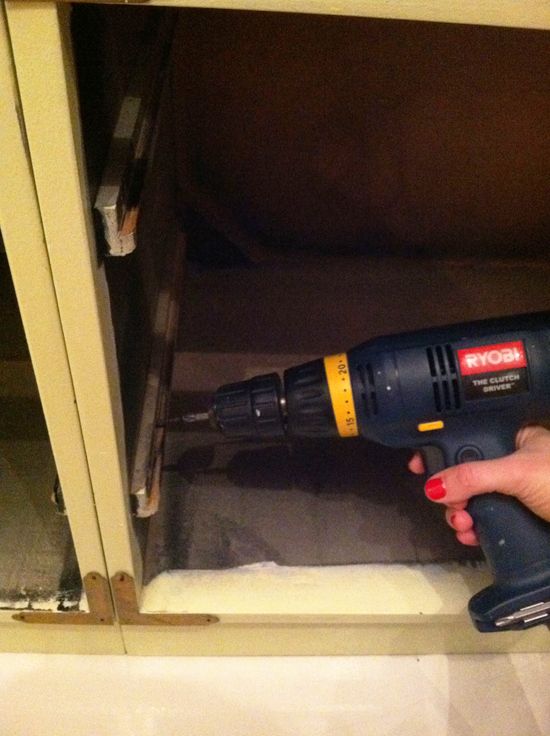
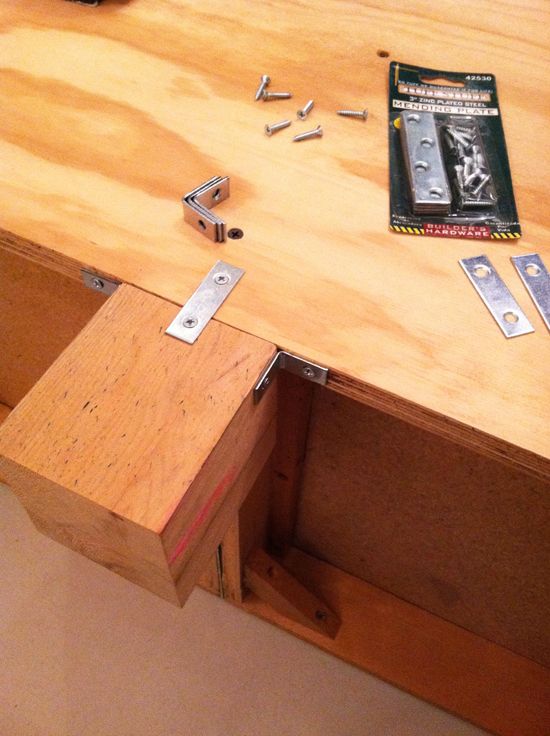
I had my local hardware store (Metropolitan Lumber) cut me a big piece of smooth plywood to fit the back of the connected dressers and also six 4″ tall legs from a 3″ wide post, all for less than $20. I asked them to be really exact with the measuring, which they really were. I did a little bit of wood filling and sanding to the legs first.

Then I attached the plywood and counter-sunk the screws so I could fill the holes and have a more seamless finish. The plywood backing helped the dressers to fit my marble top a little better and also helped keep the dressers better together structurally. Once the plywood was screwed on, I attached the legs using mending plates (a combination of corner and flat plates). I tried to sink these in as flat with the wood as possible.
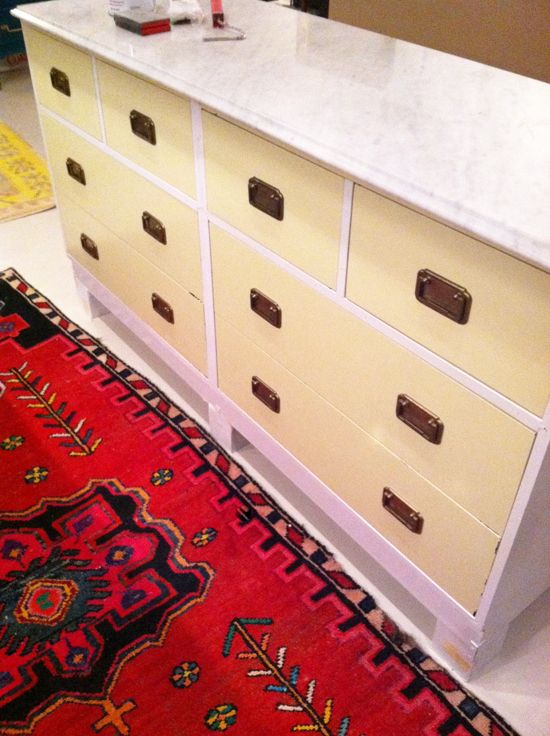
I started out with the plan to paint the new island white because I was sort of sick of having a dark colored island and thought white would be nice and bright in the space. I only had a chance to get one coat of white on the frame before I changed my mind. It was just too vanilla and boring.
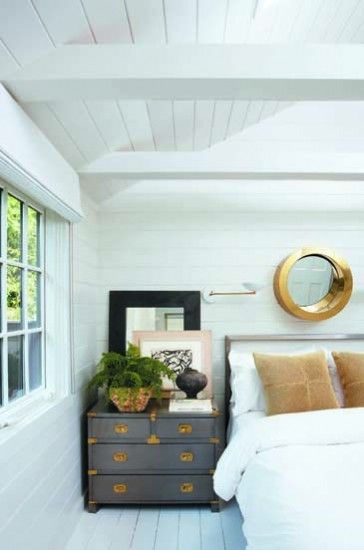
And I couldn’t get this image out of my head:
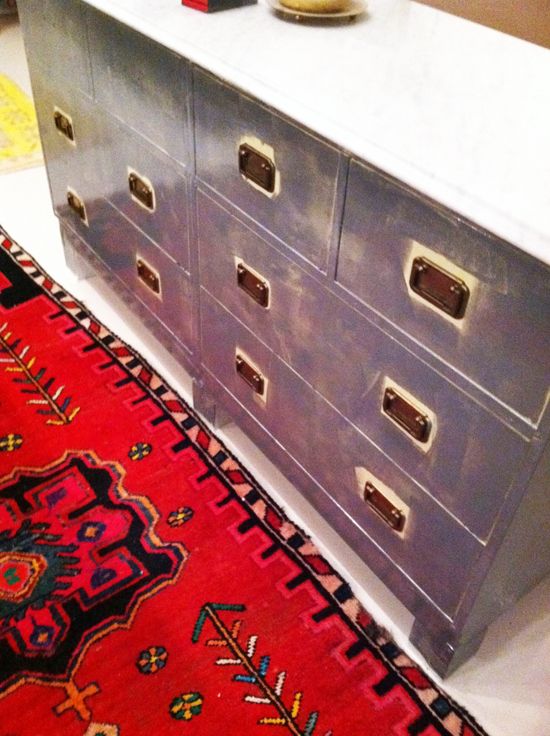
So I pulled out the Smoke Gray oil based paint from this project.
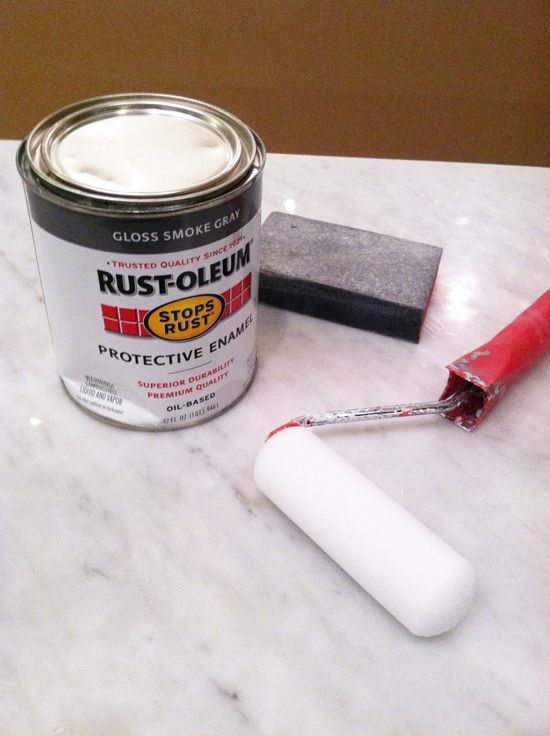
When I paint furniture, I always use a white foam roller and I do a sort of dry coat first and then I do a thicker second coat that really covers the old color. Sometimes you’ll need to do a light sanding between coats.
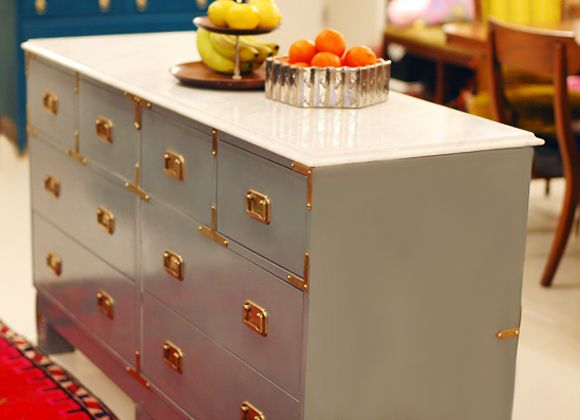
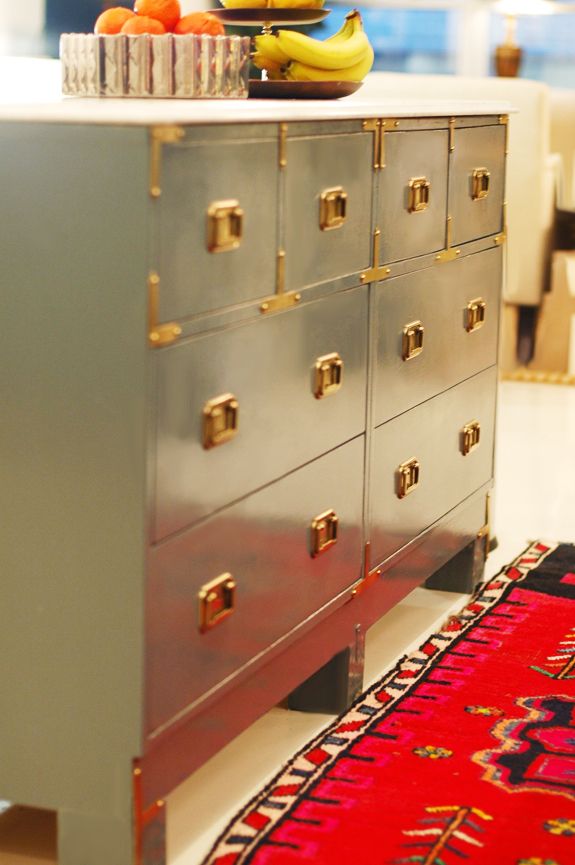
While the paint was drying I cleaned the pulls and plaques with Brass-O and discovered my mini nail head love.
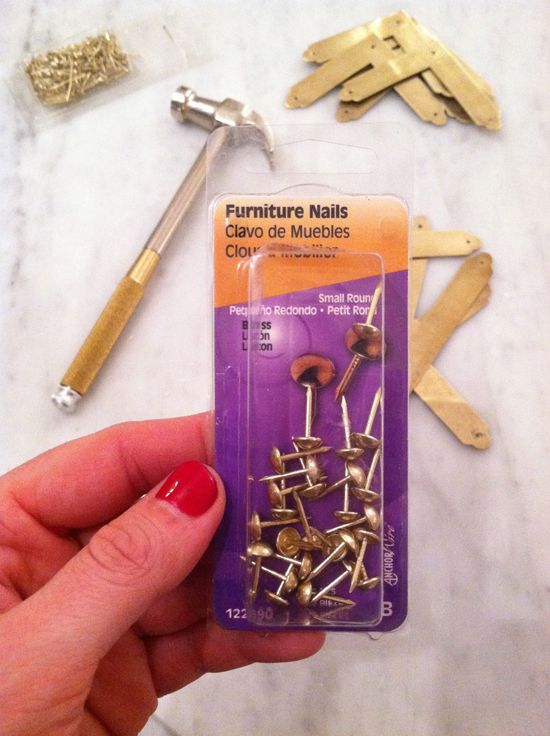
Since I didn’t want to spend any money on this project, I just worked with the hardware that I had from the dressers and the bookshelves (which have been recycled). I made the plaques stretch and put a little less on the front so there could be at least eight plaques on the back of the island.

It’s not perfect, but I’m really loving it! I love the color with my black cabinets and white floors. And the glossy oil based enamel finish has been a dream to clean. Everything wipes right off. (It’s way more glossy than these photos show. You can see though in the picture above I’m wearing a hot pink shirt. Super glossy!)
I might go back and order a few plaques for the sides, but I sort of like it a little more sparse. I don’t want to go overboard with the brass.

I sort of think the more substantial nail heads make the plaques a little chunkier anyway, so it’s okay there are less plaques.
Not only do I love the new look and color, but I LOVE the functionality. The much deeper drawers open and shut as smooth as buttah. And the top of the marble hits at exactly 36″ (standard counter height).
Do you have a unique kitchen island? I’m a big fan of islands.


okay, i'm so in love with what you've done. mine is original as well…we had a very tricky space and needed something old and rustic to fit with the modern tones of the kitchen. old and new. anyhoo, after finding an old barn filled with the most amazing french farmhouse tables and industrial tables (sooo long) we stumbled upon this old woodshop station with original lockers. i spray painted them gunmetal gray and need to get better stools. here's the link – and don't judge (bad pics) – we're right in the middle of a huge remodel we're doing ourselves. (everything in the kitchen but the countertops is all us). i don't normally post but i'm such a geek about our island.
http://asplashofbipolar.blogspot.com/2011/10/my-kitchenagaini-dont-care-if-youre.html
we have a galley kitchen, so no island, but that smoke grey is BANANAS! great choice with the brass, and the black cabinets. white just wouldnt have done it justice :)
Love the look. This looks very NY…great JOB>
oh my gosh, that is amazzzing. I love the smoke grey, I often want to paint things grey, and never have the courage! Wow it really encourage me to replace our very long and dingy dinner table in our kitchen into something like this!
Like everyone mentioned, love the color with the brass. I feel like the back looks unfinished though. Maybe a huge sheet of brass to cover the back? I don't know, but even without it is fabulous
it looks amazing. good job!!
http://www.absurdlypeculiar.blogspot.com
What a great idea to recycle what you had. Looks great and the color is also nice. We have an island made with ikea cabinets with 2 deep drawers to put all our small appliances and we put 4 heavy duty wheels, so I can move it around from the middle to the side.
Wow!!!! That's amazing. You did an absolutely beautiful job. Congrats!!
i am in love! so amazing!
xx
I love the brass! Speaking of, im dreaming of brass hardware in my future kitchen.
Dc
So good looking!!! My kitchen is more of an island itself, but I am thinking about my farmer drawers and what I could do to them. Gracias for the post!
Unbelievable! It looks so great. I will never get sick of a good campaign chest project.
Wow, very nice! And I still love that rug in the kitchen!
Hi Jenny, it looks wonderful! Except does the marble top fit correctly on the left side (if you're standing by the drawers?) It doesn't look exact on that side…but regardless — outstanding job as usual! I was wondering what you were going to do with your bedroom campaign. Love that color, too!
I absolutely adore this! Looks so SO great and I think it's unbelievably inspiring that you've found so many unique uses for the same slab of marble. I always love reading your blog to see what you'll come up with next!
This is absolutely amazing! As an aspiring interior designer and student, I can honestly say you and your blog have been an amazing inspiration and I look up to you so much!
Thank you for sharing.
Tiffany
thedesignerlifestyle.blogspot
Fabulous diy, Jenny! I LOVE unique islands!
It tuned out so well, I love it! The gray looks so good. I wish I had a island. My kitchen has an odd angle that I need to straighten out someday. I have to be ready to do the floors and counters at the same time though so it's gonna be a while :). But I love the idea of doing a dresser.
And thank you so much for your sweet comment yesterday on my blog. I'm not gonna lie, it went straight to my head! Thank you for taking the time!
OOHHHH It is brilliant!! I LOVE The gray too! After seeing you use it on the side table I bought it for a little entryway telephone table in my house- love the smooth & shiny finish!
It's AMAZING! I am obsessed with campaign style anything right now, but you totally nailed it. It fits in your kitchen perfectly!
~ Stop Me if You've Heard This One
Fantastic! Love the color!! Love campaign and the look of it the kitchen! What great idea for an island! looks beautiful, happy cooking:)
Wow! The island looks amazing! Love the color, the contrast with your cabinets, the trim details. Definitely bookmarking – and pinning this one!
It looks amazing! What a fancy upgrade for your kitchen too!! I've got to get out and find me a piece of campaign furniture now :)
I'm seeing green! LOVE it!
Love love love!!!
Love it! You have such a great eye for color and style.
Love it – but one question.
How did you remove the plaques from the dressers before painting? I've got some I'd like to remove, and I'm afraid I'll bend them. What tool did you use?
wow. just wow. you've done it again, jenny!
love.
Looks amazing!!! Fabulous as always!!
That looks incredible and inspiring (as always) Jenny! Just a question – are the mending flat plates still visible? Or did you mount them on the inside? I can't see them in the finished product. Were they painted to blend in as well?
Looks like we are puttin our kitchen renovation on the back burner,received four bids last week, two were twice the architect's projections! the others were still well over, i guess that's a good sign for the economy??? Anyways this and your original dresser post are helpful as I need more counter space!love the color, another poster commented on the back and recommneded metal sheeting for the back,i think the dressers back to back would look incredible but realize your aim was to re-use the marble and you might need a long narrow counter in your space. Plan to show this post to my hubbie as a way to 'improve' our kitchen until it can be ripped out, biggest fear with a 1906 house is what 'unknown' items are yet to be discovered! Thanks for this post it's helping with a stressful time.
This is beyond incredible! I'm dying to paint something high gloss in my home right now! Have you used the Rustoleum high glass enamel spray paint on furniture?
Love the island, what you've put together really looks nice. The color & the nail heads really pull it together. Classy & modern.
We rent and our kitchen isn't NEARLY big enough to pull off an island.
I am the huge fan of your blog!! very practical and inspiring ! Like this kitchen island .. so unique , however you didn't mention how to get marble top on ?
wow, love it, and knew I would from the title of this post. Awesome job!
Trish
http://www.mash-upchic.blogspot.com
That's seriously to die for.
I love this!! It looks perfect for your space!! I just used a very similar color to turn an old dresser into a console in my home! Now I want to paint everything that color. Ha!
http://midsouthstagers.blogspot.com/2012/02/styled-console-and-new-pillows.html
This is absolutely brilliant. I absolutely LOVE your style, and they way you keep your apartment looking so fresh with new projects! How did you secure the counter on top of the dresser? And what did you do with the old lovely one? If I lived in NYC I would make you an offer :)
You did a fabulous job! I love the gray. It looks like a new campaign piece.
Happy Thursday.
Teresa
xoxo
Your island really is gorgeous. I love that you've repurposed that marble top over and over again. Gotta hold onto the good stuff!
We extended our island with a butcher block top. The original island was small and on wheels and pretty dinky, but we needed the storage. So we added a large top and 2 legs to it. It filled in some dead space in our kitchen/fam room, plus it seats 4! We love it and it's the center of operations in our home now.
You can see it here:
http://thenestinggame.com/nest-tour-2/nest-tour-kitchen-and-family-room/
Couldn't wait to see how this turned out! You never cease to amaze me! Beautiful job!
LOVE islands! your kitchen is stunning. what material is your backsplash made of?
Yet another amazing project! Love love LOVE how the island turned out. I'm constantly amazed at your ability to make DIY projects look so expensive & flawless. Great job!
Gorgeous! You are just too clever!
You are such an inspiration! I'm always wowed by your projects, which are far more interesting than the expensive purchased versions. It's nice to see that you don't need a large budget for a lovely home just good taste and DIY ingenuity.
WOW – so gorgeous, chic and original! Your creativity is genius and I so wish I had more. Thanks for sharing this wonderful project, Cynthia
Wow- this looks amazing!! I cannot wait to have a kitchen large enough to have an island. SO impressed.
Your island turned out fabulously!!! I'm a giant campaign in the kitchen fan too and am so happy with my island version- brass and grey is just soooooo yummy! Great job!!
It looks amazing! I love the color you chose, and the hardware looks terrific! It makes me want to steal my parents guest room campaign furniture on our next visit. ;-) Thanks for sharing.
unbelievable! your projects are so innovative! and they always leave me feeling inspired to tackled a new project myself!