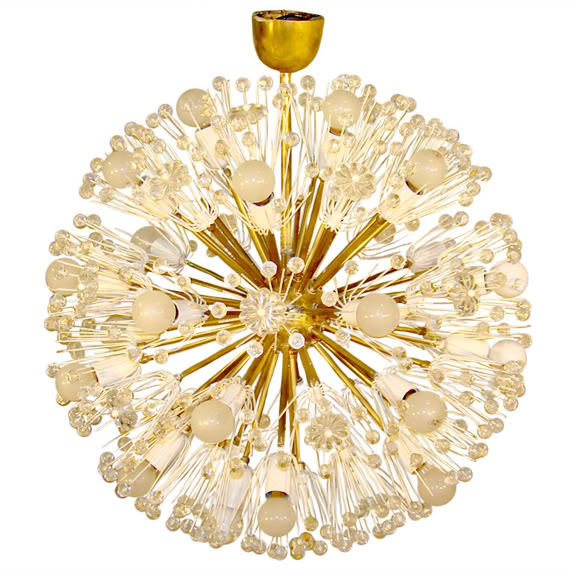
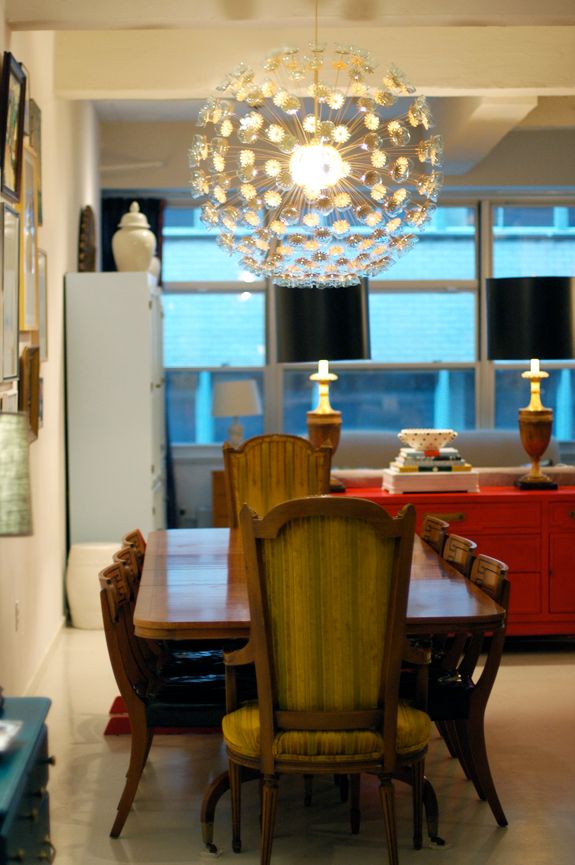
I’ve always dreamed of having a gorgeous sputnik chandelier, but they are usually on the smaller side and in the many thousands of dollars. I had planned on investing a little bit more of the house budget on the dining area’s light fixture because it would be basically the first thing you’d see when walking into our apartment. I wanted big and beautiful.
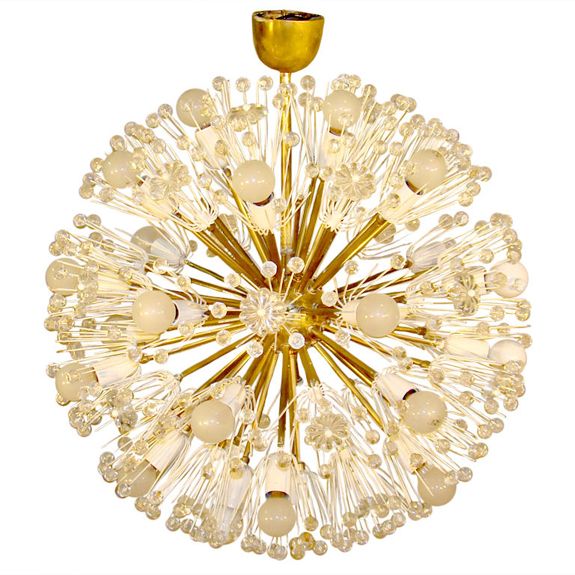
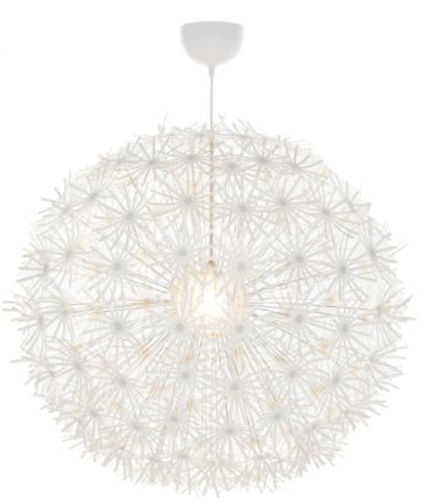
After deciding to buy the Gossip Girl sconces, I had sort of eaten up my lighting budget and needed to figure out something very inexpensive for the dining room. I thought the ubiquitous IKEA Maskros (which means dandelion in Swedish) might be a good base for a DIY sputnik.
I had some help from my Mom and Dad, who were in town visiting at the time. We busted out the entire project in a night and had the thing hung in the morning. I love projects like that!! (THANKS Mom and Dad! xo)
It’s a pretty simple project, with not a lot of tools required. I went with the 32″ diameter fixture because we have a big open space, but I would recommend the 22″ fixture (which is only $49!) for more traditional rooms.


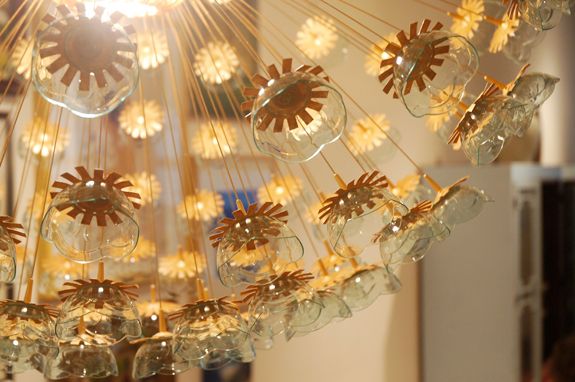
The white, plasticy paper flowers are about 5″ wide. This is totally personal preference, but the thing I don’t love the most about the Maskros in it’s original state is all the shadows the flowers create and I needed this fixture to be a functional light source first and foremost. So I played around a bit with the proportions to shorten the petals and decided I like a 2.5″ diameter best.

I used a clear (making it easy to find the center) plastic cup with a 2.5″ base to trace a circle on each of the flowers. A little tip: I find that projects with many steps of many multiples are done best and fastest by focusing on one step at a time. I traced all the flowers first. Then I cut all the flowers, etc. Don’t get ahead of yourself in the steps for the sake of accuracy and efficiency.


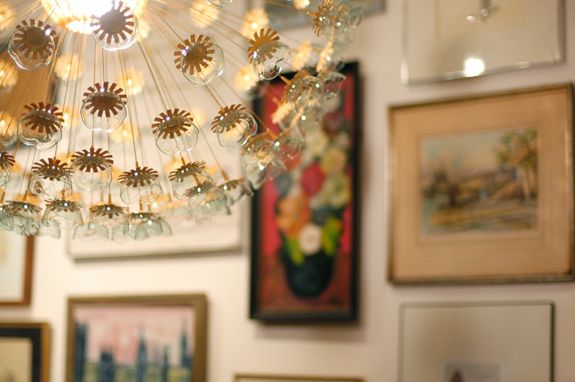
If the weather had been better and if I didn’t live in NYC, I totally would have spray painted the whole thing using Rustoleum’s metallic line in the Brass finish. But, I am actually really happy with the look of the hand painting. It didn’t take that long, and I think the end look is a little less flat than spray paint – more mottled, like real gilded metal.


Fabritac is hands down my favorite adhesive and it worked really well for this project. Super tight hold and a fast drying time. I needed only a small dollop on the bottom of each plate to attach the flower.


wow, this lamp looks really great, you should be proud of your creativity to create such a wonderful interior light :-)
best regards from Germany
Andreas
Great project and love the paint. Where can you buy it since Home Depot no longer carries it? I've looked everywhere with no luck.
Besides being a gorgeous make over that Ikea is probably copying right now, I'd say that your parents win the oh-so-cool award for spending their time with you in such a supportive way!
Great blog!!
Unreal! Someone may have pointed this out already, but you could eliminate a step by using a blade to trace and cut the flower 'petals' all in one step. Just be sure to have a solid, slip free cutting mat beneath.
oh my gosh…i love this idea! awesome…thanks!
You're a genius.
Ok I know this post is old, but I’m hoping someone with this chandelier could tell me:
If you replace or shorten the drop pole, and don’t use or trim some of the “arms,” can this be a flush mount light?
I’m answering this a year late but yes, the Maskros fixture can be used as a flush mount light. It was installed flush against my ceiling in my dining area.
Where you bought the small flower bowl?
I would also love to know where you bought the small amuse bouche bowls!
http://thriftychickrochester.blogspot.com/2011/08/ikea-hacks-maskros.html
Hi! I came here through Pinterest and am eager to try out this project! HOWEVER I am sitting here laughing hysterically — I hope it’s not some virus just on my phone, because that would be really embarrassing, but when I click on the link for the amuse bouche plates it takes me to a VERY different amazon listing… just wanted to give you a heads up to double check, maybe the url has changed! So I’m off to find the amuse bouche plates on my own… and how to explain this search history to my husband??
TT13 did you find a source for small bowls?
can you recommend a source for the small plastic bowls..amazon link on post doesn’t work. Also, what is the diameter of the bowls
found cups/bowls on amazon (case of 100) made by restaurantware seagreen le fleur cup 2 oz