So, you want to hang a gallery wall, you say? But you don’t want to put a million holes in your wall through trial and error. And you don’t have eight years to cut out kraft paper templates, ala Martha. Maybe you want something a little more… technical than my approach?
You’re in luck! The adorable Marissa from Roost Home figured out a quick, easy and exact method for hanging a gallery wall. Go here for in-depth instructions, but the gist is…
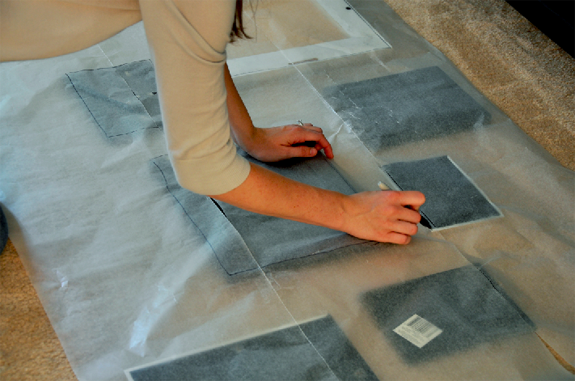
1. Trace your arrangement on wax paper, making sure to mark the hanging mechanism.
2. Tape the wax paper template on the wall and tap in your nails.
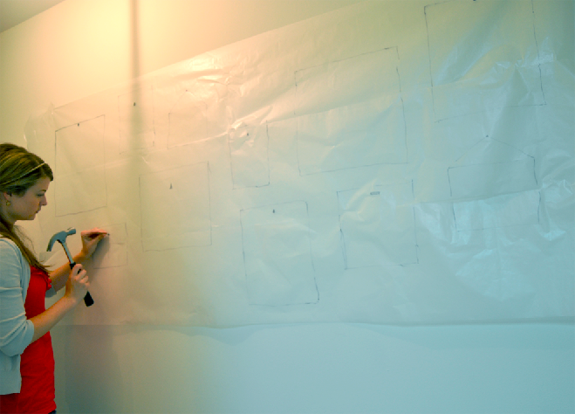
3. Hang up your art and tear down your wax paper (which ever you feel comfortable doing first)
Voila! Easy and exact! Thanks, Marissa!


Cheeky – Marissa used multiple sheets of paper and, I think probably just taped them together to create one large sheet.
Sara, Marissa is not a professional decorator – the image is from her own home. I think her layout looks great and I'm sure she's happy with it. It's the method that she's sharing that I find most important.
j
So smart- I never in a million years would have thought of the wax paper and it worked so well! I have a gallery wall going up my stairs (posted some pictures of it and my whole mainfloor today on my blog) and we just pretty much eyed it and surprisingly, it turned out really well- I think because it is going up stairs, I didn't have to worry as much about things being lined up or straight. I love a gallery wall – adds so much warmth to a space.
wow this is awesome, I am totally gong to be utilizing this method! Thanks for sharing.
Where can you buy wax paper that large?
Finally! I think I just might be able to do this!
Brilliant! I've always done the kraft paper a la Martha, but this looks so much faster.
I love love love this idea! Genius!
Cheeky – Marissa used multiple sheets of paper and, I think probably just taped them together to create one large sheet.
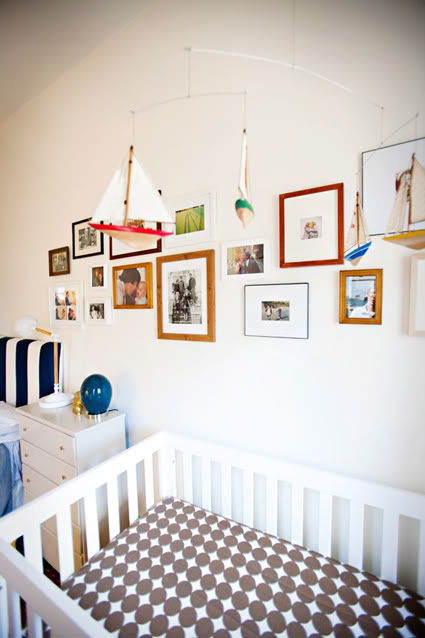
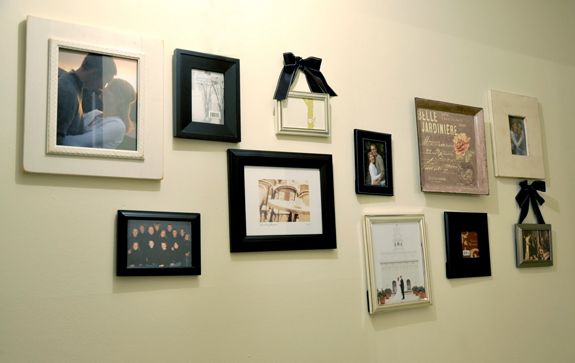
Hi! I'm an interior designer and I think this method is a GREAT idea…except, the final result of her gallery wall looks a little off – I think there is too much dead space between the pieces, and nothing is level! I think it's important also to stress the point that some consideration should be given to making sure the spaces between the pieces are consistent, and that you use a level (or two nails for each work) to make sure everything hangs straight.
Sara, Marissa is not a professional decorator – the image is from her own home. I think her layout looks great and I'm sure she's happy with it. It's the method that she's sharing that I find most important.
j
Um. . . why is it for me so hard to think of such easy solutions? Love, love, LOVE this idea!
This looks so easy!! I love the results! Going to try this in my house this weekend. I have a wall in my entry that is oh so sad and needs some love.
Thanks for the inspiration!!
Thank you for sharing this tip!
I have been intimidated by hanging a 4ft wide "clock" made up of individual vintage brass house numbers. This is just the trick I needed to tackle this project.
What a great tip! I'd love to have a gallery wall in my house!
I use Monkey Hooks when I hang stuff. I realize As Seen On TV stuff is super cheesy, but those things actually work. And since I don't need to worry about getting the right size nails to hold the frame and searching everywhere for my hammer when the kiddo hides it, they end up being super easy. I do think the wax paper is a good idea, but I prefer winging it. Great idea for patient people.
awesome!!! Thanks so much for posting this!
What a great idea! I have been thinking of a wall for a while, but haven't started because I've been dreading the work. We miss you in DE!
Love this! And it came along just in time. I am hanging a gallery wall in our hallway tonight and had planned to basically eyeball it (after laying things out on the floor to get the arrangement right). This probably saved me tons of time and nail holes!
So simple, makes sense.
I love this idea. Art- your going up this weekend.
I have been looking for the best way to do this – thank-you for sharing. I'm going to attempt this over the winter and will share on my blog! Thank-you!
What a brilliant idea! Thanks so much!
what a great idea. I am about to hang a gallery wall in my daughters bedroom, thanks for the tips!
i could kiss you. i used to trace and cut out each frame… worth it, but YIKES. this is genius!!
Very clever. I love this! As much as I measure and pencil and lay out, I always make one to two nailhole mistakes. With this, you'd have none. Thx for sharing!
Love that idea…I usually end up with a few extra holes. oooops
This is a great idea. My "go to" product is 3M picture hangers. They are AMAZING. I wish that I had known about them when we moved in because I would have saved myself a ton of nail holes.
What a brilliant idea! Thanks for sharing!
oh my goodness- that is brilliant!
great!
thaks!
This is an excellent idea. I'm an (anal retentive) accountant so I like my pictures perfetly lined up – no random patterns for me. So this technique will be a boon to me as I redo my living room. Thanks!
Love this, just one warning–not a good idea to post pics over the crib. They look great, but once they hit toddler age you need to make sure that they are out of reach otherwise they can stand to reach up and grab them and crash! Not good.