It was so much fun to work with Joanna on her adorable baby boy’s nursery!
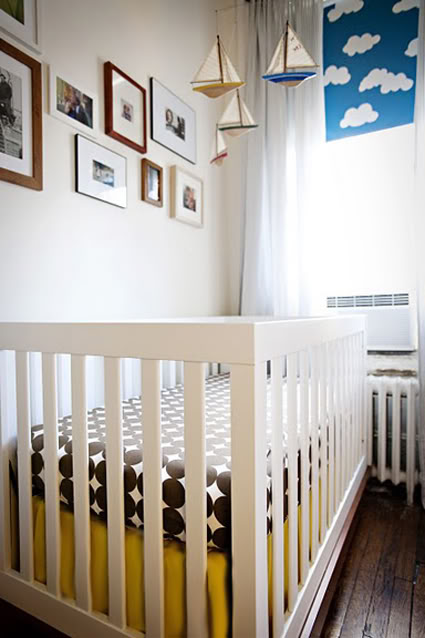
When we were looking for cribs, the ideal was the Oeuf Sparrow – but the cost was a little prohibitive. We ended up using the Olivia crib from Walmart’s Baby Mod line. It’s a really great crib for the price ($300) and I think Joanna has been happy with it. The adorable dots sheets are from Dwell. I sewed the crib skirt from a one yard remnant of yellow linen I already had.
We really loved the idea of doing something with clouds in the room (originally we were thinking about this bedding). Joanna wanted a black-out shade for light control with nap time, so we bought a vinyl roller shade online cut to fit the nursery window. I drew out some cloud shapes on cardboard and played with the design a little until the layout looked right.

Then I traced out the shapes and painted out the background with regular latex paint. I used a sample pot of Glidden’s Peacock Blue and that was more than enough for two-three coats on the shade.

Make sure to really let the paint dry – give it at least two days before you mess with it at all. I love how this project turned out!

We paired the clouds shade with some simple gray and white linen curtains that I sewed myself.

I tried something new with the header and sewed in little strips of ribbon for hanging rather than doing a rod pocket.

The goal was to make the creases in the hanging drape more pronounced than the effect of a rod pocket – more like a pinch-pleated drape. I need to experiment with this a little more, but I am happy with the way these stripey curtains look with the cloud shade!

Joanna was excited about the idea of a gallery wall of family photos in the room. I collected some new and vintage frames for her photos and brought a huge box with me on installation day.
A quick note about gallery walls: I’ve hung a bunch of these types of arrangements. I’ve used kraft paper templates before (= ridiculous waste of time) and I’ve tried just eyeballing the arrangement (= a million extra nail holes). Here’s how I figure out the lay out of a gallery wall. It works like a charm for me. It’s fast and there are no extra nail holes in the end.
1. Measure the length of the wall space you want to cover. In an open area where you have lots of room to work, put your measuring tape down on the floor, locked at the correct length so you can reference that measurement.
2. Play with the layout of the frames. Be sensitive to frame size, frame color, mat size, image color, image subject, etc.
3. Once you’ve found a good arrangement and the right spacing, take lots of photos of your arrangement on the floor for reference.
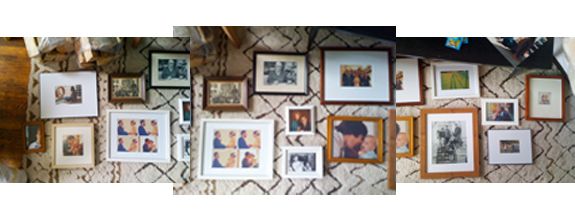
4. Start with the top left frame in the arrangement and hang that on your wall. Refer to your photos to note where to hang the adjacent frames (ie 4″ down, 3″ to the right, etc). It’s easy to figure out where to put your nail if you’re sensitive to the placement of the nail hanging mechanism on your frame.
It’s not an exact science, but it really works well for me. I rarely have to make adjustments in the end. I think it took me about 20 minutes total to lay out and hang the gallery wall in Toby’s room.


Part 2 of Toby’s Nursery tour is up tomorrow!
{Again, a HUGE thanks to Karen Mordechai for taking many of these photos above. Karen is a fabulously talented New York-based photographer. You should check out her portfolio, especially if you have a wedding coming up!}


Oh my. This is gorgeous! I pained a wall of clouds in my last house. Kinda miss it. The blue of the boat picks up the cloud blue perfectly. I love that this isn't a traditional nursery and that an adult would feel just as happy in here as a child.
That is one lucky baby :) It looks great, as do all your things. Love it!
Wonderful result, love the painted roller shade, and the drapery technique for hanging the panels. I also love how the brown dots in the bedding pick up on the worn wooden floors…beautiful! Janell
Love this room, so thoughtful…I especially think the roller shade is awesome, I would have never thought of that!
Great results. Love it!
Love it! Crisp, clean and not overdone. And the roller shade with clouds is genius. So much more original than clouds painted on the ceiling!
Such a cute room! The cloud shade is adorable and such a creative idea.
Lovely! My favorite is the sailboat mobile, so sweet!
Looks so good! I can't believe the crib is from Walmart! Thanks for the tip on hanging a gallery wall…I usually end up with a bunch of holes!
Oh this is gorgeous! Thanks for the tips on the gallery wall- I just did one and I don't think it turned out quite right. Take #2 will be done your way :) Can't wait to see the rest of the room!
xo- M
Another great design Jenny. I appreciate that you write not only about the design but also things like cost considerations and customizing off the shelf products. You really prove that you can create beautiful rooms with a limited budget and lots of creativity.
I am so glad I found your blog! The room is amazing, and I love seeing the way you brought the curtains and painted roller shade to life! And your method for hanging gallery walls! Genius! I'm embarking on some of these around my house, and I am really excited to try your tips!
I adore this nursery. It is so cozy and sweet, not too over-styled or "designy". Love.
Thanks also for the gallery wall tips! I'm doing one in our bedroom and now know the best way to approach it!
Great job! I love that shade. And the gallery wall adds such a nice personal touch. Thanks for the tips.
What a cool nursery!
Those painted cloud shades are incredible!!!
Questions-after the 2 or 3 coats of paint, was is streaky? Also-are they any issues with flaking or chipping when you roll the shade up or down?
I am thinking this is the perfect solution for my studio!
Great work-as always!!!!
Was *it streaky. Geez. Is it Friday yet?
What a seriously adorable nursery. The shade is so creative! I'm impressed.
I'm glad I got some inspiration…I'm in the middle of our nursery/playroom makeover!
This is so fresh and charming.
Come on over to visit my post on boys' rooms today.
Cheers, Alcira
thenerochronicles.blogspot.com
Lovely! I especially like the window treatment. I love clouds!
love love love it! especially the shade and curtains!
Love the nursery colors…fabulous!
LOVE this! Love the window treatment. Who would have ever thought of it? I love the gallery wall, too!
Beautifully executed! If you want a pinch peat effect, check out Ikea's curtains, they make some that slip onto a rod but when close "pinch". If you look closely at how they put them together you could replicate it easily!
This has got to be the cutest mobile I have ever seen. And those shades are genius. I'm going to star this in my reader to remember for the distant future when I have kids. You never fail to inspire.
Love this! Can you tell me where you ordered the shade online? I need two of these and can't find ones to fit my windows. Thanks!
The nursery is darling! The painted shade is so cute! I recommend that doing something similar to one of my clients. We end up putting a favorite quote on the shade.
The sailboat mobile is my favorite piece! Love that it is from SF too. :-)
xo,
cristin
PS- drop by my blog if you get a chance – giving away a custom window shade!
This is adorable! It's so hard to do kids rooms just right and you really did a great job. The sailboat mobile is my favorite part so far!
Oh my goodness. I totally just fought this art hanging battle last weekend at a client's home. Measured to the center…but how far out from the center? Taped off a square for the outside dimensions of the finished collage…nope. It was a mathematical nightmare! Love your solution! Thanks for the tip!
So adorable. My favorite parts are the cloud shade and the embroidered mobile. It really is all the details. Thanks for sharing!
So beautiful Jenny! Your talent truly shines through!
It was lovely to meet you in NYC the other week at the Nate Berkus after party…hope to see you again soon!
xo,
Crystal
The clouds on the shade are genius. I think this nursery turned out beautifully. Bravo to you:)
super sweet. the changing table/dresser midcentury modern piece came out fantastic…. jenny…. you should be a carpenter! LOL or at least start a series each week of all of the work you do!! ha ha
Love, love your cloud shade! It's so cute. I'm thinking about doing something similar myself, but I'm wondering how durable it is? Do you feel like yours has held up well to getting rolled up and down? Thanks!
Love everything you did! I can't wait to try the ribbon trick. Such a great idea!!
i love your nursery!!!!
OMG! LUVVVVV IT GIRL FIEND!
I know this is a really old post… so I apologize for commenting so late. But I am in love with that sail boat mobile. You mentioned it was purchased at "The Ark" in SF, but it appears they no longer sell it. Does the mobile happen to have a company/manufacturer listed on it? Could you email me at AJCandrian@gmail.com and let me know? I would appreciate it so much. Thank you!!!