I get asked to post upholstery tutorials A LOT. I do have plans for some tutorials later this year, but every piece of furniture needs a different approach, so it’s not really a ‘one size fits all’ sort of thing.
For now I keep responding that the best way to learn how to reupholster furniture is to read this book (my favorite) or this one (also great), and then to slowly, taking pictures all along the way, take apart the original upholstery. That’s the best way to learn what works for your specific piece. And then just recreate!
Katy, one of my old college friends, recently moved into a new home and has been doing all sorts of fun home projects. Check out this headboard she made. And don’t you love those euro shams?! The fabric is from Joanns!!

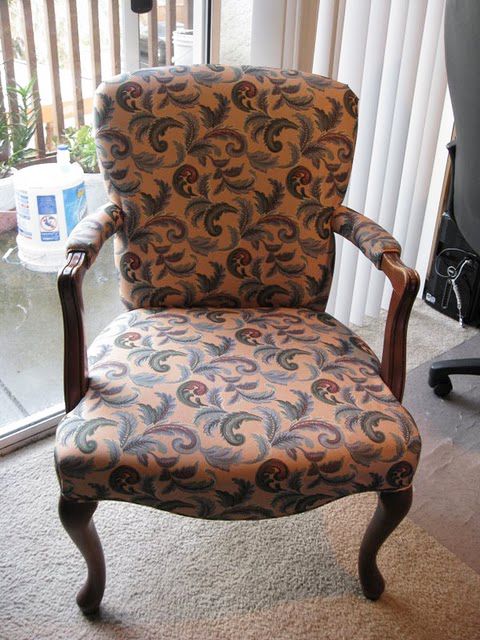
Katy had never taken on a big upholstery project, but she was determined to reupholster these inexpensive craigslist chairs for her bedroom:

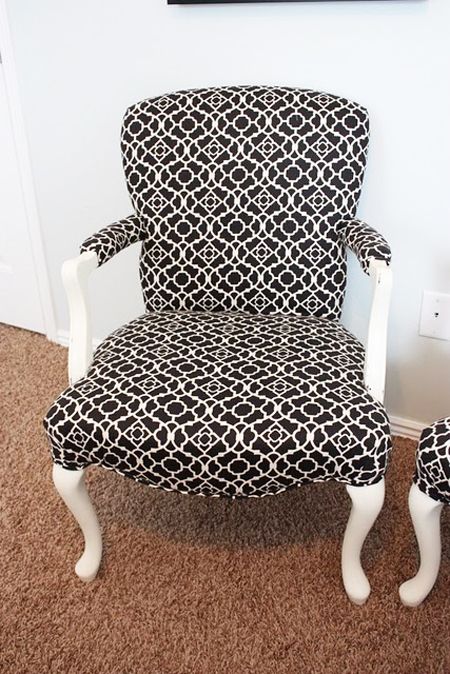
She paid careful attention to the original upholstery and reproduced the same look in the new fabric.

The only sewing she did was to make the piping.

I think she did a great job and she saved herself a bundle of money! My upholsterer would charge a few hundred each for the labor on these chairs.


Are you brave enough to reupholster used/vintage furniture? I promise it’s not as scary as it looks!


Wow! that is a great transformation. Well done Katy!
Wow, good job. I'm actually trying to reupholster a little complicated couch with the same fabric in the light blur color-way (the same the board in your office) and it's not going great. I'll try the books you recommended.
From YUK to fabulous!!!! AMAZING! Thanks for posting.
Wow what a transformation! Love the white, love the fabric too! xx
Those came out amazing! I wish I had the courage to tackle a project like this.
No way, I think I would lose something in the process, like a finger or a child. I bet I could, but I think I will not add this to my repertoire.
pve
i have two different chairs that i plan to redo. it's a bit daunting so i keep doing other projects instead. i think i will read the book and then tackle the one i think will be easier.
I have done some very simple chair seats and am trying to move up to more complex projects in babysteps. So rewarding when finished and I could not afford to recover otherwise!
I'm not too confident unless I can work with a staple gun!!! I have one cushion I have redone so many times — but it's the only piece I've ever touched. Katy did a great job!
Wow! What a great transformation! I have only tackled reupholstering dining room chair seats but I am determined to move on to a bigger piece of furniture one day!
I'm scared of the thought of sewing piping, which makes a HUGE difference in whether it looks professionally done.
Katy did a great job!
The black and white chairs are so unique looking. I love them. I would never have thought to paint it white, which I love. I probably would have went with typical black. Very cool.
That's amazing! I can't believe that wasn't professionally done! Nice job Katy.
I love the black geometric print with the white chairs, a great transformation. Geometric fabrics are all the rage right now!
The Designer Insider
Great job! This makes me think I can tackle my old chair's upholstery after all.
I found this book to have some really good projects for beginners:
http://www.amazon.com/Simple-Soft-Furnishings-Projects-Transform/dp/155407018X/ref=sr_1_7?ie=UTF8&s=books&qid=1277820556&sr=1-7
Another great way to learn is to see if your community college offers an adult continuing education class. I took an upholstering class, which turned out to be more of an eight week workshop, this past winter and have since reupholstered two craigslist wingbacks. The first one I recovered with a black and white waverly fabric very similar to the post and painted the wood white. It really gives vintage furniture such a graphic and modern look. The other one I recovered with a gorgeous Lee Jofa ikat that I snagged on ebay. I'm absolutely loving my new hobby and can't wait to do more!
I'm actually about to reupholster the world ugliest setee for a friend of mine. It's truly hideous and my husband wonders why on God's green earth she even wants to keep it. It's a family piece is all I know.
I'm definitely not patient enough but I love the black and white chair.
I'm definitely not patient enough but I love the black and white chair.
Gorgeous! I reupholstered a favorite chair last year- and then one of my dogs got sick and destroyed all my hard work. I haven't gotten up the nerve to try again.
Since joining the blog world, I have seen/read about so many 'reupholster projects'…more than ever before (have I been living under a rock- maybe under the 'diy rock'??). I am feeling veeeeeeery behind, but soooo excited to get started on my first project! I have a couple saved in an inspiration folder. Thanks for the book recommendations!
Fantastic projects! Love the headboard and the pillows. The chairs are gorgeous! Thanks for sharing!
I LOVE the chairs, pillows, and headboard. She did a fantastic job. I recently reupholstered two wingback chairs for the first time and it really wasn't that hard- just very time consuming! But it saved tons of money so it was worth it!
very inspiring! I NEED to learn more about upholstery – have two thrift store chairs in need of a makeover.
I keep wanting to try but have been too worried "what if i mess up!" Maybe these books and inspiration will help–thanks!
The transformation is gorgeous! I have a chair that I'm planning to tackle, and I admit I'm more than a little intimidated. But this gives me hope that I can actually do it.
curious about the reupolstering resources, but the links aren't working for me. do you mind reposting? thank you!!
Hmm yes. Could I get the names of those books? The links don't seem to be working.
Wow, I always wanted to know how the seams and piping is done!
gorgeous, katy!
Amazing transforamtion!
Does anyne have any idea where the geometric fabric is from? I am desperate to find it!
Thank you so much for any help!
Learning to upholster has been on my to do list for years, along with sewing. Like someone else said, sewing piping freaks me out! (: The chairs look amazing!!!
I reupholstered a Louis-style chair at the end of last year – posted how I did it here: http://worthwhile-ride.blogspot.com/2009/12/have-seat.html
It wasn't as hard as I thought it would be – The hardest part was making sure the pattern wasn't crooked… I'm kinda fickle, so just last week I found some different fabric and redid the upholstery again! This time, since I knew what I was doing, it took about 30 minutes and now all I have left is to add the piping.
Oooh, I don't think I'm that brave! I guess that the worst that could happen would be to mess up & have to go to a pro! But wow, these look fantastic!!
* http://donandamanda.blogspot.com *
Inspiring. Katy is awesome. So is Jenny.
I got inspired to learn upholstery after I began following your blog last fall (your ottoman and settee convinced me)! Since then I've accumulated an inordinate amount of orange chairs to tackle – for some reason all my great Craigslist finds are orange! got 2 great 1940s wing chairs for an upholstery class I signed up for last winter – only to have it canceled because only 3 people signed up! Now I have those, 2 orange slipper chairs which will be my "complex project guinea pigs" and 4 vintage bamboo Chippendale chairs that someone decided would be good to recover in orange velvet in the 70s. All have such potential – I just have to take the plunge!! I already have the book you recommended – it looks fabulous. First step is getting used to the staple gun by covering some simple pop off dining chair seats … Thanks for the extra motivator – Katy's chairs are inspirational for us beginners!
Thanks for suggesting these books! I just requested the first one from my library. I've been taking an upholstery class at a local craft school and am amazed how many different techniques there are, depending on the type of piece. You're right–every one is different! I started with a bergere chair, but got stalled deciding how to finish/paint it, so I put it on hold and am working on a much less ambitious chair for now (a chair my husband found outside his dorm room in college, ha!). But I did get to do the 8-way hand-tied springs on the bergere, which was pretty fun.
Do you have an good reads on finishing/painting furniture? I'm slowly starting to get into this, but I want to stick to products that are safer to breathe (like AFM Safecoat). Right now I'm struggling with how to paint wood so that it's smooth and you can't see brush strokes . . . and how to strip the finish off that bergere chair without using nasty chemicals or breaking my back sanding it!
Joann's? seriously? They have failed me so often. Thanks for the tip!
I've been wanting to reupholster our wingback chair but there is a lot of piping and I'm not sure I'm up for the challenge without someone watching over my shoulder. I've been wanting to take an upholstery class at my local fabric store but just haven't gotten around to it. I have the perfect fabric picked out and everything!
She did an amazing job! I have a chair like this to redo and I'm totally putting it off–just need to dive in. Thanks for the book recs too. Will check those out.
What a fabulous transformation! Congratulations to Katy. Thanks for the great tip about taking photos as you unwrap the original coverings.
oh me! i'm brave enough! i took a 4-session upholstery class at a local community college, but i used books and common sense more than anything. it just takes a little patience!
http://stonesgatheringmoss.blogspot.com/2010/06/la-chaise-fini.html
guoweigang Water clocks did not depend on the observation of the sky or the thomas sabo sun. The earliest water clock was discovered in the tomb of Amenhotep I who was buried around thomas sabo online shop deutschland 1500 B.C. Greeks called them clepsydras ; they were stone boxes with sloped sides that allowed water to drip thomas sabo anhänger at an almost unceasing rate from a small hole in the bottom.Other clepsydras were cylinders or thomas sabo charm club anhänger bowl formed engineered to slowly fill up with water coming in at a near sustained pace. Markings on the thomas sabo anhänger günstig inside of the bowl marked the passage of the hours. Though this was employed primarily angebote thomas sabo anhänger at night, it is thought they were utilized in the day hours too. A metal bowl with a hole the bottom was placed in a bigger bowl crammed thomas sabo charm with water.It would fill and then sink in a certain quantity of time.Since water flow was not exactly predictable sabo charms and difficult to control the flow accurately, timepieces that depended on water were very inadequate. People sabo charm were drawn to develop more accurate ways of measuring and telling time.The development of quartz crystal clocks and timepiecesthomas sabo anhänger sale depended on the crystal size, shape, and temperature to create a frequency.