
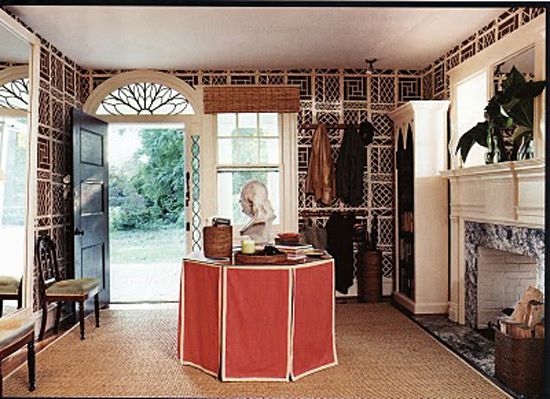
Inspired by these two images,

Palmer Weiss
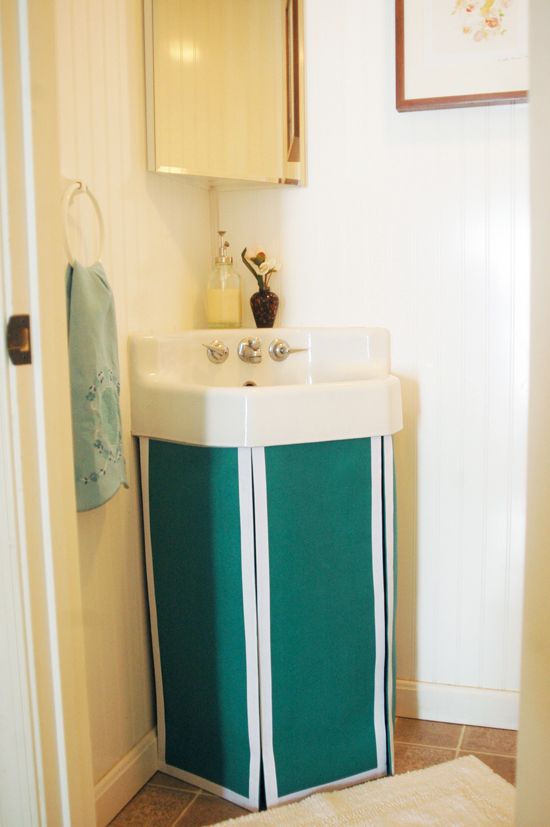
I decided it was time to add a skirt to the ugly pedestal sink in our powder bath.
 First I measured.

Then I sat down and came up with a game plan and incorporated my measurements.

I decided to use some indoor/outdoor fabric in a pretty emerald green color.

I did some more measuring and some cutting.

Then I did some ironing. I made my bottom hem 4″ to give some extra weight and make a nice drape. The sides were only 2″.

After I ironed in all my hems and pleats, I used a small amount of Fabritac to secure all the ironing.

Then I glued white grosgrain around the borders.

Using some clear velcro that I picked up at Home Depot (cheapest source I’ve found),

I velcroed the middle panel first to the underside of the sink.

and then followed with the side panels. You can see here that I ironed in a pleat on the side panels that makes it so you can easily access the space under the skirt through the middle panel, but it looks continuous when all the panels are in place.
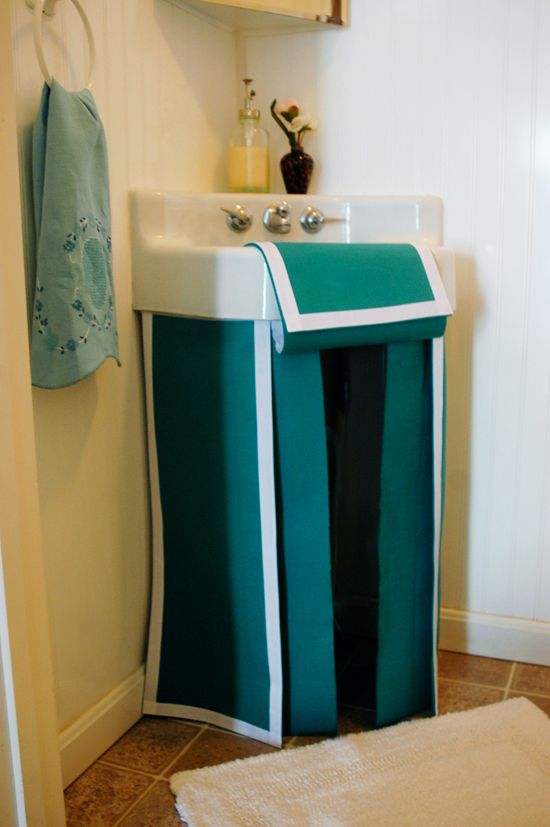
I love how the skirt hides the unsightly plumbing and provides some much-needed storage in our tiny half bath. Also, the outdoor fabric has worked like a charm here. Any water that splashes down from the sink beads right up and is not absorbed. If something ever did stain or leave a mark though, it would be easy to pull the panels off the velcro and put everything in the washer.


OOOOHHHHH – Your cutting and ironing is so perfect – a fantastic fix for your sink! Looks awesome…..KG
What a great project… you have done it so beautifully and neatly.. perfect for that little spot! Nice job!
:)
wow, that is so nice! perfect fit!
Beautiful!
It looks great. It's amazing how that changed the entire look of your bath.
Looks awesome. Cannot believe you didn't even have to sew. Great job!
Glad you are feeling better and back to your old tricks of transforming and DIY projects.
pve
How gorgeous is that?! I could definitely use this trick in my home! Thank you!!
Great job!
Love this!! How do you find the time with three little ones? So amazing!
You are seriously a genius.
It looks great!!! Thanks so much for sharing your skills with your readers!
Amazing stuff:-)
It gave your bath a whole new life, very chic.
That turned out so cute! It makes me wish I had a pedestal sink so I could make one too!
~Megan
OH MY GOODNESS! that is simply awesome! How great that this doesn't include any sewing… I am forever impressed by your DIY skills! I recently followed your directions on making a fabric covered corkboard and it came out soooo cute! Thanks!
Brilliant!
Very nice! I have an old bookshelf that I've been meaning to make a skirt for– something like the first photo you posted. Maybe now I'll actually do it. ;-)
looks great & it is getting to where i expect nothing less! thanks for always giving instructions.
Great job! I love corner sinks.
wow! such a quick project but such a dramatic change. love it!
what a transformation! I love how nice and neat it looks now!
GREAT color choice. I love the wide band. This is awesome! Marija
LOVE it! I'm wishing I could've seen this a few years ago when we had a bathroom sink very similar to this It would've looked a lot better!
amazing! love the color.
thank you SO much for posting this!! I have been meaning to do this with our old bathroom sink for a year now … this just gave me the motivation :-)
lack of storage is SUCH a problem with those pedestal sinks. we had one in our first (tiny) 1 br & I hated it. This is a good idea if I ever come across one in the future – thanks
Did you find that you had issues sticking the velcro to the porcelain? I was considering doing the same thing to our bathroom sink, but have it in my head that the velcro would come un-glued… especially because our sink doesn't have a lip to it, so I will have to adhese the velcro to the outside of the sink on the smooth porcelain.
Love it!
Great job as usual!
Yowzaa!! I am in love with this. The color is gorgeous. Kind of wish I had some ugly pipes to cover. Fabulous!
I love reading your blog and getting such great tips on diy projects. You are so incredibly creative.
You rock!
keep up the great work. You are such an inspiration!!
Kristina from K & Co. in Stockholm, Sweden
http://www.kandco.se
Saving this in my DIY file, thanks!!
Awesome! It's so pretty now. I have to say, I'm always quite happy when you post a project from your house–you never cease to amaze me!
Wow; When I heard "sink skirt" I thought "tacky and ugly." You sure proved me wrong! Great work!! = )
Hi Casey – I didn't have any problems with the velcro at all. There is an 'industrial strength' velcro strip available too that might be a good option for you.
Good luck!
jenny
You are so handy! Each entry is so much fun to read!
hi jenny! i love your blog and this is a great project!! i think you should be visible the labels so i can find the post i look for(sorry for my bad grammar, a spanish follower) Virginia Holmes :D
Wow, could you fly to England and help out an expat!?! Beautiful work ~ as always! I have a quick question… If you were going to decorate a dining room from scratch where would you start? Carpet, table, lighting…I'm just not sure where to begin. All the best, MB
I love the color you chose! I'm a big believer in outdoor fabrics — in fact, I had my banquette covered in Sunbrella fabric and it's been a life saver. (I have a very messy husband and puppy!)
Fun and cute, I love the color!
What a difference! It looks fantastic. You are such an inspiration!
I wasn't a big fan of sink skirts because I've only seen really bad ones before, but this is awesome.
Fabulous!
This is EXACTLY what I need to do for our bathroom! Thanks for the ideas!
I love it. I might do this in our powder room. In mine, however, I have an original 50s buttercup yellow sink and toilet. Oh, I know. You're insanely jealous. I can't blame you.
Oh my gosh AMAZING!!!
I am always stunned by the awesomeness on here.
I have been following your blog for a little while now and wanted to say that I really appreciate how you give names and sources of products/supplies you use. Very helpful. The pictures of the supplies are even MORE helpful! I am in the middle of a pelmet project and am so far very pleased with the results.
Perfect! Makes me want to have a sink just like that one, only to be able to have a sink skirt :)
Cute Skirt Jenny. love that it is no sew.
Crisp, clean, tailored! Love it! Especially the great contrast with the white!