Do you love the look of fabric shades but don’t want to fork over the cash?
 design by Coddington Design, via Desire to Inspire
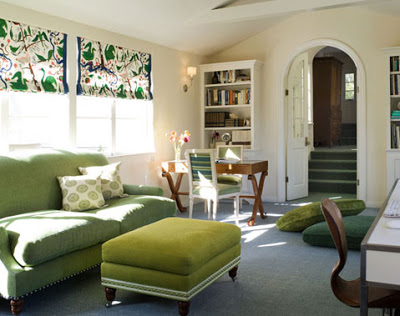
Shades can often cost you an arm and a leg (especially custom fabric shades). When my cheap white IKEA shades were safety-recalled, I decided to figure out a way to repurpose the old {ugly} mini blinds that had previously hung in our bedroom windows. The result was better and easier than expected, not to mention even cheaper than the cost of new IKEA shades.
Here are the basic instructions. If you need more details, feel free to comment or email.
–Supplies–
Tape measure
Scissors
Fabritac (or comparable fabric glue – NOT HOT GLUE!)
Mini blinds (like the $3 Target mini blinds)
Fabric (yardage depends on the size of your window)
Trim (optional)
1. Measure you windows carefully. Then do some math and figure out how many folds you want in your shade. I like the look of a fold every 9 inches, which meant I only needed 6 slats for my small windows.

2. Let out the blinds all the way, making them the longest they can be. Carefully cut away all of the thin tilting/ladder-like strings, being very careful not to cut the thicker lift cord. I simply ran my scissors along the top of the slats, cutting away the tilt strings and avoiding the lift string altogether.
3. Take out the plastic plugs from the bottom of the miniblinds and remove and put aside the thick bottom slat piece (you’ll need this later). Then simply pull off most of the slats, while leaving the few you’ll need for the folds of the shade. Like I mentioned before, I only needed six slats for my shade.

4. Make sure the blinds are still let out all the way. Measure carefully and reinstall the thick bottom slat so that the length of your window and the full length of the shade are roughly the same. I decided to make my shade about 1″ longer than my window measurement. Just to make sure it would be long enough.
Trim the extra cord away off the bottom.
Now cut out your fabric, using the shade skeleton as your pattern and leaving a 2.5 inch (or so) border on all sides.
5. Congrats! You’re done with the hard part! You should have something that looks like this:
 It’s time to start gluing.
6. Start with the top of the shade. Fold over and glue the fabric together to make a clean edge and glue that to the front of the big top rail mount. **NOTE: Do not glue the folded hem to the very ends of the rail mount. You need to be able to slip the rail into the wall-mounted brackets, so the fabric needs to stay unglued on the very ends.
7. Measure 9″ (or your preferred fold length) from the top of the rail. Adjust and glue a slat into place. Continue all the way down, gluing the slats to the fabric. I glued the rounded, convex side of the slat to the fabric so there was more slat-to-fabric contact. Make sure not to glue the lift cord to the slats or the fabric.
8. Glue, turn in and glue again the three other sides of the shade to finish off all the edges. Let it all dry.
9. (Optional) Glue on some trim to the bottom slat. I picked up some super, super tiny ball trim at JoAnn’s for less than $1 a yard. (only needed one yard)

10. Hang up the shades just like hanging up mini blinds. The cord still functions the same way and, as long as you didn’t glue the lift cord to your slats or fabric, the shade should lift and fold beautifully.
Here’s my finished shade. The fabric is a blue-gray burlap that I bought a while back on eBay for about $6.50 a yard. I think I used about a yard and a half total for two shades, but I have small windows.

I’m happy with the look of the burlap. The dark color helps with light control (it filters), but I still feel like the room is bright and cheerful when the shades are down. It’s a good balance for me. Some of you might want to add black-out fabric to the backs of your shade to completely block out the light. It’d be like living in a hotel.

Please let me know if you need clarification or elaboration. And don’t forget to send me pictures if you make your own shades! I’d love to see them!


THANK YOU!!! Made our first shade yesterday and will make many more. Our first version is not perfect, but its 1,000,000,000 times better than what we had before! See it at http://whatthevita.wordpress.com/2010/01/17/homemade-window-shades/
Again – thank you. Discovered your blog just recently and I've read all of your posts. Very inspirational..
You know you came up with a great tutorial when people are still commenting on it almost a year later!
The design world is so desperate for an inexpensive way to be rid of those hideous mini blinds, so thank you, thank you, thank you for this. I'm in love.
Linked to this post here:
http://mrspottsthoughts.blogspot.com/2010/01/improving-window-treatments.html
Hi, my mom sent me this link and we're both going to try it! Can't wait. If I want the fabric to cover the entire width of the window and go a little (say, 1/2 inch) over the trim/sill, what do you suggest? Should I glue a thin, top dowel that is wider and follow the width down? Or just glue the wider width to the original top rail and all the way down. Do you think the top side parts with no rail to back them will look floppy or flimsy? thanks so much!
Hi!
I am so excited. I started at 10:30 tonight, had to cut the window blind to fit my strange size window 45.75 wide by 33 long….. It took me 1 hour to hang and cut the blind. It's not 12:45 and I'm finished. I can't believe how good it looks. I'll try to post a picture if I can figure out how. I have 11 for the blind, 6.25 for the fabric, 4.00 for the glue and I plan to buy an bottom edging of some kind. I know some are worried about the look from the outside — I just went and looked and with a lot of light streaming, it looks nice with no backing. We'll see in the daytime. Thanks a ton!
PS — I'm not good at this stuff and have NEVER used miniblinds before!
Jenny, thank you SO much for posting the tutorial on this. In a matter of 2 to 3 hours, I was able to do two of the windows in my son's room, and I am THRILLED with the results. I posted photos at my blog, Pencil Shavings, here at: http://wp.me/phRhk-i8
Thank you again!
xoxoxo,
Rachel Shingleton
What a GENIUS idea! A friend forwarded this to me and I tried it out today. I cannot sew…and yet thanks to you….made what I think are beautiful shades from the icky old plastic mini-blinds we had in the kitchen! Thank you! Thank you!
I'm not sure if this link will work…but here is a photo of the first shade I finished…
http://www.facebook.com/photo.php?pid=31041490&l=eaca372a47&id=1038436175
O! O! O! I LOVE this!!! We are very very retired and on a limited budget. Pretty much have the whole house renovated from top to bottom and needing shades for at least 22 windows. I will be back with photos. Thank you!
I made these shades for my son's room and for the office. They came out good considering how much trouble I had with the glue. I used a cream color cloth and made a backing for the shade so I didn't see the slate. A perfect reuse of a broken ugly shade!
Thank you, thank you, thank you a million times over! I just completed my first mini-blind to roman shade for my son's room and I L.O.V.E. it! When we moved into this house the room had wooden blinds in a yucky yellowed cream color – these had the wider slats. I used a canvas drop cloth, lined the back with drapery lining, and trimmed the front with navy grosgrain ribbon. CUTE! And they work great! I love them so much and can't wait to make a set for my other son's room.
I've read your directions and viewed your how to pictures. I really don't want to glue on to the blind and want to be able to remove and wash from time to time. So..I thought..Velcro the ends to the blind and to the base blind, use key rings or plastic rings to attach to cord hole in the blind strip, then tie with string or safety pin to a plastic ring. Removable and easier than trying to rip off the glue. One could put up a fabric covered valance to hide the top. I think it will work and look a bit more finished. We will know later this week!
I'm dying to try this— and I'm wondering. Do you think it would work with my normal thick brown, wooden blinds? If I used a thick enough (or lined) fabric? Any chance you'll answer this? lillie_biesinger@yahoo.com. Just in case I get lucky. :)
I just made some, and used some white sheets, lets plenty of light in let provides privacy.
Best of all this was FREE!!!
I made roman blinds from scratch. I remember thinking that I should have saved the old crap mini blinds that I had up from before, because I could have used the string and pull caps. Then I though for the bedroom I'll use the mini blinds that I have. I like the way you did it, but I want to be able to take them off and wash them. Though your idea is fast and easy, I am going to do some sewing, but I will combine the two ideas. Thanks for the tutorial.
Thought you might like to see another tremendously successful version of these. I used spray adhesive and really loved the results.
Thank you sooooo much!
http://happinessisabutterfly.blogspot.com/2010/04/beautiful-blinds-on-cheap.html
this idea is amazing! my blinds look great except for the fact that the glue i used is showing through even after drying making some spots really dark but not in a consistent way. is there a way to prevent this? thanks SOO much.
Loved this idea so much I just had to try it! You can see mine at:
http://sunshineandspilledmilk.blogspot.com/2010/04/little-love-for-my-trusty-kitchen.html
Thanks so much for sharing!
Wow! I can't wait to do this in my kitchen! Thanks so much for sharing this.
I did it! Thanks for the great idea…loving my fabric shade instead of my old miniblinds by our dinner table.
Come and see! :)
salliekate.blogspot.com
I just want to say THANK YOU for this!
I just moved into an old Victorian with 38 (yes, 38. 20 of them being in bay windows) very tall windows covered in outdated pinch-pleated drapes.
I bought some $4.50 mini blinds and used the fabric from the existing drapes and saved myself hundreds or thousands of dollars in window treatments for all of those bay windows.
And it was SO easy. I did 8 blinds in one day.
I realize this was posted more than a year ago — I've been wanting to do this with some of my blinds all this time. I've hesitated because I have 2-inch wide aluminum blinds. Do you think it would work with the wider blinds too? I am hesitant to cut them up if it's not going to work. What do you think?
Just found your blog and love it!!! THis is such a fabulous Idea,I love romans shades just not the price!!!!
A blog I read frequently linked to another blog, that linked to your site. (does that make sense?) I read about doing this with mini blinds last night, and tonight…I made shades using a flat sheet that matched the colors in my daughter's room. Total cost….FREE. It was super easy and they look really cute. I think I might put a backing on it so that when the sun comes through you can't see the folded edges but other than that…they're perfect and I don't have to look at ugly mini blinds anymore. I'm going to do the two in our room tomorrow. :)
Thanks so much for posting these instructions. I just made some for our bathroom today. Took me about three hours of measuring, cutting and trying to figure out how to get the cords to come out the front and to get rid of the drive rod lever so it wouldn't make a bump. The finished product is <a href="http://dianasdoings.blogspot.com/2010/07/making-roman-shades-out-of-mini-blinds.html>here</a>.
After stumbling onto your blog a few weeks ago I have turned a coffee table into a tufted settee, a slip cover for a chair my daughter loves but needed an update (I had to buy a sewing machine and learn how to work it…but whatever) and now I just finished making some roman shades for a huge bay window. So…basically I love you. Heehee…your blog is really great!!!
I LOVE your blog and link to it often. This is the first of your projects I've completed. I was amazed at how easy this was! Here's the link to my post (with pictures).
http://kentuckyyears.blogspot.com/2010/08/my-bathroom-window-shade.html
Thanks for the fabulous ideas!
This is a nice project and after reading it I am feeling to try it in my bedroom.
Great idea!! Wow!
I have bamboo shades in my house-they have the same hardwares as mini blinds. any idea if I can do the same thing? We have exposed cords on the back of them and I have 3 kids under age 5! I'm sure they were in a recall but since they were custom made I can't find any information.
Thanks!
Just finished my first set of shades for our dining room. I used fabric glue straight on vinyl blinds, no problem. I would definitely recommend laying a garbage bag down beneath the project while gluing. I accidentally got some on my hardwood floors. :(
Thanks so much for this wonderful tutorial!
Just blogged a shot of my finished product:
http://livingtheswelllife.blogspot.com/2010/08/made-my-shade.html
Thank you for the easy-to-follow instructions! I made a shade for my boys' bathroom out of dark brown faux leather and I love the results!
Here's the direct link:
http://ahappyvalentine.blogspot.com/2010/09/roman-shade-project-finished.html
OH. MY. GOSH. I just found this via The Idea Attic, and it solves all my problems!! I love it and can't wait to make itm (and I can't wait to return the not-quite-right Roman shade I bought and was going to make do with)!!! Thank you so much!!
Brillant idea – I have to try this out on my windows now :)
Aanee xxx
Aanee @ Flower Delivery
I just want to thank you for posting this project idea! I did it in my bedroom windows and just finished the ones in my bathroom today and they came out awesome. I already had the blinds and bought fabric for cheap so it didn't cost me more then 20.00 I'm going to post pictures of them to my blog today.
Hi; Just stumbled upon your diy roman shades and think it is great. My question: Can I use heavier material to create more of an insulated roman shade?
Thanks.
Tim
Love this project. Just bought a single microfiber panel from Walmart for less than $7, a miniblind from Goodwill – helped my daughter make a great looking shade this evening. Brilliant!
ohhhh….awesome really great work…amazing tips and tricks
This tutorial seriously changed my life. I used to make roman shades from scratch, using a sewing machine, hand sewing the rings, cutting the dowels, the whole deal – and it always cost so much money for all the components…not to mention TIME!!
I just used this tutorial for the 2nd time in my daughter's room — it came out fantastic. THANK YOU!
LOVE this! Here's a question for you: What if your home came with thicker, white wood blinds? Could I use those for the same project?
Thanks in advance!
I just bought my blinds from Target and got my fabric, but I'm looking at the directions about mounting the blinds and I'm confused. I have to mount a plastic bracket into the top two corners of my window, but then after I set the blinds into the brackets, I have to slide 2 plastic pieces into the front of the brackets to hold them in place. How can I do that if I'm supposed to have fabric glued to the top bar? Do I have the wrong kind of blinds? How should they mount to my window? Help!!!!
This is a great idea. How do they hold up compared to regular blinds? Do they still work as well?
Once again, great DIY!
Just made four roman shades for my office using your tutorial – thanks, Jenny!
http://10rooms.blogspot.com/2011/03/blinds-are-finished.html
Your idea has made me so excited. Before i read you blog i made one out of wood and dowels buy imitating a roman blind i bought on sale for 2 dollars that was the wrong size.
It was a lot of work and the mechanics were not as functional as using a mini blind.
I also think your way can be the start for many other custom problems to be solved.
Thanks for sharing. I cant wait to try it your way.
This was a life saver for me, I decided to sew my edges and sew velcro on the fabric and glue velcro on the blinds – so I could take them off and wash them. It makes the process longer – but worth it. I will post a pic within the next day or so.
Hatefulhannah
does anyone know where i can get a liliac or purple mini blind?
Great idea… my question though, is how come you don't cover the back?? For me, I'd like it to look nice from the outside as well. I'm still bookmarking this for future reference.
Hi Jenny,
Thanks sooo much for this project. I loved it! Simple to follow and I couldn't be happier with the results! I used a black and white floral print for our office and brown and white leaf print for our bedroom, looks very retro and my husband liked the results as well. Great way to change a room, and much cheaper than buying new blinds. I will write a response with pictures and link back to this great article on my blog, http://www.beautycareme.com/ because I'm sure many people will find it as useful as I did. Thanks again for such beautiful and crafty tips!!
Do you think that this could be easily modified to put black out fabric on the back?
Looks great!
I stumbled across this awesome idea whilst Googling how to repair a broken mini blind (the slats wont open all the way anymore – I think the mechanism is stripped?) – but since they still close all the way I think I can still do this?
I tried this and I totally glued the lifting strings between the slats and the fabric! Doh! And even worse, it took me pulling so hard to lift them that I actually broke the top bar. I'm such a dummy. I'm hoping some super glue and an X-acto knife can save this travesty, because they do look pretty cute!
LOVE this tutorial! Thank you so much for sharing it. Here is my version: http://frostedgingerbread.blogspot.com/2011/06/new-window-treatments-at-last.html