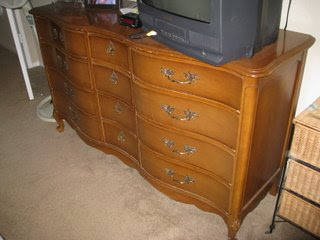
Katy wrote in asking for advice on updating her vintage bedroom furniture that she inherited from her grandmother.

Katy likes a clean, uncluttered look and would like to stick with her black, white, red, cream and gold color scheme (which we’ll talk more about in tomorrow’s post). I love the curves of the furniture and I think an easy coat of black paint on the dresser and the nightstands would look great.

Here’s what I would do:
1. Remove all knobs and pulls. I think the antique brass finish of the current knobs will look great with the new black paint.

However, if you’re set on replacing the hardware, I’d consider something like these from Home Depot.  2. Use your finger and a damp cloth to fill in and wipe smooth the dings in your furniture with wood filler. Make sure you are using the filler sparingly and only applying it the gouges, keeping the surface as smooth as possible.
 3. After letting the filler dry completely, carefully sand down the filled spots with fine grade sandpaper or steel wool, making an even surface. It’s really important that these filled spots are completely smooth.

2. Next comes the primer. One coat should do the trick and will ensure that the new paint job doesn’t chip or flake. Zinsser primer is my favorite. 3. Apply two coats of black paint in a semi-gloss finish (with drying time between coats).
A side note about painting furniture: I recently tried one of these flat foam mini-rollers to paint a table top. It made a smooth-as-glass surface. It was awesome and I totally recommend them for painting big, flat surfaces. Also, for the other non-flat surfaces of the furniture, it’s a good idea to invest in one of the more expensive brushes at the hardware store (around the $10 range). The resulting finish is so much superior to the economy brushes and is well worth the $2 or $3 difference. Although, I wouldn’t use a good brush for the primer coat, since primer can be hard to get out of paint brushes.
4. Once your paint finish has been dry for about 24 hours, you’re ready for the last step, finishing wax. Apply the wax with a lint-free rag in a circular motion. The wax seals the furniture, protects the surfaces from everyday wear and tear, and gives the furniture a great, antique luster that only wax finishes can. I think you will be surprised at how great your new-old set will look!
Stay tuned for tomorrow’s post on redecorating Katy’s bedroom…


Oh can’t wait to see what she does with it!! It is such great solid furniture~~~ I am in a bit of a decorating slump but looking at your blog has put some pep back into my step!!!
Thanks for the “mojo”!!
Really, paint over the woodgrain? I'm scared to do that and I have a very similar bedroom set, but I've grown to hate all the nicks and marks on it!
Oh my gosh, I have a very similar bedroom set and it has such nicks and stains on it, but the thought of covering the wood grain scares me. Convince me to do it!!!! I can't wait to see her finished product. P.S. Your blog is the first thing I open each morning!!!
Get to learn more about how to fix the bluetooth audio device easily in windows 10. Most of the people face this type of problem, but now you can easily fix this by clicking on the link i mention in the name section.