**Wow, this turned out to be a wordy post. Apologies in advance.**
When I posted last week about how I like to work in layers on decorating projects, I got some comments and email feedback asking for elaboration. I’ve been wanting to share my new pillows anyway, so I thought maybe I’d share a little bit more about my overall approach to decorating a space. It’s not fool-proof, but this has been pretty tried and true over the years for me.
Here’s how I get to the first foundation layer with a client. If I can have these three questions flushed out at our first meeting, we are in good shape.
1) How do you live in the space?
So, the first point is obvious, but so important. What is the primary function for the space? And be honest with yourself. It’s okay if you mostly watch tv in your living room. It’s easy to convince yourself that a pair of lovely little antique chairs would be perfect for your space because they are so amazing to look at. But if the chairs are uncomfortable – no one will ever sit there. Waste of space. Waste of money. Function comes first.
{BUT! If you have the room in your budget, get those chairs you love and put them where the function of the seats would be different, like in a bedroom or in an entry.}
2) What has to stay?
Deciding what has to stay and what can go is a really great way to overcome decorator’s block. People will sit and stare at their old furniture and accessories and work and rework configurations and feel like nothing fits right. Or, and this is a really tricky one, people will fall in love with a handful of fabrics and run themselves in circles trying to figure out how to use them all together. Don’t let that happen to you. It’s okay to love a piece of furniture or a fabric and decide to not incorporate it into your home.
Be a ruthless editor. Do you love it? Do you use it? Does it work well with what you DO love and use? If not, can it go elsewhere? Or can you sell it and then maybe buy something better for the room? Try to only keep things that have both form and function perfectly suited to your space and to your budget. (which is a whole other post for another time – decorating for your budget)
3) What’s your inspiration piece going to be?
Once you’ve put on your Editor’s hat and made an inventory of the items you’re keeping, the exciting part starts! When I decorate rooms in my own house, I like to pick one serious statement item for each space. A piece of furniture, a fabric pattern or a colorful work of art.
This is key: Don’t get caught up in matching everything in the room to that inspiration piece. Just use it as the first piece of the puzzle and build from there. A room where everything matches perfectly can feel lifeless and flat, so try to mix it up. Throw in a random color that’s nowhere to be found in your inspiration. Use an accent color that’s four shades darker than the color found in your inspiration fabric.
Rather than mastering the matching of fabrics and furniture, focus on nailing the mix.
Here’s some applied theory. I am probably on the second layer of decorating my living room and it’s starting to come together. But, this is how I figured out the first layer.
1) For us, our living room is used for one part tv-watching (just keeping it real here, folks), one part hosting (we like to have friends over), and one part kids play room (though toys are usually corralled in the girls room, just a few feet away). This all means we need kid-friendly and comfortable seating and lots of floor space. I bought a new slip-covered sofa and had our green linen LEE roll arm reupholstered in an outdoor velvet and I bought a pair of arm chairs (posts coming soon about the specifics). We opted out of a coffee table so we could have more room for the kids to run around. And we got rid of the old ottoman because I’m not planning on having another baby for a while (ba dum dum).

We do have lots of side tables and the big red credenza as flat surfaces for books and drinks, etc. And we have a pair of extra benches that sit in front of the tv for extra seating (and to keep Evie out of the DVDs). Also, despite my huge sale last summer, I still have ridiculous amounts of stuff, so the two armoires act as great storage for china collections, picture frames and other accessories not currently in rotation.
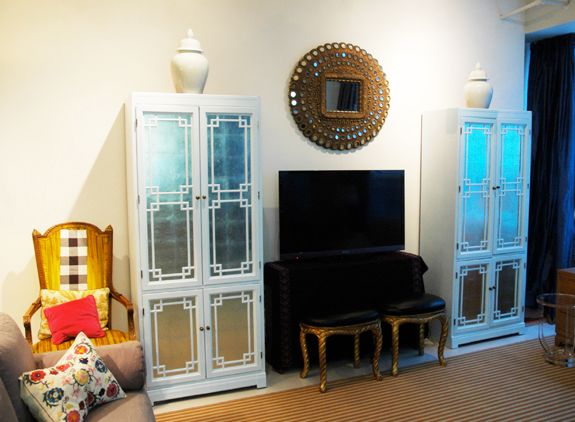
I tried to buy and place things in our living room with purpose. I sold stuff that I still liked, but knew wouldn’t work for us here in a loft apartment. And I kept things that fit the space and our needs and that were investment pieces, like the LEE sofa. I’m pretty sure we’ll have this thing for decades to come. It is as sturdy as can be and I love the pretty shape. But best of all, it is so dang comfortable. We call it the nappin’ couch.
Since the LEE is the last thing your eye stops at when you walk into our apartment, I knew the inspiration item needed to be some killer pillows. I searched high and low for just the right pattern. I wanted something colorful, floral and modern. I thought a lot about this Designer’s Guild pattern, called Rugosa, but the scale is really better suited for drapery.

But right next to it was the heart-stopping Orangerie. For some reason, I had never seen this pattern before (though I’ve recently seen it used as wallpaper).

The colors are amazing. The pattern is big and bold, with a crisp white background and there’s lots of black, which I like in florals. And I love that the flowers have this really lovely hand-painted quality.

It’s a pricey fabric, but I only needed a little more than a yard to make two 12×36 lumbar pillows. To help justify the cost of the fabric, I sewed the pillows myself and I’m so proud of the black piping and the invisible zipper. Each side has a different scene (the repeat on this fabric is huge), so I can flip and switch these up to see different flowers and colors. Also, they’re fully lined and the inside edges are serged to help them stand up to washings.

We’ve had a chance to live with these pillows for a bit now, and I have to say that I’m a big fan of the long lumbar style, especially for a deep couch like ours. The pillows provide nice back support, but don’t get in the way at all like big square throw pillows sometimes do.

PHEW. 10 points for you if you’re still reading this.
I’m beat, so here’s the conclusion in a nutshell: Once we had figured out the function of the space, the main pieces we needed and then the inspiration fabric, I have been able to sort of build a master plan. After deciding on the floral pattern, I knew I wanted a striped rug. From that, I knew it made the most sense to do a solid color on the curtains. The next step is reupholstering the arm chairs in a small scale print and making a skirt for the tv console with a more organic/flowy pattern, like an ikat. The next layer will be the smaller stuff: reupholstering and painting the rope benches, pillows for the chairs and the gray sofa, lamp shade changes, throws, accessories, etc. I’m not really even thinking about what I’ll do for that layer until I get there and can see what colors and pattern scale I’m lacking in the room.

I’ve learned the rooms I like the best aren’t usually designed with moodboards in one day or even a week. I think you’ll be most happy with your space if you move a little slower and try to decorate in layers.
Aaannd, I just want to point out lastly that it’s 75 degrees here in NYC today! Awesome. I’m looking forward to lots more one on one time with Evie’s belly, which has been absolutely neglected all winter long and needs lots of tickling and squeezing.


Thank you for this! So incredibly helpful. I recently got married and graduated college so this is the first time I've ever been responsible for decorating more than just my own bedroom so it's been a bit overwhelming. This post helps a lot! Please keep advice coming :) I love coming to your blog for inspiration for my space! Thanks again!
It's my all time favourite pattern- I love it as wallpaper and I loooooveee as fabric. Your pillows are amazing- I am seriously jealous of those puppies and I think you just officially sold me on the idea that Orangie has to find a place in my house- love love!!
Love the long post! Like many of your readers I favor the posts where you really dive in and share a lot with us – of course I recognize that those are the posts that take the most time for you to do, and that's partly why I appreciate them so much. Thanks for sharing! Love the pillows and am very envious of your mad sewing skills.
I just saw your fabric in tradhome today — used it on a louis xvi chair.
http://www.lonnymag.com/issues/19-trad-home/pages/1#p55
(tradhome spring 2011 page 105)
Love seeing that fabric come up somewhere else. Right on trend :) And I love, love those pillows. Fabulous work as always.
There is a chair upholstered with your fabric in the new TradHome. Looks great!
Where can I get that fabric?! I am so in love with it and I can't find where I can buy it online. help?
i have to thank you for this post. i get so frustrated with myself, always having a "work in progress" kind of home, but this really makes me feel okay about taking my time and finding new treasures at my own pace…..and even permission to blog about my own home, which i've been terrified of doing since it's not in photo-worthy finished form.
and might never be, i might add :)
also, FAB job on those pillows!!! they're killer!
that fabric is really gorgeous. that black piping makes it really stand out! great job.
Love the pillows! Did you store your nolonger food worthy pyrex in the same place you are storing your ottoman? :) Sorry, after I saw the "ba dum dum," I just had to respond. Can't believe how big Evie is!!
Could you give us a hint as to the price of the orangerie fabric?