{I know you guys are going to hate me, but there are no after pictures in this post. Sorry! There are just too many projects and pictures here. Next post. Promise.}
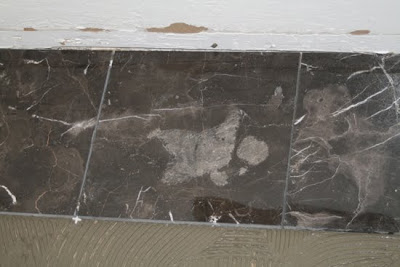
While Ali and I were shopping for fabric and accessories, my mom tiled the floor with this beautiful black marble. There are lots of great tutorials online for how to tile your own floor. My mom is awesome and fast. This was the last bathroom in their house to redo, so my parents had already invested in a tile cutter and the other necessities, but it is easy to rent a tile cutter from Home Depot or Lowes. We used black grout and 1/8″ spacers.


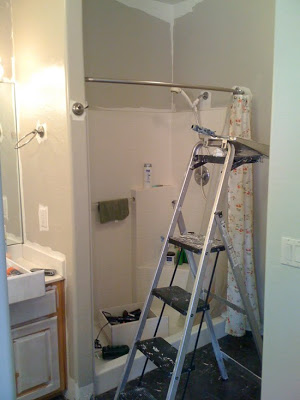
By the time we got back from shopping, the grout had dried and it was time to get going on the other projects of the room.
First up: the walls.
To save time, I always roll first and get as close to the edge as I can with the roller. Then I cut in with a two-inch angled brush after the rolled portion is dry. Repeat as needed. I rarely use painters tape. Just a steady hand and a wet rag to clean up and mistakes.

The walls in the bedroom were painted RL’s Montauk Driftwood and the bathroom walls were painted Hopsack. We softened the color of the Hopsack by about half with the addition of white paint. The result is a pretty oatmeal color that was better suited for the bathroom space and looked better next to the new pale blue wall color.
While the walls were drying, we painted the furniture.

When I don’t use spray paint, I almost always roll on the paint with a foam mini-roller, let that first coat dry and then come back with a brush for all the grooves.

We used Ralph Lauren’s Smoked Glass on the bed and Hopsack (no white added here) on the night stands. The curtain rods were spray painted Heirloom White.

The antique-glazed white console table was painted Martha’s “Yellow Magnolia”.

I just used a $3 sample pot of paint for this project.

The hope chest got some decorative molding and two coats of a slate blue color we mixed with paints we had lying around to save cash.


The top of the hope chest was reupholstered with the floral fabric.

These little decorative tins were spray painted Heirloom white. We got them on major clearance from Home Goods.

Moving on to some of the more involved projects…

Ali picked up this book in the clearance section of her local library for just a few dollars. We had 400 beautiful botanical plates of gorgeous wildflowers to choose from for framing.

These frames from Michaels are so great and I’ve been using them in lots of projects lately. They come in two-packs for $7.

You can use them without mats, but I decided to use these mats, also from Michael’s, for about $2.50 each.

We measured and mapped out the gallery wall.

And you’ll just have to wait to see the afters! ;) but here’s a sneak:

Remember the giant round mirror from Home Goods? I sanded off the scratches and rough spots.

Then I brainstormed ways to evenly space out these little wooden floral appliques. At first I was just going to find the center point and then draw some straight lines on the mirror with a dry erase marker for registration marks.

Then my dad reminded me about geometry! (who says you never use math in real life?!) It was surprisingly easy to figure out how far to space out the appliques once we determined the circumference of the frame.

I glued each piece down, let the wood glue dry and then put on the first coat of paint (Martha’s “River Mist”). I wasn’t too worried about the paint getting on the mirror because paint cleans off mirrors so easily with a little windex. Any tougher spots clean up very fast with the help of a razor blade, so no tricky painters tape needed.

My mom was a busy little seamstress while we painted. She turned the 18 yards of Barbara Barry Poetical linen into six beautiful panels. We wanted the panels black-out lined, but that lining can be expensive with so many yards needed, so we used $10 canvas drop cloths from Home Depot for the lining.


Also to save on cost, we decided to forgo curtain rings. Mom sewed in a panel with evenly spaced slits for the curtain rod to weave in and out of.


The result is actually really similar to the drape of a pinch pleat (as you’ll see tomorrow in the ‘after’ photos), but does not require rings and hooks and also takes a lot less time to sew than pleats do.

My favorite project from the room redo was inspired by the mirror-on-mirror image I posted about a few weeks ago. Tricia Huntley, who was the interior designer behind the layered mirror image, emailed me after my post and shared her strategy for hanging her mirror on a mirror. Basically, she used a lot of planning, foresight and a contractor. We really didn’t have any of these things, so we just made do.
So I decided to look for a very lightweight mirror. I knew this mirror from IKEA would be perfect. It was light and is sort of reminiscent of a Venetian mirror, but more modern.

Here’s where my secret weapon came to the rescue. Have I ever shared here how much I love 3M Picture Hanging Strips? They are amazing. No holes required and each strip holds up to 10 pounds.

We used six strips on each mirror just to ensure a strong hold.

Measure twice, stick once!

The result is amazing. You’ll love the photos tomorrow!

Once all the major projects we done, we brought all the accessories in and started unpacking. It looked like Christmas morning aftermath. Such a mess!

See you back here tomorrow morning for the after photos!


I am 100% doing the mirrors in my new bath!!! That is beautiful; thank you for the how-to. Can't wait to see the final pics.
you seriously shock me w/ you diy mojo…..can't wait for tomorrow!!
Oh my goodness, I can't wait to see the "after" photos of this space!!!
I have Poetical (in green) on order from Kravet for some window treatments in a kitchen. I excited to see how it looks in real life (well via the internet).
Teresa
I literally CANNOT wait to see all these projects come together!
great post–I love all of the DIY! just a warning: I've had the 3M command hangers fall off of my wall after a few months (and I applied them as directed, with the alcohol and everything). Thankfully nothing was broken, although a frame (and my wall) were dinged. I'm just commenting because I'd hate to have something bad happen with that gorgeous mirror!
QUESTION-
Do you need to sand or put an undercoat on the bed before painting? Did it have a finish on it?
Thank you – it looks great so far – hope you are feeling a bit better.
This is going to be stunning! You guys work fast! I can't wait to see the end result!
Clearly, this was no vacation for you! I'm absolutely amazed by how much you accomplished in such a short amount of time, and can't wait to see the after photos!
i'm in awe. you've got mad decorating skillz!
Before…DURING…After. The during shots have definitely made me curious. It's looking so cute in there. What a fun project.
jbhat
Ack! I canNOT wait to see this room after! Love the mirror from Ikea and might just have to try that on our huge bathroom mirror. Lookin' good! You amaze me!
I am DYING to see the afters. For real, I just feel like I can make my home beautiful by coming here! You are so inspiring, and I'm stoked to see the afters. And that mirror on mirror thing is genius.
Just a quick note to say "so glad to find you!" I heard about you through The Skirted Round Table today, and popped over to see your blog. It is wonderful and I realized you have a link to my blog. Thank you so much! I have gladly returned the favor. I will be back to visit!!
I am so excited for this! Thanks for sharing your processes!
Cannot wait to see the finished project!! You've been so creative and used great resources!
I am loving EVERYTHING so far and can't wait to see the final pictures! Such suspense!!!
EXCITING!!!! You girls were busy, busy, busy! Can't wait for the big reveal.
I cannot believe how excited I am to see the reveal….but even more excited about your innovative design skills. You are so talented! And you and your family make such an incredible team!
I can't wait to see it all together. Obviously it's going to be amazing.
Love your DIY layered mirror project! What a great idea. I too can't wait for your after picks! Great work :)
Jenny , when can you and Mom come over. I am astounded. I listened to Skirted Rountable and had to come and see the latest. Be back tomorrow. I worked on a painting while SRT was on and here I am It is 3:18 am!!
Can't wait for the Afters! You are freaking AMAZING
Oh my goodness! It looks absolutely amazing! I have been a follower for a long time now. You inspire me so much! I just LOVE your style. Thanks for sharing!!!
I love, loved these two posts. What lucky parents you have!
I could really use your services. We have a 1895 brick house in upstate NY and I am stumped with some of the rooms, namely, where and how to place furniture, etc. Help!
I love the bathroom idea of mirror on mirror. Can you go into greater detail on how to measure this out. Thanks
Fantastic! You rock!
wait…you did this in one weekend?!? You sure must have an energetic family! It looks amazing!
Looooove the mirror-on-mirror! I'm thinking of doing that in my bathroom but I'm a renter. Will those 3M strips come off cleanly from the other mirror?
You are Amazing, what a bunch of great ideas and tricks!
Thanks for sharing
wow! this is so beautiful! what a great job you did and your parents are so lucky to have a daughter with such talent.
I really enjoyed the tutorials on different things such as the drapery panels and the bathroom mirrors. The after was really awesome too.
Thank you for sharing. My sister is about finished building her new bedroom and it has two walls with nothing but windows. We will need to do very inexpensive drapery for privacy and blocking out the sun and heat in the summertime.
Thanks for all the inspiration and tips! This inspired me to turn our master bedroom around from storage room to a beautiful room.
You can see pics on my blog
http://sarahnielsen.com/2010/08/our-master-bedroom/
This blogs is absolutely amazing!!! i really liked, i think all the information contained in this blog are very useful and very interesting. i really enjoyed reading. i am very curious for everything, usually i want to know new things. this is the reason why i like to know.
buy viagra
Water clocks did not depend on the observation of the sky or the thomas sabo sun. The earliest water clock was discovered in the tomb of Amenhotep I who was buried around thomas sabo online shop deutschland 1500 B.C. Greeks called them clepsydras ; they were stone boxes with sloped sides that allowed water to drip thomas sabo anhänger at an almost unceasing rate from a small hole in the bottom.Other clepsydras were cylinders or thomas sabo charm club anhänger bowl formed engineered to slowly fill up with water coming in at a near sustained pace. Markings on the thomas sabo anhänger günstigangebote thomas sabo anhänger at night, it is thought they were utilized in the day hours too. A metal bowl with a hole the bottom was placed in a bigger bowl crammed thomas sabo charm with water.It would fill and then sink in a certain quantity of time.Since water flow was not exactly predictable sabo charms and difficult to control the flow accurately, timepieces that depended on water were very inadequate. People sabo charm were drawn to develop more accurate ways of measuring and telling time.The development of quartz crystal clocks and timepiecesthomas sabo anhänger sale depended on the crystal size, shape, and temperature to create a frequency.
Can you update with the link to the after photos??? I love it!