I love the glam factor that mirrored furniture can bring to a room! My Rhode Island client and I were really hoping to get a little of that glam into her bedroom. Unfortunately, mirrored furniture is really expensive – even the cheapy stuff from Target or Pier 1 was cost prohibitive in this project.
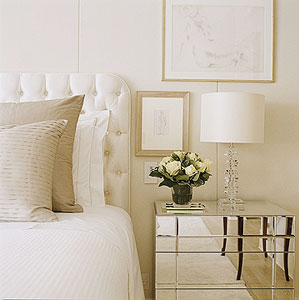
When I found this image from House Beautiful, I was inspired to look into getting mirror custom cut to fit a boxy and inexpensive dresser. That also turned out to be completely out of our price range (several hundred dollars for just the mirror for each dresser).

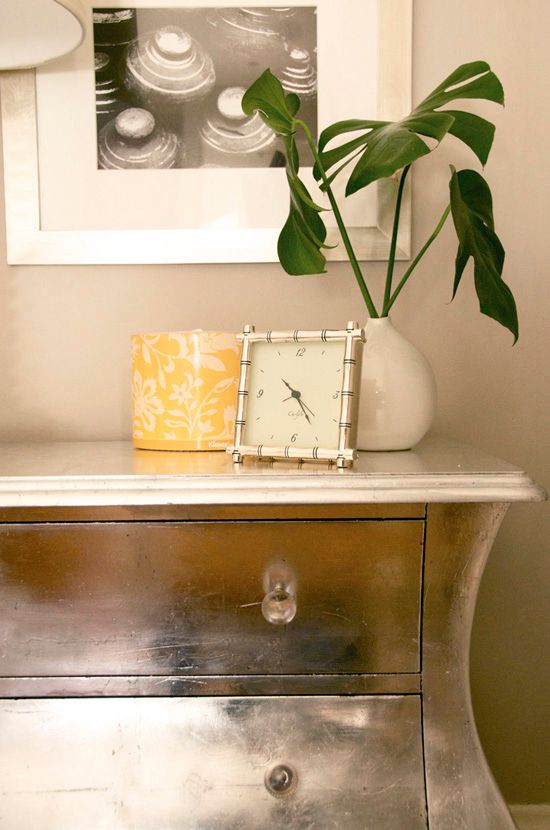
So, we were on to Plan C! I did a little googling and found some images of silver leafed furniture…


We both thought the silver leaf was a good alternative and decided to take the plunge. I found two bombay chests at HomeGoods that were on clearance for $75 because the paint was chipping. The size and shape were perfect for the room.

Once home, each dresser was lightly sanded over the chipped parts and then given a coat of chocolate brown paint (Ralph Lauren’s ‘Galvenized’). Once the paint had cured, I coated both dressers with 3-hour Quick Set Gilding Size, available here and at most art supply stores. I used about a pint between both dressers.

The gilding size acts as the glue that holds on the leaf. It’s applied just like a varnish, and after waiting for a specified time, the size becomes tacky and is ready to be gilded.

There are many types of metal leaf. For this project, I used aluminum leaf because it was the brightest silver tone and looked the most to me like mirror (and the bonus is that aluminum is less expensive than silver leaf). A box of 500 5.5″ x 5.5″ sheets is $40-$50 and was more than enough for these two dressers.

As far as application of the leaf goes, the basic idea is to carefully lay the sheets down with as little folding of the leaf as possible. Then using a soft bristled paint brush, just tap, burnish and rub the leaf down. It gets really easy with practice – you’ll feel like a pro after only 4 or 5 sheets.
Here are my best tips for gilding:
1. Do this project in the garage or outside if you are working on a large scale (like on furniture). The metal leaf bits get EVERYWHERE (which is a bonus if you are a four-year old obsessed with fairy dust)

2. Start with a flat, horizontal surface (like the dresser tops) to get the technique down before you attempt the vertical front or sides.
3. Once you’ve burnish one leaf sheet and are ready for the next, place that next sheet slightly on top of the already burnished leaf. By overlapping the sheets a little, there will be less of a gap/crack and the resulting look will be more seamless.
4. I ended up sort of liking the cracks and gaps in the gilding (it looks like antique mirror to me, with the chocolate brown base peeping through), but if you don’t want to see the “imperfections” just use a bit of extra leaf and rub it into the gap or crack with your finger and the size will quickly pick up the leaf bits.

5. I was shocked at how resilient the gilded surface was after the size had fully dried. My client opted not to seal the finish because she wanted it to gently wear over time, but it would be easy to apply some Wipe On Poly to protect and seal the gilding.
The process looks more intimidating than it really is. While it’s sort of time consuming, I was able to catch up on my tivo-ed shows while I gilded (do you spy my remote?).

We used vintage lucite knobs from eBay as a final touch and I think that really moved these formally “Olde World” Homegoods dressers in the “Glam and Gorgeous” category.


This really inspired me, and I just completed my own! You weren't kidding when you said this was time consuming – but so worth it! Thanks!
this is awesome!
okie dokie. Now that I've found this post, I'm going to try this on an antique kidney-shaped desk I just bought. BEAUTIFUL work, and I don't mind a little pixie dust obsession, either. :-)
They look beautiful. I'm about to try gilding a table, which is how I found your blog.
love the silver leaf dresser. i'm going to try and silver leaf a chest i have at home. wish me luck!!
wow great i have read many articles about this topic and everytime i learn something new i dont think it will ever stop always new info , Thanks for all of your hard work!
Thanks for the helpful post! I would not have gotten this otherwise!
Just want to say what a great blog you got here!I’ve been around for quite a lot of time, but finally decided to show my appreciation of your work! Thumbs up, and keep it going!
This is just gorgeous! I'm going to try this on my jewelry cabinet. Thank you so much for the inspiration!
I have wanted to post something like this on my website and this gave me an idea. Cheers.
Just beautiful! I love the mirrored look, but alas, too much for my budget :(
Jenny ^above^ and I will be having a leafing party together this next month! Thanks for the inspiration!
Those turned out amazing! Great jpb!!
this is so cute!
I love this! Thanks or the tutorial.
I am in LOVE! Totally going to try this! thanks so much for the tutorial!
This is amazing! You did a fabulous job on this piece. Thank you so much for the tutorial.
This is amazing! You did a fabulous job on this piece. Thank you so much for the tutorial.
It looks fabulous!
I love silver leaf- such a bold statement!
Elle
This is a beautiful job and it's just what I was looking for. I purchased two of the bombe chests from Bombay for $25 each from the clearance sale when they went out of business in the US a couple of years ago. The marble top is cracked/broken and I don't know how to replace them but thanks to you, I now know how to silver leaf them, which I sincerely appreciate.
hi…u just got me inspired i saw ur post thru centsational girl…i just silvered leaf my dresser but i didnt like the way it looked well some areas looked perfect and some of them they were too wrinkley…do you think if i poly them those imperfections will blend ?i wish i can add a picture so you can give me an advise
Wow! It's awesome blog post here. really very interesting for reading.Like those pictures.. I enjoyed it.
Great post,very informative.
Please continue to write more
interesting post in your blog.
mobility vans
terrific! I didn't read all of the comment/questions, but do you recall if you used water-based or oil-based size adhesive?
This is amazing! I love it! I gold leafed a mirror, but that was small stuff next to this. I have two end tables I'm working on with silver metallic paint, but I think I'll silver leaf the top. In one blog I saw, she used crinkled up aluminum foil and sizing. Awesome! Thanks for sharing.
Diddie
Hi! I want to try this project, but when I went to the website for the aluminum leaf, I wasn't sure which product I was looking for. Can you give me more detail?
::slow clap::
AMAZING.
You've inspired me. During my lunch break (and after 3 days of researching) I went to an art supply store and bought some imitation silver leaf and size to cover a blanket box I rescued from the dump. Wish me luck!
I just have to say that you inspired me too! Your blog posting was a reason I decided to aluminum leaf an old french provincial chest and nightstand that I've had for some time. I posted about it on my blog. Feel free to check it out. :)
http://diyprojectsbynina.blogspot.com/2012/05/aluminum-silver-leafed-french.html
This looks so awesome! I really want to try as well. WIsh me luck! Those tables were a great find too.
I absolutely love this dresser and have been inspired to do the same project in my home. However, I am having trouble finding the aluminum squares. I went to the link you provided for the base, the 500 squares were $168. Can you tell me where you purchased the box of 500 for $40-$50?
I get my leafing supplies from the Gold Leaf company…..they have it in various prices….the box of 500 aluminum leaf I just bought was $69.00
aluminum leaf will tarnish over time….maybe you could seal it at the “right” aging point for your client….
They turned out beautiful! Question though; is there a reason why you painted them dark brown first and not just primed them with something similar to out-of-the-can Kilts or Zinsser’s 1-2-3 Bullseye Primer which in both cases are white? Also, do appreciate you sharing your tutorial but it would be extremely helpful if you could advise more specifics on the actual products you used as there appears to be several choices from the links you provided. (Thank you.) -Brenda-
Hi it is amazing , I did not understand how the aluminium leaves hold on the furniture? Do u use some glue or is it sticky? Also with what did u smooth it that it looks as one piece.
thanks.
regards
gabriela
Awesome!