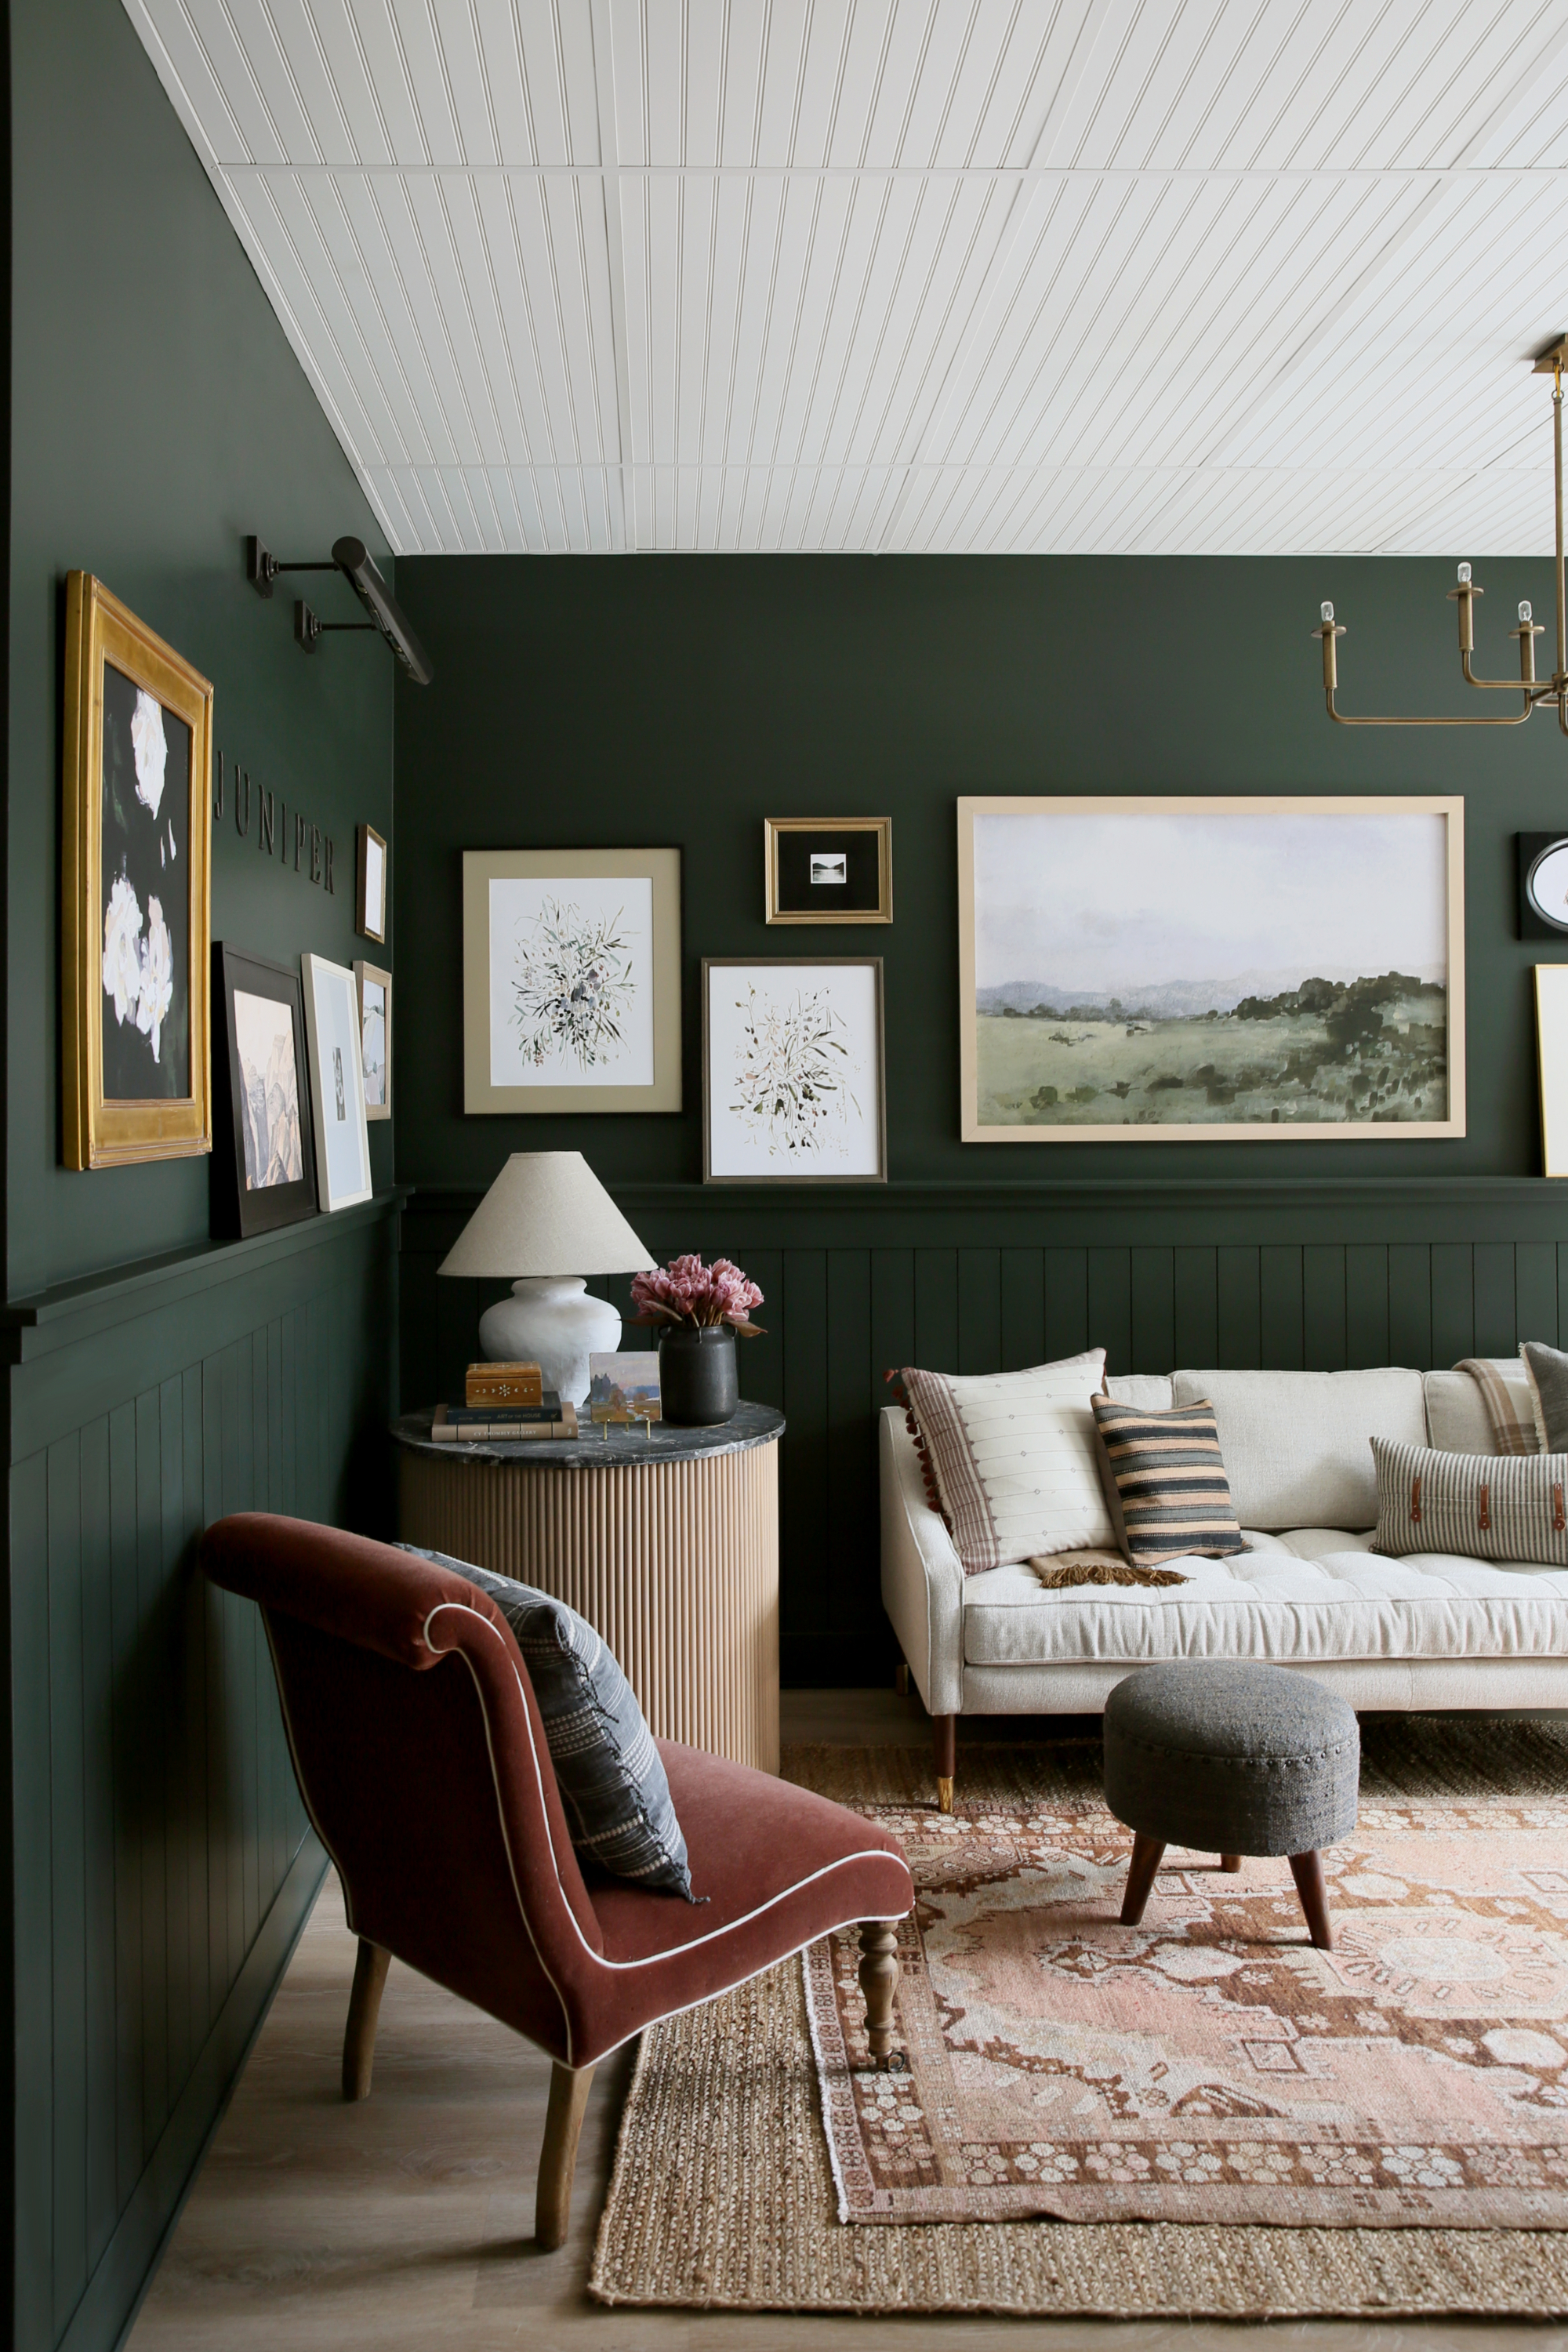
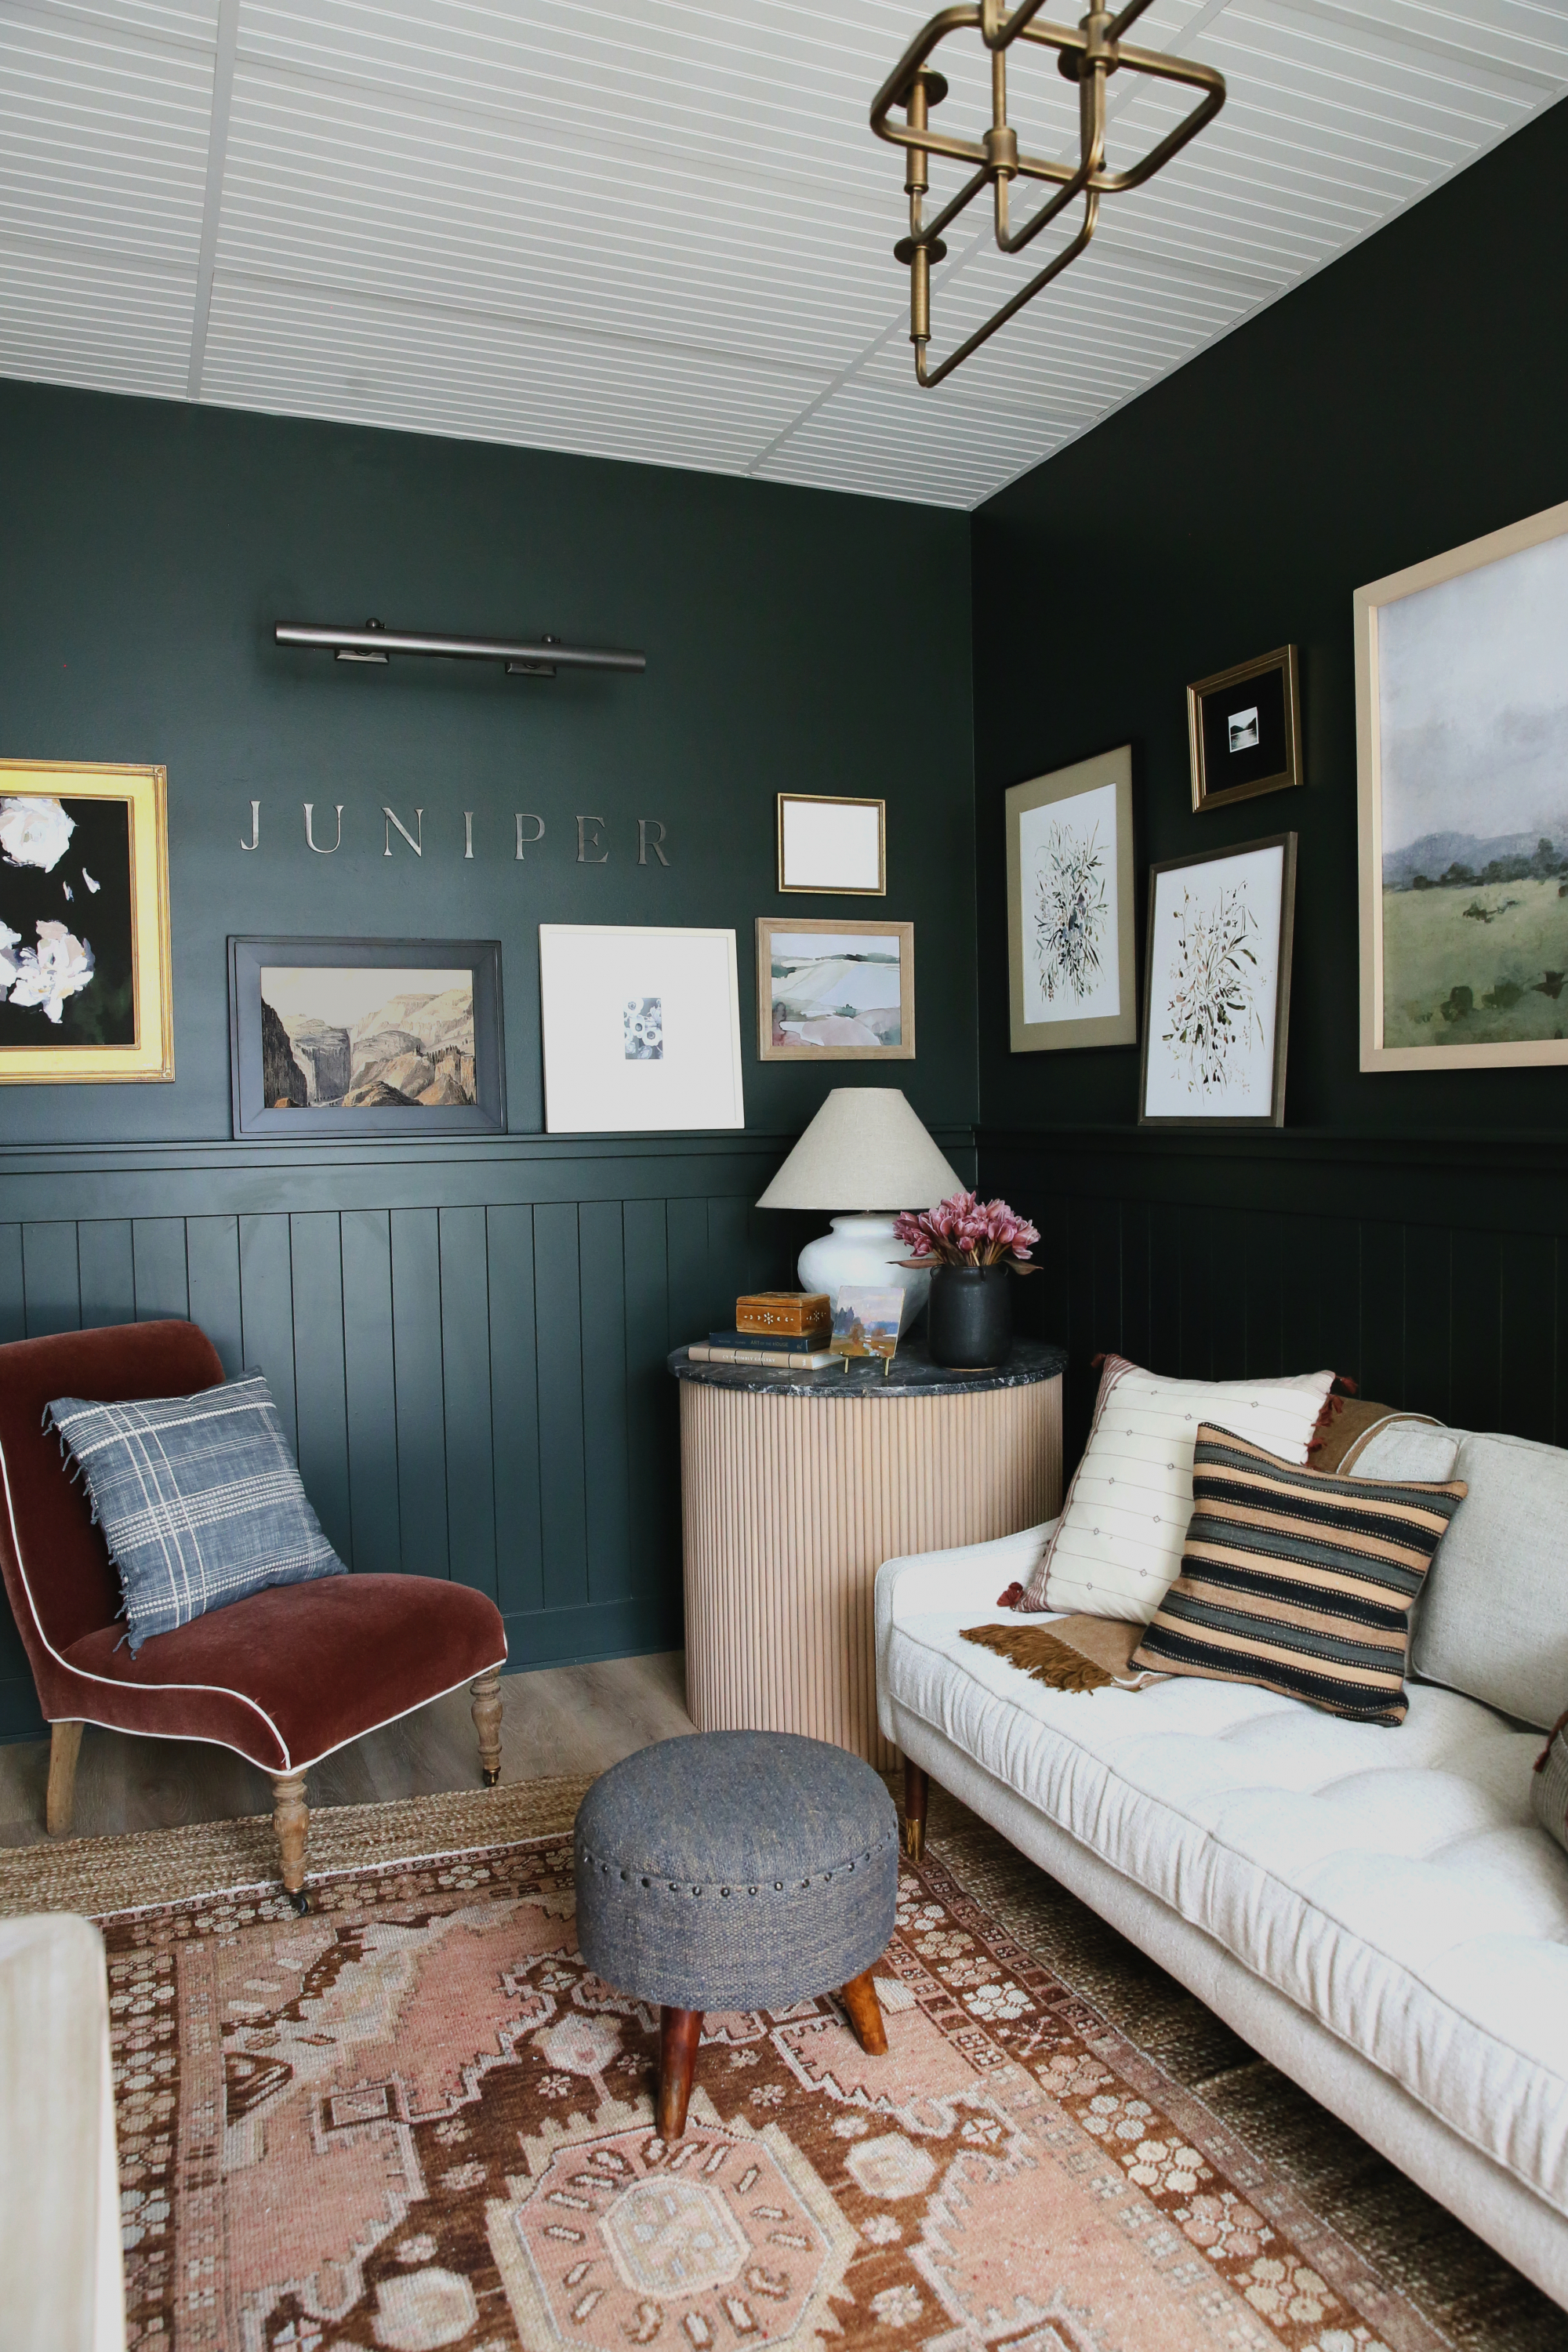
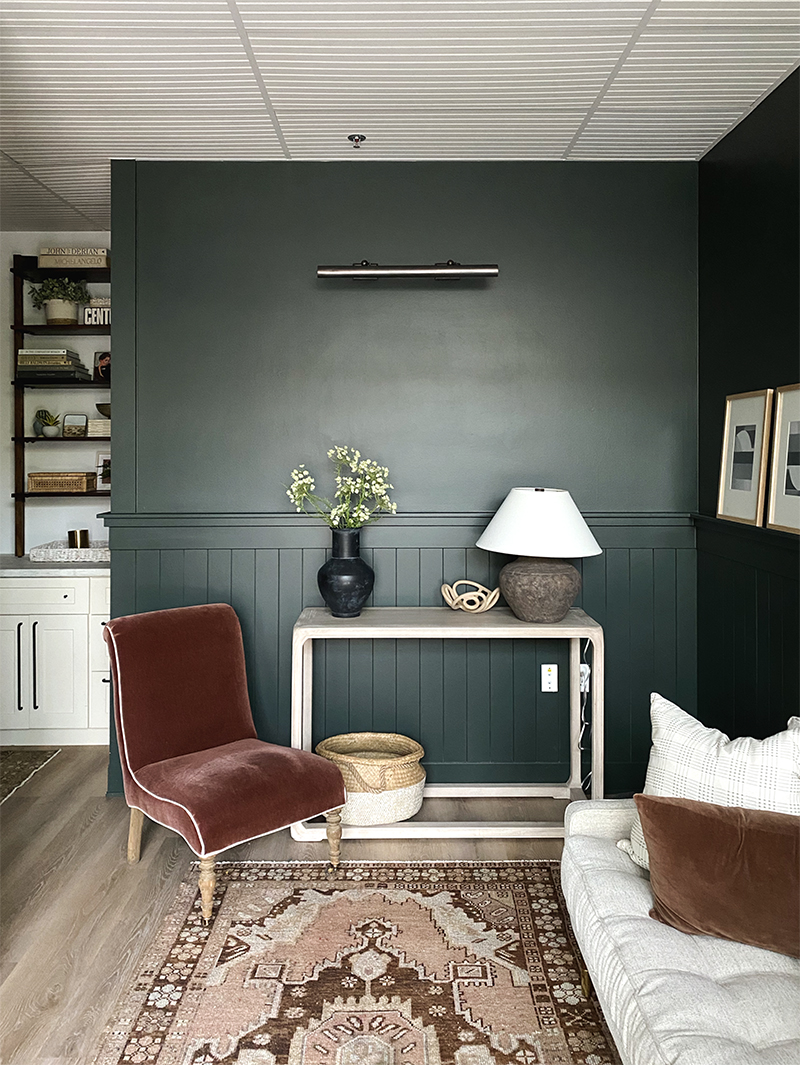
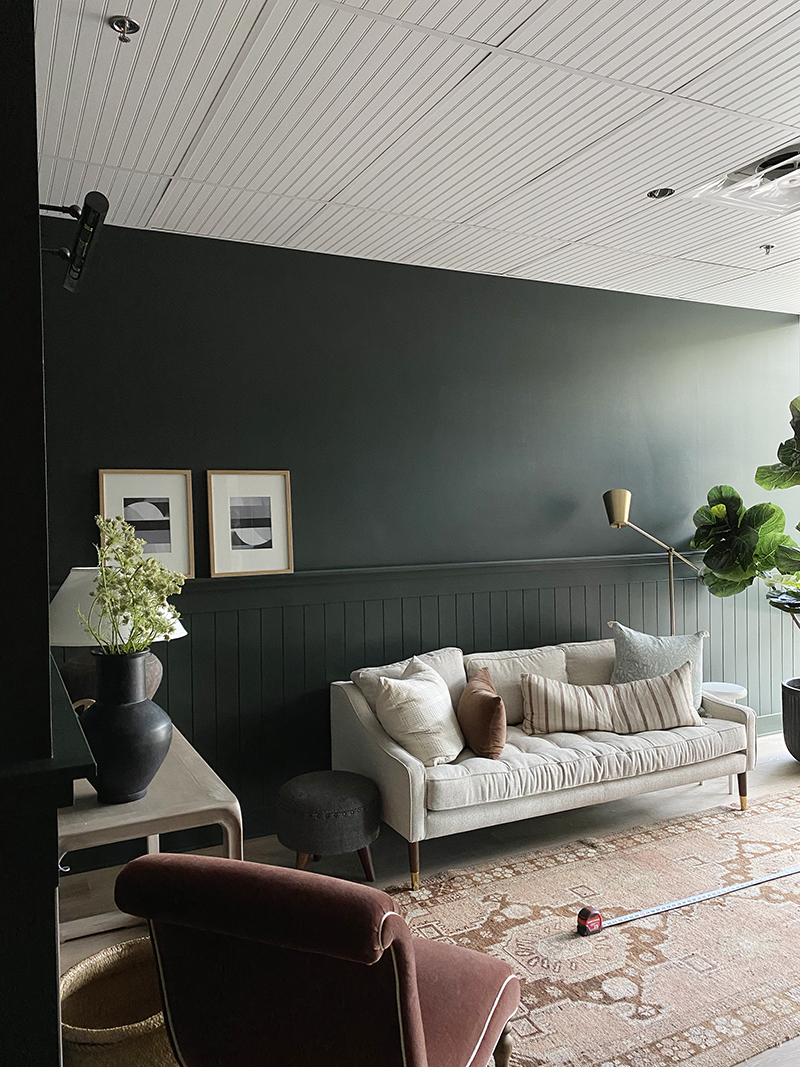
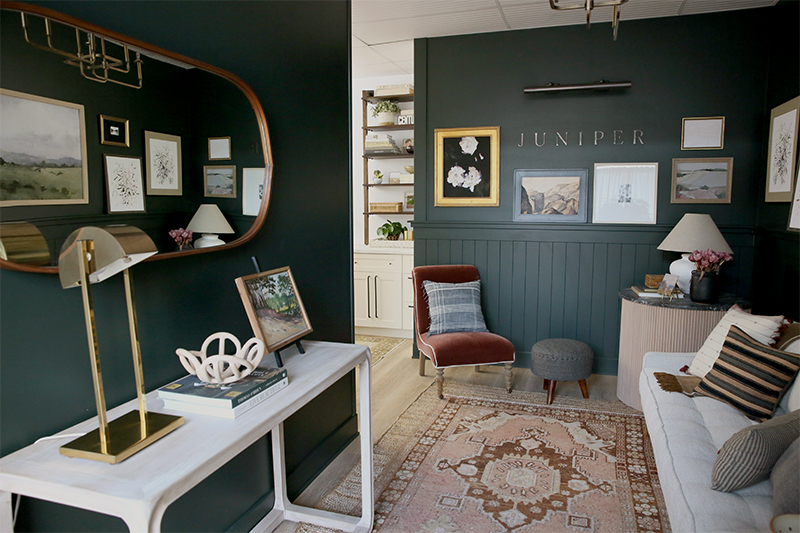
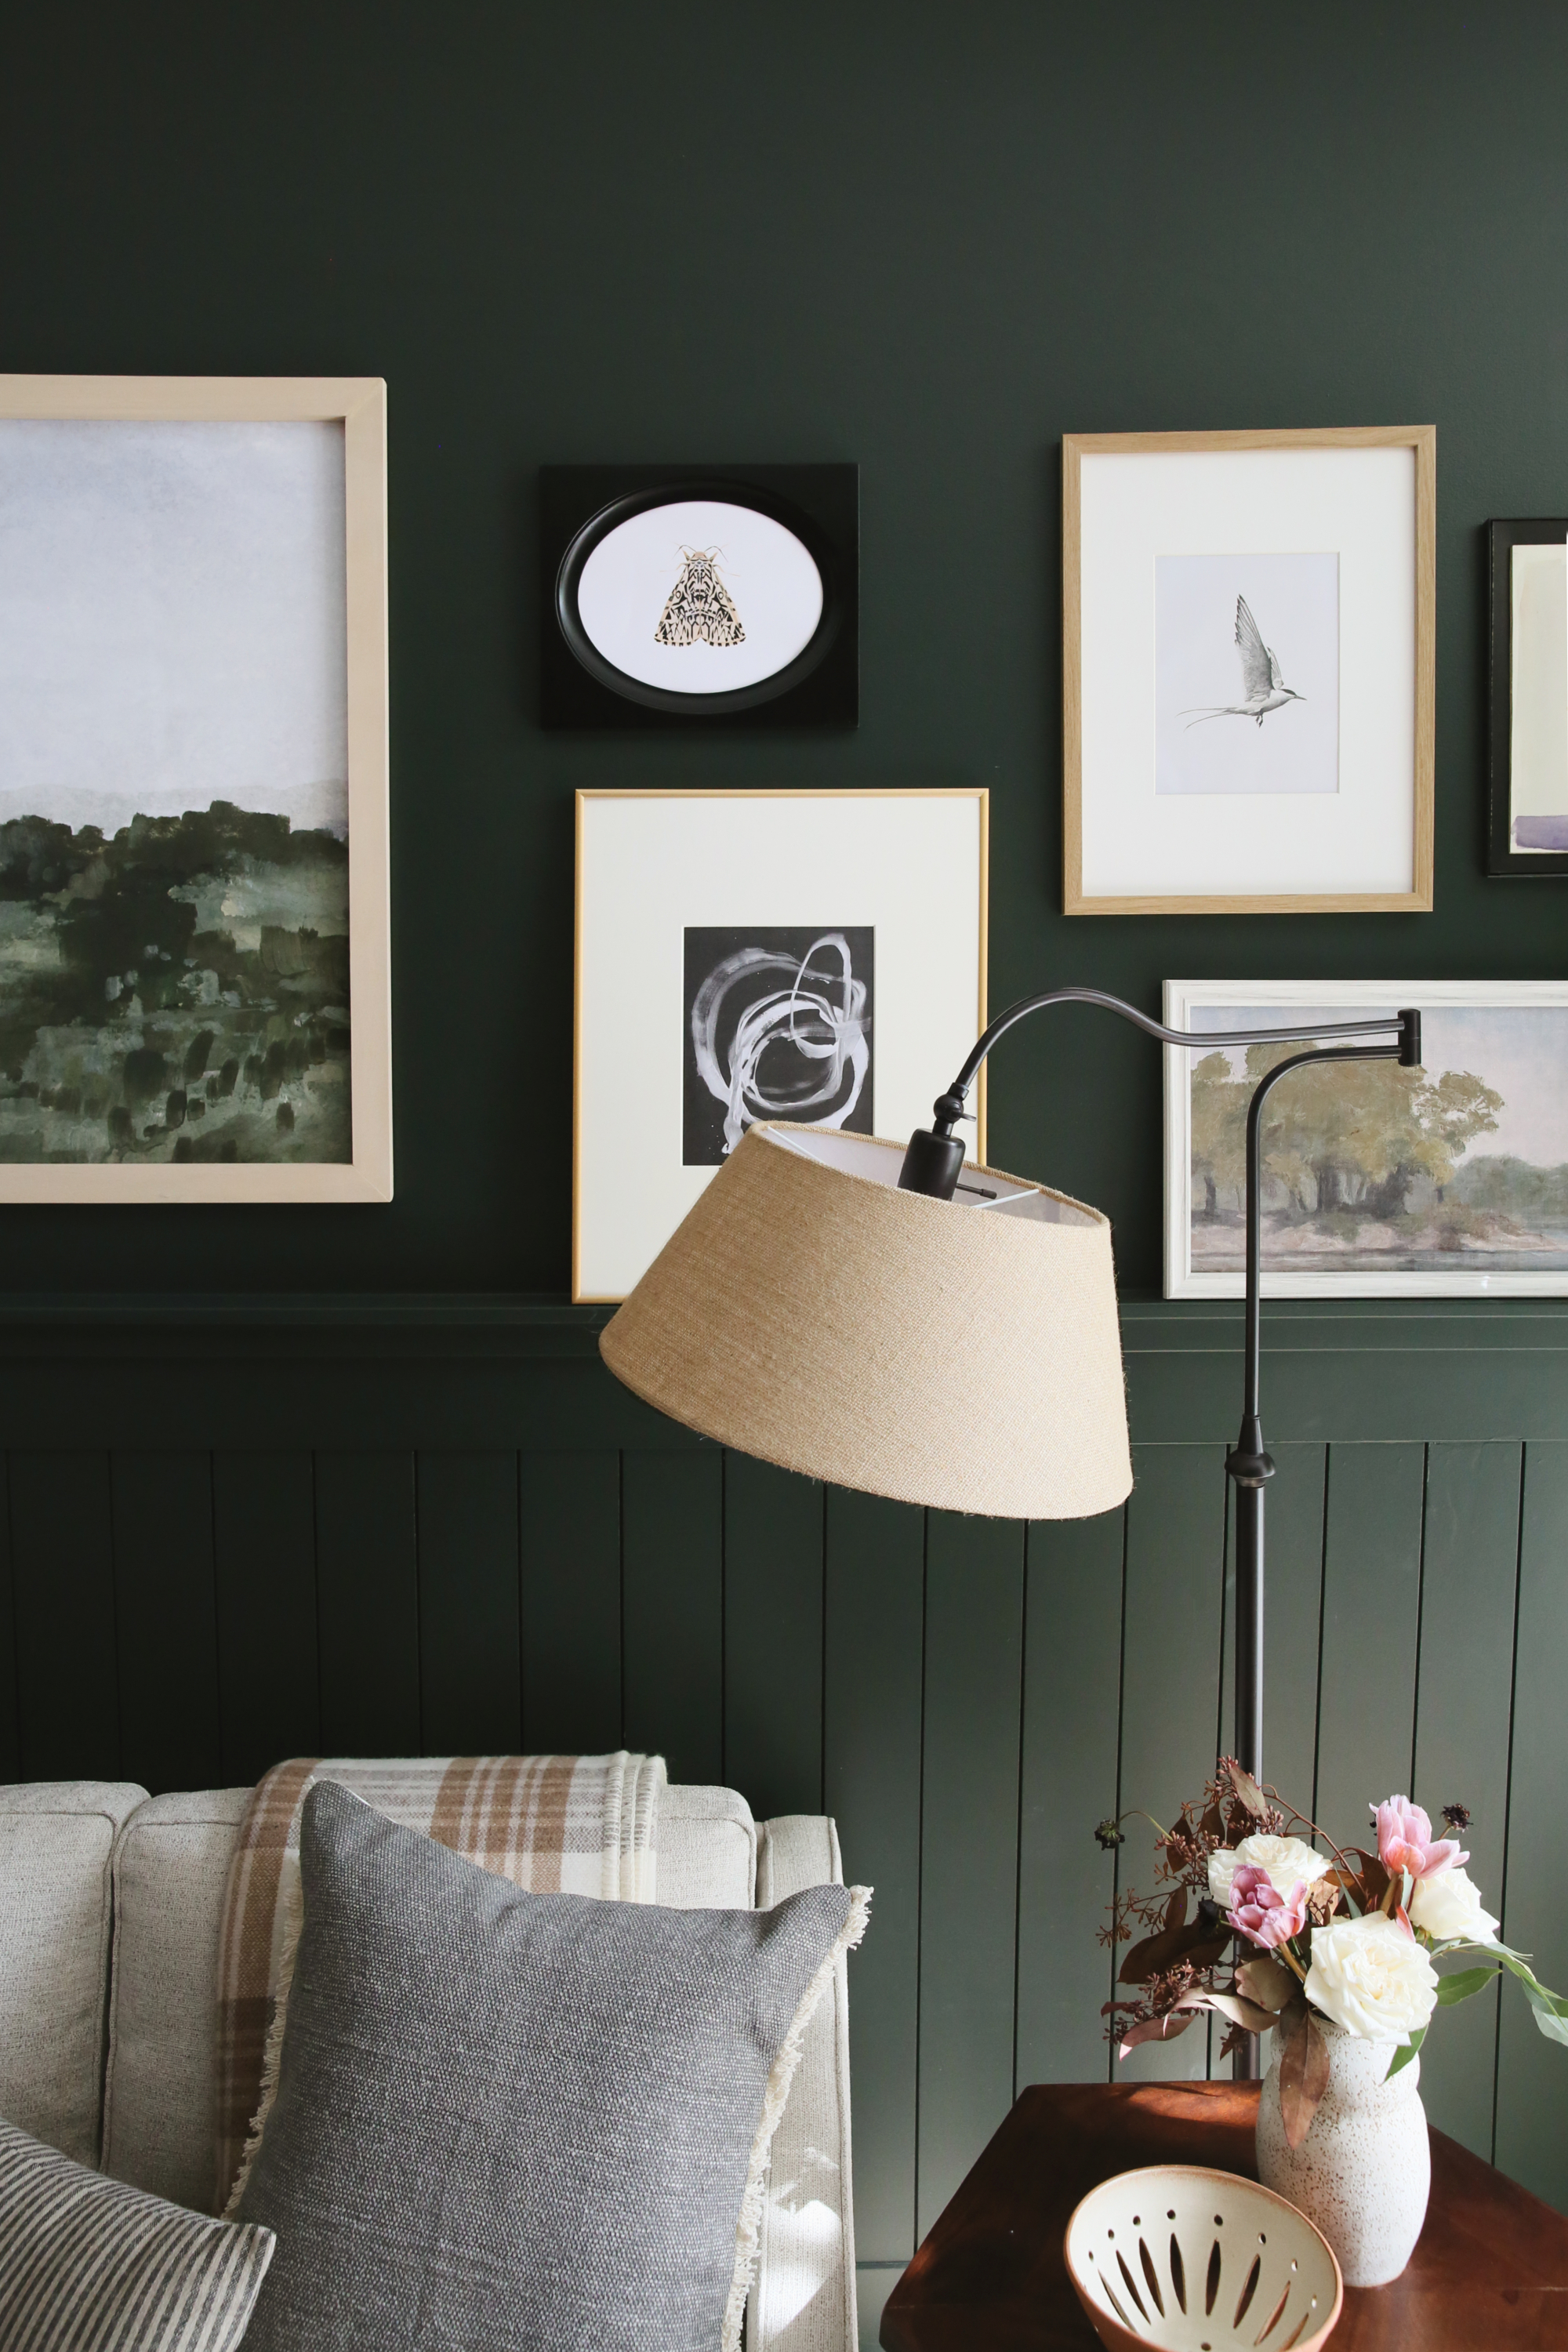
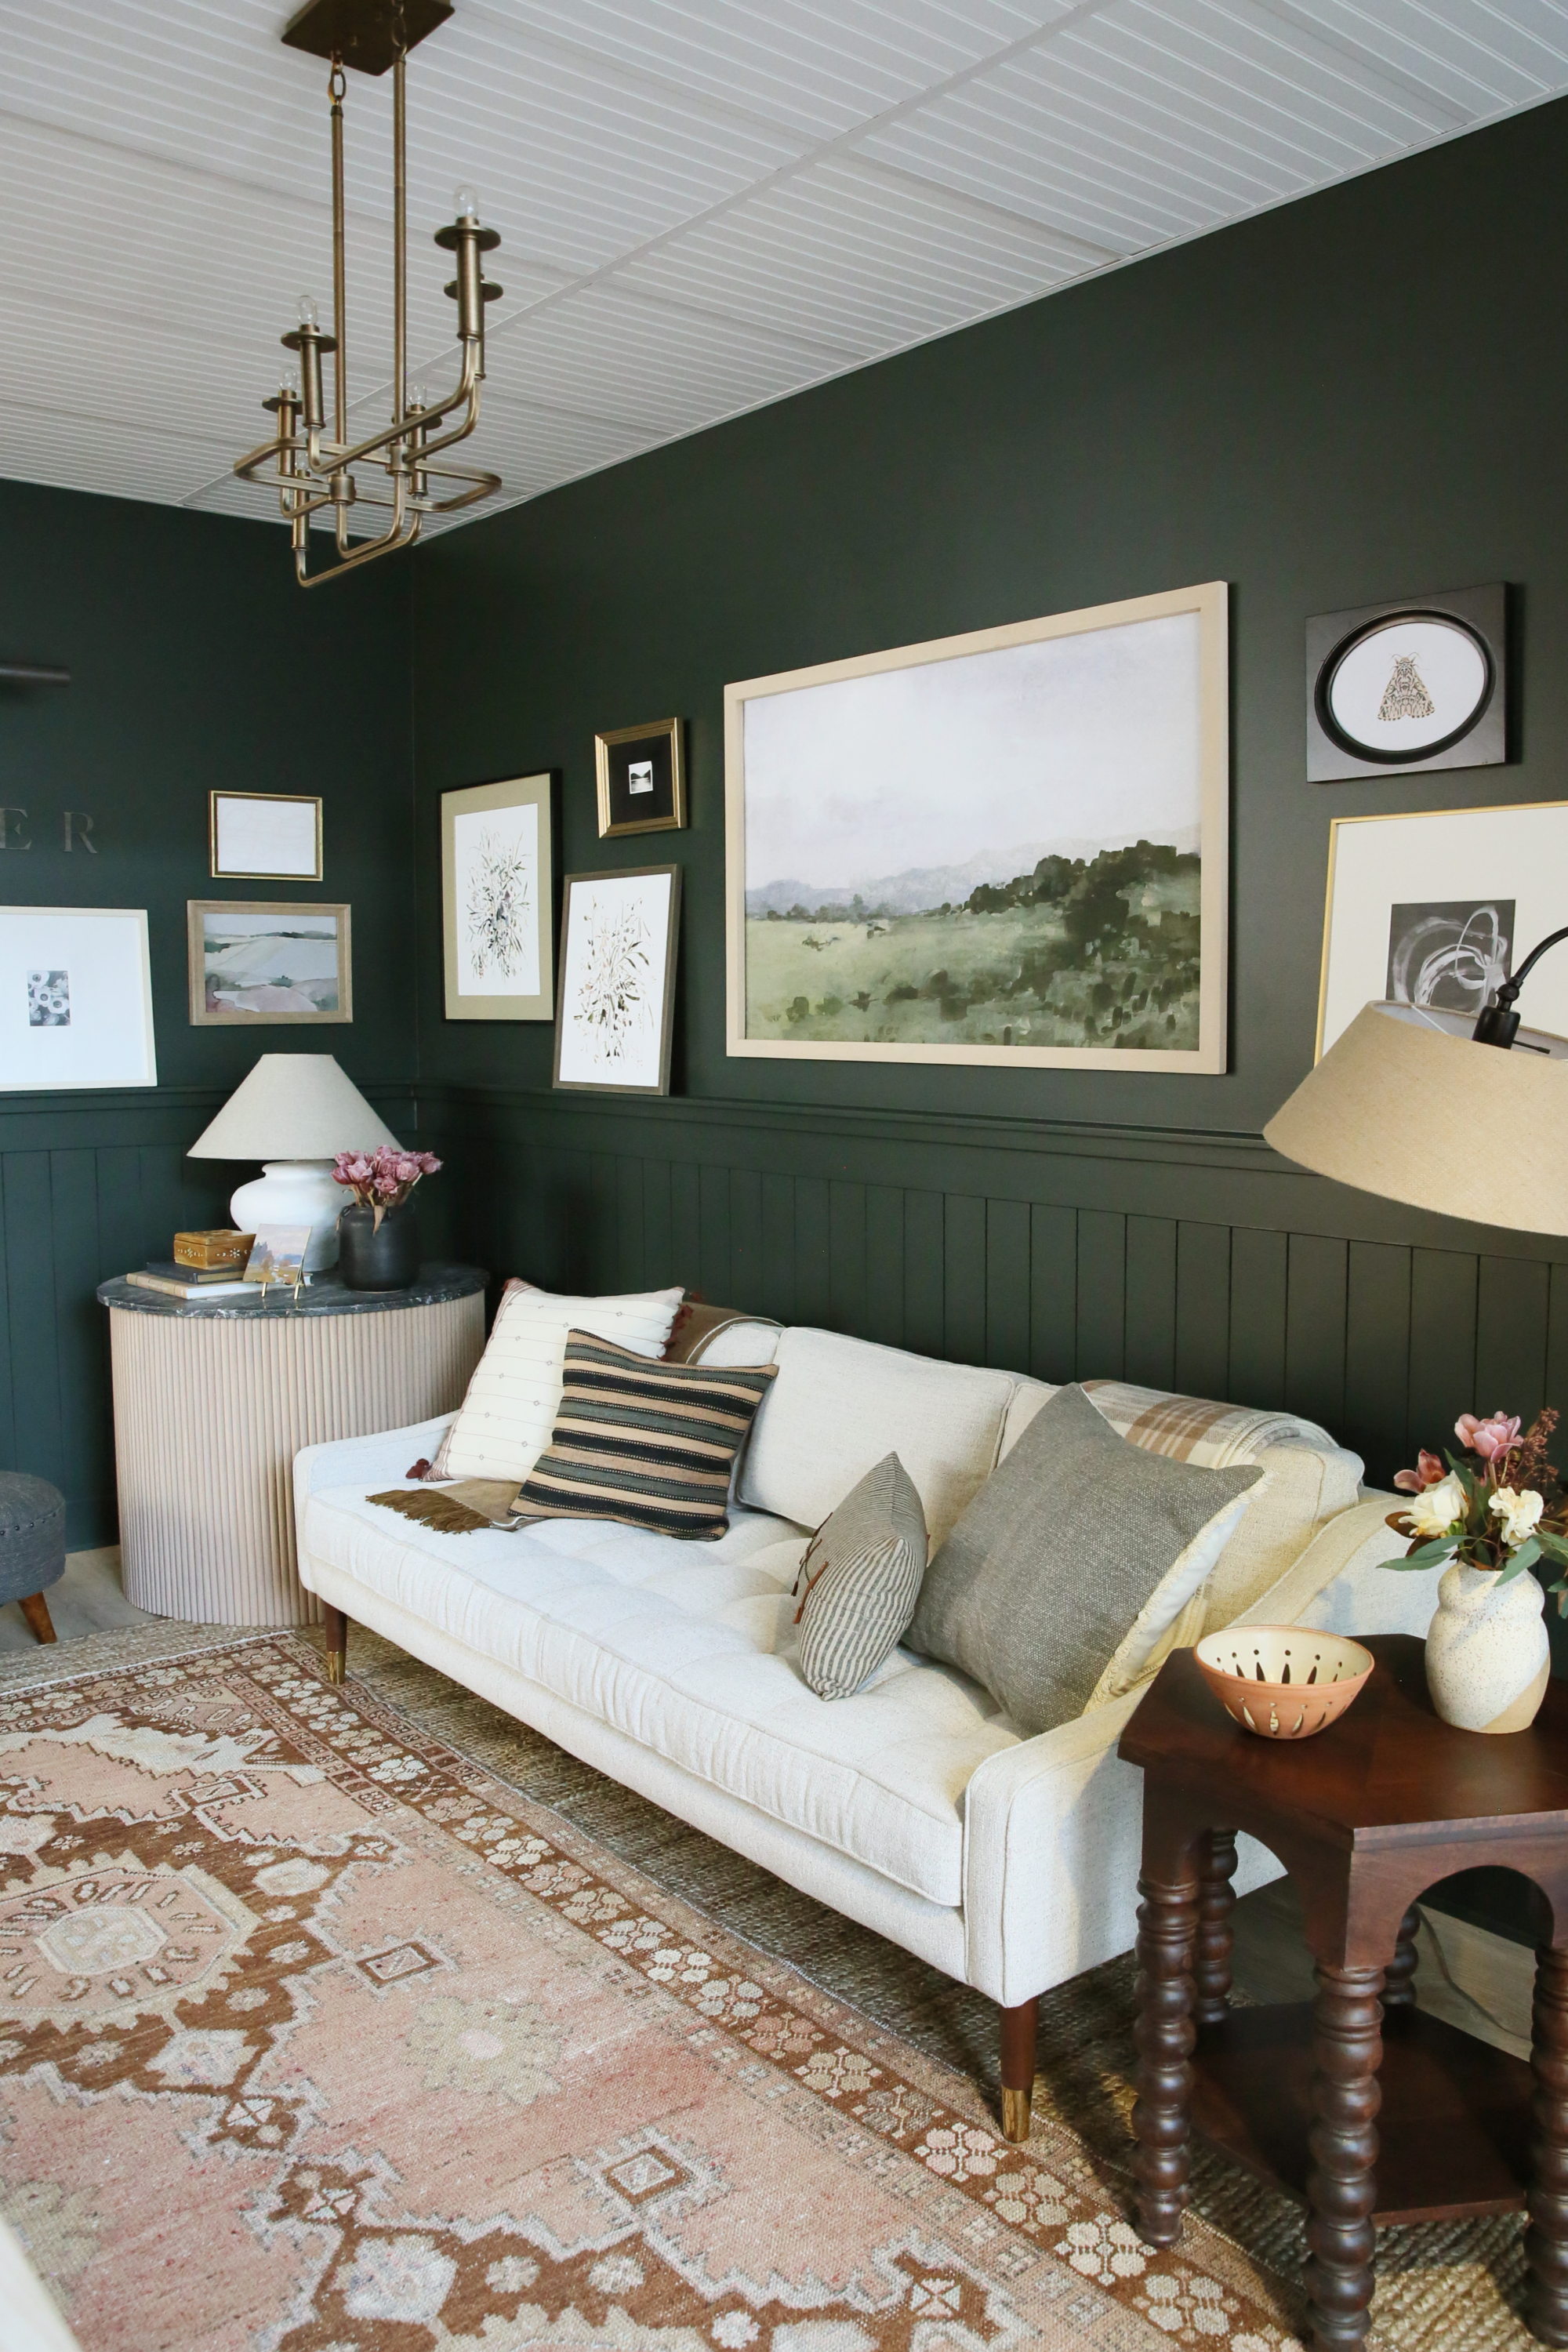
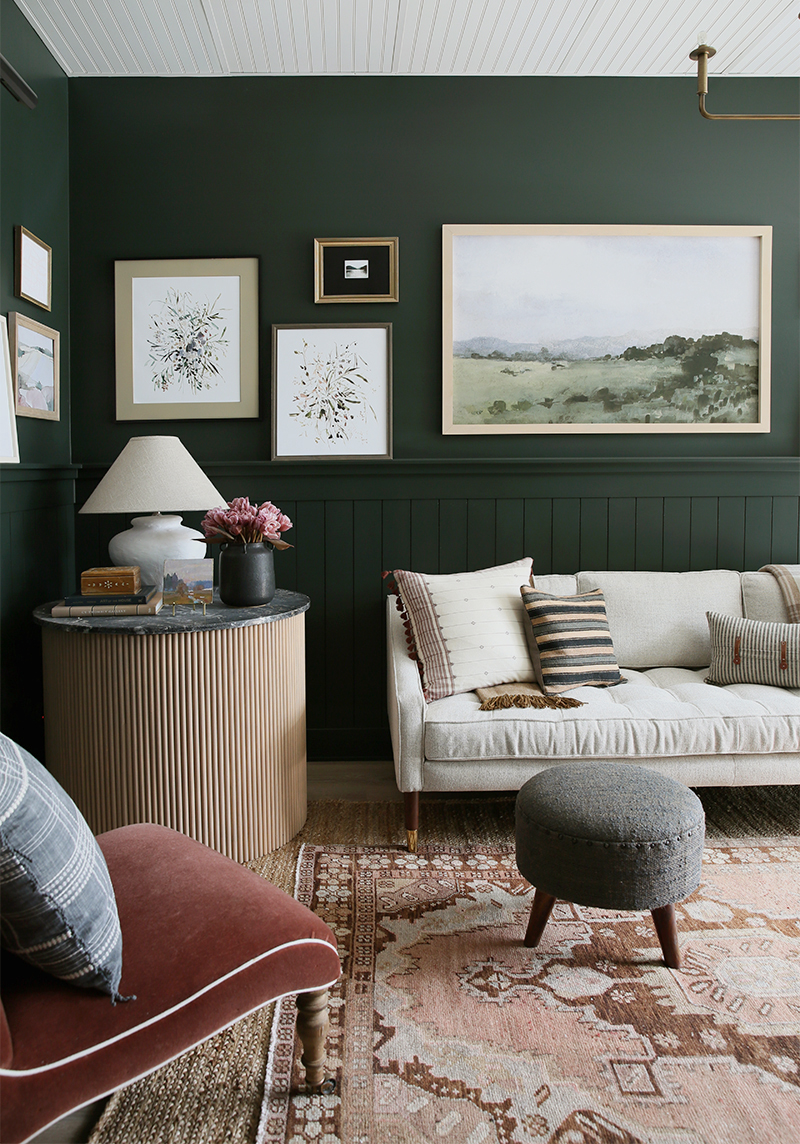
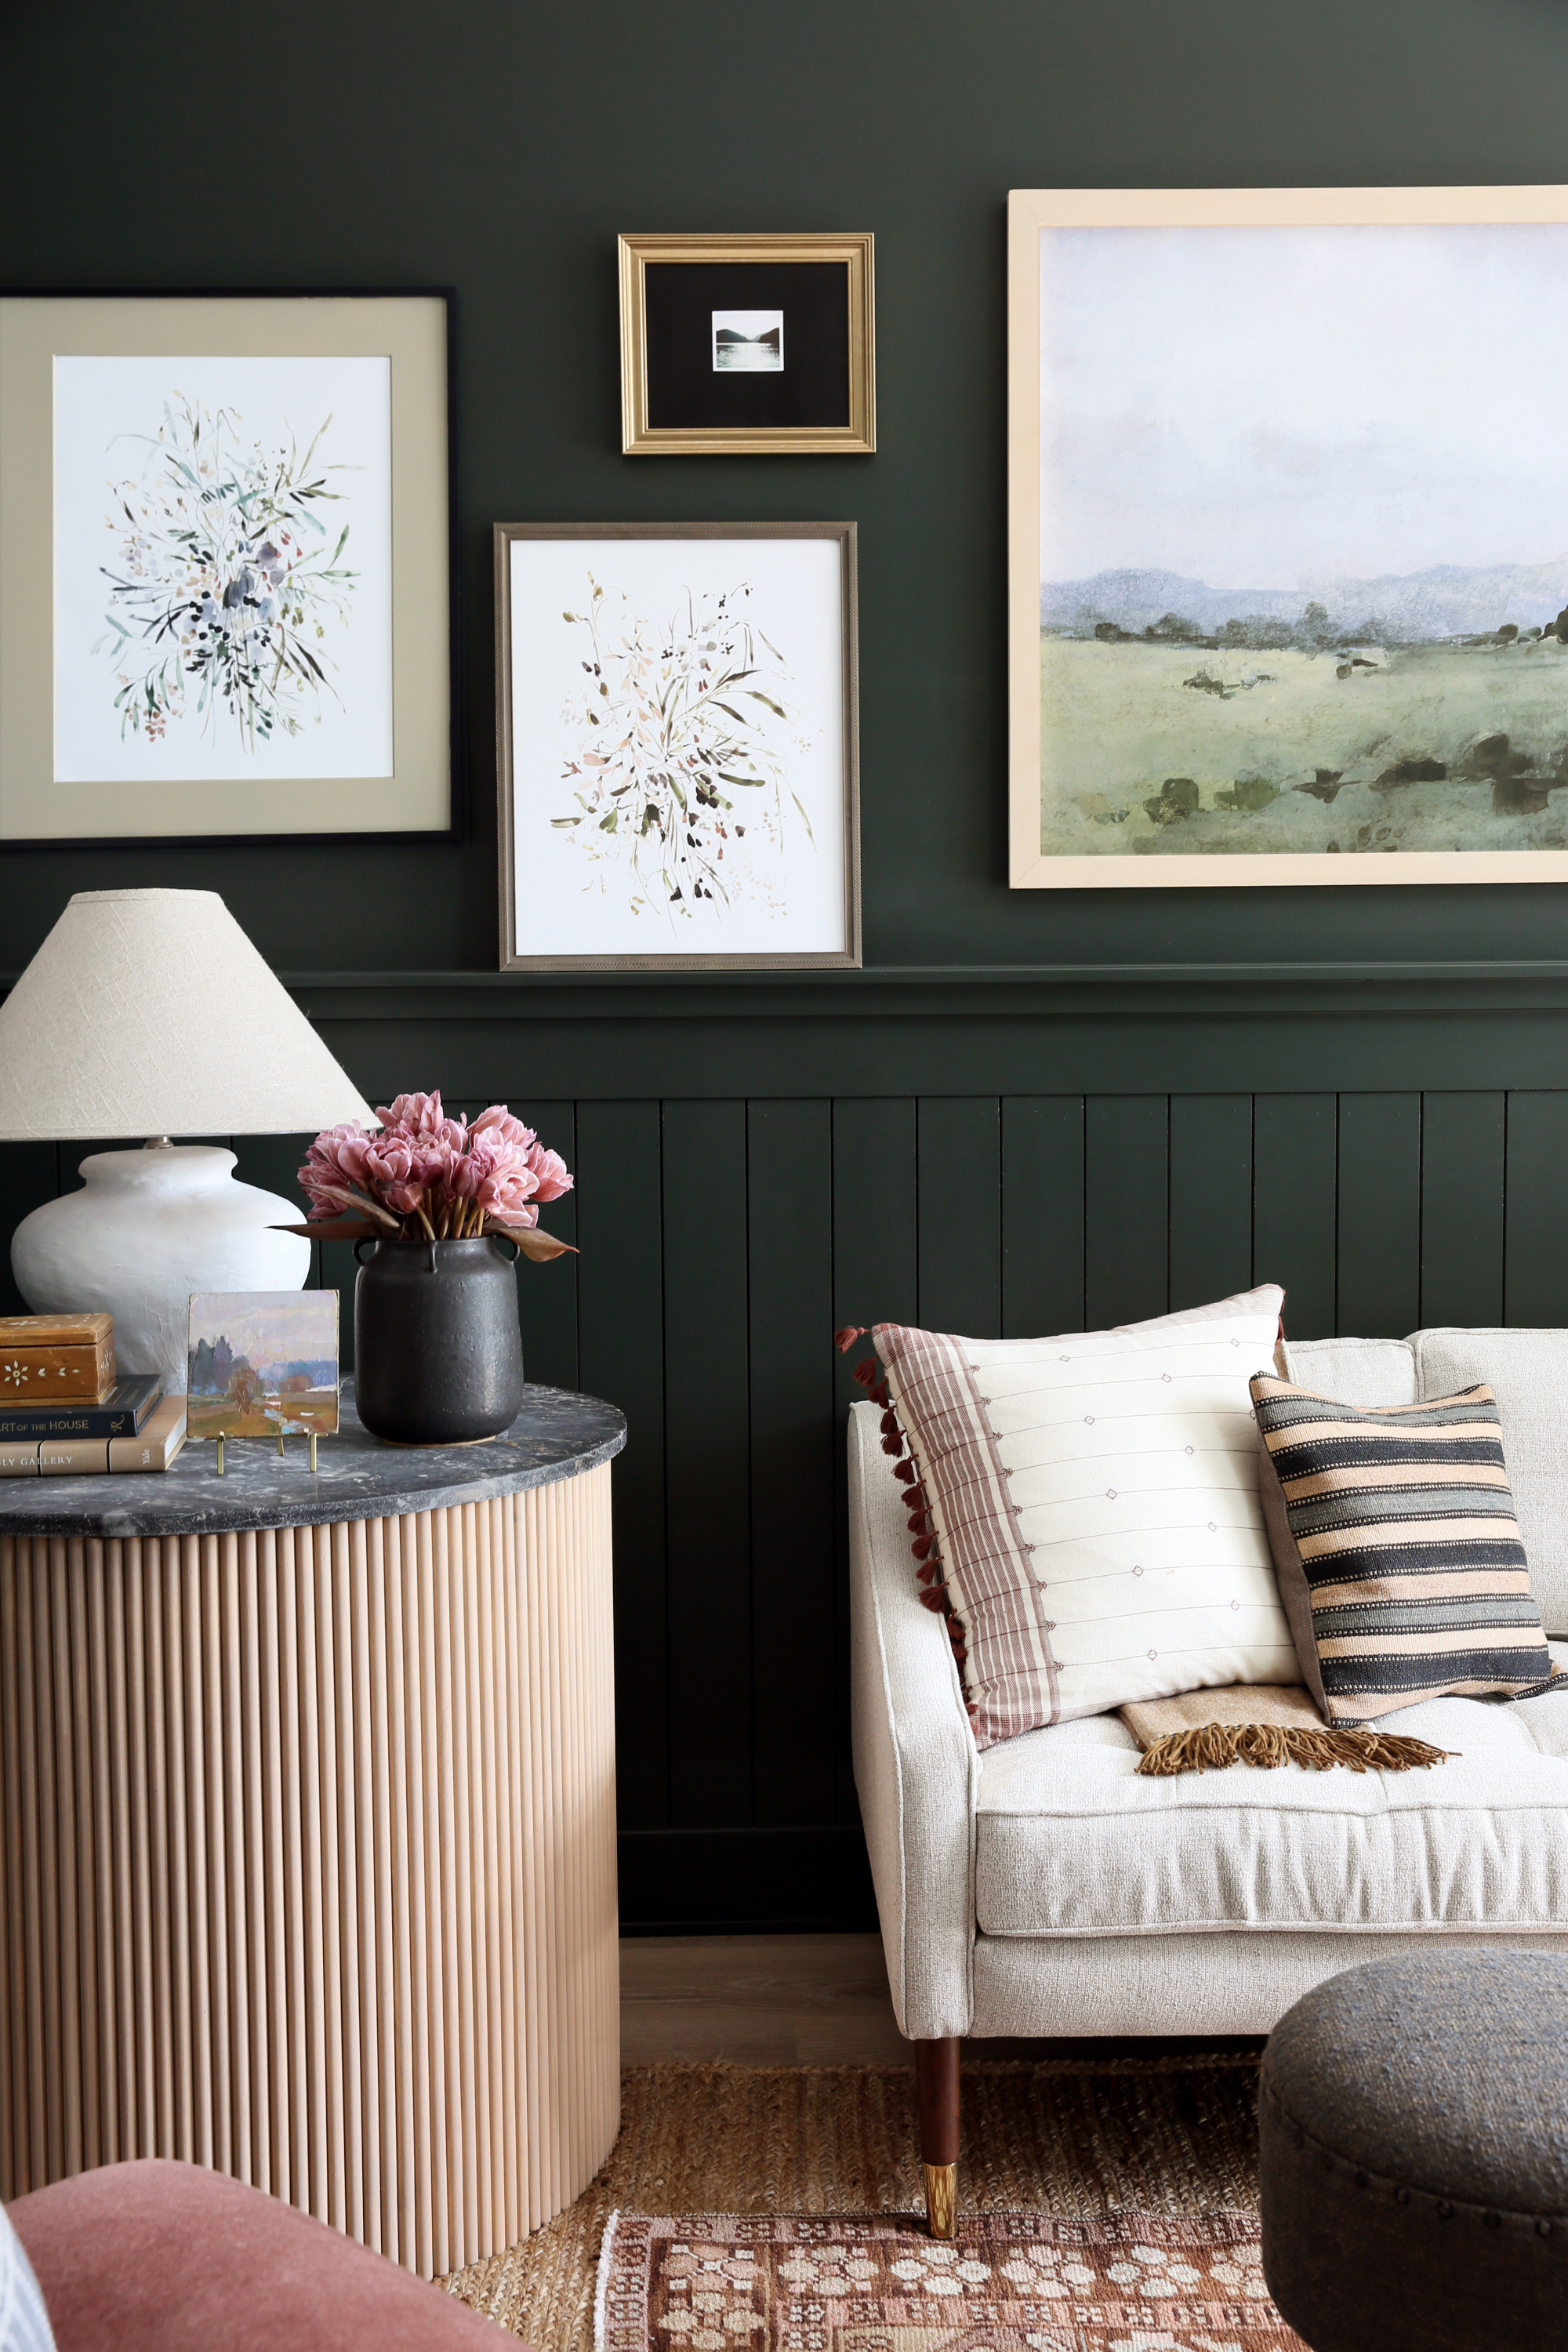
We have a front foyer in our new office that I wanted to be a place for employees to comfortably sit and chill in as much as I wanted to make it a beautiful statement to our office visitors. I chose a dark green-black color for the walls (Farrow & Ball Studio Green) with the same vertical paneling with top rail that we did in this bathroom, also in our office. The top trim is about 2.5″ deep – just deep enough to lean art from the Print Shop!
Cream Sofa (similar) // Rust Chair (similar) // Jute Rugs // Vintage Oushak (similar)
Table Lamp (similar) // Blue Pillow (similar) // Cream & Rust Pillow // Striped Kilim Pillow (similar) // Ottoman (similar)

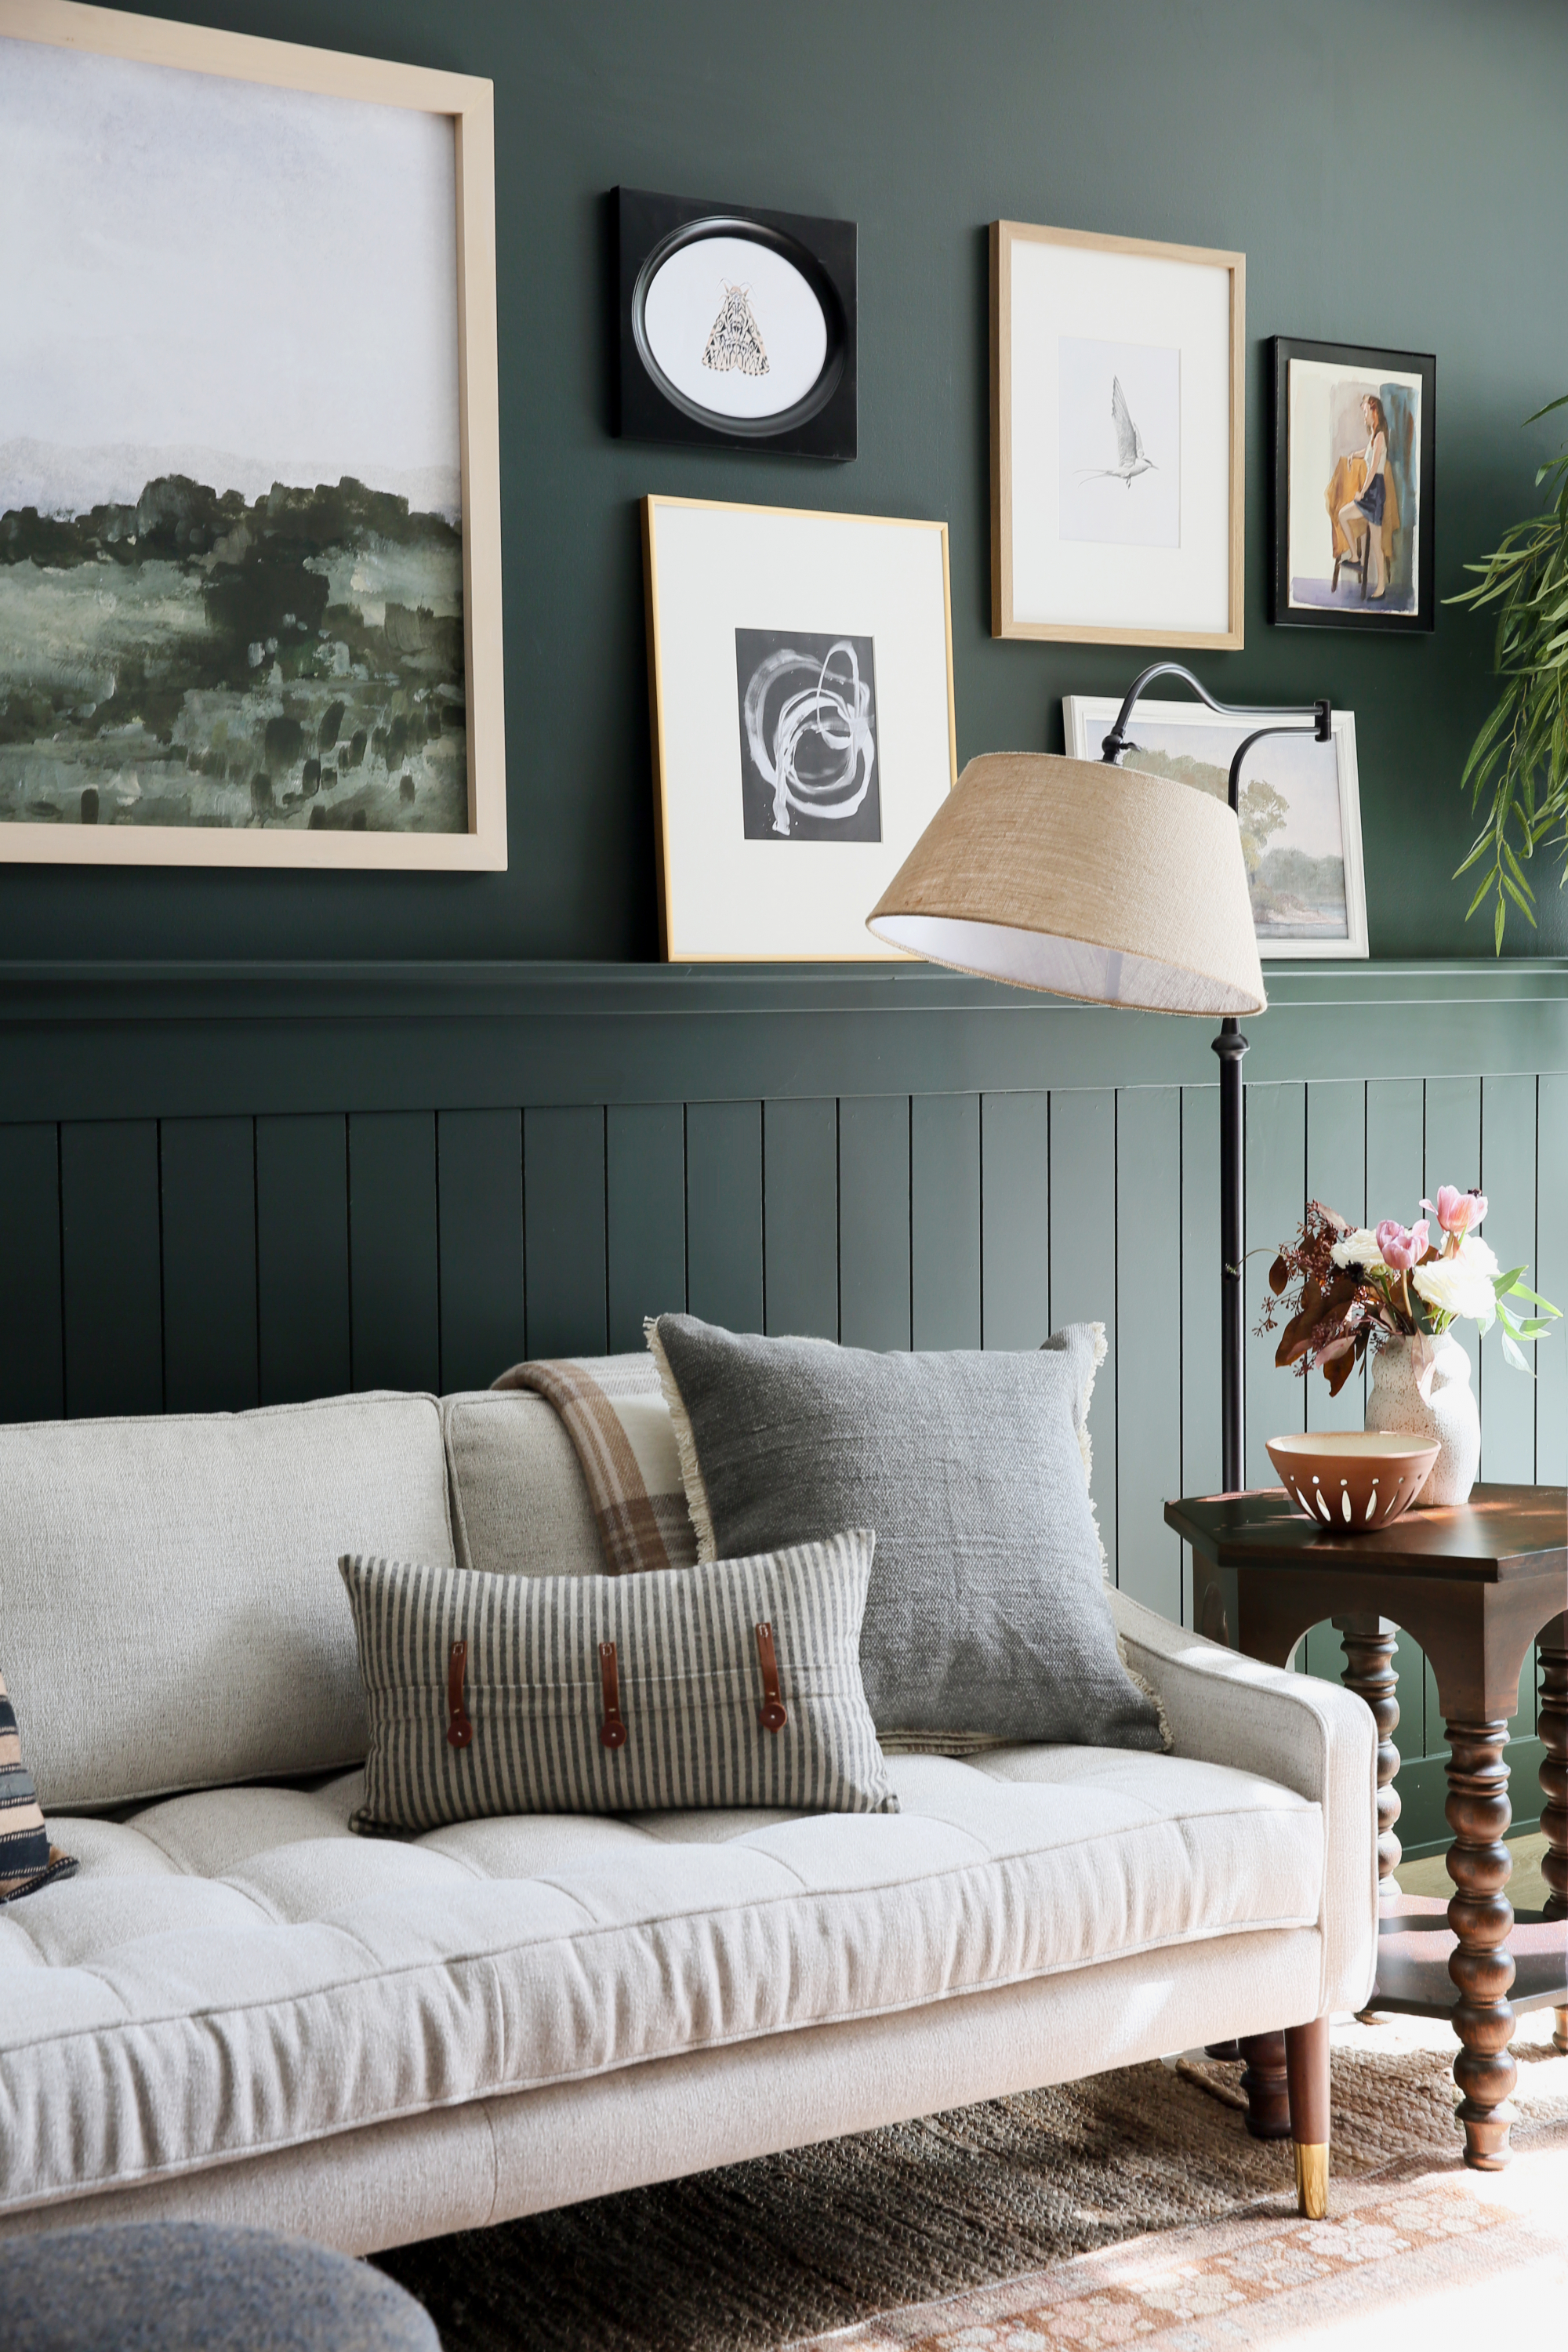
Cream Sofa (similar) // Plaid Wool Blanket (similar) // Stripe Pillow with Leather Straps // Wood Side Table // Floor Lamp

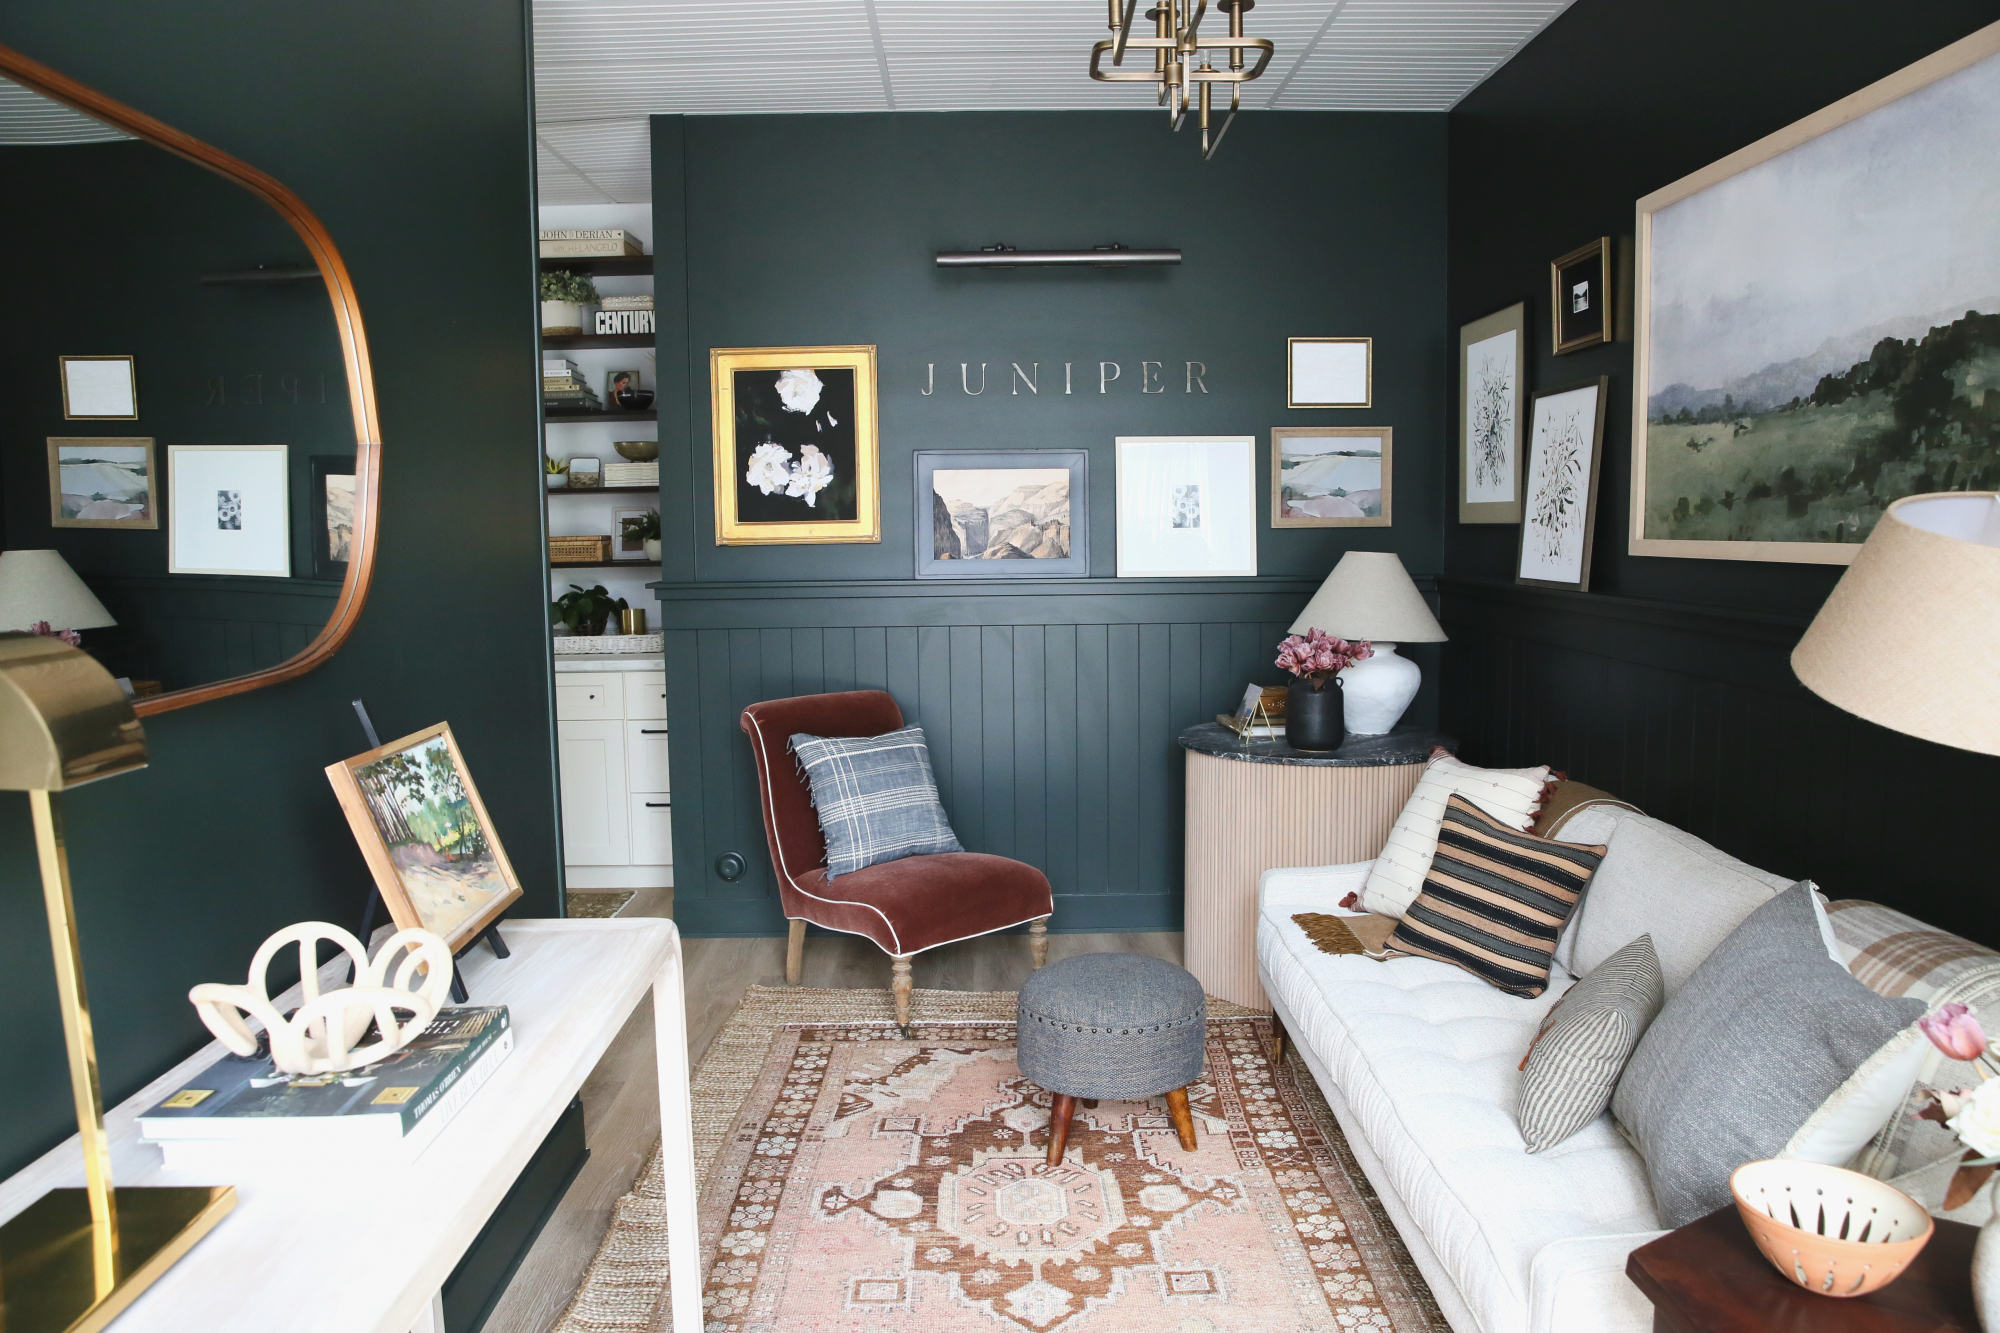
Walnut Mirror // Console Table (similar) // Brass Chandelier // Rust Chair (similar)
Lamp (similar) // Picture Light // Jute Rugs // Vintage Oushak (similar)
We wanted our logo to be on the wall in here, but I felt like something tonal and more subtle would be best. This Etsy shop used our logo to create these 4″ steel letters that we mounted using a strong double sided adhesive. I love it!
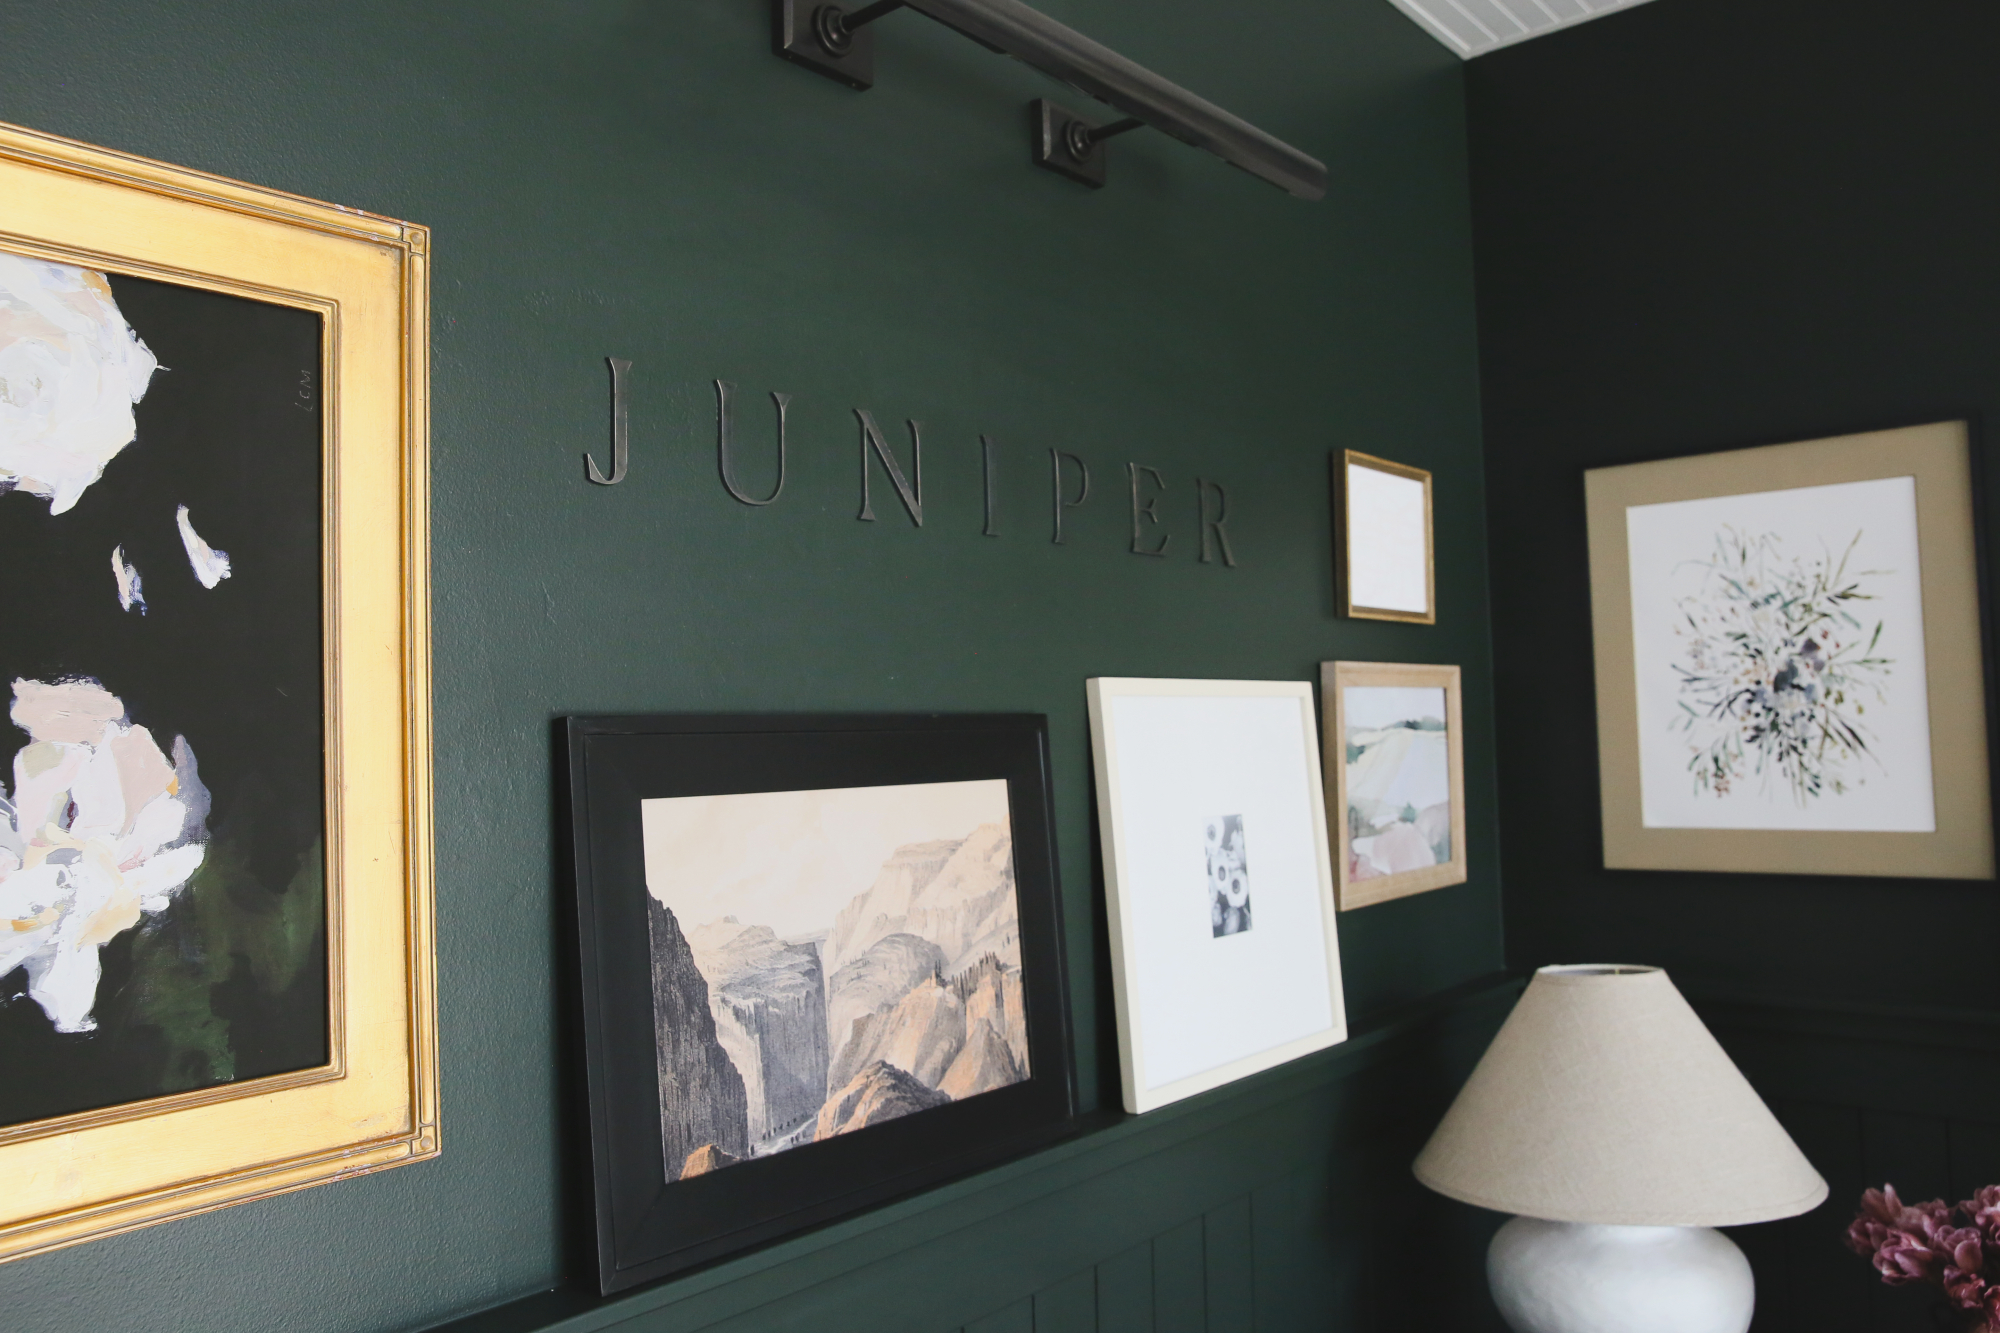
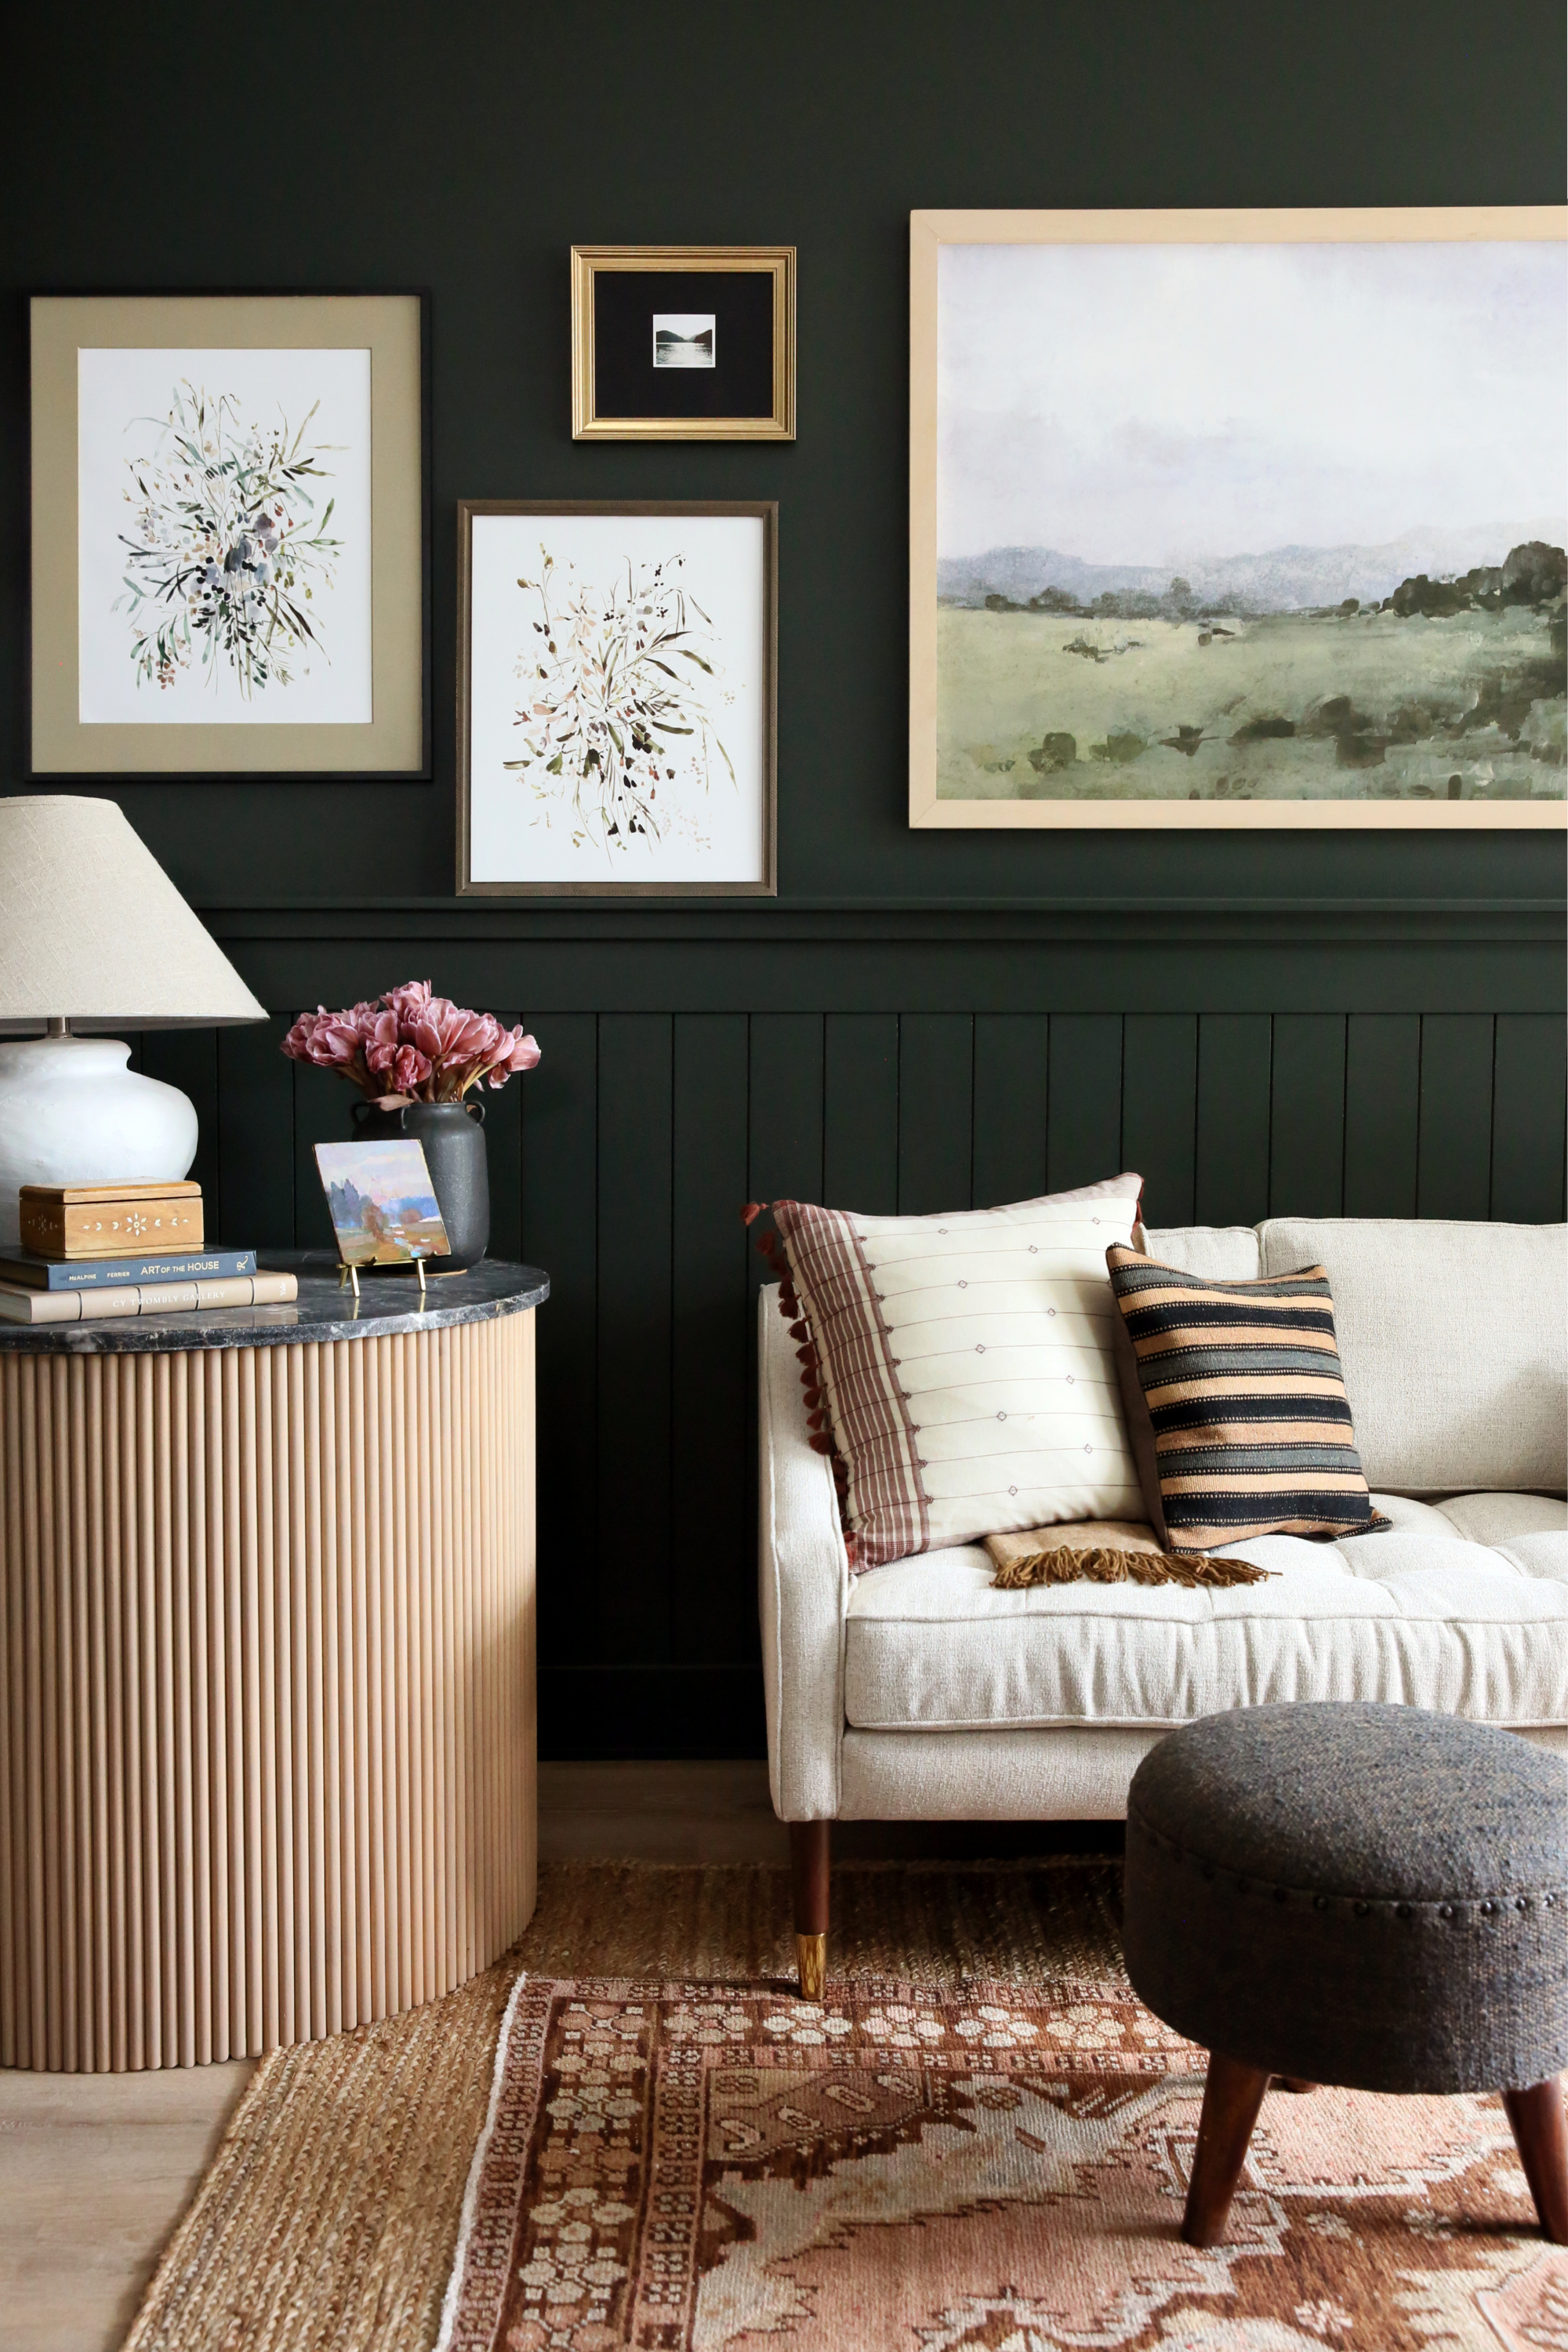
Garden Roses Print with 16×20 Gold Frame (similar) // Canyon Print with 11×14 Black Frame
Anemone Print with 17×17 Frame // Connection Print with 8×10 Gold Frame (similar)
Fields Print with 16×20 Open Back Wood Frame // Meadow Flowers I Print with Black Frame
Meadow Flowers II Print with Wood Frame // Swimmers Print with 8×10 Gold Frame (similar)
When it came to decorating the space, I chose this affordable oatmeal sofa a few months ago. I love the single bench cushion with modern tufting and the smaller proportions, which were just right for this not-huge 8×15′ space. I bought the 5×11 vintage Oushak runner for the same reason – it was pretty, affordable and it fit the space well-enough, especially after I layered the three 4×6 jute rugs under the runner!
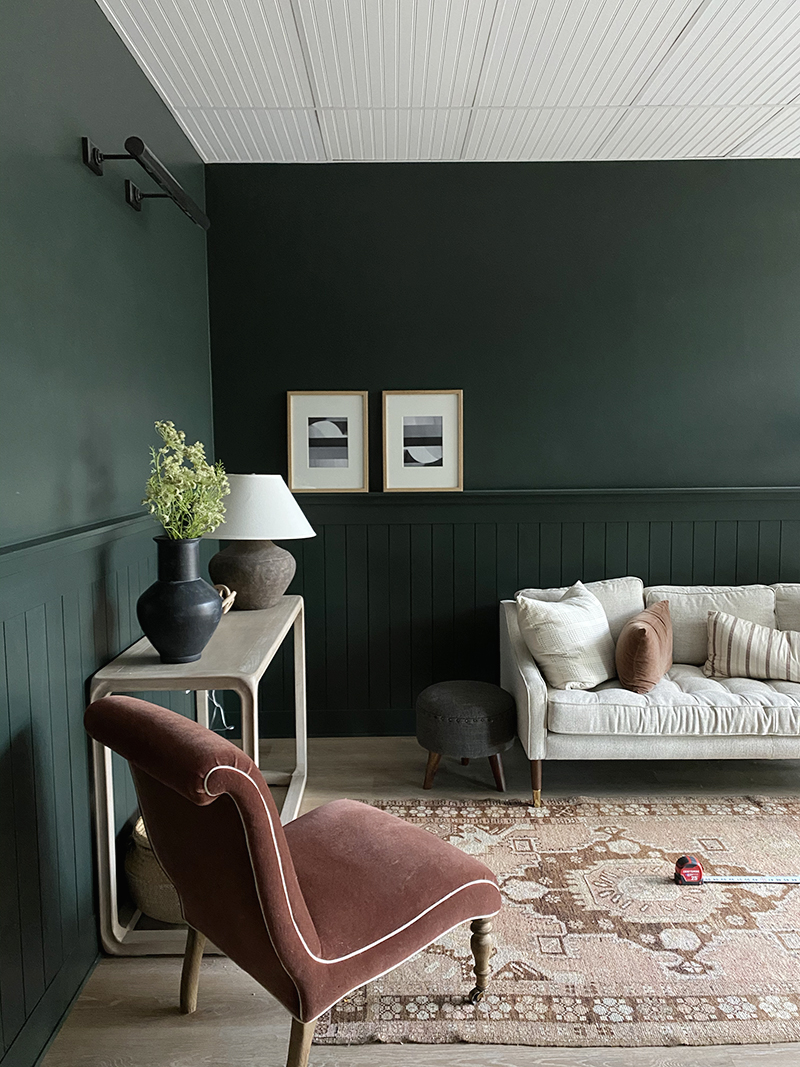
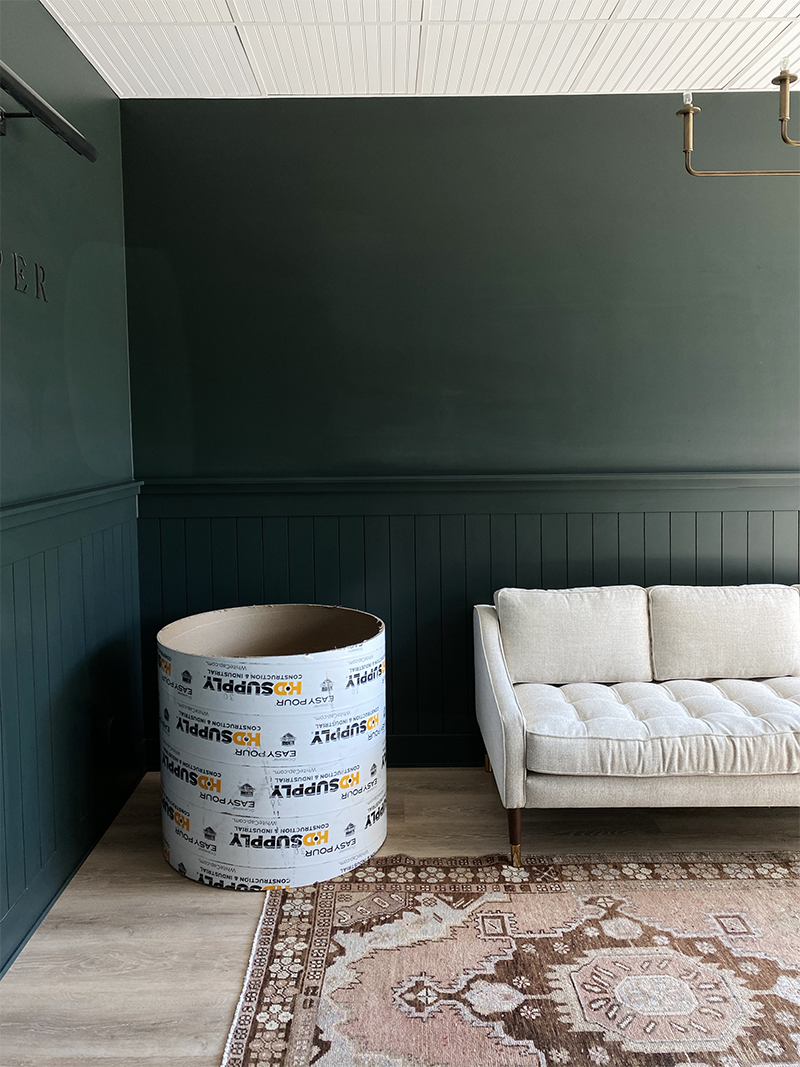
Let’s take a step back though and look at where we were with this space about a week ago. Pretty enough, but basic, right? I had lost a little steam after putting out the rug and sofa and needed to focus on other spaces for the last few months. I had a clearance console table from Living Spaces sitting under the picture light, even though I always wanted a round table in the corner.
Fast forward to this last weekend. The time had arrived for completing this space, and taking it from 80% to 100% done (if that’s even really a thing – spaces should always be evolving a little bit, don’t you think?). I’ve found that after a big project, like a full renovation, it can take some real effort to get to 100% done. My best tip there is to really focus on one space at a time. For about three days last weekend, I only worked on this space. I bought things, I made things. I sketched, I tried to tap into my creativity. And I’m pretty happy with where that focused effort landed and how far we got with this space! Before this space was pretty but looked half neglected but now it just FEELS finished and considered and loved, you know?
Cream Sofa (similar) // Rust Chair (similar) // Jute Rugs // Vintage Oushak (similar)
Table Lamp (similar) // Blue Pillow(similar) // Cream & Rust Pillow(similar) // Striped Kilim Pillow (similar) // Ottoman (similar)
Cream Sofa (similar) // Rust Chair (similar) // Jute Rugs // Vintage Oushak (similar)
Table Lamp (similar) // Blue Pillow (similar) // Cream & Rust Pillow(similar) // Striped Kilim Pillow (similar) // Ottoman (similar)
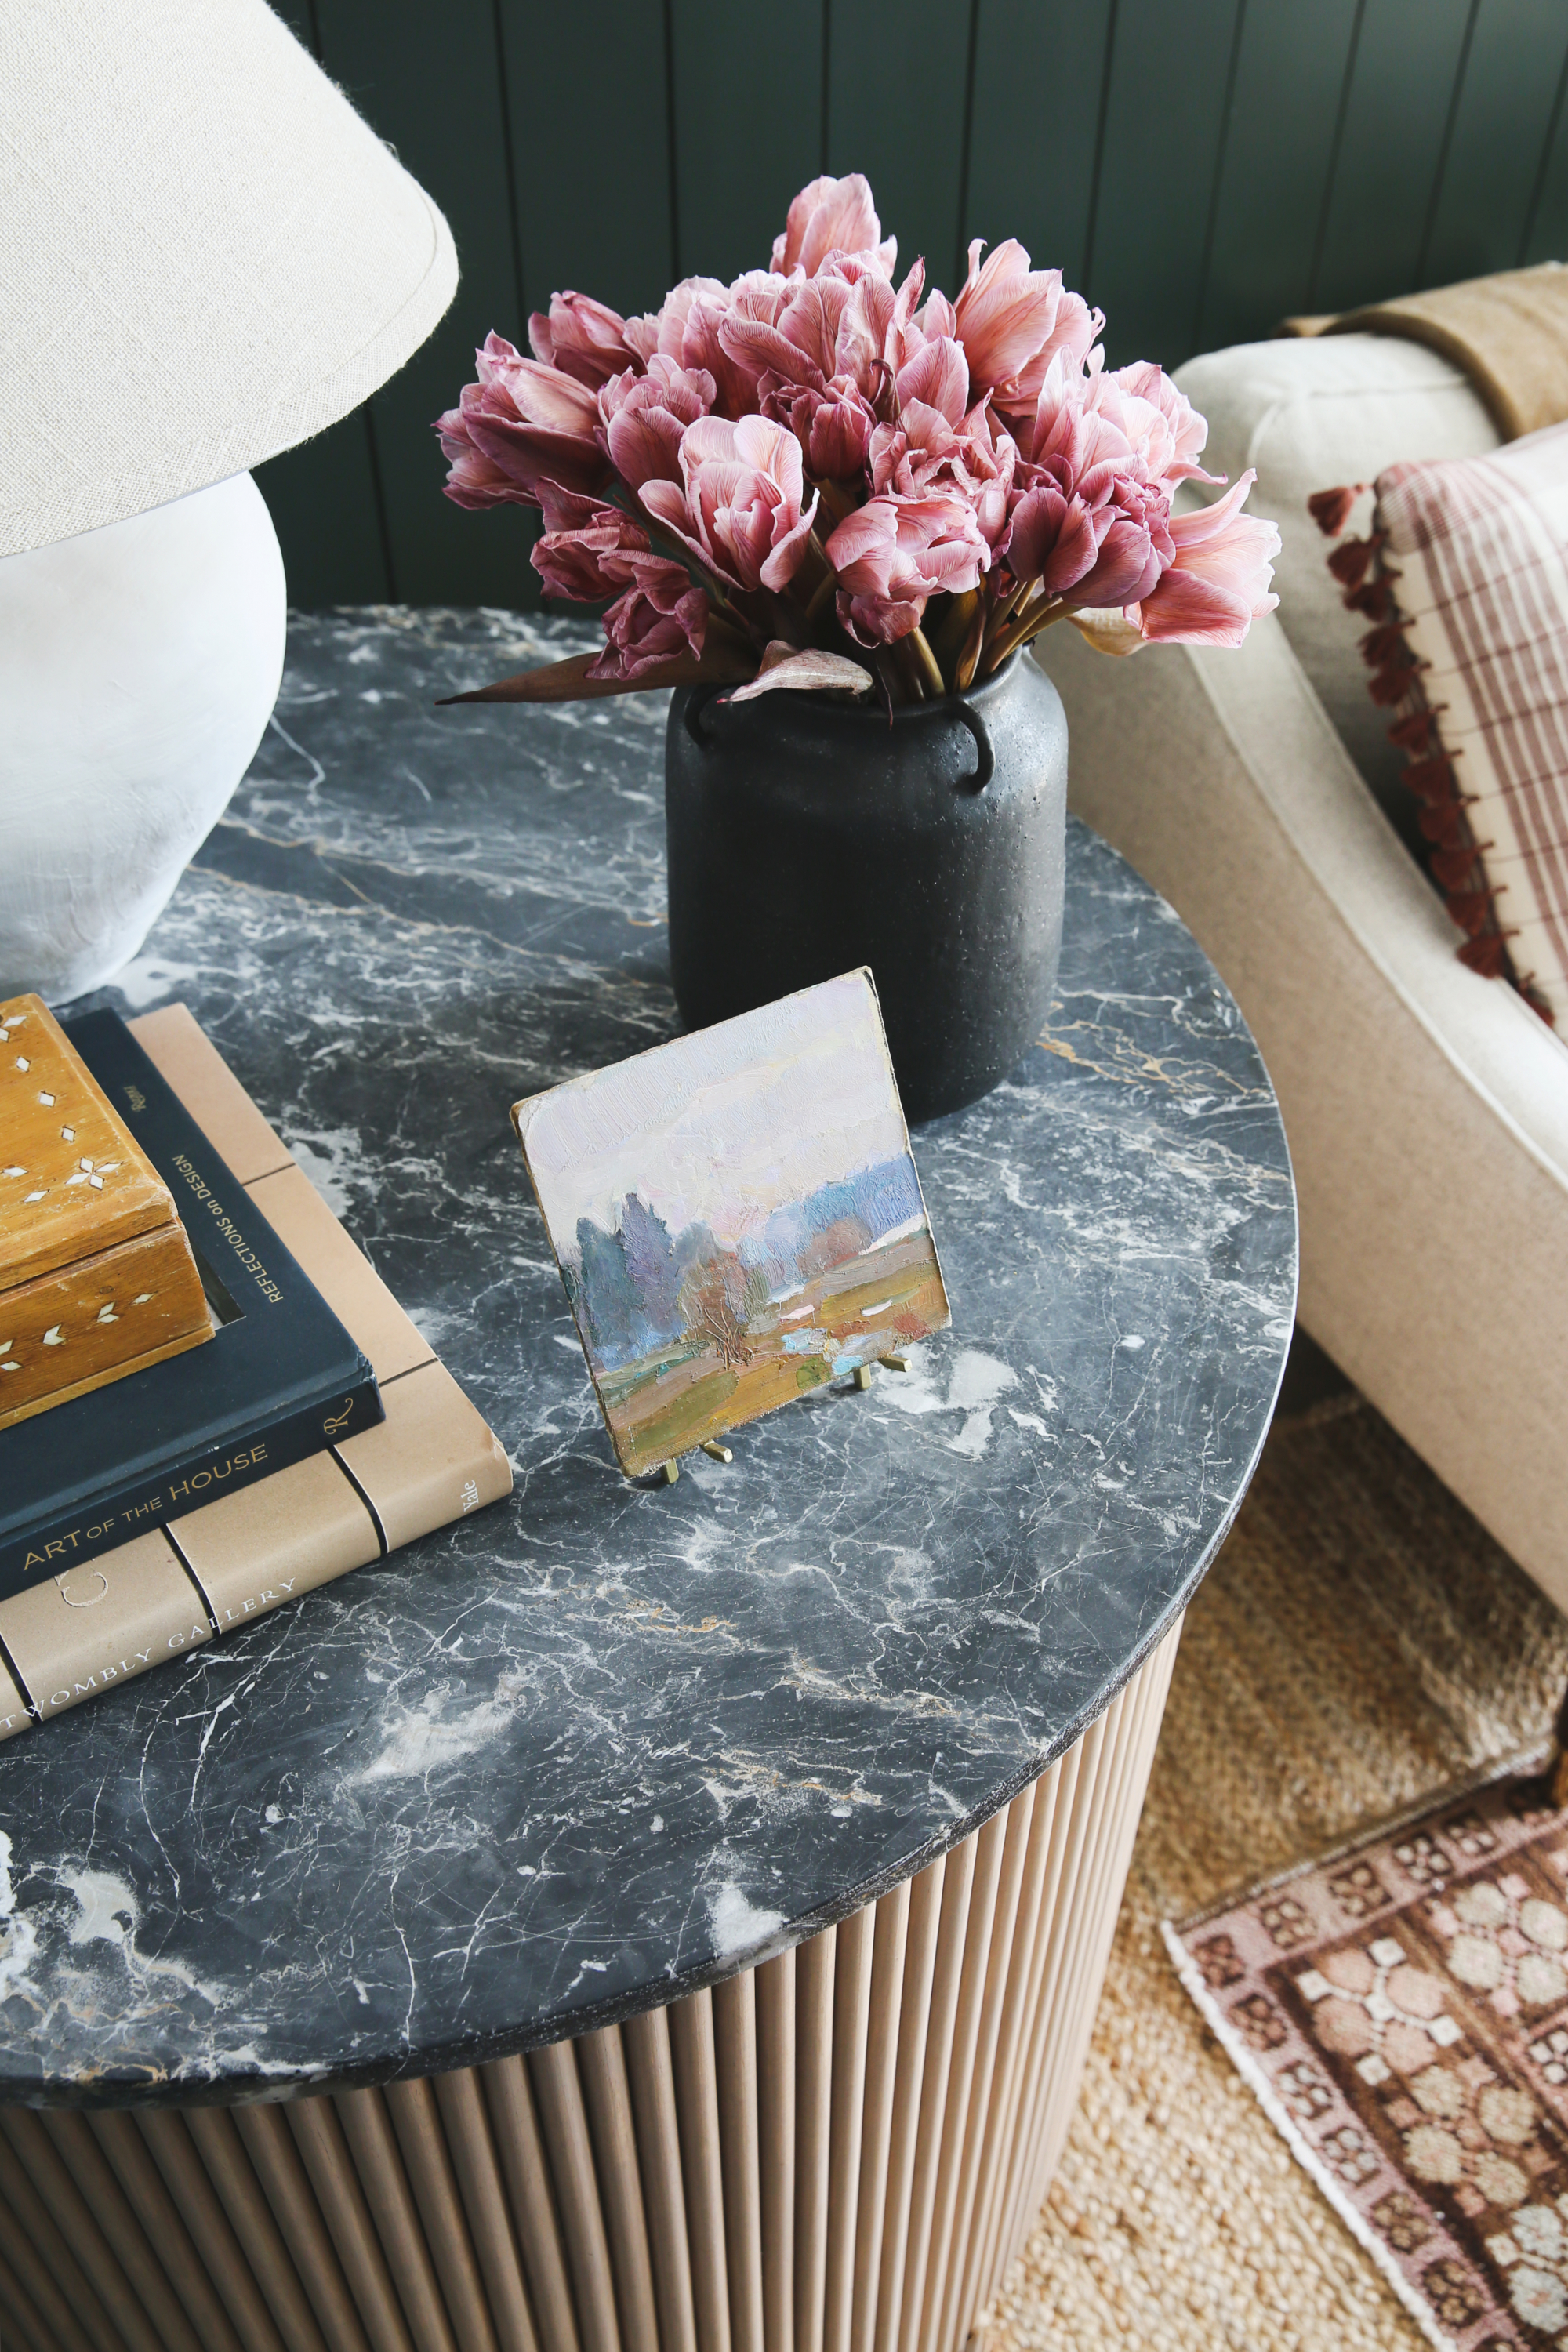
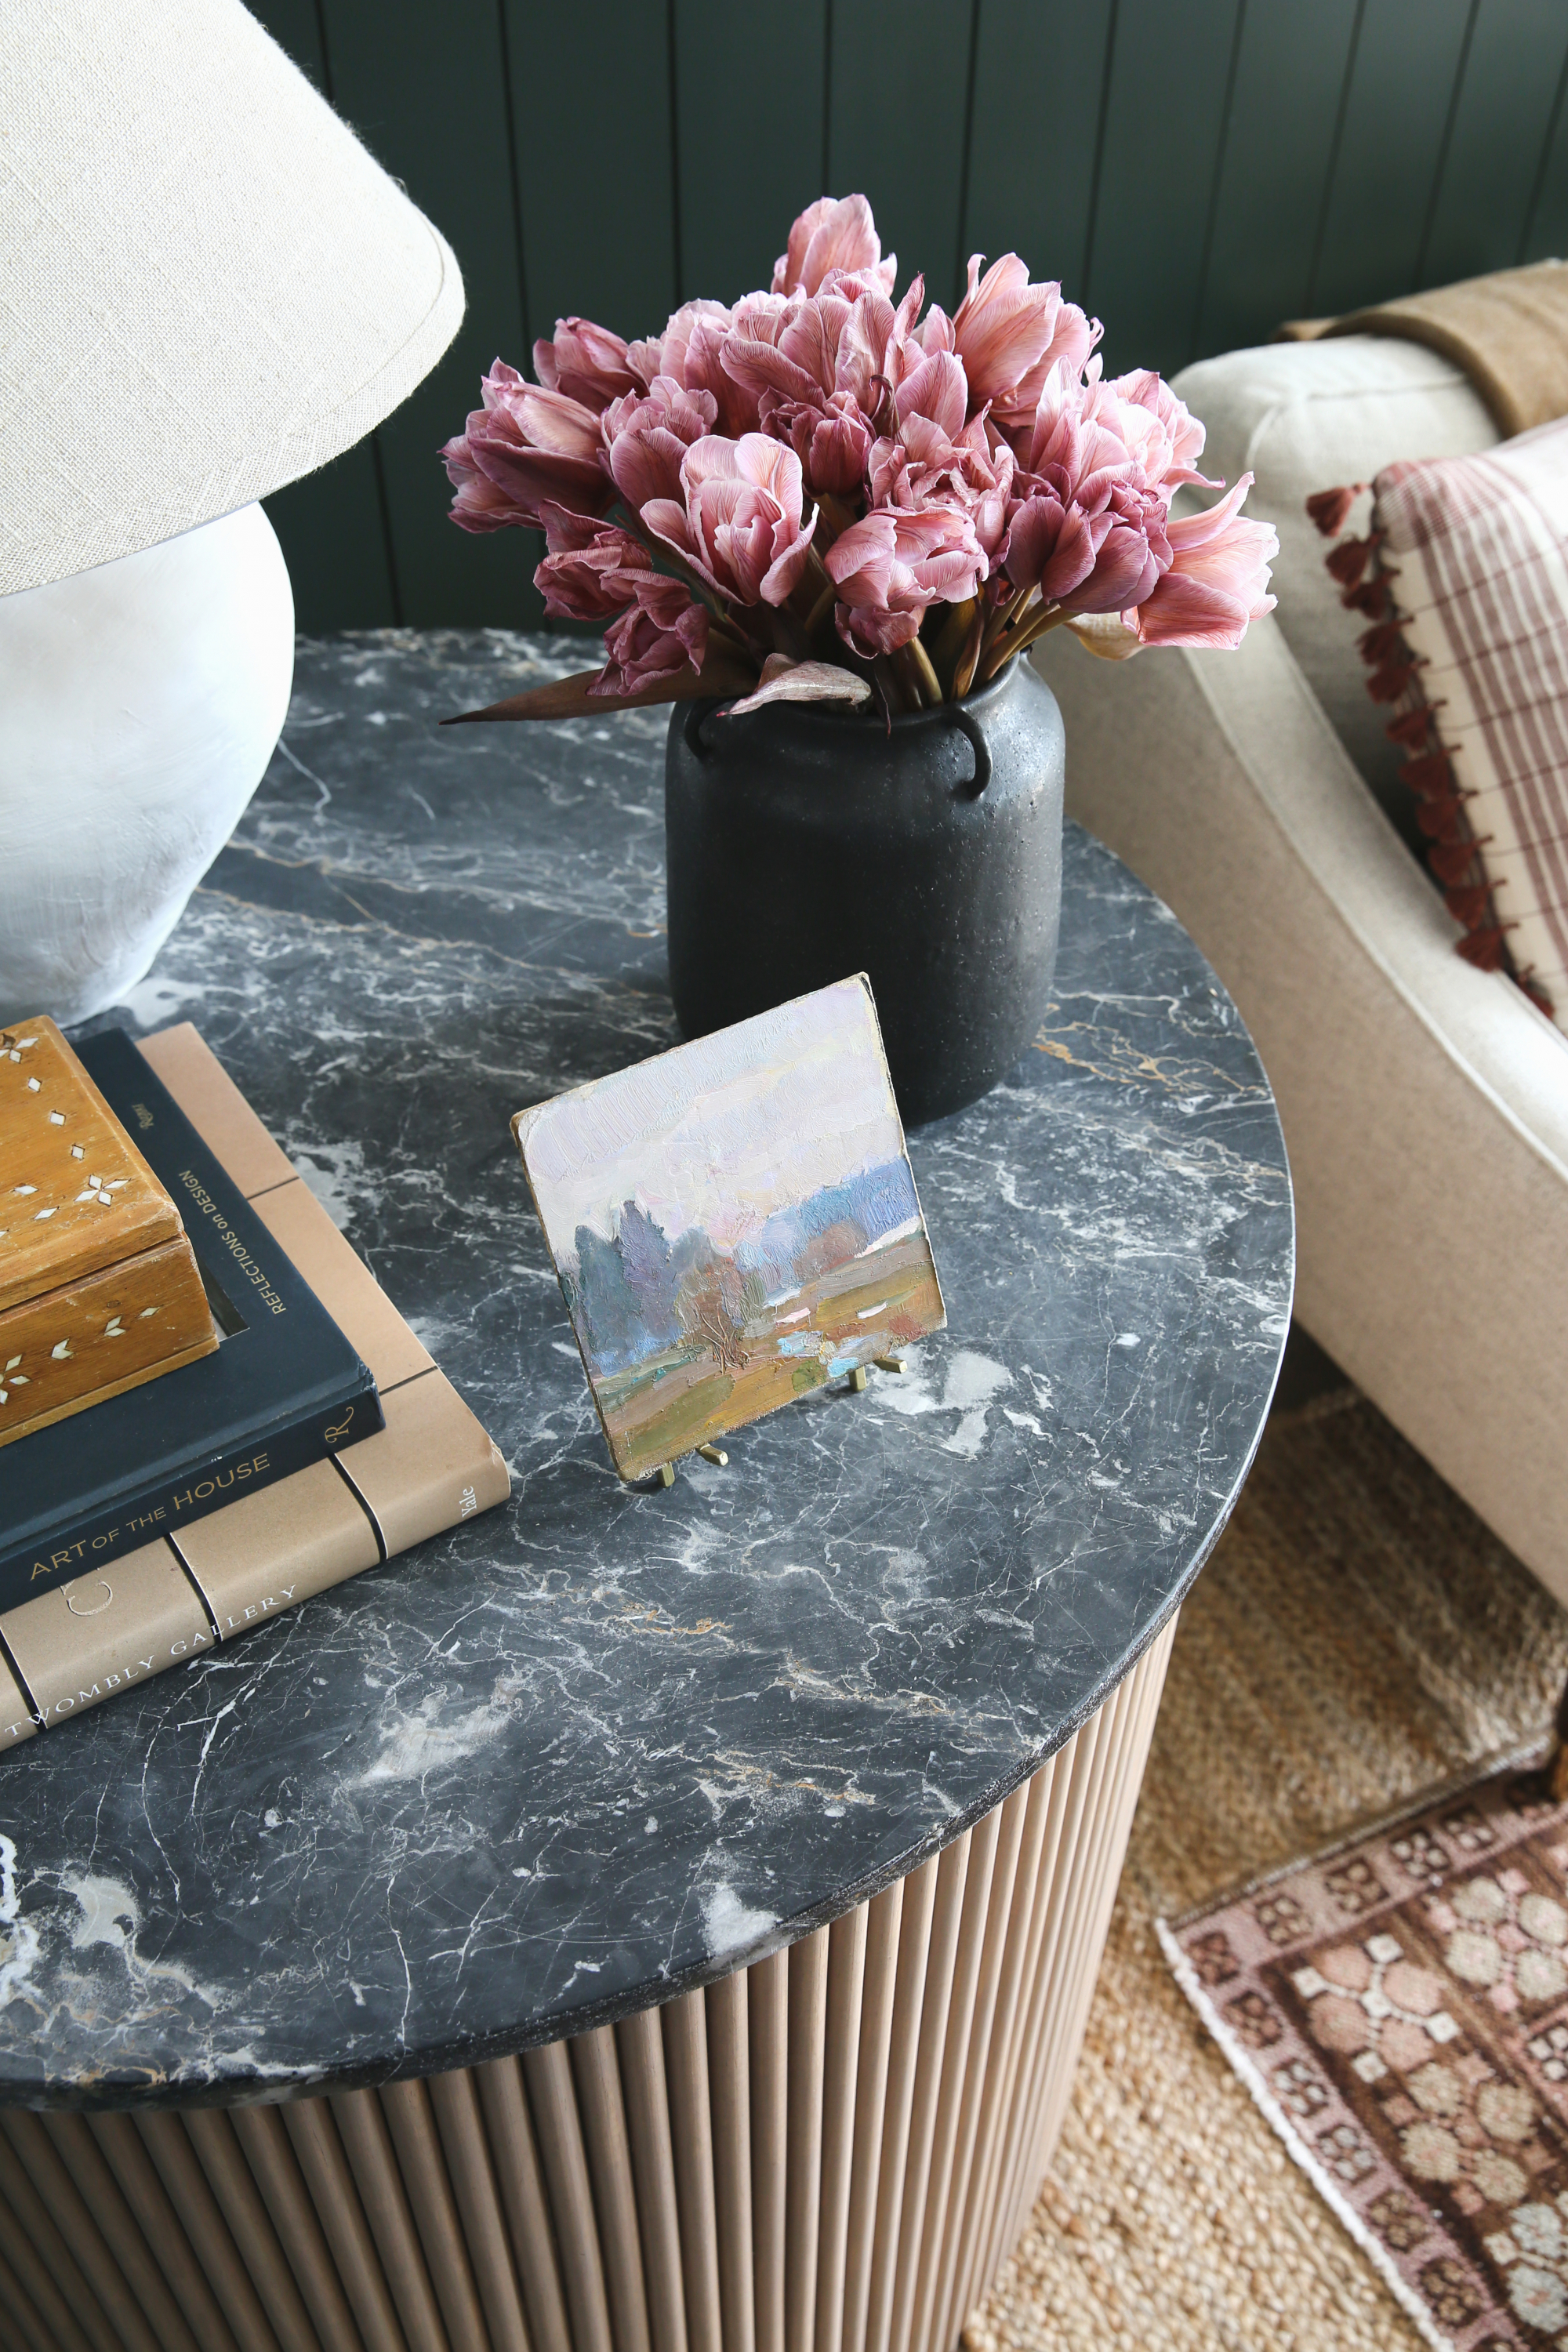
My favorite project in the room was this DIY fluted side table, inspired by the tambour on the cabinetry in this kitchen project I helped design, as well as Mandi’s DIY wall treatment and Jyll’s DIY coffee table. I shared a lot of video and BTS of this project on my stories, but I wanted to post a tutorial here too!
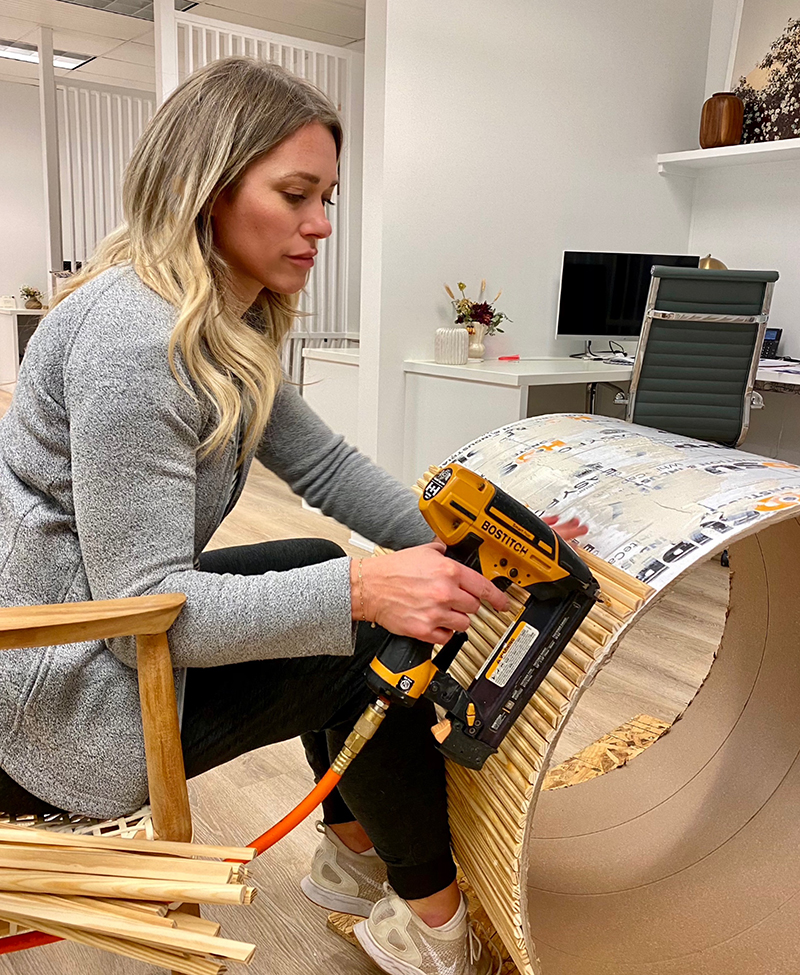
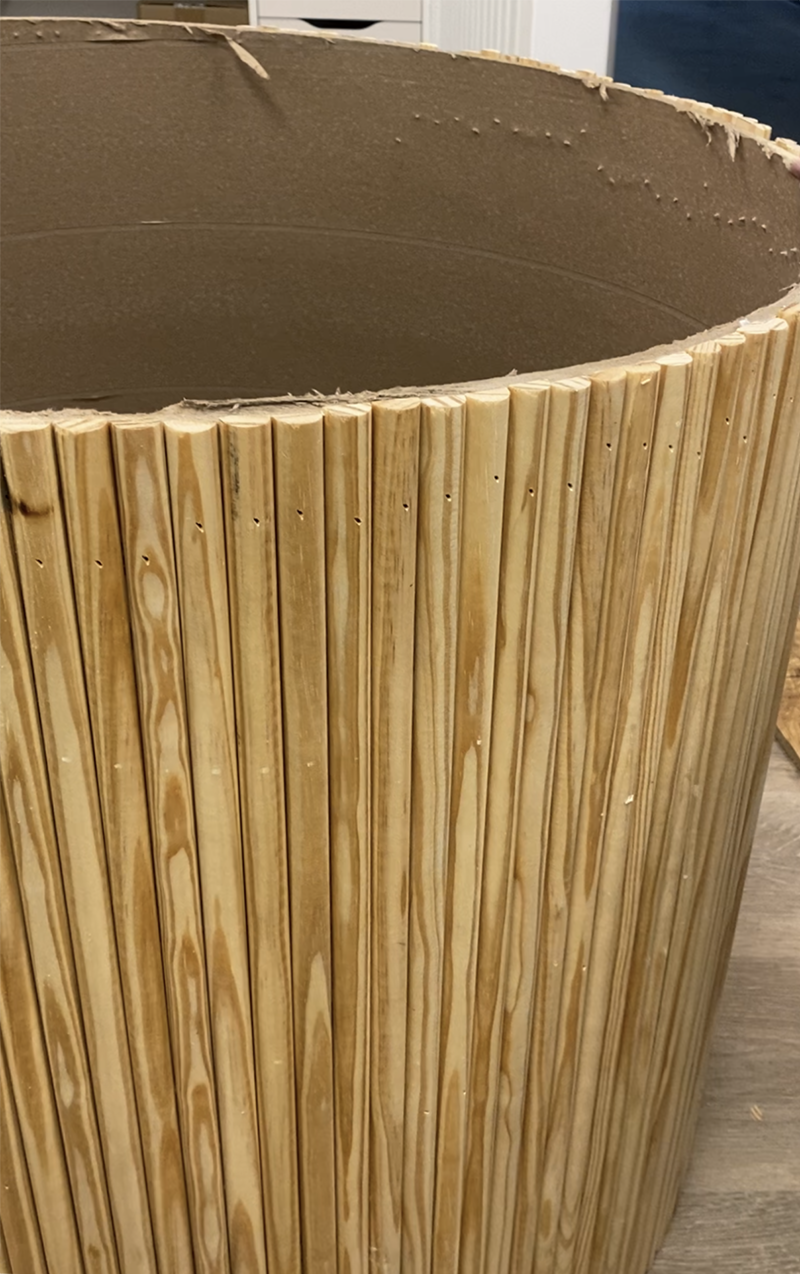
The trickiest part of this project was figuring out a good base with which to secure the half round dowels. I needed something sturdy, affordable and that could be found in both diameter and height that I wanted. It took some calling around to learn that building suppliers carry concrete forms in many diameters (up to 60″ wide!) that are priced by the foot. PERFECT. I was able to get a 30″ round tube cut to 28″ high at a national supplier called White Cap Construction. You can see locations here.
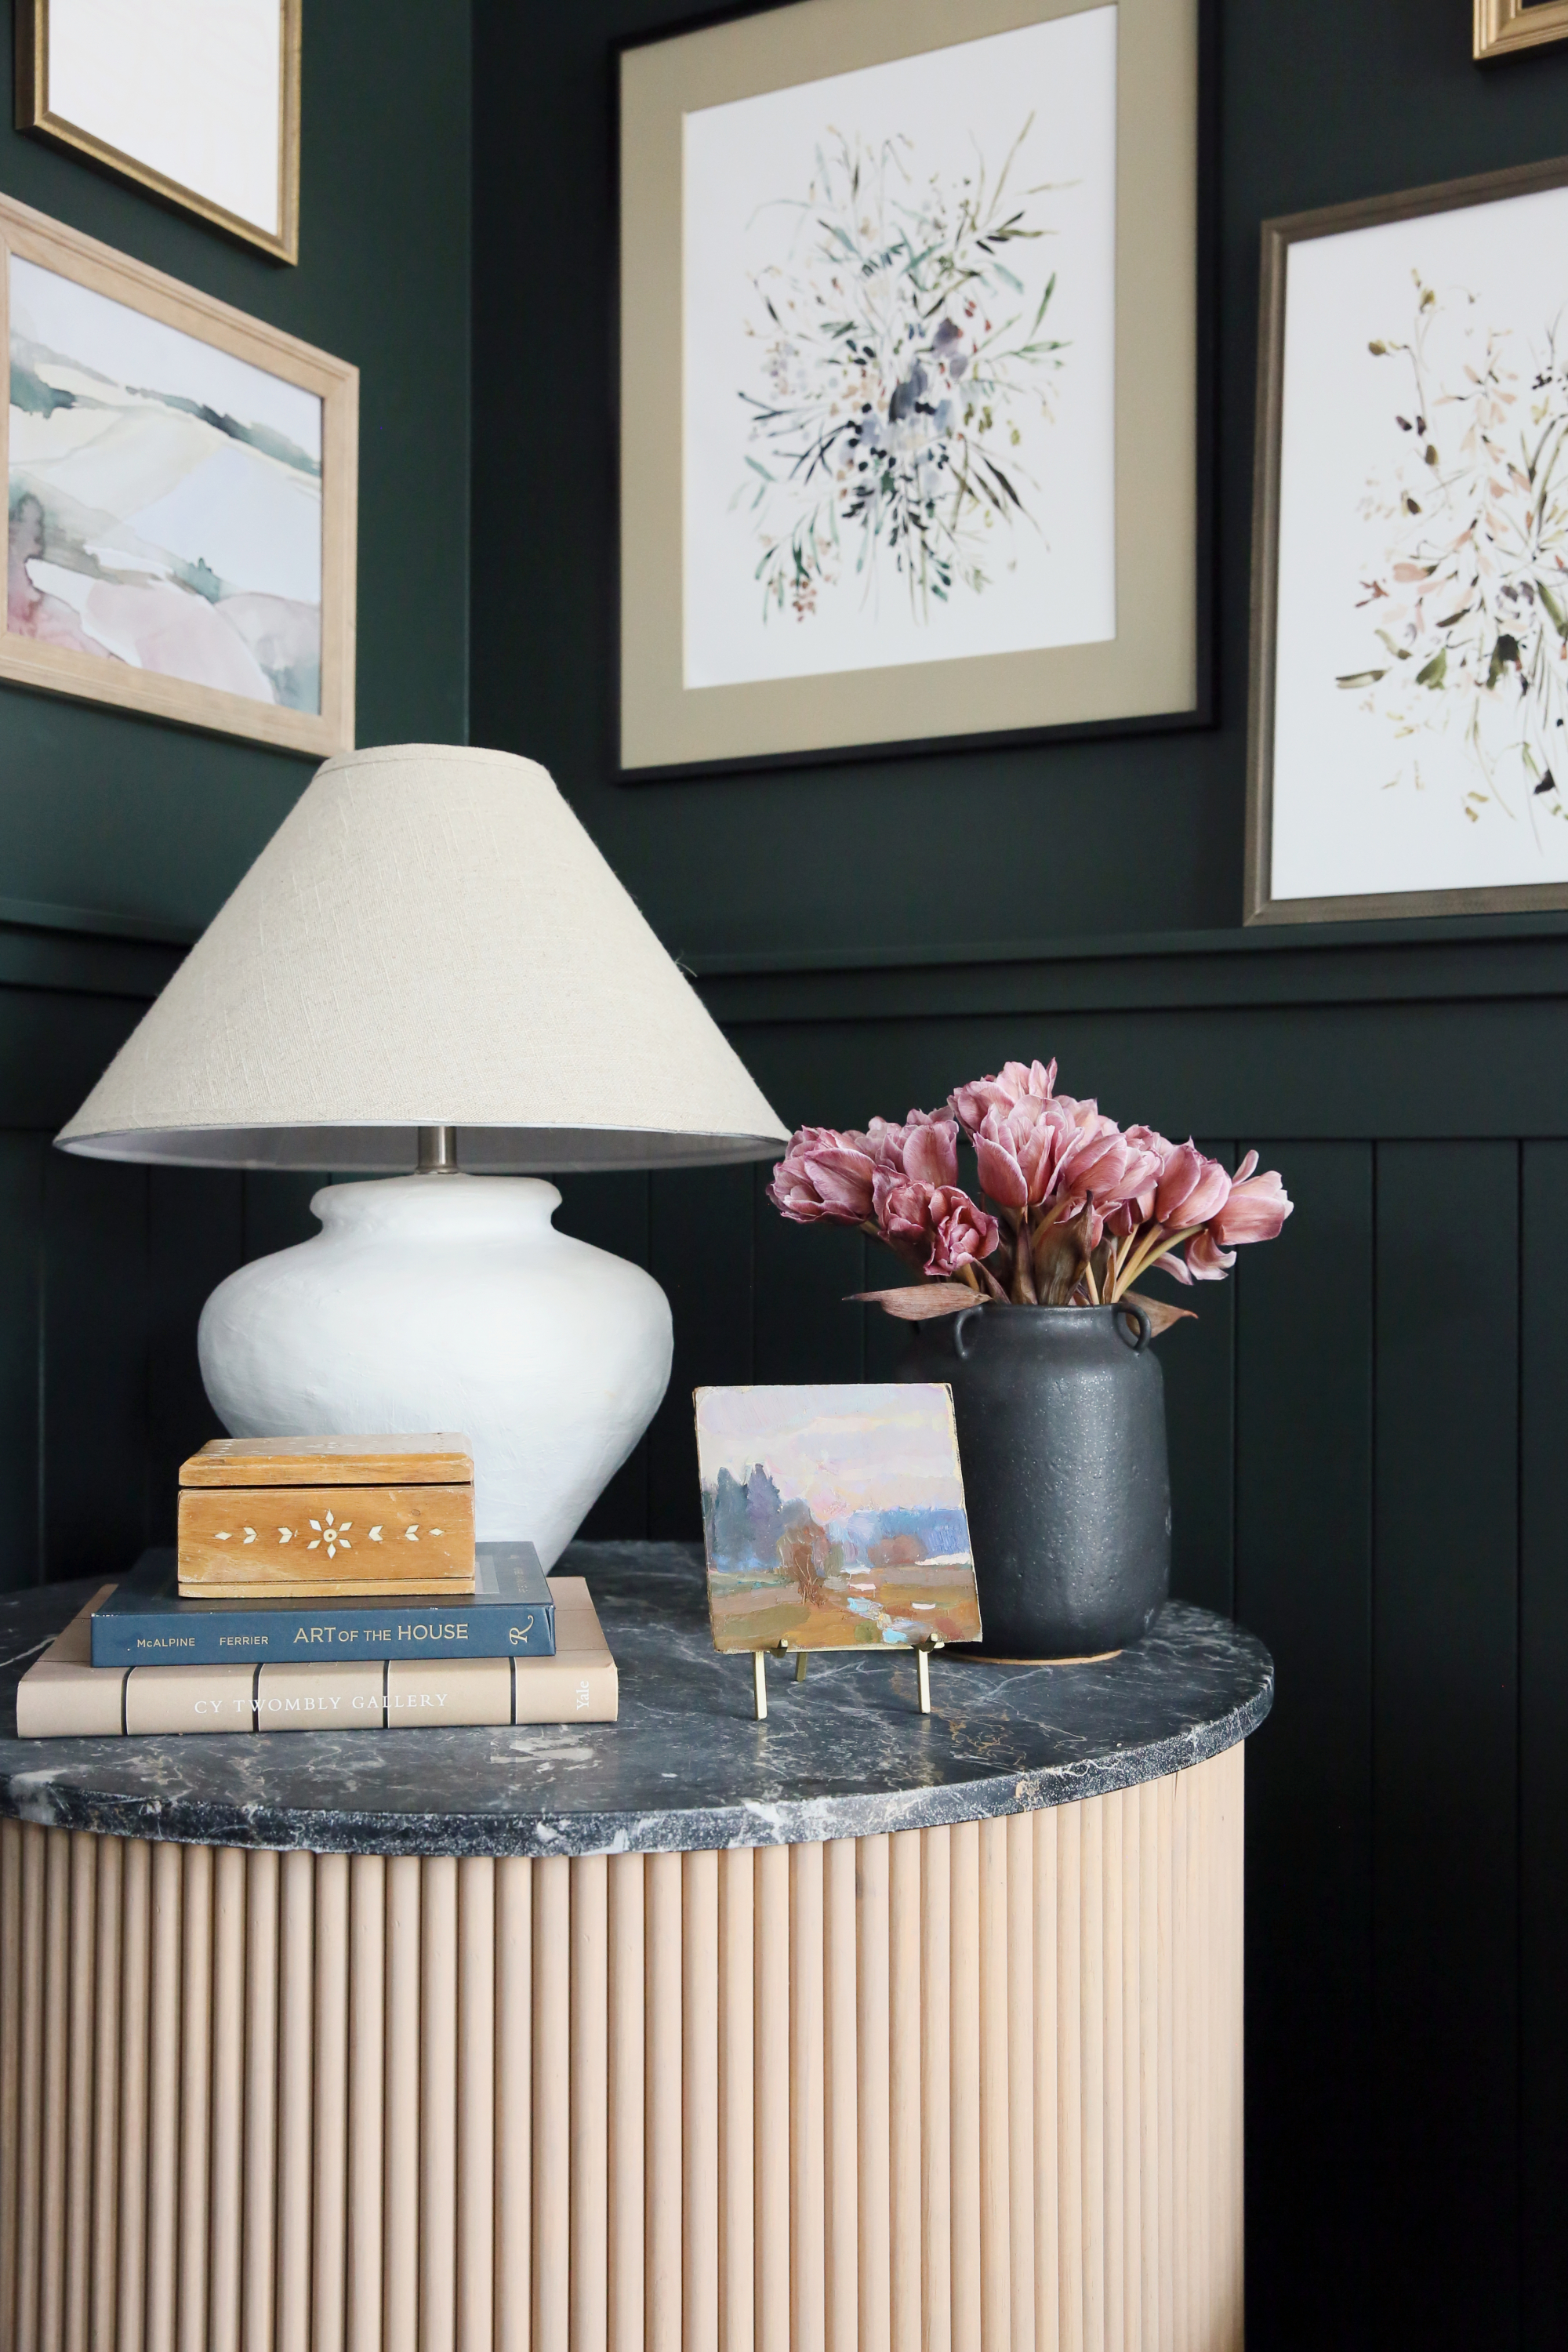
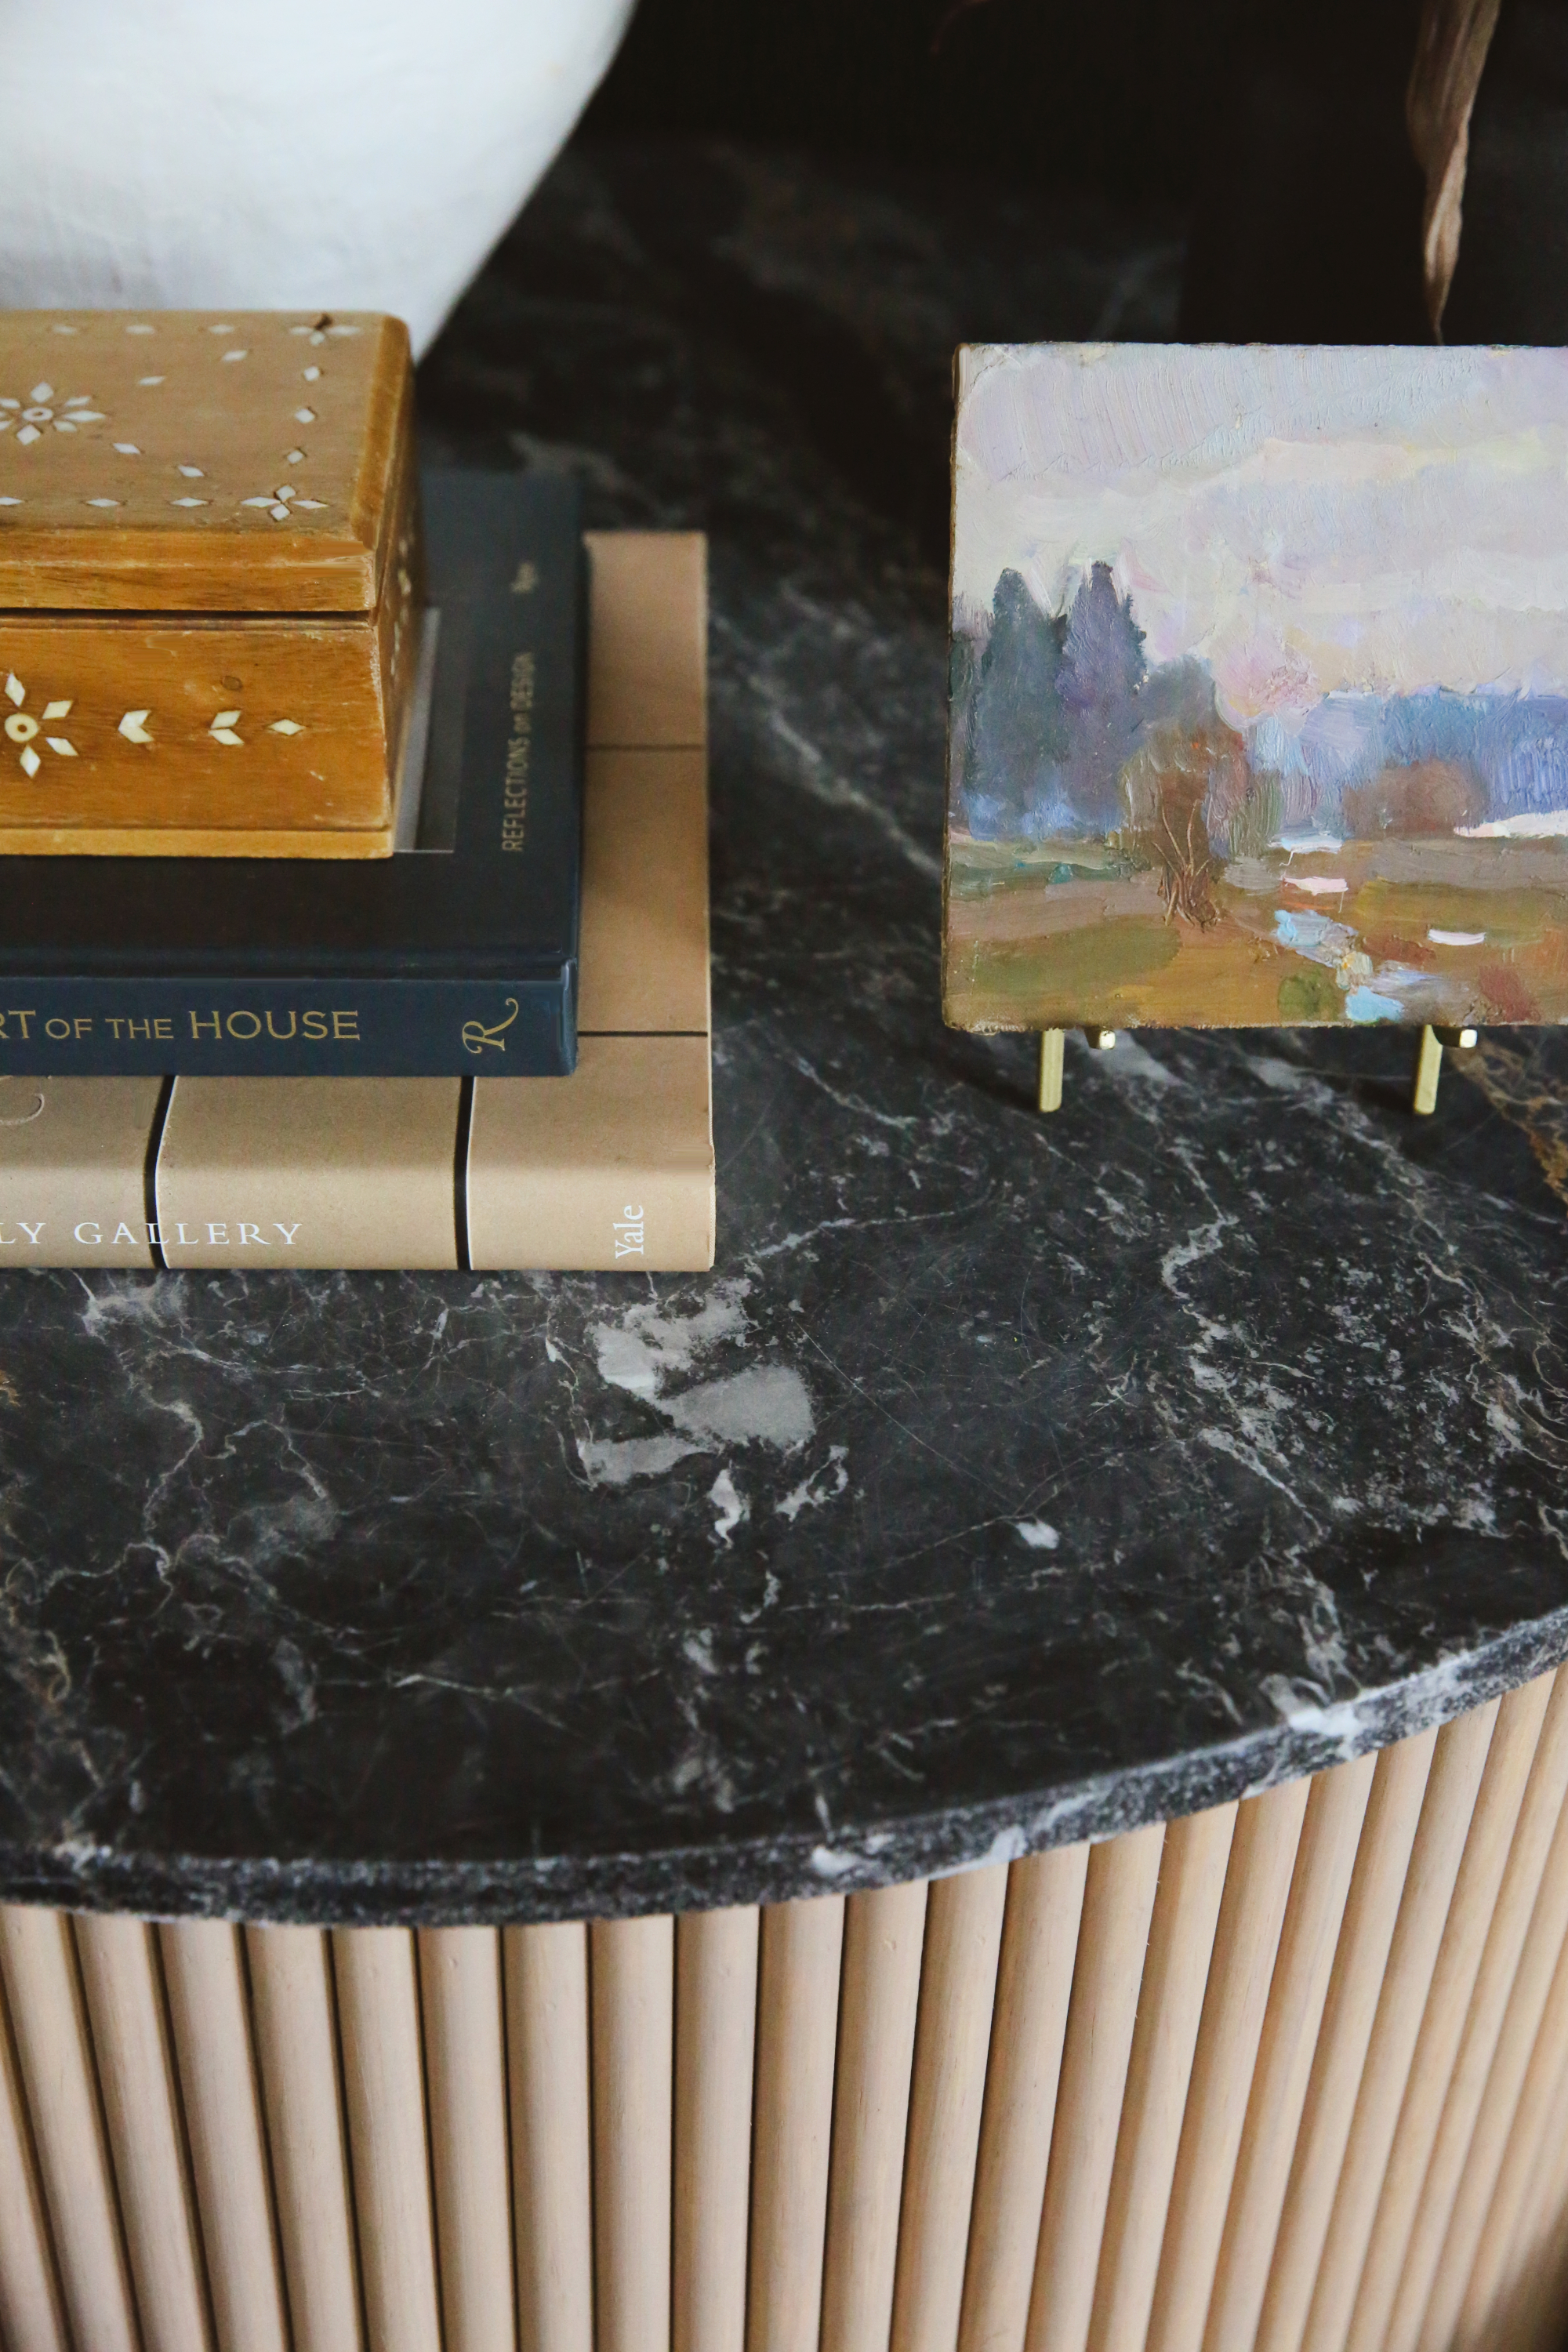
A quick note about the top of the table – if you try this project, you’re going to want to start with sourcing a table top. My suggestion is to head to your local thrift store (or maybe better yet, pop onto Craigslist/OfferUp/Facebook Marketplace) and find a vintage coffee table with a cool piece of stone. These are usually pretty affordable. I had a 32.5″ wide vintage black marble top in my furniture hoard that I found at a thrift store for $35 a few years back. The marble has beautiful movement – but I definitely wished it was honed instead of polished. I thought it would be worth experimenting with knocking back some of the shine with some (er, actually a LOT) of distilled white vinegar. I poured basically a whole quart of vinegar on the stone and just let it sit for a few hours. It worked SO well! Be sure to check out my stories for more on that process!
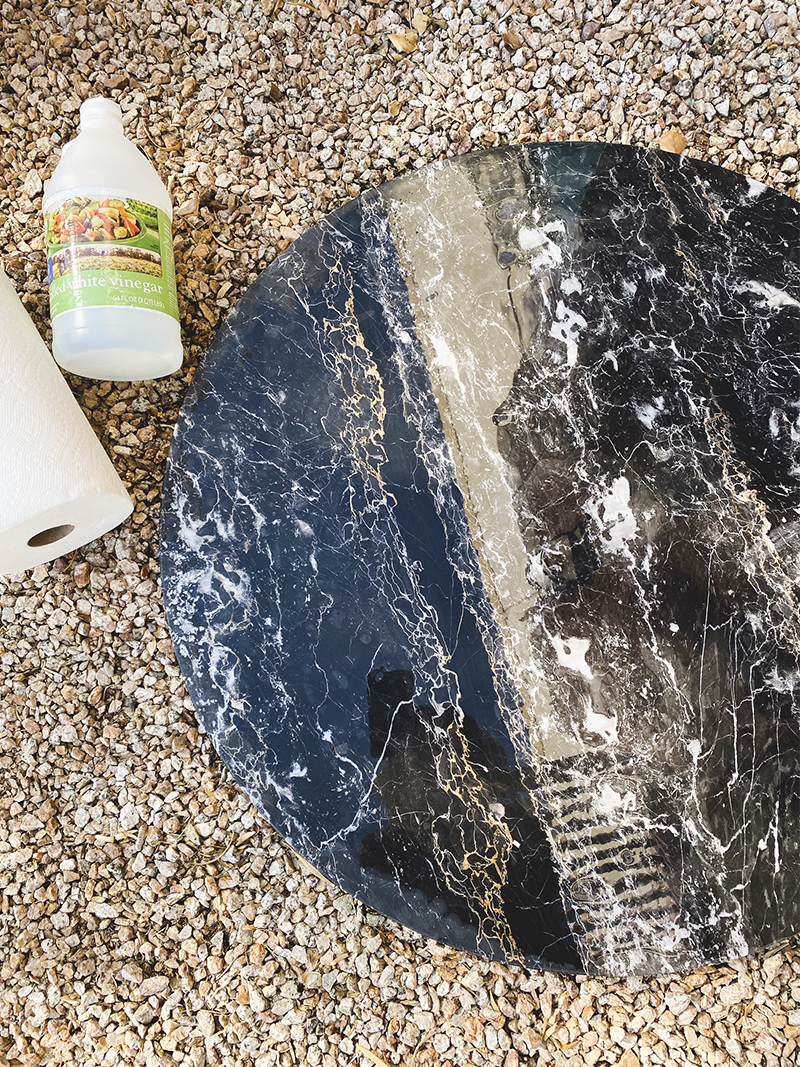
This photo really shows the difference between polished and honed marble finishes. I missed a bit of the edge here but was able to go back and fix it later with some additional vinegar.
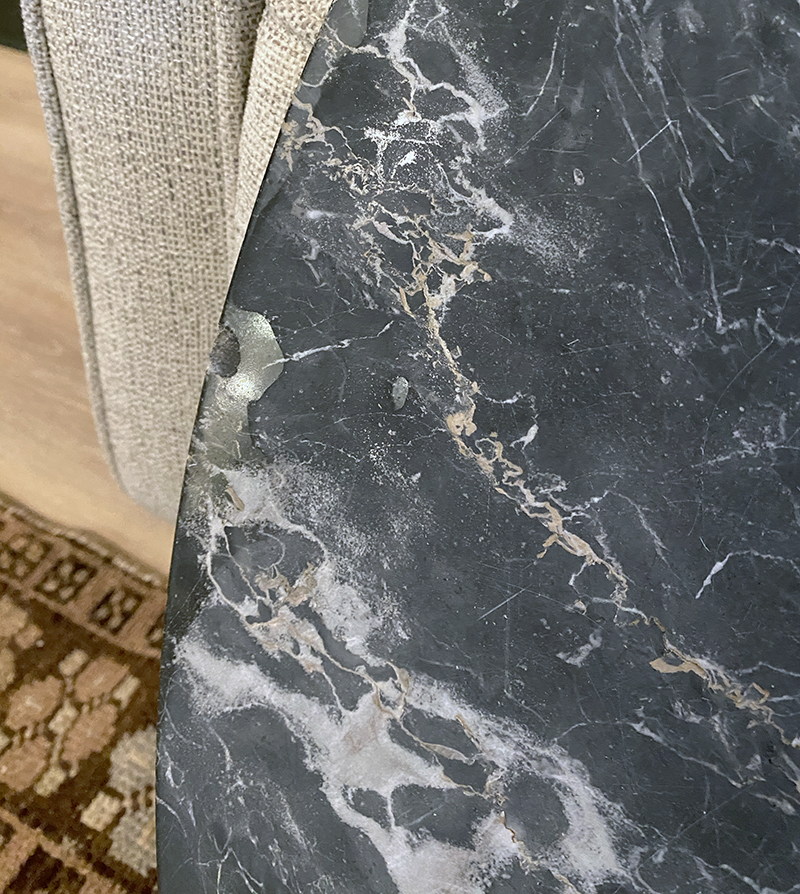
It’s definitely a matter of personal preference, but 10/10 times I choose honed, or even leathered/satin stone over polished. I like that honed (or matte, chalky) finishes look older and less harsh. And wherever you have marble in your home – table tops, tile, or countertops – its a good idea to seal the marble with a matte finish impregnating sealer. I like this one best. (PS stay tuned for a HUGE tutorial we have coming up in the new year all about countertop care – specifically honed marble, soapstone and butcher block! It’s going to be a great one.)
Back to the DIY fluted base! You can find half round trim at Home Depot as well as custom trim shops. They come in 8′ lengths and cost around $2-2.50 per piece. I was able to get three lengths out of each stick and needed about 200 lengths to stretch around my 30″ form.
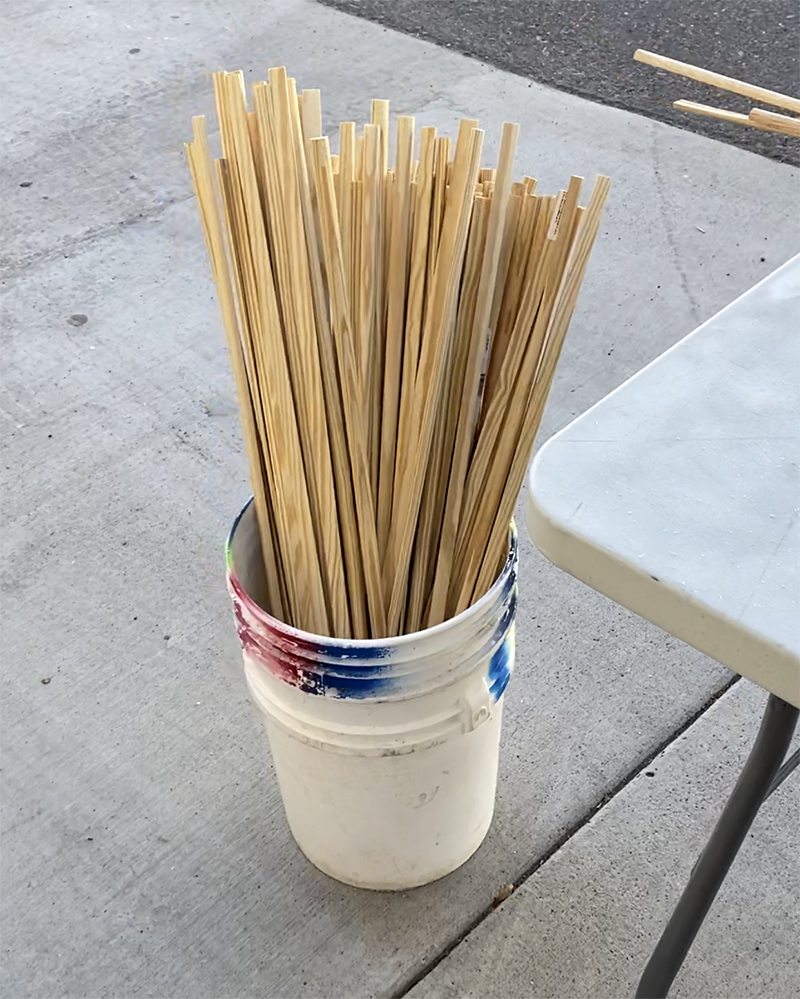
I had hoped that there would be a version where I could just use Liquid Nails to secure the trim to my concrete form. That hope was dashed about 30 seconds into my efforts. A nail gun is necessary here. Real wood is just too squirrelly. And you need these trim pieces to be uniform, straight and tightly joined. In the end I used a bit of Liquid Nails and a brad gun nailer on the ends of each dowel and occasionally in the center. I filled the holes with wood filler before painting the raw wood.

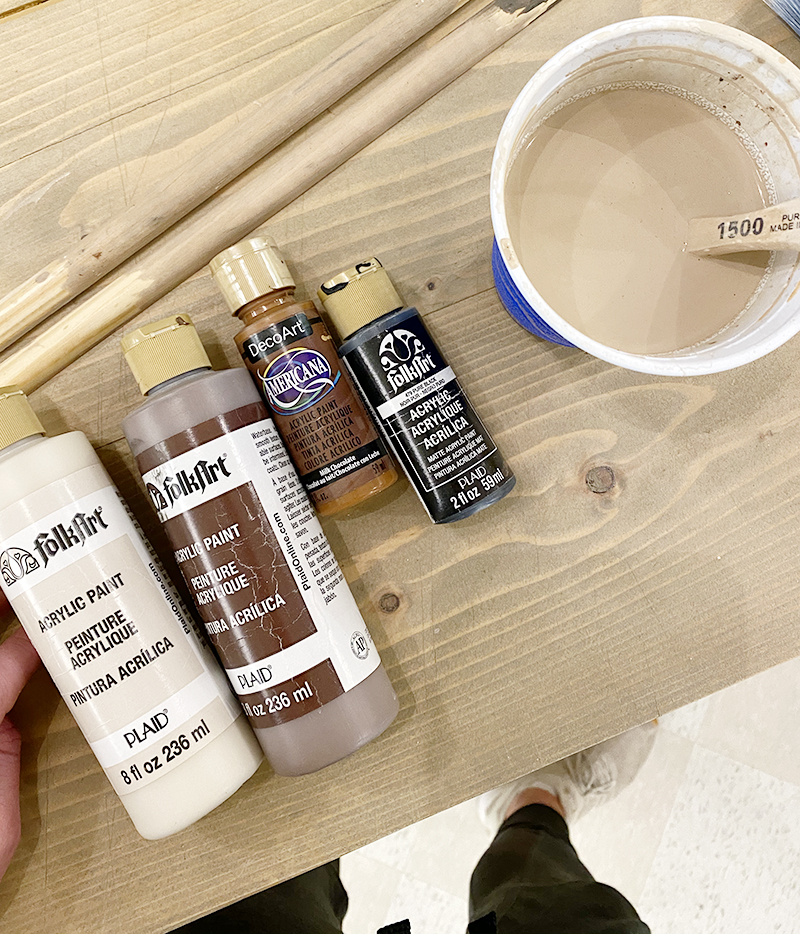
Pine is not my favorite wood species. I don’t love the yellow tones. But over the years, I have started using watered-down acrylic craft paint to “stain” my wood projects, especially when I’m trying to get inexpensive pine to look like oak or walnut. It works like a charm, folks! Just mix whatever beige, brown and black colors you like and add about four parts water (more or less depending on how much of the grain you want to show through!). I use this Linen color most with accents of brown and black depending on how dark I want the stain. If you are trying this method on something that gets touched or cleaned regularly, you’ll want to seal the surface with a matte, clear Polycrylic.
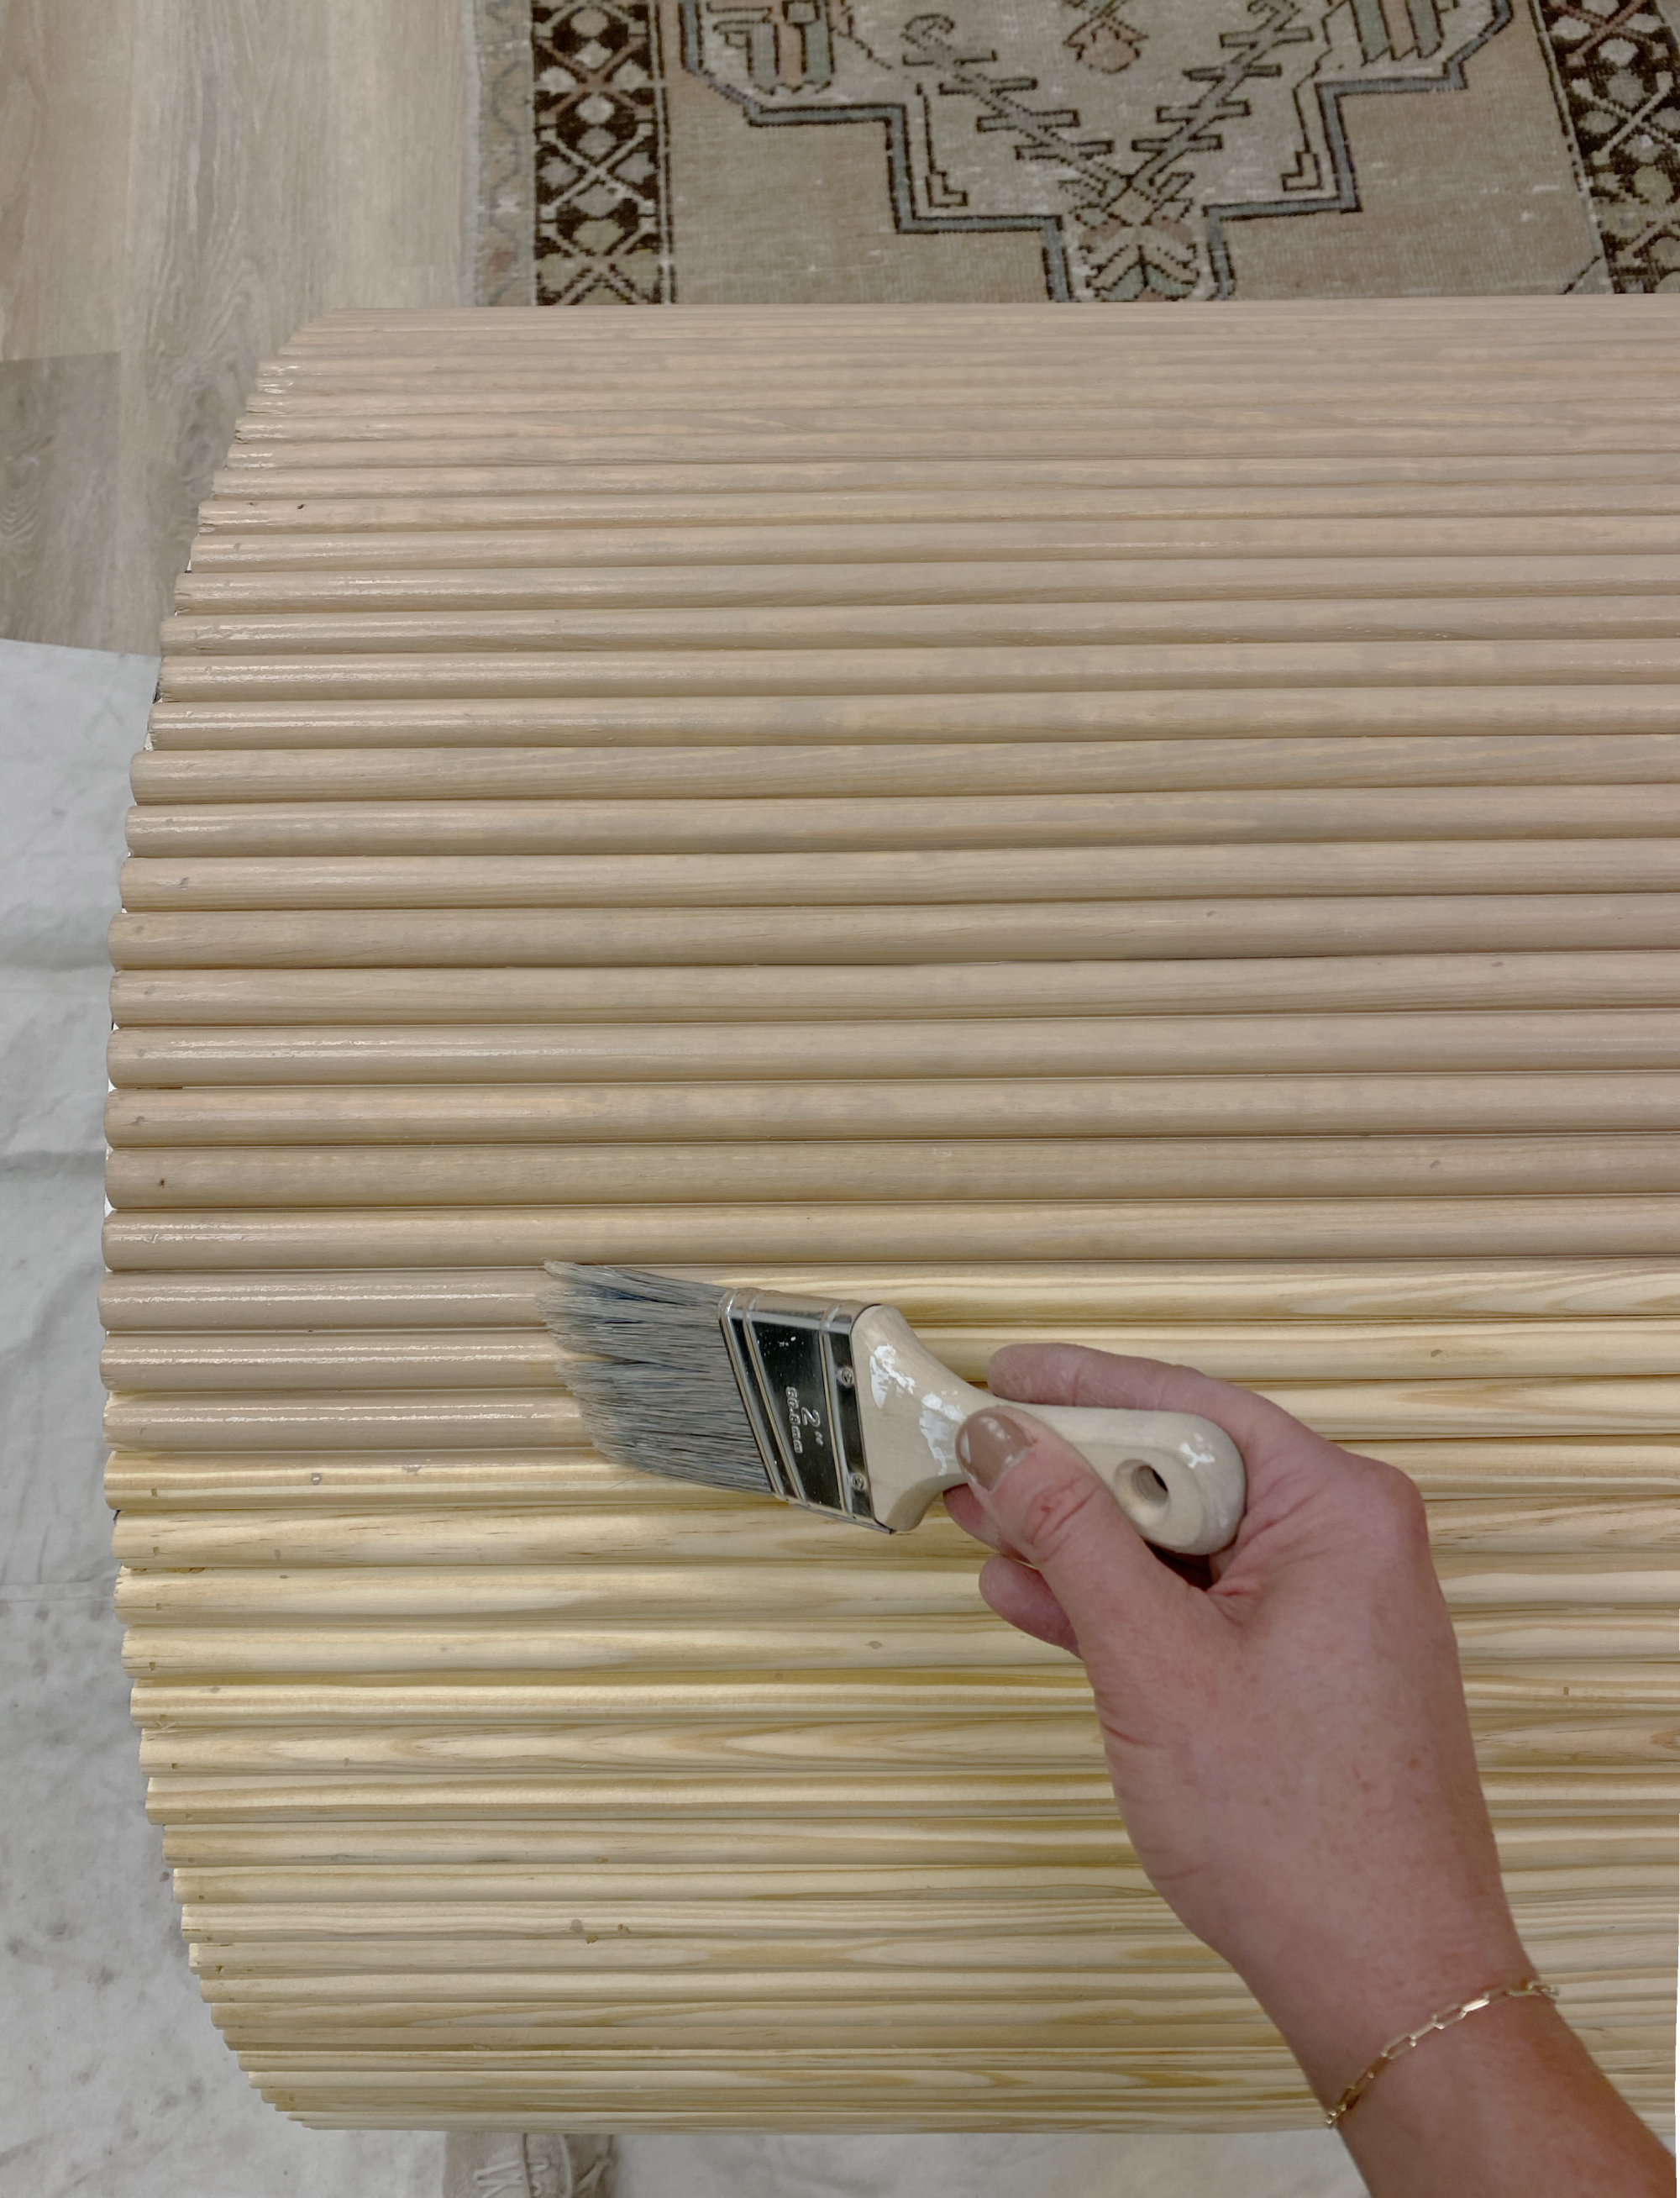
Pretty great, right? You can coat just once or as many times as you’d like. It dries very quickly. Gosh, I love craft paint.
Cream Sofa(similar) // Rust Chair (similar) // Jute Rugs // Vintage Oushak (similar)
Table Lamp (similar) // Blue Pillow(similar) // Cream & Rust Pillow(similar) // Striped Kilim Pillow (similar) // Ottoman (similar)
Some of you wondered how I planned to attached the stone top to my table base. I didn’t actually attached the top here. The marble is so heavy, and with the table base being so wide, it would take hundreds of pounds of effort to tip the whole thing over. But if you make a version of this table yourself that is less wide, you may want to consider figuring out a way to attached the stone to a wooden round that would then sit inside the fluted based. Sort of like a giant bottle stopper?
That’s it for the tutorial, but let’s talk about cost for a minute. DIY does not always mean super affordable. Especially when you count the time you invest in the project! That should always be a factor. Here is every dollar I spent on this table:
30″w x 28″ H Concrete form: about $60 ($22/foot for this size)
Half Round trim: $130 ($2/piece)
Liquid Nails: $6
Brads: $6
Vintage marble top: $35
Vinegar: $3
TOTAL: $240
Now, if I had found a table like this at a local shop for even… $800 I would think it was a steal and I would be very tempted. But at $240 in materials cost and, call it, six hours of my labor time, I’m happy with the result. I’m proud of how the table turned out and how it perfectly fits in that corner space. It will be a fun reminder to me as I walk in the door every day of my DIY roots and that a little scrappiness from time to time really pays off.
(PS if you’re not into DIY or power tools at all, no biggie! The fluted furniture trend has hit the retail market as well – here are some of our favorites available in stores right now. And if you’re looking for some additional pieces for your home, check out the Shop Our Finds section of the site! We have been working hard to source items (even finds from small shops and vintage sellers!) and we are constantly monitoring this links to make sure they are in stock.)

1 // 2 // 3 // 4 // 5 // 6 // 7 // 8 // 9 // 10 // 11
Juniper Office Entry Source List
Prints:
Furniture & Decor:
Wall color: Farrow & Ball Studio Green
Flooring: Lifeproof in Dusk Cherry


Fabulous! I loved watching your stories of this diy. The vinegar science experiment was my fave. Your creative, problem-solving brain is a joy. Thank you so much for sharing!
The fizzing was a fun surprise! :)
I love this! It turned out great. Could you talk about the ceiling? Is it a drop ceiling that you painted?
We used bead board ripped down to 2×4 size and popped them up in place of the acoustic tiles!
I had the same question about the ceiling tiles – so smart!
Love it! It’s looks amazing.
Question about the 40×55” frame with the hillside print….is that the bjorksta frame painted your favorite gold or is that a different frame/color?
Hi Ashely! Good eye! This is a DIY I made and will be posting the tutorial for this week! Stay tuned! :)
Love the finished space! Would you mind sharing what finish of paint you used for the walls and trim/paneling? Thanks!
I used satin finish in here. The paint color was color matched with Dunn Edwards paint. Hope that helps!
I’ve been watching this very closely over the last few days. I love how it turned out and the fantastic diy makes me excited that you are able to do more of those again. How comfortable is that sofa? Good for lounging on or just a few minutes in waiting room? Thanks so much!
It is comfortable – but I wouldn’t describe it as super loungey because it’s on the smaller side!
Really love this space! Curious, is the small painting on the brass easel vintage? Thanks!
It is a vintage painting, Sarah! Aren’t the colors pretty? I would love to put it in the print shop but it’s a little small to blow up to our largest sizes, sadly!
I would absolutely buy a tiny print like that if y’all made it available! Does the scale of the digital downloads work well for printing smaller than 8 x 10 (like with the Swimmers print)? Thanks!
Thanks Meg! Yes, when you buy a digital download, we send you several different print ratios that work perfect for smaller prints, like 8×10! :)
Bravo!
I was fascinated with the small landscape also. Why not mske it available as is.
Nice job, but the term for what you did is not “fluted.”
It’s called “reeded” wood. Best!
I love this space! And the table turned out amazing. I actually have a question on your evergreen house. I love the combo you painted the walls and trim. Would you mind sharing what color you painted the ceiling with that combo?
Thanks Krista! We painted the ceiling Chantilly Lace too!
This is one of the most exciting DIY projects I’ve seen, and manageable for a senior like myself. I’ve enjoyed your site for years, always creative, tasty, and well written.
I love the look but am curious about the logistics. The front hallway looks a little narrow between the entry table and the couch. Am I perceiving the space wrong, or is that not an issue since you have a warehouse for large deliveries? Thanks for sharing this space with us!
This is just for employees and visitors to walk through. There is 5-6 feet of clearance between the sofa and the console table – so plenty of room for that. We receive deliveries in our adjacent warehouse.
I want to try this coffee table project, but I’m having the hardest time finding the right cylinder. I’ve seen otters tutorials use a firepit drum, but I’d like my tail to have a fairly large circumference (46-50 inches). I called the resource you provided but they don’t sell concrete forms of that diameter. Any ideas?
Hi Amy! Sounds like a very cool project! I can’t think of anything that would be sturdy enough at that size off the top of my head, but I’ll keep thinking about it and will reach out if I do come up with something. It might need to be a custom metal worker making you a ring?
This is amazing! We just happened to find a round piece of stone left abandoned and are hoping to turn it into a table like this :) It has a few chips along the edge, do you have any recommendations on how to fill/repair these? Thank you!
I would try to use some epoxy that matches!
Hey what type of nails did you use for the wood?