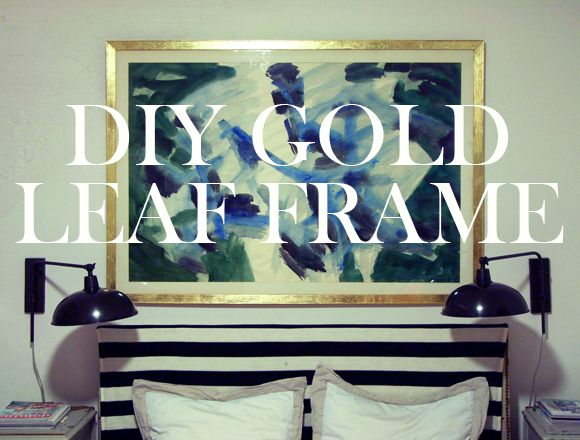
I love big art hanging over a bed and have been on the look-out for something large and in charge for above our headboard. Recently (actually when I was shooting that IKEA commercial spot), I spied a HUGE frame in someone’s cart at IKEA and was surprised to hear from them that the artwork/frame combo was on $50! Not bad at all for 55″ of wall decor! I was planning to pick up one of these and replace the print with some of my own artwork.
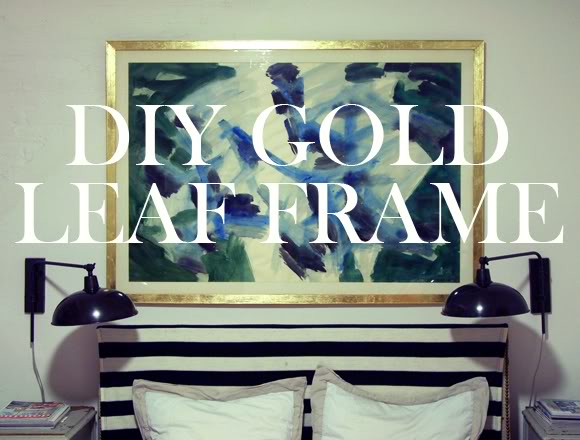
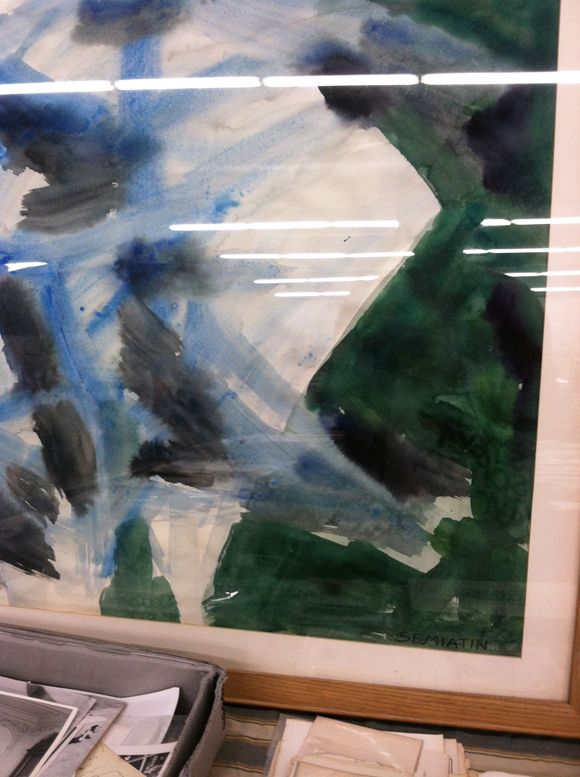
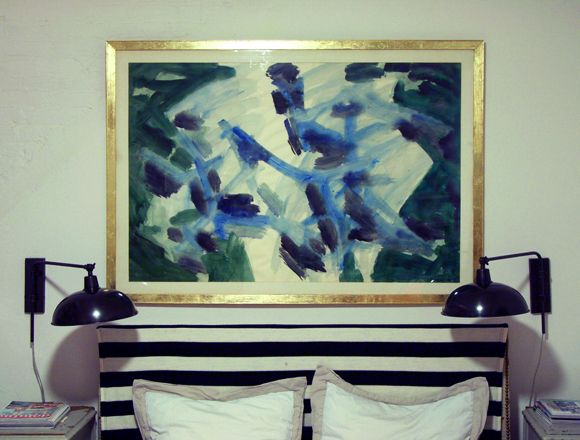
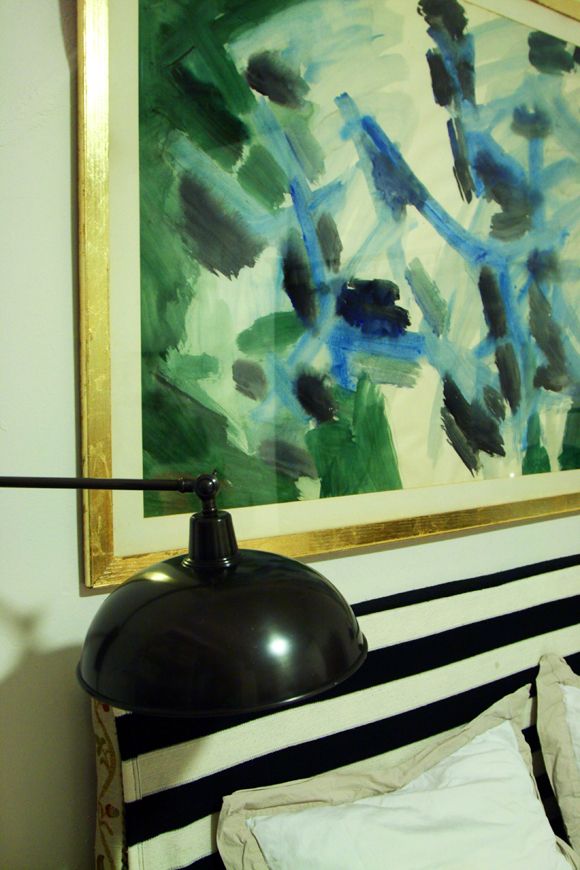
Then last week at the flea I found the absolute perfect, perfect piece of art for above our bed. It’s a vintage watercolor featuring all sorts of lovely blues and greens and some black for contrast.
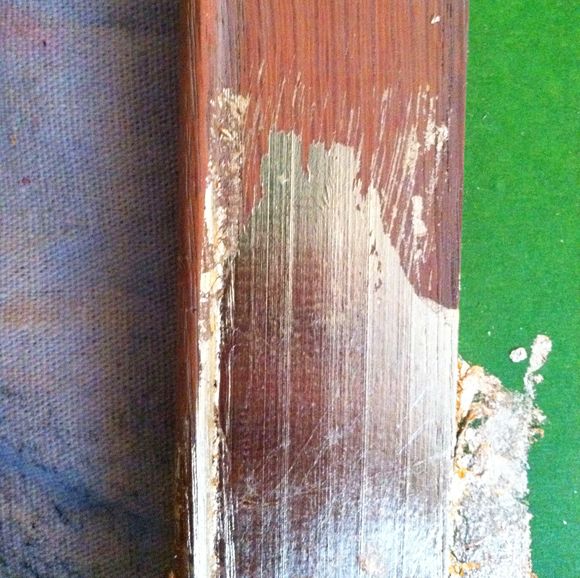
The only part of the art I didn’t love was the heavily grained oak frame (I prefer natural wood frames to be birdseye maple, burlwood or birch).
Since deciding on dark walls for our next bedroom, I thought a gold frame would look lovely here. I love using my trusty gold leaf pen for smaller frames, but this frame is huge – also around 55″ wide. Plus, the gold leaf pen can end up looking a little flat (sort of like gold spray paint can) when it’s used on large surfaces. Real gold leafing has almost a lightly distressed look (at least when I do it myself!) that actually I love.
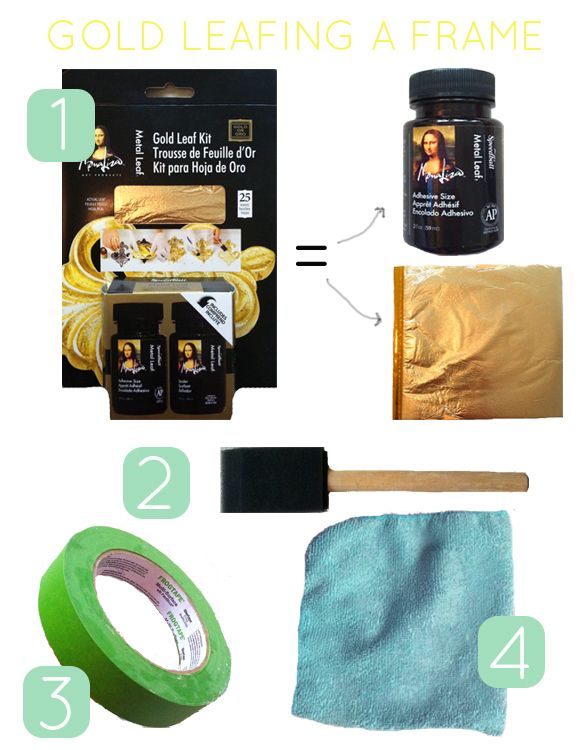
It’s easy to assume that taking on a gold leafing project will require a big investment for supplies. Not so!
This little kit from Speedball has the glue (called ‘size’), 25 sheets of leaf and even sealer, for only about $10. That’s as much as a gold leaf pen costs!
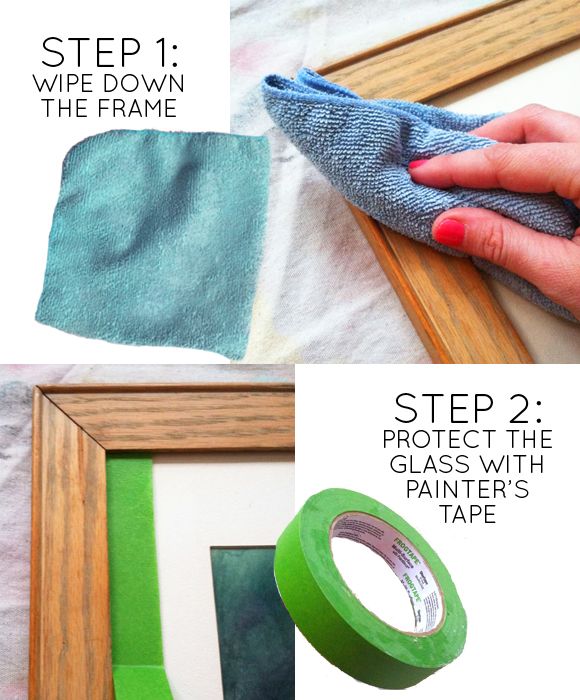
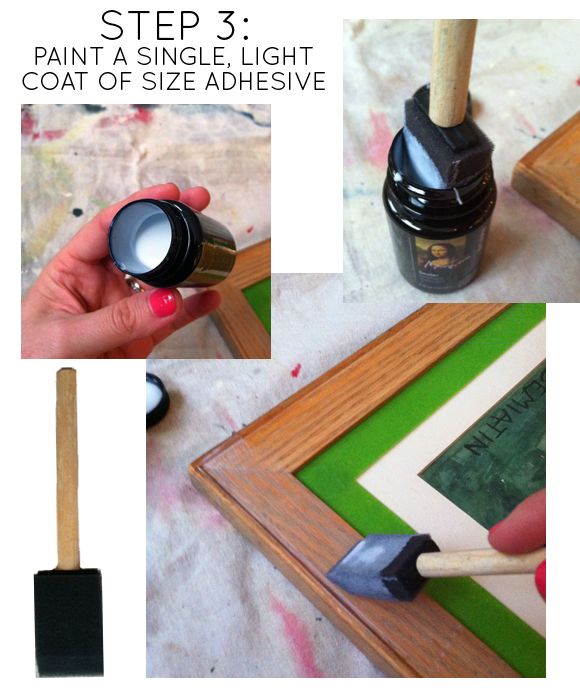
The step-by-step is a breeze. It took me about 30 minutes to gold leaf this huge frame, and that includes 15 minutes of size drying time. First, just lightly clean the frame. Remove any gunk or dust. Then run a line of painters tape along the inside edge of the frame to protect the glass. If it’s easy for you to remove your artwork, leafing an empty frame is ideal. (my art was backed with kraft paper, so I needed to go the tape route).
Using a 1″ foam brush, dip and fill the brush in the size adhesive bottle. It should fit perfectly in the bottle. One dip was plenty for one entire side of the frame. You don’t need a lot of glue here. Less is definitely more. Also be careful to avoid any puddling with excess size. Everything needs to dry evenly.
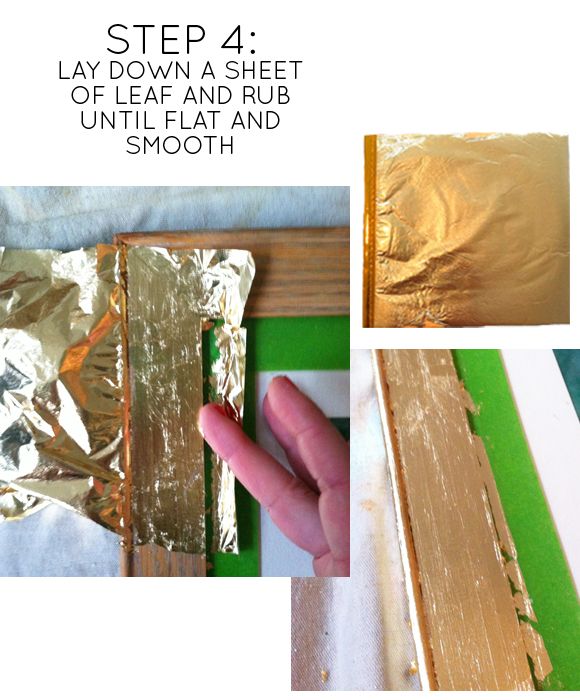
Once the size has dried for about 10-15 minutes and is completely clear (not milky), it’s time to start leafing. If you’re working with a very small frame, you can cut the sheets down to size to help reduce wastage. I should have cut my sheets in half before using them to make my life a little easier.
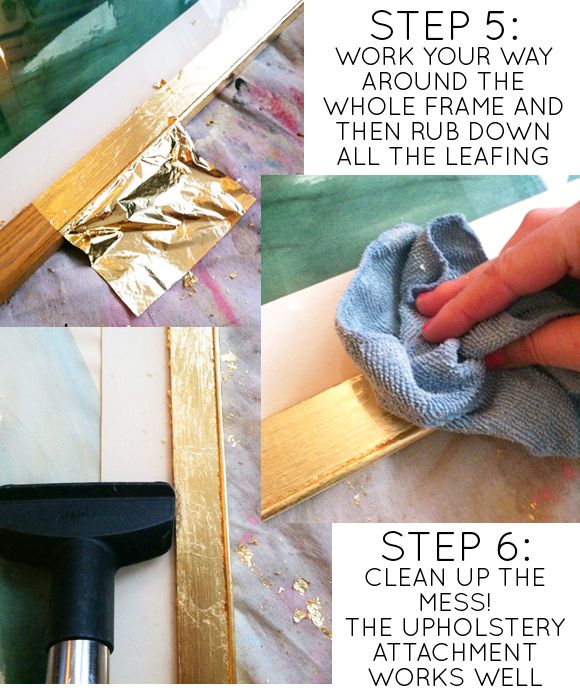
There’s really no going wrong with the leafing process. You just carefully lay the sheet down, trying to not let the leaf fold over on itself – thought it’s not the end of the world at all if it does. Then burnish the leaf into the frame with your finger or a clean paint brush. You can just rub in bits and pieces of extra leaf and it will stick to any amount of the size. You can see here where even the tiniest bit of size got on the frame at the end of a brush stroke, and the leaf stuck to every bit of it.
I went around the frame one side at a time (I’d be leafing one side while I was waiting for another side to dry and get tacky). Once all the leafing is done, and you’ve filled in all the missing parts and the cracks, use a clean cloth to further burnish and rub in the leaf sheets. This is the best step for me! The gold starts to look finished, and so pretty!
If you would like the extra protection of using a sealer on top of the gold, here’s when you would do that. I didn’t bother since picture frames don’t usually get a lot of wear and tear.
I like to pull out my vacuum with the upholstery attachement on to clean up all the gold leaf specs left over on the frame and on the drop cloth. It cleans up very well with the vacuum, even though you feel like you’re making such a mess during the project!
I’m so glad I changed the frame to gold. Much better than that reddy, grainy oak! And see what I mean about the lightly distressed look? I love that.
I’m just itching to get into the new house and paint my bedroom black now. :)


love it and is that an ikea stripe rug over your head board? love that too.
pve
I don't think I've ever seen a peek of your bedroom. Love the graphic stripes and the wall sconces! Love the art peice – I dream of finding a piece like that secondhad! xx
Anna (My Design Ethos)
The phrase Large and in charge is really not used enough. Love it! I have a thrifted mirror I wasn't sure what to do with and this is my answer. Can't wait to try!
I can see it hanging on the black walls now! Great find in that watercolor.
Thank You for sharing Valuable information in this blog.
Green Printer
Not only does this look great it also makes the piece look so much more modern! Nice to see a peek at your bedroom too!! I'm so looking forward to following your new adventure in your new home!!
Love it! Would you please share where we can find those cool black sconces?
It turned out awesome! I recently discovered "rub and buff" at michaels. It gives a similar effect and is a super quick process!
Where are the bedside sconces from? They're perfect.
I always thought it would be really expensive to do something like this so I never bothered. It looks great with the art and on a black wall! It's going to look very cool in your new home. Curious-how many sheets of gold did it take?
I have always wanted to try gold leafing, but have never had the balls to finally take the leap and do it with the fear that it would be a time consuming project and the finished result would look like crap- but you have just inspired me! I'll start with a frame. :)
Also, excited for you to paint your bedroom black! That's another thing I have always wanted to do, but the hubs nixes that fast- I'll live vicariously through your blog on that one!
Alyssa (Baubles & Beams)
How terrific! I'm going to gold leaf something…very soon…maybe this little faux bamboo table I have…you've inspired me!!
That looks gorgeous! Nice job!
You were totally right to go with goldleaf… it looks fantastic!
this pic is going to look so great on your black walls…i want to try gold leafing a frame, but i'm a new diyer & a bit scared…soon, though!
http://ohhhsolovely.blogspot.com/
So pretty! I don't know if I've ever seen your bedroom either!
Champagne Lifestyle on a Beer Budget
Very sleek and contemporary also a modern ornate touch without being over the top
Looks great! Thanks for the step-by-step. Just noticed I have the same sconces in chrome. For those that asked, they were from PB a few years back.
That looks so good! I have a gold leaf paint that I use all the time. Love the look!
-Katie
Athomewhenimwithyou.blogspot.com
Hi guys! Thanks for all the nice comments.
While I love gold leaf pens, Rub N Buff and gold leaf paint for small applications, nothing beats the variation and depth of real leaf! And since this kit is about the same price as the others, why not try the real deal?
Someone asked how many sheets I used. I used almost the whole booklet (about 25 sheets) for the huge frame.
The wall sconces are from the Pottery Barn Outlet a year or two ago. I love them and still see the style pop up on eBay now and again.
xx
love! a look into your bedroom is fun too.
What a great,easy-to-follow tutorial! I've always wanted to try gold leaf, but like everyone else, figured it was too much $$ and too difficult! Thanks for posting!
Hi, I've read your blog for ages and sooo admire all that you do! I'm always inspired by your diy projects!
Had to write today just to clear up any misinformation on the gold leaf: it's actually not real gold when purchased in those books at Michaels and the other craft stores. It's a composite material, usually derived from copper, colored to look gold, hence the need for the sealer. 25 sheets at about 5" square. (around ten dollars a book) If you don't seal or varnish it, it will patina back to it's color of origin- usually copper.
Real gold leaf is readily available in books as well about 2.5" square at about $50 a book.
I work with gold composite, silver and real gold leaf extensively and couldn't help but chime in. sorry to sound like a know it all, but wouldn't want someone to try this thinking it's "real" because it does have to be handled differently. Thanks for indulging me!
Kate
Thanks so much for the tutorial, Jenny. I've been wanting to update some old dark wood frames hanging in our home, and now you've inspired me to just do it.
A word of warning:
You do not have to clear coat the leafed item if you are using REAL GOLD leaf. Metal leaf, also known as "Dutch Metal Leaf", has a copper component to it that will very soon turn green. To prevent the oxidation, you can often use the glue or "size" you used to apply the leaf to coat it – check the instructions on the bottle. You can also coat it with clear shellac cut with denatured alcohol, about a 50/50 mix that has been slowly stirred together so you do not make lots of bubbles. Apply with a fine brush in a single light coat (the alcohol will make the shellac flow much more easily). Let dry and you are done. Be sure to do this in a dry space on a dry day.
it looks great! I love the big frame!
I really like your painting and the frame makes it pop. I will have to try gold leafing something! Looks like fun, & I love the effect!
Thanks so much for posting this! I'd been wanting to try gold leaf but I've been too intimidated to try it since I couldn't figure out quite how to do it. Loved your little piece in BH&G, by the way. You are my favorite designer ( well, you and Lauren Liess!) and I so admire your style.
Wow, I love the artwork, very lucky to have picked that up at the flea. Im so happy with the outcome of the gold leaf frames and was wondering if you ever considered using gold paint instead? and what made you decide to use this method?
What a terrific project. The piece looks gorgeous above your bed. Thanks so much for sharing.
oooh this is the perfect post for me. I just bought a coffee table off of craigslist but wanted to gold leaf it, and this is a great how-to, thanks so much!
This is SOOO good!! Thanks for the step by step – it looks easy!
This is such a fantastic tutorial! Saves you a lot of money purchasing an actual gold accent frame! How long did the whole process take and was it easy to handle?
You seriously have the best DIY blog! It seems like every time I see a project that I love it's from your blog.
This frame is amazing and definitely my style. Thanks for sharing as always!
Corbin
decor-eat