I love the look of using an ottoman as a coffee table. But large upholstered ottomans can be so (!) expensive.
 I think I shared this story before, but a few years ago we lived in Washington D.C., where there is a Restoration Hardware outlet. One magical/terrible day I walked into the store and there, right in front of me, was the most gorgeous and glorious upholstered ottoman (normally $1200). Price tag? $150. No joke. With the understanding that the salesperson knew I wanted to buy the ottoman, I stepped out of the store (no reception inside) to call my husband about the purchase (our rule is no purchases over $100 without a team discussion). I skipped back inside the store after getting the go-ahead from Michael, only to find the ottoman no where in sight. Someone else had bought it in those few short minutes and I felt like such a fool. Saddest. day. ever.
Fast forward two years and I’m still thinking about the gorgeous velvet ottoman. Since I don’t have $1200 to spend on the same RH ottoman, I decided to try and make a similar ottoman out of a coffee table.
I decided that I needed a smaller size ottoman for our living room. I thought 35-40″ would be the right size. And it couldn’t be more than 16″ tall. And I wanted a square table, not a rectangle. And I wanted sort of chunky, turned legs. I know, picky, right?
But Craig’s List came through for me again. $25 for this heavy, solid wood piece.

Perfect dimensions (36x36x16). Just needed some paint on the legs for that dark-stained look I wanted. I used Ralph Lauren’s “Galvenized” in eggshell for two coats and sealed it after that.

I marked out where I wanted my 16 tufting buttons to lay and drilled holes in the table top.

Then I used a little spray adhesive to hold my 2″ foam (from JoAnns) in place.

I also cut up some of the left over foam and adhered foam strips to the apron of the table to fill in the empty space under the lip.

Then I wrapped the apron in batting and then the whole table was covered in a sheet of quilt batting (no photo of that step, sorry).

Using the 16 drilled holes as my guide, I adhered the tufting buttons (which I made with a button kit from JoAnns) with upholstery thread and a long needle.

I used regular plastic buttons to anchor the tufts on the underside of the table.

Once all the tufts were in place, I stapled the fabric edges to the underside, being sure to pull the fabric really tight. Then I tackled the corners, which was the trickiest part.

I decided to use upholstery nails on just the leg area where I did sort of hospital bed corners with the fabric. I might end up redoing this part, but I think it’s fine for now.

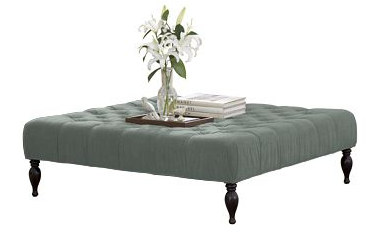
Here’s the finished product. What do you think? Does my $60 project compare with the $1200 Restoration Hardware ottoman? Maybe not, but it will do for now!


Wow!! So impressed! I have been looking for the perfect coffee table/ottoman for my living room and cannot find one for the right price!! I am definitely going to try this. Thanks for the step-by-step!!
I am about to start this project tomorrow. Sadly couldn't find any RL paints around my area but found a good Valspar color Fired Earth! So excited! Thanks for this awesome idea.
I'm also curious how you do the button tufting thing. Do you need a really long sewing needle? I just bought my coffee table and I am gathering all my goods! If you have any tips for the tufting (and the upholstery nails) I would really appreciate it! Your blog is incredible, you have inspired me for months!
Natalie
nkh124@yahoo.com
Great Project. I am thinking of doing a similar thing to make a padded bench for near the front door. When you applied the two pieces of foam side by side with spray adhesive, do you find that they stay in place? Or do they shift around? I am concerned that if we sit on our bench many times, the crease between the foam pieces will spread. Any tips? Thanks.
amazing! I love it. This looks so good.
Here's a post to my version. I didn't do the upholstery buttons, although I did make them and drill the holes, because my needles weren't long enough, but I used gimp to make a pattern and then threw the buttons on with hot glue/not quite the same effect, but I can always go back and add them when I get a long enough needle and some patience.
http://ocgardenjen.blogspot.com/2011/09/trash-to-treasure-my-new-family-size.html
I LOVE THIS!!! thanks for sharing! I have a table just like this that Im going to do! YAY! Thanks for the tutorial! :)
I have that exact same coffee table and have been wondering what in the world to do with it! Thanks for the idea!
Thanks for the great idea. My wife and I had been shopping around for a large ottoman for awhile now and just didn't want to pay the prices we were seeing. We found an old coffee table for ~$30 and followed your steps to create an ottoman that we now love. I think we spent ~$150 for everything, so we saved at least a few hundre dollars. Should we split the savings with you? Ha ha… Thanks.
Thanks so much…I made one like the west elm essex but used your tutorial for help. Trying to figure out how to send you a pic but just wanted to say thanks!
http://pinterest.com/pin/19421842112790214/
here is a link to the one I made, thanks for the help
I Love it!! OK, but I must ask, have you buttons stayed put? The reason I ask is because my mom, grandma and I made something similar to your beautiful ottoman except my dad just build a square box out of plywood for the base. My mom and grandma have tried various types of quilters thread/wire (you name it, they have probably tried it) to keep those pesky buttons on! Could you recommend something to keep them in place? Thanks!!!!
It's been 3 years and this project is still grabbing attention! I know it sure got mine. I'm going start stalking craigslist right now for the perfect ottoman. Thank you for the inspiration!